Company Inquiry Overview
SapphireOne’s multi-company Company Inquiry accommodates an unlimited number of companies within a single SapphireOne data file, whether for a Single User or a Client-Server setup. The advantage of SapphireOne’s multi-company functionality is that each company can operate in a distinct tax jurisdiction and use a unique currency. Moreover, within a single company, the user has the ability to run an unlimited number of currencies. The purpose of a multi-company system is to manage entities that trade in various locations and industries.
As a SapphireOne user operating multiple companies within one data file, you have the option to create various logins. For instance, you may opt for a master login that allows you to access all your companies with a single user login. Furthermore, within financial reporting, you can consolidate these companies and generate a consolidated profit and loss statement or balance sheet. You may also group companies by different demographics, such as country code or any other preferred criterion. This versatile functionality within the SapphireOne application enables users to customise and analyse their multiple companies as needed once they have been set up within a single data file.
Efficient Management of Multiple Companies
Typically, a multi-company structure is referred to as the parent company or the corporate group. This industry terminology denotes a multi-company n:n system ultimately controlled by a single parent entity. These corporate structures or parent companies may have a broad and diverse range of reporting requirements based on various international tax treaties, and they may have established the companies within tax-free structures, such as a Dutch Sandwich.
The Company Inquiry function, located within SapphireOne Utilities mode, is where companies are set up within the user’s SapphireOne data file.
For both single or multi-company data files, the details for any company in the data file are entered in this Company Inquiry. This includes information such as company name, ABN, tax numbers, postal and physical addresses, and the departments and contacts associated with the company.
Upon opening the Company Inquiry, users are presented with a list of companies enabling n:n set up within their company data file.
Company Details Page
To create a new Company profile, select Company Inquiry from the Utilities Controls menu, and then click the New ![]() button on the SapphireOne main toolbar.
button on the SapphireOne main toolbar.
Company Details Area
The Company area is where you enter all the essential information about the company.
- ID: Enter the Company ID.
- Company Name: Enter the Company Name.
- Area: A user-created list, as in all other areas of SapphireOne.
- Trading Name: Enter the Company Trading Name.
- ABN: Enter the Company Australian Business Number.
- Tax No. B: If a company has a secondary Tax number, enter it here for reference.
- Starting Month for Financial Year: Enter the month when the company’s financial year starts.
- Opening Period: Enter the company’s opening financial period.
- Created: SapphireOne automatically logs the date the Company was most recently modified, as well as the SapphireOne user who modified the inquiry.
- Modified: SapphireOne automatically logs the date the Company was created, as well as the SapphireOne user who created the Inquiry.
- Active Checkbox: The active checkbox is automatically selected when setting up a new company. In SapphireOne, you cannot delete Company records. Instead, you can deselect this checkbox to make the Company inactive. Once you deselect this checkbox, a data entry point will appear, asking you to enter a finish date for the company.
Dictation and Speech to Text Overview
SapphireOne’s implementation of both Dictation (MacOS) and Speech to Text (Windows) is a game changer for data entry. Any data entry field you can type into using a keyboard can use this feature.
You can also use this functionality on all inquiry screens within SapphireOne. For example, the user is in a Contact within a Client. They may have made a phone call to that particular client using the Softphone technology. Consequently, this will automatically date and time stamp both the contact and the phone number you called.
As soon as the call is completed, the user has the ability to use Speech to Text (Windows) or Dictation (MacOS). They can dictate into the memo field of the CRM contact, adding as much description as they require.
Dictation and Speech to Text Procedure
This functionality applies across every single Data Entry screen. For example, the SapphireOne user is entering a Vendor Invoice (VI). Additionally, you may want to add a memo within the Vendor Invoice (VI). The user can utilise the tool and simply dictate the memo.
Another example is if the user wants to add additional lines to the General Ledger account, within each General Ledger account. When the user is completing data entry using a General Ledger, there’s always a unique memo field for each GL account line.
The user can then utilise this feature to quickly add the information they need to add. Alternatively, you may have an interview with an employee. After the interview process is completed, the user can then make notes about the employee.
Speech to Text or Dictation is an extremely powerful tool. It is something that we at SapphireOne, as well as our clients, utilise daily. It is a massive time saver.
Company Address Area
The Address area is where you enter the company’s primary contact details.
- Postal: Enter the company’s postal address. This address will be used in all documents created by SapphireOne.
- Physical: Enter the company’s physical address. This address will be used in all documents created by SapphireOne.
- Country Dropdown: It is crucial to select a country from the drop-down menu. SapphireOne determines the Local Currency, Tax Rates in the Periods & Taxes window, and automatically loads default Allowances for Payroll based on the selected country.
- Main Telephone: Enter the main company contact number.
- Second Telephone: Enter the second main company contact number.
- FreePhone: A facility for an additional telephone number.
- Facsimile: Enter the facsimile number.
- URL: Enter the company’s website URL.
- Primary Email: Enter the company’s primary email contact.
- Preferred Contact: Select the preferred contact at the Company.
Company Departments Area
Any Departments linked to this Company will be displayed here. You can view or modify the Department by double-clicking on an existing Department.
Additionally, by selecting the New ![]() button, you have the ability to create new Departments and link them to the company here. New Departments can also be created within the SapphireOne Department Inquiry function and linked to the Company.
button, you have the ability to create new Departments and link them to the company here. New Departments can also be created within the SapphireOne Department Inquiry function and linked to the Company.
Contacts Area
All Contacts linked to this Company will be displayed here. You can view or modify the Contact by double-clicking on an existing Department.
Additionally, by selecting the New ![]() button, you have the ability to create new Contact Inquiries and link them to the company here. New Contacts can also be created within the SapphireOne Contact Inquiry function and linked to the Company.
button, you have the ability to create new Contact Inquiries and link them to the company here. New Contacts can also be created within the SapphireOne Contact Inquiry function and linked to the Company.
Company More Details Page
The second page of the Company Inquiry is the More Details Page. This page contains information that must be entered accurately, as SapphireOne will refer to this page for details when performing various functions.
Company Area
This area cannot be modified. The ID and Company Name are inserted from the ID and Company Name entered on the previous Details Page and are for reference purposes only.
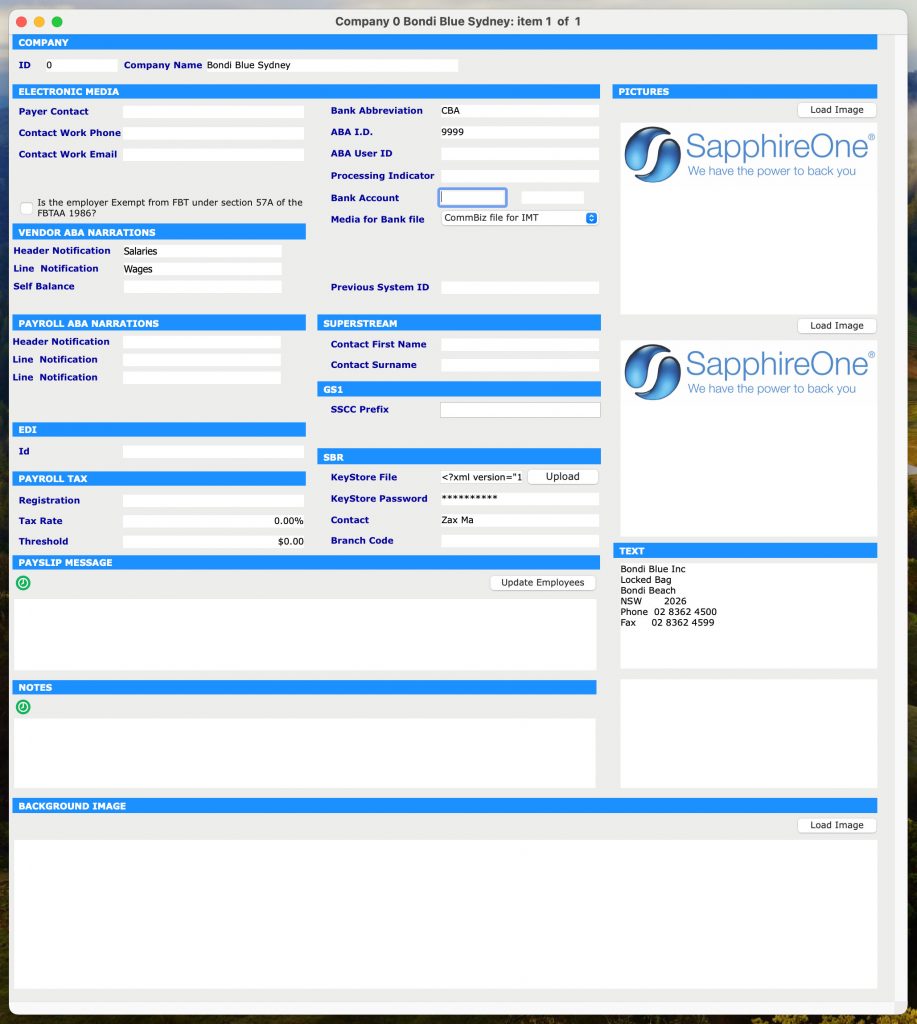
Electronic Media area Overview
When SapphireOne is searching for electronic media data for generating ABA and EFT files, it follows the following precedence:
- General Ledger Inquiry – The primary source is the Details page of a General Ledger Inquiry.
- Company Inquiry – The secondary source is the More Details page of a Company Inquiry.
The data inputted into this section serves various functions within SapphireOne whenever the need arises to generate an electronic Banking file. In each of the scenarios outlined below, a tailored electronic file is generated, ready for presentation to the relevant institution as needed. It’s important to emphasise that each of these files, as detailed below, is highly specific to the entity, and every single one of them is generated from a specially crafted template within SapphireOne. The workflow for this process is as follows:
ATO Electronic File
To generate an electronic file for submission to the ATO (Australian Taxation Office), follow these steps.
- Access Payroll/HR mode within SapphireOne.
- Next Navigate to Administration > Reports > Payment Summary.
- Within the print dialogue screen, choose the Report Type as Magnetic Media.
- An alert will appear, prompting you to select the relevant financial year.
- Upon selection of the print button, a file will be generated in the format prescribed by the ATO, tailored to their specific requirements.
ABA file for Remittances
To generate an ABA electronic direct credit text file for sending remittances directly to a bank using SapphireOne, please follow these steps:
- Navigate to the Accounts module and go to Payables > Payments.
- From the Process Payments alert, select the Payments option.
- The next alert will prompt you to choose the bank account to be used for this procedure.
- A print dialogue screen will then appear. In this screen:
- From the Report Type menu select Remittance.
- Next select the Report Method drop down menu.
- Then from the list, select the ABA file required, with the most common one in Australia typically being ABA file for EFT.
- Please note that SapphireOne provides several specific ABA/E.F.T remittance templates, with the option to add more as needed.
ABA/E.F.T file for Employee Payments
To generate an E.F.T electronic direct credit text file in Payroll/HR automatically, either at the time of processing the pay run or at a later time, follow these steps:
- During the Payrun – Commence a Payrun by selecting Payroll/HR > Payroll > Start New Pay. Once you have completed your data entry for a new pay run, proceed as follows:
- Go to Payroll > Payrun, and perform your normal procedure until you get to the Set Up Reports window.
- Within the Set Up Reports window, the ABA file for E.F.T checkbox will be automatically selected, as it is the most common option for Australia.
- If the default E.F.T option is not required, you can deselect it or choose one of the additional E.F.T options provided.
- After the Payrun – Alternatively, if you prefer to complete this task after the payrun has been processed, follow these steps:
- Navigate to Payroll/HR > Reports > Payments.
- The Money Reports/Print Dialog screen will be displayed.
- Select the Report Type menu. This will automatically default to ABA E.F.T file, or you can choose one of the other ABA/E.F.T file formats provided by SapphireOne.
- Once you’ve made your selection, click the Print button, and the file will be generated as usual.
- This alternative procedure above can be repeated as often as needed to generate the desired ABA/E.F.T payroll files in SapphireOne.
- One of the most common reason would be testing when setting up a new payment method.
- Tip: The generated file has an extension of aba so to view it, you can change the extension to txt allowing any text editor to open it for inspection.
Electronic Media area (ATO Related)
- Payer Contact – Enter the name of the person who is contactable within the ATO.
- Contact Work Phone – Optionally, enter the work phone number of the person who is contactable within the ATO.
- Contact Work Email – Optionally, enter the email of the person who is contactable within the ATO.
- FBT Exemption Checkbox – Some employers, such as charities, are exempt from FBT (Fringe Benefits Tax). To claim this exemption select this checkbox.
- Branch Abbreviation- In this field, enter the Abbreviation for your bank i.e CBA.
- ABA I.D. – Enter the ABA I.D. that has been supplied for the Company.
- ABA User I.D. – Enter the ABA ID that has been supplied for the Company.
- Processing Indicator – Enter the processing indicator that has been supplied for the Company
- Bank Account – If required, input the bank account particulars needed for ABA transaction processing.
- Media For Bank File – This drop-down menu includes templates furnished by SapphireOne. Depending on the template chosen, the bank account information may or may not be automatically filled into the Bank Account data entry field.
- Previous System ID – If your company has previously reported to the ATO using a different System ID, you can enter that previous System ID here. This helps the ATO recognise that it is the same company conducting electronic reporting, even if the System ID has changed.
Vendor ABA Narrations area
Vendor ABA Narrations Rules
Once valid data is found SapphireOne will use that data and not proceed any further. When creating an ABA file, SapphireOne looks for the Narration and Self Balanced data, SapphireOne uses the following rules are followed as to Vendor Narrations.
- For a Vendor
- If the [Vendors]lodgement reference number is filled in that is used.
- If the [Transactions]external reference number is filled In that is used.
- If above they are both blank.
- If the Vendors Line Narrations is entered In that is used.
- If they are all blank the it says Pay Vendors.
Vendor ABA Narrations data entry
- Header Notification- Enter the Vendor’s Header notification data that is to appear in the ABA file for example Creditor.
- Line Notification – Enter the Line Notification data that is to be entered in to the ABA file for example Payment.
- Self Balance – .The sum value of the lines above for example Self Bal
Payroll ABA Narrations area
Payroll ABA Narrations Rules
Once valid data is found SapphireOne will use that data and not proceed any further.When creating an ABA file SapphireOne looks for the Narration and Self Balanced data, SapphireOne uses the following rules as to Payroll narrations.
- For Payroll.
- If the [employeesbank]reference is filled in that is used.
- If this is blank.
- If the payroll line narration is filled In that is used.
Payroll ABA Narrations data entry
- Header Notification- Enter the Vendor’s Header notification data that is to appear in the ABA file for example Salaries.
- Line Notification – Enter the Line Notification data that is to be entered in to the ABA file for example Wages.
- Self Balance – .The sum value of the lines above for example Self Bal.
EDI area
- ID – Enter the provided EDI ID.
Payroll/HR Tax area
- Registration: Enter the registration number to be used by SapphireOne for Payroll/HR tax.
- Tax Rate: Enter the Tax rate to be used by SapphireOne for Payroll/HR tax.
- Threshold: Enter the threshold to be used by SapphireOne for Payroll/HR tax.
SuperStream area
- Contact First Name: Enter the first name of the contact to be used by SapphireOne for SuperStream details.
- Contact Surname: Enter the surname of the contact to be used by SapphireOne for SuperStream details.
GS1 area
- SSCC Prefix: The details entered into this area are used by SapphireOne for shipping details. When a prefix is entered here, SapphireOne will add this prefix to all Serial Shipping Container Codes (SSCC).
SBR area
The credentials and details entered into this area are used by SapphireOne for accessing the ATO website when a BAS is being lodged. Details may be found on their website here.
- KeyStore File: Upload the AUSkey keystore file obtained from the Australian Tax Office.
- KeyStore Password: Enter the password that the user has created on the ATO web portal.
- Contact: Enter the contact established on the ATO web portal.
- Branch Code: Enter the Branch code provided to your organisation by the ATO.
The BAS functionality, which utilises SBR credentials, can be accessed by navigating to Management > Analysis > Tax Calculation within SapphireOne.
Since the BAS functionality is an integral component of SapphireOne’s Management mode of operation, users can access comprehensive documentation in the Knowledgebase under the Analysis article.
Payslip Message area
The user is able to enter any message you would like included on the Payslips sent from this Company.
Notes area
Enter any additional notes related to the Company.
Pictures, Text & Background Image areas
On the right side of the screen, you will find three distinct areas each serving a unique purpose:
- Pictures 1 & 2 – Pictures may be loaded into Pictures 1 & 2 areas by selecting the appropriate Load Image button. When SapphireOne’s built in reports feature is used, images installed here are used by those reports automatically. If the reports have no images in them please return to this company inquiry and check that they have been inserted correctly.
- Text Area – Enter any text the user would like to include on the email payslip, such as an email signature.
- Background Image area – A picture may be loaded into this area by selecting the Load Image button.The Background Image field allows the assignment of a background image specific to the company the user is logged into. This is useful for branding and/or identification purposes.
Company Emails Page
There are five areas within SapphireOne where emails may be sent on a company wide basis. SapphireOne also records a log of all emails sent. The log includes both successful and failed emails as may be seen in the screenshot below.
Default Emails Area
When SapphireOne is asked to generate and send emails, a return address is required to be inserted into them. Five separate return email addresses may be set up in a Company Inquiry for Accounts Receivables, Accounts Payables, Inventory Sales, Inventory Purchases, and Payroll/HR.
For this “From” email address, SapphireOne looks in three places in the following order:
- In a User Inquiry: If an email is found for the logged-in user, SapphireOne will use it for all single emails that it generates for the logged-in user.
- Here in a Company Inquiry: If the user does not have any email details entered, SapphireOne will look here. There is provision for entering five email return addresses from five different areas within SapphireOne.
- System Controls: If SapphireOne is unable to get the email addresses from the User file or a Company Inquiry, it will fall back to system controls as a last resort. This ensures that emails are always sent with a valid return address, making communication more efficient and reliable.
Batch Emails
For batch emails, SapphireOne only considers step 2 (Company Inquiry) and step 3 (System Controls). It does not look at any email details entered into a User Inquiry. This ensures consistency across all batch emails, regardless of the individual user sending them.
Emails Page
If the same email address is required for all users, leave the Email area in all of the individual user files blank and enter the email addresses that all users are required to use into the Emails Page of a Company Inquiry. This way, all users will automatically use the specified email addresses from the Company Inquiry, maintaining a uniform return address for all batch emails sent from the system.
For each email group, the options are as follows:
- Email Address: Enter the return address email.
- Username: Enter the account Username.
- Password: Enter the account password.
- BCC Address: In addition to the Email Address, the user can also enter a BCC Address.
- Edit Signature: SapphireOne will display a screen that allows the user to enter text as a signature. This text will then be included in the email, along with any other text created and any attached documents. This signature can also be set up for individual users in a User Access Inquiry.
Email Log Area
SapphireOne maintains a log of all outgoing emails. The recorded details include Date, Time, To, From, BCC, Title, and the email status.
Control Accounts Page in Company
Control Accounts form the primary structure for your SapphireOne system. They need to be thoroughly checked and balanced as you set up for operations. Control Accounts are organised under four tabs: System, Default, Payroll/HR, and Assets.
Please consult your accountant for guidance on control accounts. SapphireOne does not provide any advice or accept any liability regarding control accounts established within your SapphireOne data file.
System Tab
Control accounts are set on a company-by-company basis, so you will notice that the Company ID and Name are displayed at the top of each form. In the example using Sapphire Bondi Blue, the department extension for each G/L suffix code for Sydney is -0. Typically, for each company, the G/L codes are the same, but the department extension reflects the company that the G/L account is for.
Detailed explanations for both SapphireOne Control Account Details and the PayPal Map Accounts button can be found below.
SapphireOne Control Account Details
| Main Operating Bank | The primary bank account used for your SapphireOne company’s financial transactions. |
| Client Control | The primary bank account used for your SapphireOne company’s financial transactions. |
| Tax clients | A current liability account used to track Goods and Services Tax (GST) – Sales Tax / Value Added Tax (VAT) received from clients. |
| Vendor Control | Current General Ledger liability account used to track vendor balances. |
| Tax Vendors | A current General Ledger asset account used to track Goods and Services Tax (GST) – Sales Tax / Value Added Tax (VAT) paid to vendors. |
| GL Rounding | A GL (General Ledger) rounding account on a company-by-company basis. In SapphireOne, rounding may be done between 2 and 10 decimal places, and small errors may arise occasionally. SapphireOne will use this account to balance these transactions by transferring these small rounding errors to this GL account. |
| PayPal | This is where default general ledger accounts in various currencies are set up for PayPal transactions. PayPal transactions must also be set up in Master Defaults from the API page (see details below). |
| Sales | An Income General Ledger account used to track sales to clients. |
| Purchase | An expense General Ledger account used to track purchases from vendors. |
| Inventory | A Current Asset General Ledger account that represents the value of your inventory. |
| Inventory Variance | An expense General Ledger account that holds any losses or gains due to stock adjustments, etc. |
| POS Variance | An expense General Ledger account used to represent any losses or gains through a point of sale terminal. For example, when the wrong change has been given. |
Default Tab
The Default Tab in the Control Accounts page includes a list of default control accounts used in SapphireOne. These accounts are used to track various financial transactions within the company. Here is a breakdown of each account:
| PAYG GL Account | A liability account used to represent any PAYG (Pay as you go) tax accrued in financials (excluding taxes related to Payroll). |
| Retentions GL Account | A suspense account used to track any retention on purchases or sales (used in Job Projects). |
| FX gain/loss Account | A liability or suspense account used to represent any gains or losses when dealing with foreign currencies (a single account is used for all FX currencies in SapphireOne). |
| Clearing Account | This account is used in intercompany transactions. |
| Importer Clearing Account | This account is used in the function Importer as a clearing account for imported goods. |
| Tax Paid | A current liability account used to track the amount of tax owed to the ATO or tax office, such as Goods and Services Tax (GST) – Sales Tax / Value Added Tax (VAT). |
| Work in progress | A current asset account that represents the value of Work In Progress that will eventually be sold. |
| Inwards Goods Liability | A liability account used to track goods that have been received but not yet paid for. |
| Inwards Goods Variance | The variance between the expected and actual payment for inward goods received. |
| Inward Goods Expense | The additional expense incurred in paying for inward goods received. |
| Bank Charges (Expense) | The expense account used when paying bank charges on money received. |
| On Cost Clearing for Standard Cost | This account is for On Cost Clearing, a General Ledger account that can be set up for Standard Cost. |
| Transfer On Cost: | Track the costs associated with transferring goods or services out of your organisation. |
Additional Accounts
| Inter Company Loan | This field is linked to a checkbox in the Master Defaults system page and the Defaults tab. It allows journals to be created to transfer money between companies, consequently with the General Ledger account here as a holding account. |
| Discount Received | An income account used to track discounts received from Vendors accordingly. |
| Discount Given | A cost of sales account used to track discounts given to Clients. |
| F.X Accrual Account | A suspense account used to hold FX values. |
| Allocated Profit Class | The General Ledger class used to place current year earnings into the required position in the Balance sheet. |
| Retentions G.L Department | This is normally set to the default set of General Ledger accounts, in Bondi Blue -0, but may be set to a different department if required. Check with SapphireOne support before altering. |
| Inter-Department | A suspense account used for transfers between departments accordingly. |
| Appropriation | Unappropriated Profits or Losses for the current financial year. Once the financial year is closed, the figure here is transferred to the Equity General Ledger account. |
| Equity | This General Ledger account holds the value of owner’s shareholdings in the company. |
| Issued Capital | This account displays the capital issued by the company to shareholders accordingly. |
| Voucher (Point of Sale) | This account holds the value of any vouchers that are given out accordingly. There is provision for the use of these Vouchers in POS. |
| WET Tax Account | Wine Equalisation Tax. This account is used to store the WET Tax when the master default is set active for it. |
| Outwards Goods | This account is used to store variations in pricing for outwards goods accordingly. Furthermore, it is used by the GJ’s created in relation to the Periodic invoice functionality. |
PayPal General Ledger Accounts
If multiple currencies are to be used with PayPal, e.g., USD, the user will have to do a General Ledger inquiry and set up the FX General Ledger bank accounts up first.
To set up General Ledger accounts for multiple currencies with PayPal in SapphireOne, the user needs to follow these steps accordingly:
- Perform a General Ledger inquiry and set up the FX General Ledger bank accounts for each currency that will be used with PayPal.
- Select the “Map Accounts” button to open the pop-up dialog box.
- By default, your local or master currency will be inserted. To modify the currency, select the currency column and choose the currency you want from the pick list. The same applies for the General Ledger column.
- SapphireOne displays all General Ledger accounts that are set up as bank accounts.
- Remember to set up your bank accounts in the required currencies first, and then link them to the PayPal accounts. This is a final fall-back position when SapphireOne then looks for a General Ledger account.
- It is essential to note that there are default General Ledger account settings in Client, Vendors, and Inventory. If General Ledger ID selections are made within those functions, they will then override the settings made here as they take precedence.
Payroll/HR Tab in Company
The Payroll/HR Tab in Company is where you can set up the General Ledger Control Accounts for Payroll and HR functions in SapphireOne. The different control accounts and their purpose are explained below:
| Salaries Expense | This is the General Ledger account used to record the expenses for salaries paid to employees accordingly. This account is only used in the simplified version of Payroll/HR Journals. |
| Salaries Payable | This is a liability General Ledger account used to record the money that will be paid to the employee as salaries. It should finish each pay run with a zero balance. |
| Workers Comp. Expense | This is the General Ledger account used to record expenses related to workers’ compensation payments. |
| PAYG Payable | This is a liability General Ledger account used to record the money that will be paid to the appropriate Government tax collector for Pay As You Go taxes. It should finish the year with a zero balance, as all collected money should be paid to the ATO. |
| Superannuation Payable | This is a liability General Ledger account used to record the money that will be paid to the respective Superannuation fund or pension fund accordingly. It should also finish the year with a zero balance. |
| Bank GL | This is the Bank General Ledger account used for Payroll and HR functions in SapphireOne. Note that if an FX bank account is entered into the Employee Inquiry > More Details Page, it will then take precedence over the bank account entered here. |
Leave accrual Journal Accounts
| Personal, Holiday and Long Service Leave |
These accounts are used to track the dollar value of leave owed by the company to its employees accordingly. When leave is taken by an employee, the corresponding dollar value is then reversed out of the appropriate account to reflect the reduction in the company’s liability for that leave. |
Assets Tab in Company
The Asset Control Accounts are documented below.
The asset General Ledger accounts are all defaults for others in greater detail at the Asset and Class level.
| Asset | This should be an asset General Ledger account used to represent the value of all the assets owned by the company. |
| Bank | The General Ledger bank account used in managing assets accordingly. |
| Depreciation Expense | An expense General Ledger account used to track the depreciation expense of assets. |
| Accum. Depreciation | A liability General Ledger account used to store the accumulated depreciation of assets. |
| Profit/Loss on Disposal | An expense General Ledger account used to track the total loss or gain on disposal of assets. |
| Capital Gain on Disposal | An income General Ledger account used to track any capital gains on disposal of assets, where an asset has been sold for more than its purchase price. |
| Revaluation Reserve | An asset General Ledger account used for revaluations and reserves. |
| Tax In | A current liability General Ledger account used to track Goods and Services Tax (GST), Sales Tax, or Value Added Tax (VAT) received from clients. |
| Tax Out | A current asset General Ledger account used to track Goods and Services Tax (GST), Sales Tax, or Value Added Tax (VAT) paid to vendors. |
Periods & Taxes Page
This page allows for the financial periods and tax codes to be established under various tax systems. Please note that the Periods & Taxes screen is company specific.
Company Area
In the Company Area, the ID and Name of the company are displayed at the top of each form to indicate that Periods and Taxes are set on a Company by Company basis.
Company Periods Area
In the Company Periods area, you can update the Finish Date field when running the end-of-year function. Just select the date field at Period 1 and change it to match the start of the new financial year. In this area, you then have two available options as follows.
- Auto Fill: This option will automatically update the Finish Dates for each period based on the changes made to the Period 1 date. Various Auto Fill options are available, which are described below for your reference.
- Unlock All: This button enables you to unlock all the locked lines in the list. Once clicked, it allows for additional changes to be made at the transaction level within that specific period.
Auto Fill Options
When you select the “Apply to all Modules” checkbox, any changes made to the financial periods will also be applied across the Clients, Vendors, Timesheets, Sales Analysis, General Ledger, and Projects files. This ensures that the modifications are synchronised and reflected consistently throughout all related modules.
| Increment by Month | Choosing this option will set the end date for each period to be the last day of the respective month. This ensures that all periods align with the end of each month, making it convenient for financial calculations and reporting. |
| 30 Days | When you select this option, the end dates for each period will be set exactly 30 days apart. This allows for a consistent and fixed interval between the end dates, making it easier to manage and track financial data within each period. |
| On Set Date | This option allows you to manually set the end date for each period. You can specify a specific date for each period, providing flexibility in adjusting the periods based on your financial requirements. |
| Increment By | This option gives you the flexibility to set the end dates for each period by incrementing them based on the number of days or the calendar month end that you nominate. This allows you to tailor the periods according to your specific financial needs, whether you prefer a fixed number of days between periods or prefer to align them with the end of each calendar month. |
Current Periods Area
The Current Periods Area displays the current period for each module in SapphireOne. In First Time mode, when creating a data file, all periods will be the same. However, during normal operations, the periods will only be the same if Period End All has been run. If Period End has been completed mode by mode, the values will vary. It is important to update the current periods as part of your end of year process. This will ensure that your financial reporting is accurate and up-to-date.
Payroll mode
In Payroll mode, unlike other modes where users are allowed up to 30 periods, the Australian government’s new payroll process requires that the end-of-year to be run immediately after the 12th month End of month process is executed. Due to this requirement, it will be quite common for the Payroll mode to have a different number of periods compared to all other modes.
Tax Codes Area
The Tax Codes area enables the creation and management of tax codes used in the company. Initially, the default tax codes for the selected tax system (e.g., Australian or New Zealand) are shown. Users can add or remove additional tax codes as needed using the ![]() and
and ![]() buttons.
buttons.
If a country other than Australia or New Zealand is selected, the basic tax codes for that country will be inserted, and users can create additional tax codes as required.
Tax Exempt Special Rules sub area
This sub-area is directly linked to the More Details page in a Client Inquiry. Within this page, there is a Tax Details area, and within that area, it is directly linked to the Exempt on Special Rules checkbox.
Users have the option to create a set of tax codes for all global tax jurisdictions. Under the Tax Exempt Special Rules heading, there are three fields that need to be set:
- Currency: Choose from a list of all global currencies.
- Amount: Specify the desired amount.
- Tax Code: Select the appropriate tax code from the available options.
Internal Numbers Page
The Internal Numbers page is used to set the starting numbers for various functions in SapphireOne, including Clients, Vendors, Inventory, Job Projects, Point of Sale, Transactions, and General Ledger Journals. These numbers will continue in sequence from the starting number specified. This feature is useful for companies who are transitioning from legacy systems and need to continue using their previously generated numbers.
It is important to note that the fields on this page are not pre-populated to ensure that the user takes care when setting the starting numbers. The fields are mandatory and must be filled in before the system can be used for these functions.
Company Area
The Internal Numbers page in the Company area allows for the creation of internal numbers specific to each company in the SapphireOne data file. These numbers will start at a pre-existing number from the legacy system and automatically increment.
- ID & Company Name: The Company ID and Name are displayed at the top of each form as internal numbers are set on a company by company basis.
- Clients: This includes unique commencement numbers for Quick ID, Invoices Orders, Quote, Credit Memo, Journal, Adjust Note, Receipt, Refund, and Periodic Invoice.
- Vendors: This includes unique commencement numbers for Invoices Orders, Credit Memo, Journal, Adjust Note, Requisition, Cheque, and Refund.
- Inventory: This includes unique commencement numbers for Quick ID, Stocktake, Build, and Container (SSCC).
- Point of Sale: This includes unique commencement numbers for Point of Sales and hire.
- General Ledger: This includes unique commencement numbers for GL Journal.
- Job Projects: This includes unique commencement numbers for Job Project, Timesheet – Resources, and Timesheet Projects.
- Split Invoices and Order Number: Users have the option of splitting the internal numbers for Invoices and Orders. When the True radio button is selected, an additional field will be displayed to allow these numbers to increment independently. This will ensure that all invoice numbers increment sequentially with no missing numbers in the sequence. This option can be turned on for any data file, and both Invoices and Orders can commence at the same number as seen in the Bondi Blue data file example.
Allowances Page
Allowances are payments made to an employee that are identified separately. In SapphireOne, the Allowances page functions like a control account in a General Ledger, where default allowances are established for your Payroll/HR data file.
Allowances may be paid to an employee to cover anticipated costs or as part of their employment, regardless of whether they actually incur an expense.
It is important to note that allowances are considered assessable income for the employee and may be included on their payment summary. Superannuation may also be included, and these allowances may form a claimable deduction against the allowance for vocational expenses.
Allowances can be added to an employee’s final pay before or after tax is calculated. If an allowance is added pre-tax, it is included in the employee’s gross remuneration before tax is calculated. This means that the employer may need to withhold tax from the employee’s pay.
Company Area
- ID and Company Name: As internal numbers are set on a company-by-company basis, you will note that the company ID and name are displayed at the top of each form.
Allowances Area
When you start a new data file and create a company in SapphireOne, the software will create allowances for you based on the Goods and Services Tax (GST), Sales Tax or Value Added Tax (VAT) system. However, you should check these immediately as they may need to be altered to suit the tax system used in your country.
This is important because when you set up a new employee, SapphireOne will use the details entered in the allowances area to enter preliminary details for the new employee. Once these details have been entered by SapphireOne and checked by the user, they can be altered on an employee-by-employee basis as require
Allowances
In SapphireOne, almost all items are associated with a specific company, but Allowances are an exception to this rule. Allowances are not associated with a specific company in SapphireOne.
By default, SapphireOne installs Australian allowances when a new company is set up. For foreign companies, these allowances can be displayed by inserting the “@” or “?” wildcard symbol into any of the allowances data entry fields. You can use and modify these allowances as required or create a completely new set of allowances from scratch. To view existing allowances or create new ones, go to Payroll > Administration > Allowance Inquiry.
Ancillary or Defence Leave and Cash Out Overview
The Ancillary or Defence Leave and Cash Out functionality in SapphireOne allows users to report all types of leave falling under these categories. When entering leave, users can select the relevant information for the particular leave type an employee requires.
Ancillary or Defence Leave
Ancillary or Defence Leave refers to leave taken by employees engaged in volunteer programs or specific community activities, such as participating in the Australian Defence Forces, jury duty, or emergency services like RSPCA, State Emergency Services, and Country Fire Authority.
Cash Out
Cash Out of Leave refers to employees opting to be paid out their leave entitlements instead of taking time off work. This includes annual leave, personal leave, long service leave, leave loading, and rostered days off.
Ancillary or Defence Leave
To mark Ancillary Leave, the SapphireOne user can select Type D or select Ancillary Leave.
Cash Out of Leave
To Cash Out Holiday, Long Service, or Personal Leave, the SapphireOne user can select the Cash Out checkbox. Note that the Australian Taxation Office (ATO) does not distinguish between cashed-out leave types.
These features can be accessed in Utilities > Controls > Company > Allowances.
Phone Log Page
SapphireOne has provision for the integration of a PABX phone system into the actual data file itself. SapphireOne utilises the SpliceCom telephone system if installed. A log of all phone calls made through Sapphire One is maintained on the Phone Log Page .
SapphireOne allows for the integration of a PABX phone system into the data file itself. If installed, SapphireOne utilises the SpliceCom telephone system. All phone calls made through SapphireOne are logged on the Phone Log Page.
SapphireOne recognises telephone numbers in the appropriate data entry fields and displays a green telephone symbol next to them. Once the telephone system is up and running, you can call the telephone number from any data entry screen in SapphireOne by double-clicking on the green icon.
The Phone Log Page displays the date, time of call, sequence number, and details of the number called in the Name column.
Reports Page
The Reports Page in SapphireOne enables the establishment of default report settings for all available transaction types in the Company Reports section. This helps enforce branding requirements and standards and optimises workflows by reducing repetitive setup processes.
With default report settings established, the user can generate reports quickly and easily without having to configure them each time. The Company Reports page allows users to set up standard formatting, including header and footer details, fonts, and other styles for all available transaction types.
By using default settings, users can ensure that all reports generated are consistent and comply with company branding requirements. Additionally, this can save time and improve efficiency, especially when generating reports for multiple transaction type
Headings Area
The Headings Area in SapphireOne allows users to set default opening titles that are displayed when creating invoices for each transaction type. By selecting from the dropdown menu on the left-hand side of the page, users can set up individual opening titles for each transaction type, including Build, Purchase Invoice, Purchase Order, Purchase Return, Receipt, Remittance, Sales Invoice, Sales Order, Sales Quote, Sales Return, and Statement.
Users can save or delete reports by selecting Add or Remove from the menu.
Once the opening titles are set, SapphireOne will enter specific details for a client or vendor from the respective master files on the line immediately below where these titles end.
The Mail To, Deliver To, and Instructions fields set the opening titles on the first page used in Invoice Details, while Footer information is displayed under the More Details Page. SapphireOne provides the ability to pre-define this information to speed up the entry procedure. Users can define any pre-defined text they want, which SapphireOne will automatically enter at the time of entering transactions.
This pre-defined text can be altered on a transaction-by-transaction basis at the time of data entry, if necessary. The primary purpose of this feature is to automate the entry of constantly entered data, reducing the need for repetitive entry and saving time. Users only need to make alterations when necessary.
Plain Paper Invoice/Statement Area
In SapphireOne’s Plain Paper Invoice/Statement Area, users can select the colour of some of the lines within the reports to give a visual indication of what each report is. To change the colour, select the colour itself, and the colour selection pop-up will be displayed, allowing users to choose a colour. Once the colour is selected, select the red button in the top left-hand corner of the pop-up to close it and write the new colour into SapphireOne.
Images Area
For Plain Paper Reports, SapphireOne uses pictures entered into the Header Picture and Footer Picture data entry fields. The Header Picture is inserted into the header area, while the Footer Picture is inserted into the footer area on the reports.
Mailing Information Area
In the Mailing Information Area, text entered will appear at the top of all client statements. Users should be mindful of the number of characters and lines utilised, as the text entered will affect how client statements are formatted.
Client Statement Message Area
Similarly, the Client Statement Message Area allows users to enter text that will appear at the bottom of all client statements. Users should also be careful with the number of characters and lines used, as this will affect how client statements are formatted.
Company Data Entry Screens Colour Page
The Company Data Entry Screens Colour Page in SapphireOne provides controls to alter the colour of the area titles and lettering in both Accounts and Inventory modes on a company-by-company basis. This is not only to facilitate branding and customisation to the user’s preference but also to prevent data entry in the wrong screen since most data entry screens in SapphireOne are very similar.
Users can choose the colour of area titles and lettering to differentiate between different screens and make data entry easier and more efficient. By setting these preferences on a company-by-company basis, users can customise the appearance of their data entry screens to suit their specific needs and preferences.
When making alterations to colours in SapphireOne’s Company Data Entry Screens Colour Page, users are advised to check and maintain sufficient contrast between text and background. It is important to ensure that text remains easily readable against the chosen background colour to avoid any potential eye strain or difficulty in reading important information. Maintaining sufficient contrast will also improve the overall usability and accessibility of the software.
Actions Page in Company
Action Page Overview
The Action Page is a versatile tool that can be added to major records and transaction tables. It includes various actionable items such as Calendar Reminders, Meeting Invites, Alarms, Emails, To-Do Lists, General Notes, Private Notes, Meeting Notes with Date and Time, Start and Finish stamps, as well as All Day Notifications. This provides users with a centralised location to manage and organise their tasks, meetings, and notes, improving efficiency and productivity.
The Action Page allows users to use the add ![]() or delete
or delete ![]() buttons to add or delete actions as required. Simply select the relevant button to add or delete an action.
buttons to add or delete actions as required. Simply select the relevant button to add or delete an action.
Diary Area
The Diary Area in SapphireOne provides users with a comprehensive range of options to customise their actions. It includes a sequence number, title, type, action, user, privacy settings, status, tag, and link fields.
- Sequence – SapphireOne automatically generates a unique sequence number for each action.
- Title – Enter a title for the action.
- Type – Choose from the customisable drop-down menu to input a type. This will subsequently become a permanent type within the drop-down.
- Action – Utilise the user-customisable drop-down menu to input an Action. This will then become a permanent action within the drop-down.
- User – SapphireOne automatically inputs the user creating this action, though it can be modified if necessary.
- Private – If this checkbox is selected, SapphireOne will only permit the specified user to view or modify this action.
- Status – The user has three options: Open, Hold, and Completed.
- Open – Action is open and active.
- Hold – Action is active, but no alarms will be active.
- Completed – Action is now Inactive and won’t be displayed in any list of actions.
- Tag – Users may attach a tag to an action, which will create a permanent tag within the drop-down. To add a new tag, type the name of the new tag into the tag box and press the tab key. Select “Yes” from the pop-up window to confirm. To remove a tag from the list, click on the tag name while holding down the Command (MacOS) or Control (Windows) key. Select “Yes” from the pop-up window to confirm the deletion.
- Link – When created within a transaction or record, SapphireOne automatically generates a link to the transaction or record. When created from the Options Menu, Palette, or Workbook, users must select an item or function from the drop-down menu to link the action. There are 12 items on this list, ranging from Clients to Manager.
Check List Area
SapphireOne offers a user-friendly checklist tool to create and track actions, allowing users to check off completed items as they progress.
Dates and Times Area
- Start/Finish – Set a Start and Finish time for the action, or select the checkbox for an all-day option.
- Completed – Entering a completion date for an action deactivates it, and it will no longer appear in action lists.
Alarm Area
Never forget a task again – set up alarms to send reminders via email at specific dates and times. Users can also receive email notifications with the provided email address.
Recurring Area
If necessary, the alarm can be set to recur at intervals selected from the Type drop-down menu. Additionally, the recurring period can be defined by date.
Notes Area
Click the green clock button to add time and date stamps to your notes. You can also customise the font, style, color, and background color of the text in the Notes area by highlighting it and right-clicking.
Invite Attendees Area
In the event module, you can invite multiple attendees to your event and track their acceptance or rejection of the invitation. You can also send them an email notification if their email addresses are provided. Additionally, you can manage and track attendees’ RSVP status in real-time.
You can review our Blog and YouTube channel for additional information and resources on SapphireOne ERP, CRM and Business Accounting software.