The SapphireOne File Station provides all our clients with a complimentary personal backups repository and a SapphireOne download repository, that is accessible from any modern web browser with internet access. Through this service, SapphireOne clients can download application files and updates.
For clarification on the nature of the files within the Downloads directory and the installation process, SapphireOne recommends you refer to the complementary articles in the Installation sub-category that precede this article.
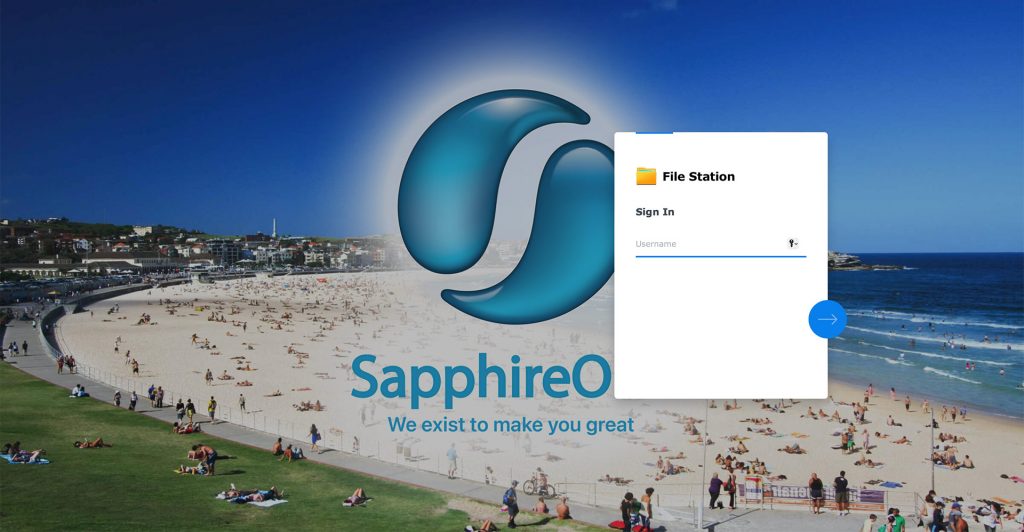
Clients, please contact SapphireOne to obtain the SapphireOne File Station URL and your personal login credentials.
File Station Access
To access your personal SapphireOne File Station account:
- Navigate to the URL provided by SapphireOne.
- Enter your provided username.
- Select the Enter Button.
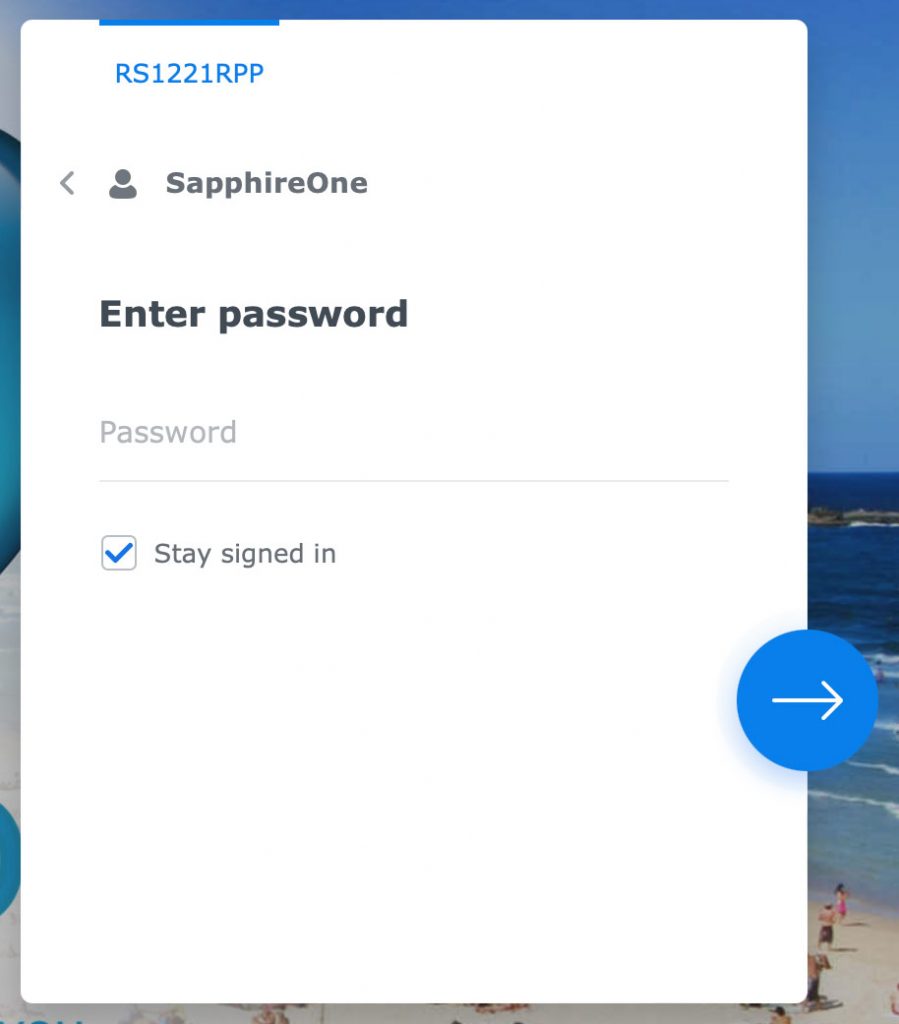
- Enter your provided password.
- Optionally select the “Stay Signed In” checkbox to have the browser automatically log you in on return access.
- Select the Enter Button.
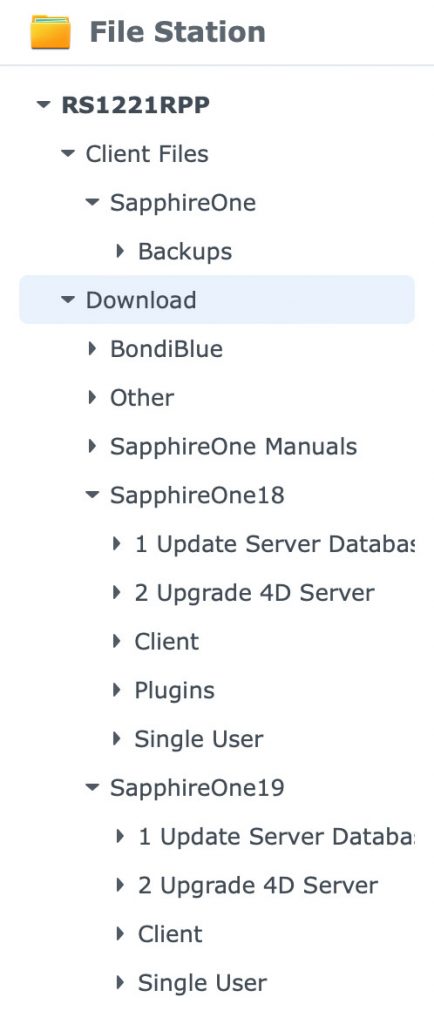
File Station Directories
The file management panel shown here has been expanded to reveal all main directories in the tree structure. The intended purpose of each directory is as follows:
- Client Files – Within Client files you will find your personal directory with the name being that of your company or organisation. Within this directory is your personal space to be used as a backup / repository for your SapphireOne data files. Users are free to mange their backup files within this area as they see fit however please respect that this space is intended for your data files only. The space is limited to 333GB. Please contact SapphireOne if you require more than 333GB of storage. This folder will contain any files that have been saved historically on our legacy FTP server.
- Download – For existing SapphireOne clients this directory will be familiar as it mirrors the structure of our legacy FTP server.
- Bondi Blue – Current Bondi Blue demonstration files.
- Other – Assorted use directory.
- SapphireOne Manuals – Legacy SapphireOne manuals.These are currently being migrated to Knowledge Base.
- SapphireOne X- Contains all SapphireOne version X Clients, Server and Single User files.
- 1 Update Server Database – Current SapphireOne version X Server database version.
- 2 Upgrade 4D Server – Current SapphireOne version X Server version.
- Client – SapphireOne version X client versions for MacOS and Windows.
- Single User – SapphireOne version X Single user versions for MacOS and Windows.
File Station User Interface
The SapphireOne File Station offers a range of buttons designed to facilitate easy navigation and management of files within the platform. Each button serves a specific function to enhance the user experience. Here is an overview of the primary buttons and their intended purposes:

- Forward and Back
 – Forward and back buttons to navigate between previously viewed directories.
 - Refresh
 – Reload the current directory. On occasions recent changes will not immediately display and this button will coax those recent changes to render. A second refresh button is provided at the bottom right of the interface.
 - Create Folder
 – Create a new directory within the currently viewed directory.
 - Upload
 – Files can simply be dragged and dropped from your local computer into the file view panel however additional option for managing conflicts If a file or directory with the same name exists in the same location are available within this menu.
- Upload – Skip – Do not replace the conflicting file already saved.
- Upload – Overwrite – Replace the conflicting file already saved.
- Action
 – The options in this menu will apply to selected files in the viewport. These options are also available from the right click contact menu.
- Download – Save the selected files to your local computer. Please note drag and drop works only for uploading and not downloading.
- Open in a new tab – The browser setting will decide what file types can be viewed directly using this feature.
- Extract – Several options are provided for expanding compressed folders.
- Extract – A pop up dialog is opened providing extensive options for decompressing the contents of the file including unlocking password protected files.
- Extract Here – Decompress the file into the current directory within Client Files. Please note the files and folders will not be contained in a folder.
- Extract To … – Decompress the files to a folder with the same name as the compressed file.
- Add to Archive – Compress the selected files in zip or 7Z format using the configured options in the pop up dialog that is provided on selection.
- Compress to … – Compress the selected files in zip format.
- Copy To – Designate a directory within Client Files to copy the selected files into.
- Move To – Designate a directory within Client Files to move the selected files into.
- Cut – Move the selected file(s).
- Copy – Copy the selected file(s).
- Delete – Delete the select file(s).
- Rename – Rename the selected file(s).
- Properties – View the properties of the selected file(s).
- Share – This generates a link and QR code which can be sent to allow the download of the selected file or folder. The mail option should be disregarded. The recipient will not require login credentials. Options include
- Secure Sharing – If selected the available options allow restrictions on file access.
- Share with Sapphire Disk Station (SFS) users: You can share the link with SFS users or groups by selecting them from the drop-down list. Please note that you cannot share with the guest account and users group.
- Share with others: You can share password-protected links with other people, including non-SFS users.
- Advanced Options
- Validity period – You can customise valid access periods and access times for shared links.
- Customise validity period – You can determine how long a shared link will remain active after creation. The link will turn invalid once it passes the specified period.
- Customise valid access times – You can determine how many times a shared link can be accessed. The link will turn invalid once it passes the specified times.
- Validity period – You can customise valid access periods and access times for shared links.
- Secure Sharing – If selected the available options allow restrictions on file access.
- Tools

- Shared Link Manager – Existing shared links can be managed in the window that appears, there are options to edit, share, or remove existing shared links. You can create up to 1000 shared links. The Status section of each shared link displays one of the following:
- Valid: The shared link is working properly.
- Expired: The validity period of the shared link has expired.
- Invalid: The shared file or folder no longer exists, or you do not possess proper privilege to access the file or folder.
- Not effective yet: The shared link has not become active yet.
- Shared Link Manager – Existing shared links can be managed in the window that appears, there are options to edit, share, or remove existing shared links. You can create up to 1000 shared links. The Status section of each shared link displays one of the following:
- Settings

- General Tab
- File Station – The options available here control the default drag and drop behaviour. Options include:
- Always overwrite files … – Files dropped in the same directory with a file or folder with the same name located within it will be replaced.
- Enable drag and drop between browsers – Allow files to be dragged between multiple browser instances.
- Enable smart drag and drop – When selected:
- Overwrite: Your transferred files will overwrite files with the same name.
- Skip: Your transferred files will be skipped and not overwrite files with the same name.
- File Access
- These options are disabled. They may be selected but will not adhere when saved.
- Codepage – For applications that convert non-Unicode strings to Unicode, such as the FTP service, UPnP support, music metadata indexing, you will need to choose the appropriate codepage for them from the Codepage drop-down menu.
- File Station – The options available here control the default drag and drop behaviour. Options include:
- Security Tab
- Always open HTML files using plain test format – This option helps prevent malicious parties from hijacking your login session by using embedded script in HTML files.
- General Tab
- Search
 – Search through all available documents.
 - View
 – Cycle through available folder view options including list, details and multiple thumbnail size options.
 - Sort by
 – Sort files and folders based on the available attributes.
 - Bottom Panel Toggle
 – This panel when expanded provides a log of upload queue activity, Background tasks and Email (not used by SapphireOne).

You can review our Blog and YouTube channel for additional information and resources on SapphireOne ERP, CRM and Business Accounting software.