FX Standard Financials Report Overview
The FX Standard Financials Report in SapphireOne provides a comprehensive overview of a business’s current financial performance and standing. It offers valuable insights into the company’s financial results.
While the FX Standard Financials Report shares similarities with the SapphireOne Standard Financials Report, it distinguishes itself by focusing solely on businesses that operate in foreign currencies. The key difference is that when you click the Print button, SapphireOne prompts you to select an FX currency type for the report.
These reports enable you to export balance information related to General Ledger Accounts, and you have the flexibility to customise the export criteria. Within the Export Financials Report, there are three types of Standard Financial Reports available, each catering to the export of General Ledger Account balances based on specific criteria, as detailed below:
- Trial Balance Statement – A trial Balance statement is a list of all General Ledger accounts including the balance of their respective nominal Ledger accounts.
- Income Statement – The Income or Profit and Loss Statement presents the operating results of your organisation. It includes the income, expenditure, revenue and expenses generated during a reporting period.
- Balance Sheet – The balance sheet provides information about the liquidity and capitalisation of your organisation utilising the assets, liabilities, and equity at a particular reporting date.
Dictation and Speech to Text Overview
SapphireOne’s implementation of both Dictation (MacOS) and Speech to Text (Windows) is a game changer for data entry. Any data entry field you can type into using a keyboard can use this feature.
You can also use this functionality on all inquiry screens within SapphireOne. For example, the user is in a Contact within a Client. They may have made a phone call to that particular client using the Softphone technology. Consequently, this will automatically date and time stamp both the contact and the phone number you called.
As soon as the call is completed, the user has the ability to use Speech to Text (Windows) or Dictation (MacOS). They can dictate into the memo field of the CRM contact, adding as much description as they require.
Dictation and Speech to Text Procedure
This functionality applies across every single Data Entry screen. For example, the SapphireOne user is entering a Vendor Invoice (VI). Additionally, you may want to add a memo within the Vendor Invoice (VI). The user can utilise the tool and simply dictate the memo.
Another example is if the user wants to add additional lines to the General Ledger account, within each General Ledger account. When the user is completing data entry using a General Ledger, there’s always a unique memo field for each GL account line.
The user can then utilise this feature to quickly add the information they need to add. Alternatively, you may have an interview with an employee. After the interview process is completed, the user can then make notes about the employee.
Speech to Text or Dictation is an extremely powerful tool. It is something that we at SapphireOne, as well as our clients, utilise daily. It is a massive time saver.
Options Button Usage
Furthermore, there is an  Options button that can be selected. When chosen, SapphireOne displays an additional Select Report Control screen, granting the user the ability to add extra criteria to the report. Details of this functionality is provided later in this article.
FX Currency Selection
When users have finished configuring their FX Financials report, the final step is to click the Print button to generate the report. Upon selecting the Print button, SapphireOne will prompt the user with an alert, requesting them to choose an FX currency type for the report. This ensures that the report is generated with the appropriate foreign currency settings, providing accurate financial information.
In relevant configurations SapphireOne will display a Query dialog enabling further refinement of the report. Once a selection is made SapphireOne will continue to the printer dialogue.
FX Standard Financials Report Data Entry
Selecting the FX Standard Financials option from the General Ledger menu will open a General Ledger Reports print dialog, as depicted below. From the initial dialog screen the user has a number of drop down menus to configure a report for exporting. These drop down menus are: Print Destination, Report Type, Report Details and Report Selection.
Print Destination Menu (FX Standard Financials)
When selecting the FX Standard Financials report, users will encounter two options within the Print Destination menu, as outlined below:
It’s important to note that when utilising the FX Standard Financials report, choosing either of these two options will prompt your operating platform, Mac or Windows, to open the platform’s print dialog, preparing for the printing of the report as configured.
- Printer – Selecting the Printer option from the default Print Destination menu and subsequently clicking the print
 button, will instruct SapphireOne to send the report directly to the designated printer.
 - Custom Report – Alternatively, when the Custom Report option is chosen, SapphireOne immediately requests the location of an existing Custom Report to be used as a template when the print button is is activated. SapphireOne then generates the report, incorporating the selected Custom Report as the template.
FX Standard Financials Report Types Menu (FX Standard Financials)
Within the Standard Financial reports there are three items for the user to select from. These reports allow the user to view the balances associated with a General Ledger Account using different criteria.
- Trial Balance Statement – A trial Balance statement is a list of all General Ledger accounts including the balance of their respective nominal Ledger accounts.
- Income Statement – The Income or Profit and Loss Statement presents the operating results of your organisation. It includes the income, expenditure, revenue and expenses generated during a reporting period.
- Balance Sheet – The balance sheet provides information about the liquidity and capitalisation of your organisation utilising the assets, liabilities, and equity at a particular reporting date.
Report Details Menu (FX Standard Financials)
These report options listed below provide the ability to produce summarised snapshots of your data. The user should be aware that a number of these reports are based on selections made from the first two pages of your General Ledger Accounts, the Details Page and the More Details Page.
For this reason we have included all of the options available from both the standard financials and export financials reports in the list of options below
| No Sort | No sorted performed, the report is printed as it is in the list on screen. |
| Use Account ID | Sorted and totaled by each General Ledger Account ID. |
| Use Account Name | Sorted and Totaled by each General Ledger Account Name. |
| Use Account | Sorted by Account number. |
| Use UDF ID | Sorted and Totaled by UDF ID. |
| Use UDF | Sorted by UDF Name. |
| Use Alternate ID | Sort and total by Alternate ID. |
| Use Account ID by Custom Class | Sort by Account ID then total or group by Custom Class. |
| Use Account Name by Custom Class | Sort by Account Name then total or group by Custom Class. |
| Use Account by Custom Class | Sort by Account and then Custom Class. |
| Use UDF ID by Custom Class | Sort by UDF ID then total or group by Custom Class. |
| Use UDF by Custom Class | Sort by UDF the total or group by Custom Class. |
| Use Alternate ID by Custom Class | Sort by Alternate ID then total or group by Custom Class. |
| Use Class | Sort then Total or group by Class. |
| Use Custom Class | Sort then Total by Custom Class. |
| Use Department Class A | Sort then Total or group by Class A. |
| Use Department Class B | Sort then Total or group by Class B. |
| Use Department Class C | Sort then Total or group by Class C. |
| Use Class by Custom Class | Sort by Class the total or group by Custom Class. |
| Use Custom Class by Class | Sort by Custom Class then total or group by Class. |
Report Selection Menu
This menu gives you the following options: Standard Selection, Include Nil Balances, Include Inactive without Nil Balances and All Records.
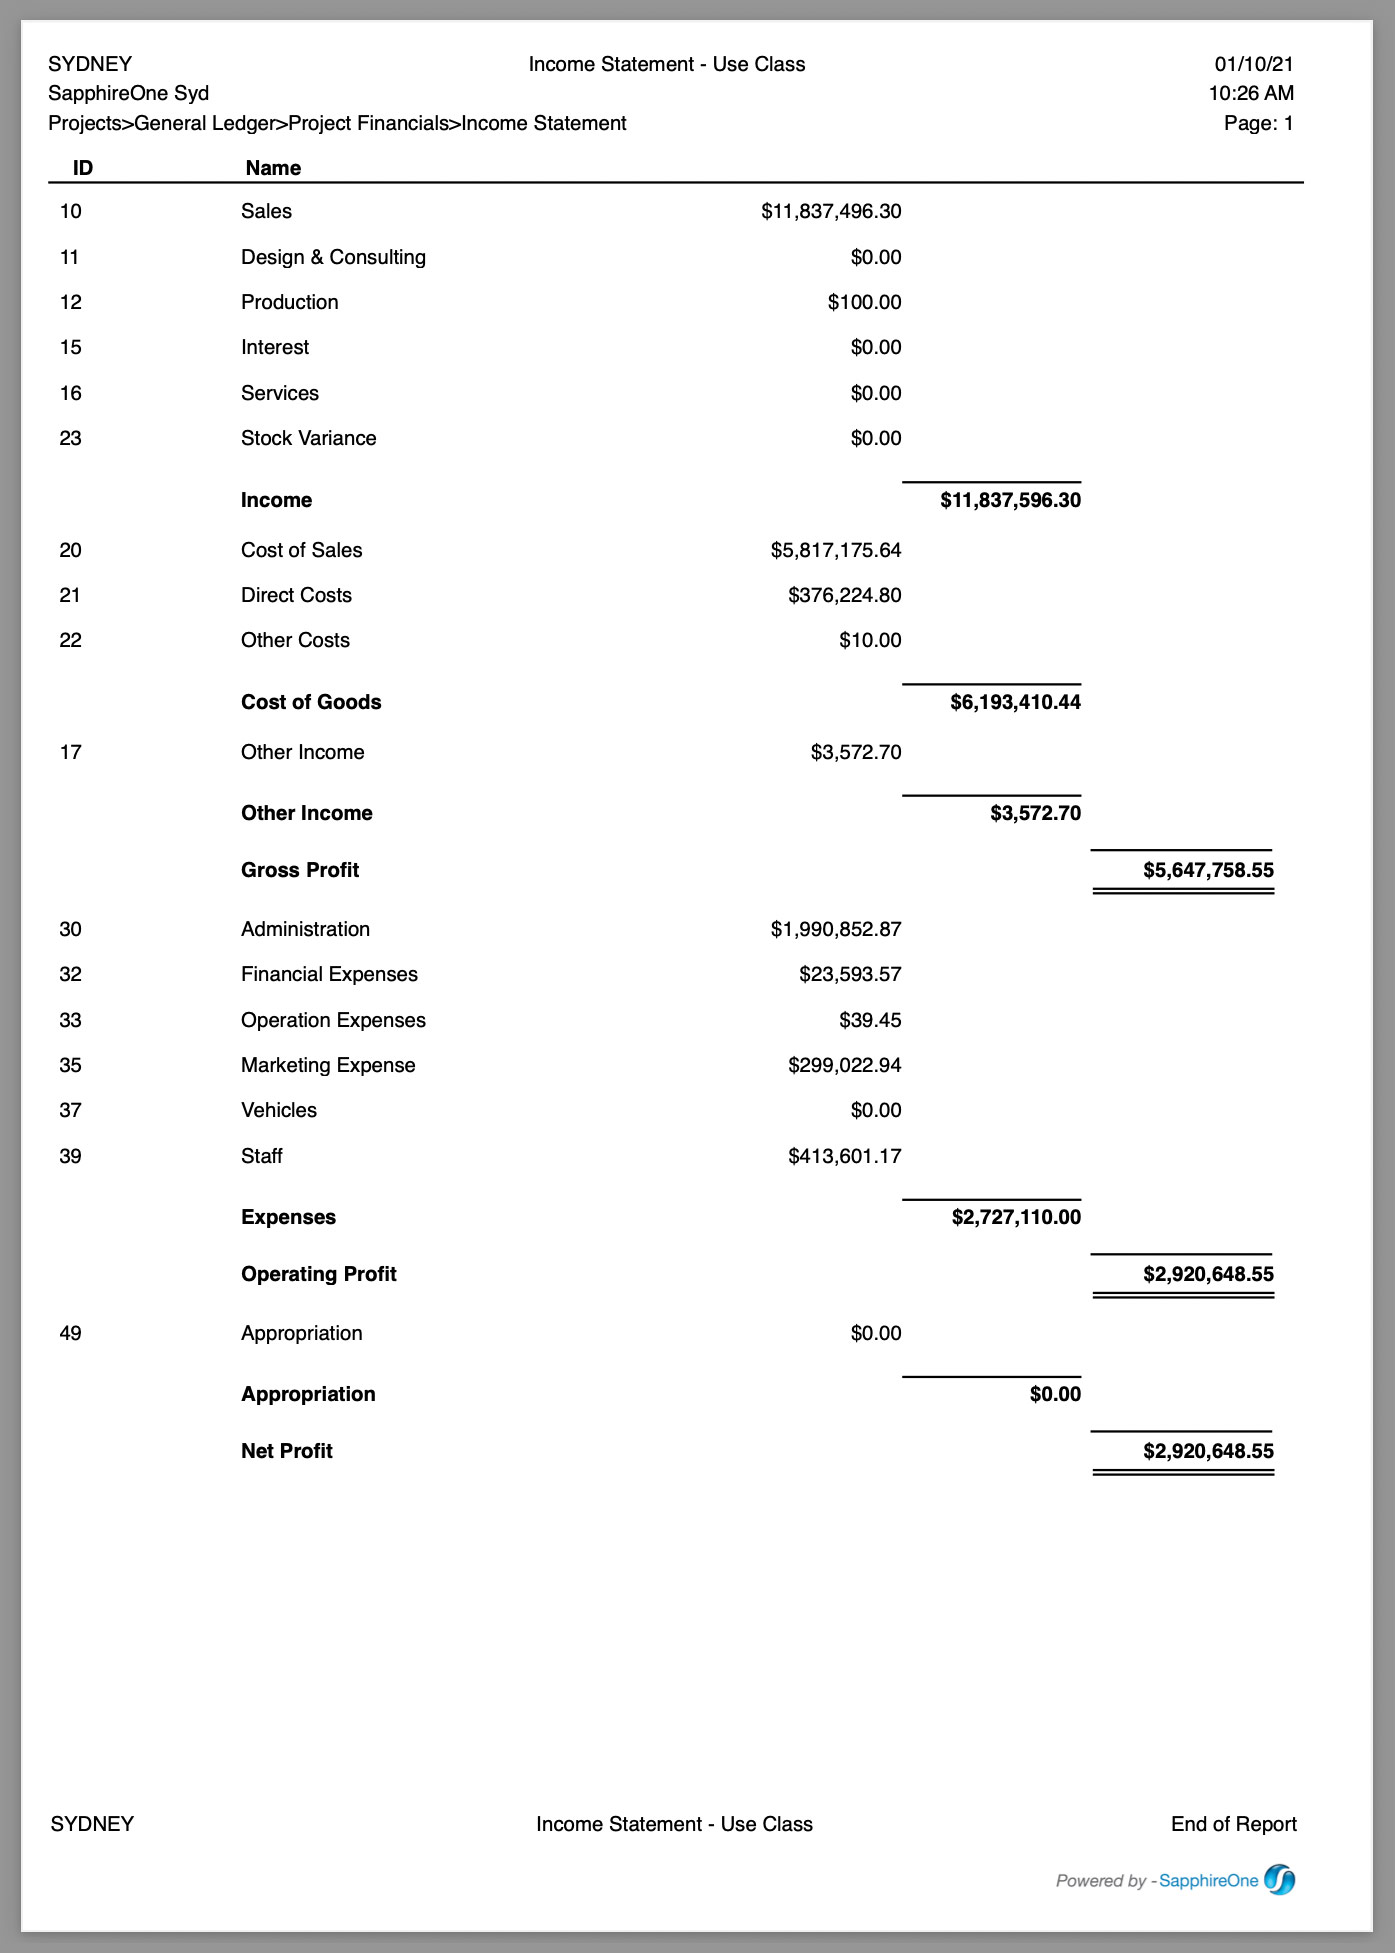
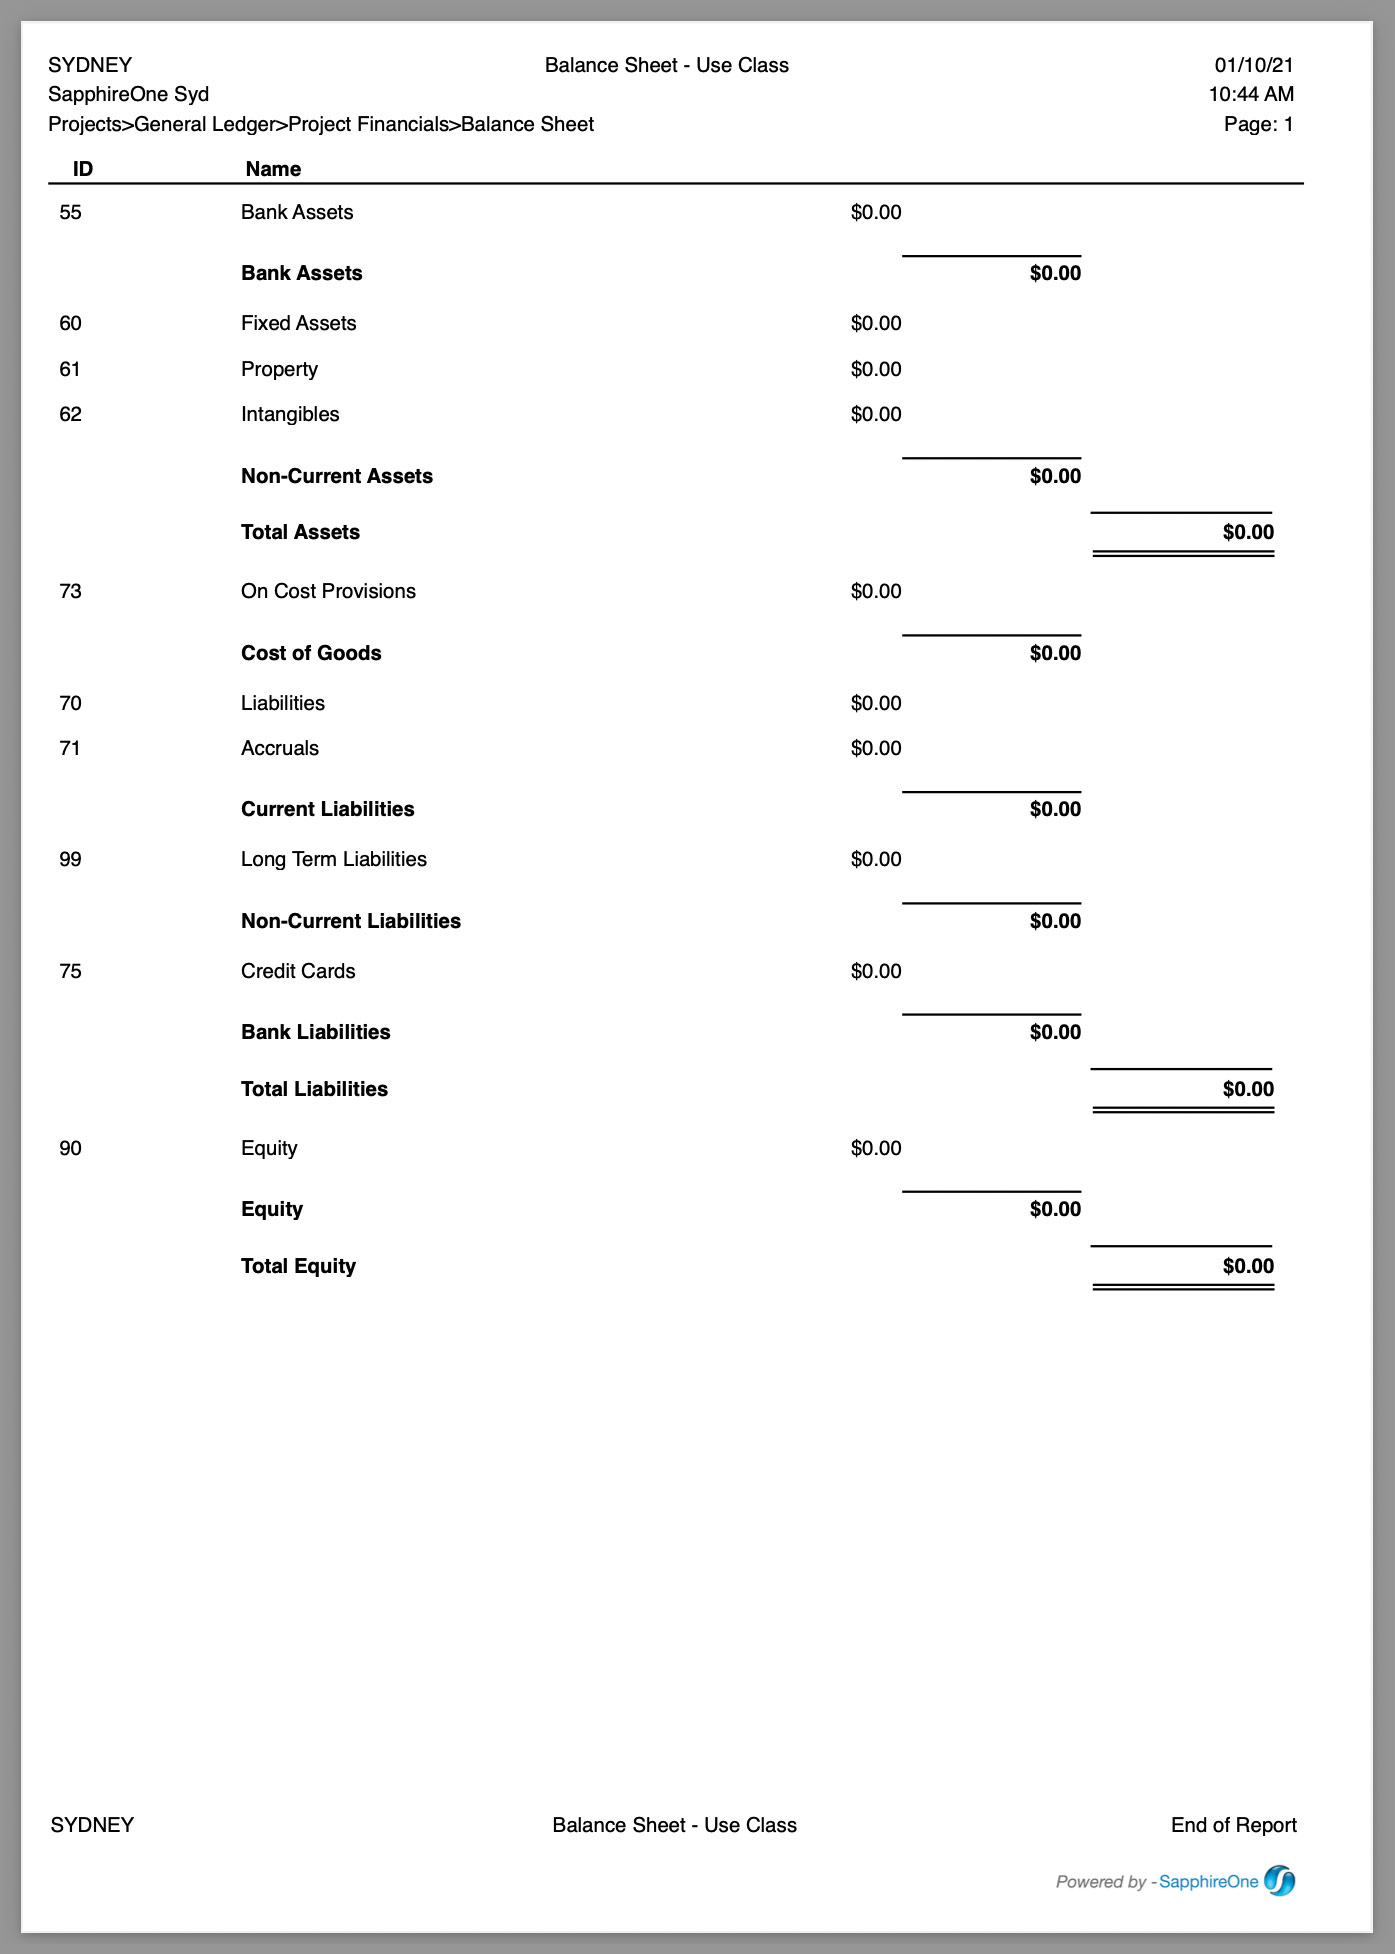
Selecting Report Details of Use Class for the Income Statement and Balance Sheet will enable you to view the format the reports will be generated in. Examples of these two reports follow in this article.
Buttons on the Reports Dialog Screen
- Print – This print button will take the user to your operating platforms Print dialog screen.
- Cancel – This button will cancel the current procedure.
- Record List – When this button is selected SapphireOne will allow the user to view the current selection.
- Options – When this button is selected SapphireOne will display an additional page where more options are able to be selected for the report. This is documented immediately below in this article.
- Queue – This button places the report on a queue to the printer.
- Background – This tell SapphireOne to print this job as a separate task in the background as time permits. It lowers the printing priority for the operating platform.
Report Examples (FX Standard Financials)
This report was created using a Report Type of Income Statement and Report Details of Use Class.
This report was created using a Report Type of Balance Sheet and Report Details of Use Class.
Options button Usage (FX Standard Financials)
In the Options Menu for Standard Financials, it is crucial for the user to prioritise the selection of the Report Type and any other preferences within the print dialog, as shown above. This should be done before proceeding to click on the ![]() options button.
options button.
Once the user has made their desired selections within the Options menu and is brought back to the General Ledger Reports dialog, their only permissible action is to click the ![]() print button. Any attempt to select anything else within the General Ledger Reports dialog upon returning will promptly cancel any previously chosen options and configurations.
print button. Any attempt to select anything else within the General Ledger Reports dialog upon returning will promptly cancel any previously chosen options and configurations.
Options Data Entry (FX Standard Financials)
When the ![]() options button is clicked, SapphireOne displays a Select Report Controls screen . It grants the user the ability to choose the reporting periods for both the Current Year or any of the and the previous 8 years. Additionally, users can opt to incorporate budget figures and customise the formatting and content of headings and sub-headings.
options button is clicked, SapphireOne displays a Select Report Controls screen . It grants the user the ability to choose the reporting periods for both the Current Year or any of the and the previous 8 years. Additionally, users can opt to incorporate budget figures and customise the formatting and content of headings and sub-headings.
It’s essential to emphasize that users have the flexibility to utilise up to 12 columns when creating the reports, as illustrated in the screenshot provided above. The report will dynamically adjust its scale as needed to accommodate a single A4 page. Therefore, users should consider the content that will fit within the confines of an A4 page when designing their reports.
Saving Reports (FX Standard Financials)
In the context of Standard Financials, it’s important to note that SapphireOne does not automatically save a report once it has been printed.
However, within the Options menu, there is a data field labeled Saved Reports where users can execute the saving procedure themselves. It’s worth noting that when SapphireOne saves these reports, they are stored as part of the data file itself. Therefore, the sole method to retrieve these reports is to utilise the Export Financial function and follow these steps.
- Initial Navigation – Once the Export Financials print dialog is on screen, select the Options button and navigate directly to the Design area.
- Adding a Report – Select the Saved Reports menu. and once the list is visible, choose the Add… option.
- Report Name – Provide a name for your report and save it.
- Saved Report – Your saved report will be listed in the Saved Reports section, enabling you to retrieve it for future exports directly from within the data file.
- Deleting a Report – To delete a saved report, select it, then hold down the Command or Control key and click on it again. An alert will appear, requesting permission to delete the selected report. Please remember that this action cannot be undone.
Columns Area (FX Standard Financials)
If direct data entry setup is desired for a report the user can uses the following procedure to set up the desired report.
- Column Number – To specify the number of columns for your report, you can utilise the radio buttons provided. These options range from a single column to a maximum of 12 columns.
- Period Selection – Following the column selection, users can designate the periods for each column from which data will be extracted. This can be done by selecting the desired period or periods from the available options within the column settings up to a limit of 30 periods.
Design Area (FX Standard Financials)
You can also individually select and configure each column by first choosing a column then selecting various options available in the Design area as documented below. The Design area provides the user with the ability to customise how reports are generated. There are several menus with the following options:
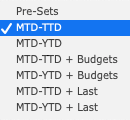
- Presets – The Pre-Sets drop down menu offers six options. Once an option is chosen, SapphireOne will automatically configure the Select menu with the recommended number of columns.
- Select menu – In the Select menu, SapphireOne will present the user with the appropriate number of columns to choose from. The user can utilise the Select menu to pick a column or alternatively, click on the specific column in the column area to make adjustments to the criteria for that particular column.
- Radio Buttons – There is typically no need to adjust the number of columns by selecting a radio button. However, if the user wishes, they can have as many columns as needed for the report, with a maximum limit of 12 columns.
- Column Data – This is the manual alternative to the preset option documented above. Each column must be individually chosen, and the following selections may be made from the drop-down menus:
- Column Year – For the selected column, the user can opt to display data from Last Year through to 8 Years ago.
- Actual Budget – For the selected column, the user has the following data display options: Actual, Budget or Revised Budget.
- Net Balances Checkbox – Select this this checkbox if you wish to include net balances in the printed report.
- Column Header – If necessary, the user can input a custom column heading. To do so, first select the column, then enter the desired heading. Proceed through each column one at a time to input the required headings.
- Saved Reports – When initially accessing this function, there may be no saved reports. You will find only the Add… report item in the list. To save a new report, select the Add… report option. Any previously saved reports will be available in the drop-down list.
- Formula & Format Buttons – Clicking the Formula and Format Buttons button trigger a pop up window where you can choose from various criteria to be applied to the column. Both of these items are documented fully later in this article.
- Formula Button – Selecting this button causes sapphire one to display a pop up where a formula can be applied to a column.
- Format Button – Clicking this button triggers a series of pop-up windows where you can choose to up the manner in which positive and negative values are displayed for the currency.
Mode Menu (FX Standard Financials)

The mode menu is the main driving force for these reports. By default this is set as seen Periods. From Periods and then from All Projects through to the All Project Class items, the only requirement is for the user to make a selection for the period for the report. For this reason only periods are displayed in the column area when these items are selected.
When a Project, Task, Department or Project Class item is selected, the column will be split vertically. The upper part of the column will still display periods, but the lower part will display the item as selected from the mode menu as seen to the right.
The user must then select the Periods for the report, as well as the Project, Task, Department or Project Class from the lower section of the column. They have to tell SapphireOne what period and what Project, Task, Department or Project Class is to be included in the report.
Per-sets Menu Set as Pre-sets (FX Standard Financials)
By default the options screen opens with the Pre-Set menu displaying Pre-set and a single column. The mouse is then used to select the periods form the columns in the upper area for the the report. This report may then be immediately printed.

- Columns – Defaults to one column only.
- Pre-sets – SapphireOne opens with this menu item set at Pre-Sets.
- Select – These three menus are set on General, Current and Actual.
- Mode – This menu is set at Period.
- Period Selection – The user must select the Periods for the report.
- Printing – The user may immediately then print the default report.
There are six additional Pre-sets as depicted in the screenshot above. When any of these are selected SapphireOne will split each column, Periods at the top and the selection made from the pre-sets menu in the lower part of each column.
- Mode Menu Single Options – By default the initial report is set up on a Period based structure. These mode options are as follows.
- Periods – Default setting for this report editor alter as required.
- Project –Enables reports to be based on a Period or Periods for selected Project or Projects.
- Task – Enables reports to be based on a Period or Periods for selected Task or Tasks.
- Department – Enables reports to be based on a Period or Periods for selected Department or Departments
- Project Class – Enables reports to be based on a Period or Periods for selected Project Class or Project Classes.
- Mode Menu All Options – There are four items at the bottom of the list. All Projects, All Tasks, All Departments and All Project Classes.
- Radio Buttons – The Column Radio buttons are disabled when All is selected and just the single column will be displayed in the upper area.This will allow you set up 1 column and repeat the selection for all of the selected items on the drop-down menu as seen to the right. For example, if you have 100 active projects it will give you income statements with 100 projects in 100 columns.
- Options – The user is given the choice to select whether the report should be purely period-driven or a TTD (Total To Date) report by selecting Periods or TTD from the column itself.
- Format – When this button is selected SapphireOne displays a pop up which allows for the selection of a number of formatting options which is documented later in this section of the manual.
- Net Balances – Select his checkbox if net balances are to be printed.
If the default setup above is not to the users requirements, from here they can make alterations as desired. The basis for the report should be there, with alterations or additions their own custom report can be setup. The documentation above is for the Period mode.
Formula Button
The Formula Button in SapphireOne allows users to apply mathematical operations such as addition, subtraction, and division to various columns in a report. This feature provides users with the flexibility to perform calculations on the data as needed.
However, detailed information on this topic is not included in this article, as it is already available in the Export Financials article. To access documentation for this functionality, please click on the provided link: Formula button (Export Financials)
Format Button
The Format Button in SapphireOne provides users with access to various currency display options.
However, detailed information on this topic is not included in this article, as it is already available in the Export Financials article. To access documentation for this functionality, please click on the provided link: Format Button (Export Financials).
You can review our Blog and YouTube channel for additional information and resources on SapphireOne ERP, CRM and Business Accounting software.