Show Reports Purchases Overview
SapphireOne’s Inventory Purchases Menu includes the Show Reports function, allowing users to create custom reports for various purposes. Users can set up reports, including Purchases by Vendor, Vendor Class, Item, Item Class, Project Class, Matrix, Serial/Batch, and Purchases by Addition/Deduction from the Purchase Menu.
Fulfillment Summaries
It’s worth noting that you can generate a Shipment Summary report from the Fulfillment Summary report. However, it’s essential to note that the Shipment Summary report comes in an extended format and differs slightly from the Fulfillment Summary. We recommend that you review both reports thoroughly and choose the one that best suits your requirements.
Standardised Layouts
Generating reports is a breeze with SapphireOne’s simple selection of standardised drop-down menus. Users can easily select the desired report options, followed by the preferred date or period for report generation. All reports can be exported in CSV format, compatible with any external spreadsheet program. Additionally, the Matrix report offers a unique matrix-style display option.
Selecting a Report
After selecting a report option in SapphireOne, you have the flexibility to choose various criteria for the report, as documented below. Once the report has been generated, you can easily export it as either an HTML or CSV file. These files can be opened in any web browser or external spreadsheet program for your convenience.
Upon selecting the Show Reports item from the Purchases menu in SapphireOne, a menu is shown with the currently available reports.
Currently, there are nine available reports.
Show Reports (Purchases by Vendor)
With SapphireOne, each purchase is assigned to a specific Vendor, providing additional reporting options using the Purchases by Vendor functionality. This feature allows users to generate a Purchases by Vendor report, providing insightful analysis on vendor-specific purchasing trends.
The Show Report feature presents the total purchases made from each vendor based on the user’s selected options in the Query and Display areas.
Query Options (Purchases by Vendor)
Please note that any changes made to report settings require that the ![]() button be selected for SapphireOne to update the report with the new details. The Recalculate function allows for updated selections and also displays the most recent data.
button be selected for SapphireOne to update the report with the new details. The Recalculate function allows for updated selections and also displays the most recent data.
- Range – This may be Date based or Period based. The button located at the bottom left hand corner of the screen
 , acts as a toggle enabling the user to swap between date and period based reports. By Default SapphireOne will set the range to Date and This Month to Date. If period is selected, SapphireOne will display Periods for the From and To fields. The selection made here will populate the From and To fields with the appropriate dates or periods.
 - From & To – Users can also manually enter a From and To periods or dates. To swap between date and period select the
 or button. The button acts as a toggle to switch between the two options, Date or Period.
- Date or Period button location – This toggle button can be found in the bottom left corner of the screen.
- Depart Menu – This button provides a drop-down selection that allows you to either choose from all departments within the company, or select a specific department for generating the report.
- Query Button – This button serves as a valuable tool for refining the content of a report within SapphireOne. When users require the ability to filter the report based on particular criteria, such as a specific Vendor, they can initiate a comprehensive query by clicking on the Query button. This action prompts SapphireOne to unveil the detailed query pop-up interface, which grants users the capability to conduct thorough searches across SapphireOne’s database, identifying items that align precisely with the specified criteria.
Display Options (Purchases by Vendor)
- Sort Menu – The Sort menu enables you to sort the items in the report according to different criteria. The available sorting options include, ID (Default), Name, or Total.
- Please note that the small [>] button located to the right of the sorting drop-down menu can be used to invert the sort. This button serves as a toggle, allowing you to reverse the order of the sorting.
- Column By Menu- These options determine the type of data that appears in each column of the report. There are three options as listed below so select the report that best suits your requirements accordingly.
- Total – This option generates a simple report that displays the vendor and total sales based on the user’s selection in the Query and Display settings.
- Rep – This option displays purchases made by each representative, as selected by the user in the Query and Display settings.
- Period – This option displays sales on a period-by-period basis, as selected by the user in the Query and Display settings.
- as selected by the user when selecting an option from the Query and Display settings.
- Recalculate Button – Whenever you make a change to the report, click on the
 button to allow SapphireOne to re-calculate the report. Any changes you make will be displayed immediately in the report area.
Footer Buttons
There are several buttons at the bottom of the Show Reports Page that Perform the following functions.
- Use Date/Period Button– Upon selecting this button, the To Field box will automatically be filled with either the current date or period. (Documented above in this article)
- Cancel Button – By selecting this button, the current report processing will be canceled.
- Export to HTML Button – Selecting this button will export the current report as an HTML file
- Export to CSV Button – Selecting this button will export the current report as a CSV file. CSV file.
- Print Button – By selecting this button, the printing interface for the current report will be opened.
Show Reports (Purchases by Vendor Class)
SapphireOne’s Vendor Class function enables the grouping of Vendors into distinct classes, which unlocks a range of advanced reporting options. By generating class-based reports, users gain valuable insights into purchasing trends that are unique to each Vendor class, facilitating in-depth analysis and informed decision-making.
Query Options (Purchases by Vendor Class)
- Range Menu – This may be Date based or Period based. A button located at the bottom left hand corner of the screen , acts as a toggle enabling the user to swap between date and period based reports. By Default SapphireOne will set the range to Date and This Month to Date. If period is selected, SapphireOne will display Periods for the From and To fields. The selection made here will populate the From and To fields with the appropriate dates or periods.
- Range Selection – The From or To Dates or Periods may be directly entered by the user.
- Date – Various date based options are available when the user selects the up/down arrows to the right of this drop-down menu. For example, Last Financial Year to today’s date last Year This will enable the user to compare last years purchase figures to this years purchase figures for the same time frame in last and current financial years.
- Dates & Periods – For a date driven report the two date entry fields require the input of a date. Note that the date option has both the From and To underlined so they have a convenient pop-up calendar to pick dates from. For periods directly enter the periods required accordingly.
- Range Selection – The From or To Dates or Periods may be directly entered by the user.
- Depart Menu – This button provides a drop-down selection that allows you to either choose from all departments within the company, or select a specific department for generating the report.
- Query Button – To filter a report, such as for a Single Vendor Class, select the Query button. This will display SapphireOne’s detailed query pop-up, allowing the user to search for the desired Vendor Class or any item within the data file.
Display Options (Purchases by Vendor Class)
- Sort Menu – You can use this option to sort the items in your report. The available sorting options include ID (Default), Name, and Total. Note
- Please note that the small [>] button located to the right of the sorting drop-down menu can be used to invert the sort. This button serves as a toggle, allowing you to reverse the order of the sorting.
- Column By Menu –This menu selection determines the data included in each column. Users can choose from three options: Total (default), Rep, or Period. Simply select the report that best meets your requirements.
- Recalculate – Every time a change is made to the report, the button must be selected so that SapphireOne can re-calculate the report. Any changes are displayed immediately in the report area.
Footer Buttons
There are several buttons at the bottom of the Show Reports Page that Perform the following functions.
- Use Date/Period Button– Upon selecting this button, the To Field box will automatically be filled with either the current date or period. (Documented above in this article)
- Cancel Button – By selecting this button, the current report processing will be canceled.
- Export to HTML Button – Selecting this button will export the current report as an HTML file
- Export to CSV Button – Selecting this button will export the current report as a CSV file. CSV file.
- Print Button – By selecting this button, the printing interface for the current report will be opened.
Show Reports (Purchases by Item)
This Show Report provides a comprehensive overview of purchases on a granular, Inventory item-by-item level. This detailed breakdown includes columns for the Inventory item’s ID, Name, Quantity, and Total Amount, presented in a clear and easily readable format. The report also highlights the percentage of sales generated by each item, as well as its Average Price or Cost, enabling users to gain valuable insights into the profitability of individual items.
Query Options (Purchases by Item)
- Range Menu – This may be Date based or Period based. A button located at the bottom left hand corner of the screen , acts as a toggle enabling the user to swap between date and period based reports. By Default SapphireOne will set the range to Date and This Month to Date. If period is selected, SapphireOne will display Periods for the From and To fields. The selection made here will populate the From and To fields with the appropriate dates or periods.
- Range Selection – Either the From or To Dates or Periods may be directly entered by the user.
- Date- Various date based options are available when the user selects the up/down arrows to the right of this drop-down menu. For example, Last Financial Year to Today’s Date Last Year. This will enable the user to compare last years sales figures to this years sales figures for the same time frame in last and current financial years.
- Dates & Periods – For a date driven report the two date entry fields require the input of a date. Note that the date option has both the From and To underlined so they have a convenient pop-up calendar to pick dates from. For periods directly enter the periods required accordingly.
- Range Selection – Either the From or To Dates or Periods may be directly entered by the user.
- Depart Menu – This button provides a drop-down selection that allows you to either choose from all departments within the company, or select a specific department for generating the report.
- Query Button – When any filtering of the report is required, for example down to a Single Inventory Item, a detailed query may be performed for the Inventory Item by selecting the Query button. This then causes SapphireOne to display the detailed query pop-up. This enables the user to query for any item in SapphireOne.
Display Options (Purchases by Item)
- Grouping Menu – The Grouping drop-down menu offers eight normal items and two items designed specifically for inventory items stored in a matrix-style layout. This option is used when grouping inventory items within the report is necessary.
- Normal Report – By default, the None option is selected for a standard report, which does not group the data. However, there are other grouping options available, including Class, Type, Brand, Detail, Tag4, Tag5, and Tag6.
- Matrix Report – For reports that involve Matrix items, there are two additional options, Matrix and Matrix Color.
- Matrix option – This option pertains to the columns in the report,
- Matrix Color – This option pertains to the rows when the matrix involves other types of inventory.
- Sort Menu – You can use this option to sort the items in your report. The available sorting options include ID (default), Name, Quantity, Amount, % of Sales, and Average Price.
- Please note that the small [>] button located to the right of the sorting drop-down menu can be used to invert the sort. This [>] button serves as a toggle, allowing you to reverse the order of the sorting.
- Column By Menu – This option determines the type of data that appears in each column of the report. There are five available options to choose from: Detail (Default), Vendor, Period, Detail Period, and Project. Choose the report that best aligns with your needs.
- Breaking Menu – By using this menu, you can break down the report according to different categories. The default option is None, but you can also break down the report by Vendor, Vendor Class, Rep, Period, and Project.
- Recalculate Button – Whenever you make a change to the report, you must click on the button to enable SapphireOne to re-calculate the report. Any changes you make will be reflected immediately in the report area.
Footer Buttons
There are several buttons at the bottom of the Show Reports Page that Perform the following functions.
- Use Date/Period Button– Upon selecting this button, the To Field box will automatically be filled with either the current date or period. (Documented above in this article)
- Cancel Button – By selecting this button, the current report processing will be canceled.
- Export to HTML Button – Selecting this button will export the current report as an HTML file
- Export to CSV Button – Selecting this button will export the current report as a CSV file. CSV file.
- Print Button – By selecting this button, the printing interface for the current report will be opened.
Show Reports (Purchases by Item Class)
SapphireOne’s inventory management system allows for the assignment of inventory items to specific classes, unlocking a host of additional reporting options based on inventory class. By generating Inventory Class-based reports, SapphireOne users can fully leverage this functionality and gain valuable insights into their inventory data.
Query Options (Purchases by Item Class)
- Range Menu – This may be Date based or Period based. A button located at the bottom left hand corner of the screen , acts as a toggle enabling the user to swap between date and period based reports. By Default SapphireOne will set the range to Date and This Month to Date. If period is selected, SapphireOne will display Periods for the From and To fields. The selection made here will populate the From and To fields with the appropriate dates or periods.
- Range Selection – Either the From or To Dates or Periods may be directly entered by the user.
- Date – Various date based options are available when the user selects the up/down arrows to the right of this drop-down menu. For example, Last Financial Year to today’s date last Year. This will enable the user to compare last years sales figures to this years sales figures for the same time frame in last and current financial years.
- Dates & Periods – For a date driven report the two date entry fields require the input of a date. Note that the date option has both the From and To underlined so they have a convenient pop-up calendar to pick dates from. For periods directly enter the periods required accordingly.
- Range Selection – Either the From or To Dates or Periods may be directly entered by the user.
- Depart Menu – This button provides a drop-down selection that allows you to either choose from all departments within the company, or select a specific department for generating the report.
- Query Button – When any filtering of the report is required, for example a Single Inventory Class, a detailed query may be performed for the Inventory Class by selecting the Query button. This then causes SapphireOne to display the detailed query pop-up. This enables the user to query for any item in SapphireOne.
Display Options (Purchases by Item Class)
- Grouping Menu – This option is used to group inventory items within the report. The drop-down menu currently includes four options: None (default), Type, Brand, and Detail. Selecting a grouping option will enable you to customize how the report is organized.
- Sort Menu – The Sort menu enables you to sort the items in the report according to different criteria. The available sorting options include ID (default), Name, Quantity, Amount, % of Sales, and Average Price.
- Please note that the small [>] button located to the right of the sorting drop-down menu can be used to invert the sort. This [>] button serves as a toggle, allowing you to reverse the order of the sorting.
- Column By Menu – These options determine the type of data that appears in each column of the report. There are five available options to choose from: Detail (default), Vendor, Period, Detail Period, and Project. Select the report that best aligns with your needs.
- Recalculate Button – Whenever you make a change to the report, click on the button to allow SapphireOne to re-calculate the report. Any changes you make will be displayed immediately in the report area.
Footer Buttons
There are several buttons at the bottom of the Show Reports Page that Perform the following functions.
- Use Date/Period Button– Upon selecting this button, the To Field box will automatically be filled with either the current date or period. (Documented above in this article)
- Cancel Button – By selecting this button, the current report processing will be canceled.
- Export to HTML Button – Selecting this button will export the current report as an HTML file
- Export to CSV Button – Selecting this button will export the current report as a CSV file. CSV file.
- Print Button – By selecting this button, the printing interface for the current report will be opened.
Show Reports (Purchases by Project Class)
SapphireOne’s project management feature allows for the assignment of projects to specific classes, which unlocks a variety of additional reporting options based on project class. By generating Project Class-based reports, SapphireOne users can fully utilize this functionality and gain valuable insights into their project data.
Users can customize the report to their specific needs by accessing the Query and Display sections, available on the Show Report screen above. In the Query section, users can input specific criteria to filter the data and refine the report. The Display section allows users to select the type of report and its format, ensuring the report is presented in a way that is most useful to them. By utilizing these customization options, SapphireOne users can generate reports that meet their unique needs and preferences.
Query Options (Purchases by Project Class)
- Range – This may be Date based or Period based. A button located at the bottom left hand corner of the screen , acts as a toggle enabling the user to swap between date and period based reports. By Default SapphireOne will set the range to Date and This Month to Date. If period is selected, SapphireOne will display Periods for the From and To fields. The selection made here will populate the From and To fields with the appropriate dates or periods.
- Range Selection – Either the From or To Dates or Periods may be directly entered by the user.
- Date- Various date based options are available when the user selects the up/down arrows to the right of this drop-down menu. For example, Last Financial Year to today’s date last Year. This will enable the user to compare last years sales figures to this years sales figures for the same time frame in last and current financial years.
- Dates & Periods – For a date driven report the two date entry fields require the input of a date. Note that the date option has both the From and To underlined so they have a convenient pop-up calendar to pick dates from. For periods directly enter the periods required accordingly.
- Range Selection – Either the From or To Dates or Periods may be directly entered by the user.
- Depart – This button provides a drop-down selection that allows you to either choose from all departments within the company, or select a specific department for generating the report.
- Query Button – When any filtering of the report is required, for example a Single Project Class, a detailed query may be performed for the Project Class by selecting the Query button. This then causes SapphireOne to display the detailed query pop-up. This enables the user to query for any item in SapphireOne.
Display Options (Purchases by Project Class)
- Sort Menu – This menu provides a variety of sorting options for the items displayed in the report. These options include sorting by ID, (Default), Name, Quantity, Amount, % of Sales and Average Price.
- Please note that the small [>] button located to the right of the sorting drop-down menu can be used to invert the sort. This button serves as a toggle, allowing you to reverse the order of the sorting.
- Column By Menu – This option allows you to specify the type of data to be included in each column of the report. You can choose from five options: Detail (Default), Vendor, Period, Detail Period, and Project. Be sure to select the report that best meets your needs based on the available options.
- Recalculate Button – After making any changes to the report, be sure to click on the button to prompt SapphireOne to recalculate the report. The changes will be reflected immediately in the report area
Footer Buttons
There are several buttons at the bottom of the Show Reports Page that Perform the following functions.
- Use Period Button – Upon selecting this button, the To Field box will automatically be filled with either the current date or period.
- Cancel Button – By selecting this button, the current report processing will be canceled.
- Export to HTML Button – Selecting this button will export the current report as an HTML file.
- Export to CSV Button- Selecting this button will export the current report as a CSV file. CSV file.
- Print Button – By selecting this button, the printing interface for the current report will be opened.
Show Reports (Purchases by Matrix)
It’s important to note that the matrix functionality within SapphireOne is not limited to clothing items. In fact, this feature can be applied to any industry where item selection is improved through the use of a matrix. By utilizing the matrix functionality, SapphireOne users can enhance their understanding of inventory items that utilize a matrix and gain valuable insights into their inventory data.
- Matrix – Matrix refers to the column headings or categories that are used to classify and organize data.
- Matrix Colours – Matrix Colors refer to the row headings or categories that are used to further classify and organize data based on specific attributes or characteristics.
Once the Matrix-style report is generated, it will display both the columns and rows, as seen in the screenshot below.
SapphireOne users have the flexibility to customize their reports by accessing the Query and Display sections, which are available on the Show Report screen above. By inputting specific criteria in the Query section, users can filter the data and refine the report to their specific needs. In the Display section, users can select the type of report and its format, ensuring the report is presented in a way that is most useful to them. These customization options enable SapphireOne users to generate reports that are tailored to their unique needs and preferences.
Query Options (Purchases by Matrix)
- Range – In SapphireOne, the Range data entry field features a drop down list that drives the From and To fields for each Show Report function. The drop down menu contains a variety of items that vary depending on the type of Show Report. Once an item is selected from the drop down menu, SapphireOne automatically fills in the From and To data entry fields.
- From & To – Users can also manually enter a From and To periods or dates. To swap between date and period select the or button. The button acts as a toggle to switch between the two options, Date or Period.
- Date & Period button location – This toggle button can be found in the bottom left corner of the screen.
- From & To – Users can also manually enter a From and To periods or dates. To swap between date and period select the
- Depart Menu – This button provides a drop-down selection that allows you to either choose from all departments within the company, or select a specific department for generating the report.
- Query Button – When any filtering of the report is required, for example a Single Inventory Item, a detailed query may be performed for the Inventory Item by selecting the Query button. This then causes SapphireOne to display the detailed query pop-up. This enables the user to query for any item in SapphireOne.
Display Options (Purchases by Matrix)
There are several buttons at the bottom of the Show Reports Page that Perform the following functions.
- Display Raw Menu – This option determines which data is included in each column of the report. There are four options available: Color (default), Master, Vendor, and Period.
- Use $ or Qty Button –This menu option determines which data is included in each column of the report. There are four options available: Color (default), Master, Vendor, and Period.
- Recalculate Button – The button needs to be selected to initiate an initial calculation based on the default settings in the report. It must also be selected each time changes are made to the report. This is so that SapphireOne can recalculate the report using the new selections made by the user.
Footer Buttons
There are several buttons at the bottom of the Show Reports Page that Perform the following functions.
- Use Period Button – Upon selecting this button, the To Field box will automatically be filled with either the current date or period.
- Cancel Button – By selecting this button, the current report processing will be canceled.
- Export to HTML Button – Selecting this button will export the current report as an HTML file.
- Export to CSV Button- Selecting this button will export the current report as a CSV file. CSV file.
- Print Button – By selecting this button, the printing interface for the current report will be opened.
Show Reports (Purchases by Serial / Batch)
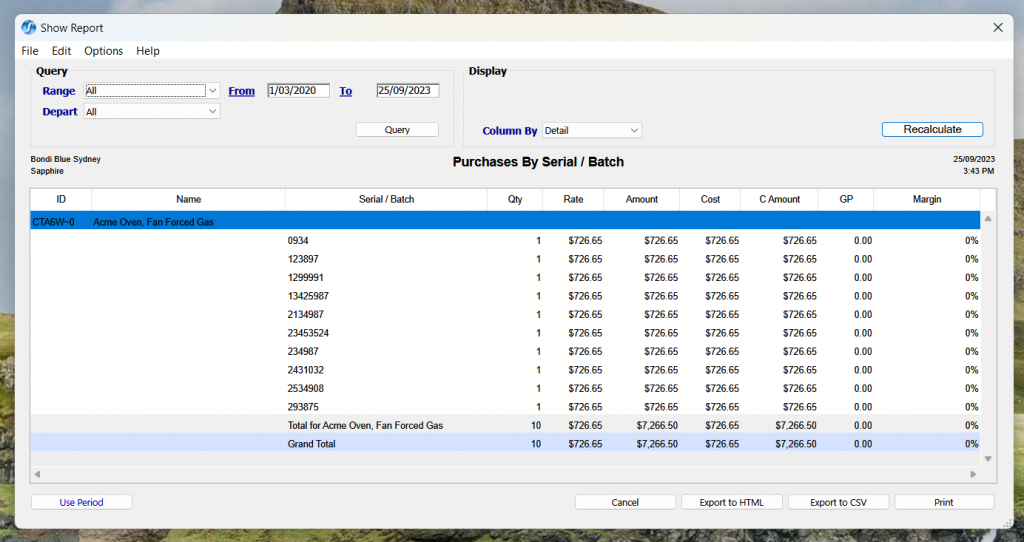
The report can be customized by users through the selection of their preferences in the Query and Display sections, which are available on the Show Report screen located above. This enables users to tailor their reports by inputting specific criteria in the Query section to filter the data. Then selecting the type of report and its format in the Display section.
Query Options (Purchases by Serial / Batch)
- Range – In SapphireOne, the Range data entry field features a drop down list that drives the From and To fields for each Show Report function. The drop down menu contains a variety of items that vary depending on the type of Show Report. Once an item is selected from the drop down menu, SapphireOne automatically fills in the From and To data entry fields.
- From & To – Users can also manually enter a From and To periods or dates. To swap between date and period select the or button. The button acts as a toggle to switch between the two options, Date or Period.
- Date & Period button location – This toggle button can be found in the bottom left corner of the screen.
- From & To – Users can also manually enter a From and To periods or dates. To swap between date and period select the
- Depart Menu – This button provides a drop-down selection that allows you to either choose from all departments within the company, or select a specific department for generating the report.
Display Options (Purchases by Serial / Batch)
- Sort Menu – This Menu provides options for sorting the report based on the selection made in the Column By menu, These options are ID (Default), Name, Type, Calculation, Vendor or Amount.
- Inverting Sort – Additionally, you can choose to sort the list in ascending or descending order by selecting the [>] button located next to the data entry field. The direction of the [>] symbol on the button indicates the current sort order.
- Breaking Menu – This Menu offers options for selecting either None, Vendor or Vendor Class as break points within the report.
- Recalculate – This button needs to be selected to initiate an initial calculation based on the default settings in the report. It must also be selected each time changes are made to the report. This is so that SapphireOne can recalculate the report using the new selections made by the user.
Footer Buttons
There are several buttons at the bottom of the Show Reports Page that Perform the following functions.
- Use Date/Period Button– Upon selecting this button, the To Field box will automatically be filled with either the current date or period. (Documented above in this article)
- Cancel Button – By selecting this button, the current report processing will be canceled.
- Export to HTML Button – Selecting this button will export the current report as an HTML file.
- Export to CSV Button- Selecting this button will export the current report as a CSV file.
- Print Button – By selecting this button, the printing interface for the current report will be opened.
Show reports (Purchases by Addition and Deduction)
To access additional details about this function, please proceed to the Additions and Deductions article.
The report can be customised by users through the selection of their preferences in the Query and Display sections, which are available on the Show Report screen located above. This enables users to tailor their reports by inputting specific criteria in the Query area to filter the data. Then selecting the type of report and its format in the Display area.
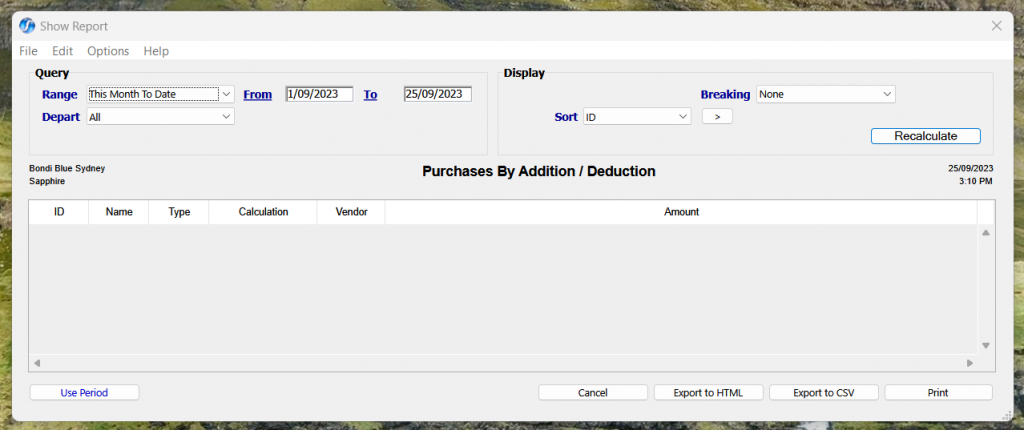
Query Options (Purchases by Addition and Deduction)
- Range – In SapphireOne, the Range data entry field features a drop down list that drives the From and To fields for each Show Report function. The drop down menu contains a variety of items that vary depending on the type of Show Report. Once an item is selected from the drop down menu, SapphireOne automatically fills in the From and To data entry fields.
- From & To – Users can also manually enter a From and To periods or dates. To swap between date and period select the or button. The button acts as a toggle to switch between the two options, Date or Period.
- Date or Period button location – This toggle button can be found in the bottom left corner of the screen.
- From & To – Users can also manually enter a From and To periods or dates. To swap between date and period select the
- Depart Menu – This Menu offers a convenient drop-down selection that empowers users to make a choice between two options when generating a report within SapphireOne. Users can either opt to include all departments within the company in the report, providing a comprehensive overview. Alternatively, they can specify a particular department, tailoring the report to focus exclusively on that selected department’s data.
Display Options (Purchases by Addition and Deduction)
- Sort Menu – This Menu provides options for sorting the report based on the selection made in the Column By menu, These options are ID (Default), Name, Type, Calculation, Vendor or Amount.
- Inverting Sort – Additionally, you can choose to sort the list in ascending or descending order by selecting the [>] button located next to the data entry field. The direction of the [>] symbol on the button indicates the current sort order.
- Outstanding + Accrued checkbox – Typically, a report in SapphireOne does not incorporate outstanding amounts. However, when the Outstanding + Accrued checkbox is selected, the report is configured to include any outstanding amounts. This checkbox option provides users with the flexibility to extend the report’s scope to encompass outstanding and accrued transactions, offering a more comprehensive view of their related financial data.
- Breaking Menu – This Menu offers options for selecting either None, Vendor or Vendor Class as break points within the report.
- Recalculate – This button needs to be selected to initiate an initial calculation based on the default settings in the report. It must also be selected each time changes are made to the report. This is so that SapphireOne can recalculate the report using the new selections made by the user.
Footer Buttons
There are several buttons at the bottom of the Show Reports Page that Perform the following functions.
- Use Date/Period Button– Upon selecting this button, the To Field box will automatically be filled with either the current date or period. (Documented above in this article)
- Cancel Button – By selecting this button, the current report processing will be canceled.
- Export to HTML Button – Selecting this button will export the current report as an HTML file.
- Export to CSV Button- Selecting this button will export the current report as a CSV file.
- Print Button – By selecting this button, the printing interface for the current report will be opened.
Show Reports (Fulfillment Summary)
It’s worth noting that the options available for both reports are identical. The only difference between the two reports arises when a selection is made from the Column by option, as detailed below.
Query Options (Fulfillment & Shipment)
- Range Menu – The range for generating the report can be either Date-based or Period-based. You can toggle between the two using the or button located at the bottom-left corner of the screen. By default, SapphireOne sets the range to Date and This Month to Date.
- From and To Dates – Either the From or To Dates or Periods may be directly entered by the user.
- From & To – Users can also manually enter a From and To periods or dates. To swap between date and period select the Use Date/Use Period button. The button acts as a toggle to switch between the two options, Date or Period.
- Date & Period button location – This toggle button can be found in the bottom left corner of the screen.
- Depart Menu – This button provides a drop-down selection that allows you to either choose from all departments within the company, or select a specific department for generating the report.
- Radio Buttons – The two radio buttons operate as a pair, enabling the report to be generated using either the Date In or the Delivery Date, depending on the appropriate selection.
- Query Button – If you need to filter the report based on specific criteria, such as a single vendor, you can perform a detailed query by selecting the Query button. This action triggers SapphireOne to display the detailed query pop-up, enabling users to search for any item in SapphireOne that meets the specified criteria.
Display Options (Fulfillment & Shipment)
- Breaking – Users have the option to display the list without any breaks (None), or to break the list on a transaction-by-transaction basis.
- Sort – This option enables sorting of the items in the report according to specific criteria, ranging from Vendor (the default) to Status.
- It’s worth noting that the small [>] button located just to the right of the sort drop-down menu is used to invert the sort order. This [>] button functions as a toggle, allowing users to quickly switch between ascending and descending order for sorting.
- Column By – This option selects the data to be included in each column of the report. There are two options available: the default option of Fulfillment or the alternative option of Shipment. You can choose the report that best aligns with your specific requirements.
- Fulfillment – This option provides a report that has 18 columns with common columns from Vendor ID to Group and ending with the 5 specific columns from Backorder to Status.
- Shipment – This report has 22 columns with common columns from Vendor ID to Group and ending with the 9 specific columns from Date In to Status.
- Recalculate Button – It’s important to remember that whenever a modification is made to the report, the button must be selected in order for SapphireOne to re-calculate the report. The report area will display any changes made immediately after the Recalculate button is selected.
Footer Buttons
- Use Date/Period Button– Upon selecting this button, the To Field box will automatically be filled with either the current date or period. (Documented above in this article)
- Cancel Button – By selecting this button, the current report processing will be canceled.
- Export to HTML Button – Selecting this button will export the current report as an HTML file
- Export to CSV Button – Selecting this button will export the current report as a CSV file. CSV file.
- Print Button – By selecting this button, the printing interface for the current report will be opened.
Report Column Details (Fulfillment & Shipment)
For the following list, it is assumed that the report is displayed column by column.
- Vendor – This column displays the ID of the vendor associated with the inventory items.
- Name – This column displays the name of the vendor associated with the inventory items.
- Internal Ref – This column displays the internal reference number for the Vendor that is associated with this transaction.
- Line# – This column displays the line number associated with the transaction
- Client – This column displays the ID of the client associated with the transaction.
- Name – This column displays the name of the client associated with the transaction
- Internal Ref – This column displays the internal reference number for the Client that is associated with this transaction.
- Line# – This column displays the line number associated with the item in the invoice.
- Inventory ID – This field shows the unique identification number assigned to the item in our inventory system.
- Name – This field shows the name of the item in our inventory system.
- Tag – This field shows the tag assigned to the item in our inventory system.
- Unit – This field shows the unit of measurement set for the item in our inventory system.
- Ordered – This field shows the quantity of the item that has been ordered..
The Fulfillment report continues from here, including information about backorders, and ends at the Status field. The Shipping report, on the other hand, includes additional information after the Ordered field mentioned above.
- Back Order – This field shows the quantity of the item that has been placed on backorder, if any.
- Allocated – This field shows the quantity of the item that has been allocated for the transaction.
- Linked – If the data related to this item has been entered into the invoice, it will be displayed in this column.
- ETA – If the estimated time of arrival (ETA) data has been entered into the invoice, the details will be displayed in this column.”be displayed in this column.
- Status – This field shows the status of the invoice related to this item.
The Shipment Report starts at Ordered above and carries on to Status.
- Date In – This field shows the date on which the item was received as recorded in the invoice.
- Ship Date – This field shows the date on which the item was shipped.
- Vessel 1 – If entered, this field shows the name of the vessel associated with the item.
- Vessel 2 – If required, this field shows a second vessel name associated with the item.
- POA – This field shows the port of arrival (POA) associated with the item.”
- ETA – If the estimated time of arrival (ETA) data has been entered into the invoice, the details will be displayed in this column.
- In Store – This field shows the estimated date for the item to be available in-store.
- Shipped – This field shows the actual number of items that were shipped, which may not match the quantity ordered for various reasons.
- Status – This field shows the status of the invoice related to the shipment.
You can review our Blog and YouTube channel for additional information and resources on SapphireOne ERP, CRM and Business Accounting software.