Details Report Overview
The Details Report, found within the SapphireOne Accounts > General Ledger Reports Menu, offers a range of reports that can be generated using various methods for your General Ledger accounts within your SapphireOne data file.
Upon selecting the Details Report from the General Ledger Reports Menu, SapphireOne will display a standard Print dialog screen. This screen enables the user to choose and customize the criteria and data they wish to include in the Details Report.
The user can select from the Print Destination, Report Type and Report Sort Order drop-down menus to determine their preferred Details Report layout. Reports are created using a combination of the selected metrics. The user also has the option to create custom reports using SapphireOne Quick Reports or Custom Reports.
Dictation and Speech to Text Overview
SapphireOne’s implementation of both Dictation (MacOS) and Speech to Text (Windows) is a game changer for data entry. Any data entry field you can type into using a keyboard can use this feature.
You can also use this functionality on all inquiry screens within SapphireOne. For example, the user is in a Contact within a Client. They may have made a phone call to that particular client using the Softphone technology. Consequently, this will automatically date and time stamp both the contact and the phone number you called.
As soon as the call is completed, the user has the ability to use Speech to Text (Windows) or Dictation (MacOS). They can dictate into the memo field of the CRM contact, adding as much description as they require.
Dictation and Speech to Text Procedure
This functionality applies across every single Data Entry screen. For example, the SapphireOne user is entering a Vendor Invoice (VI). Additionally, you may want to add a memo within the Vendor Invoice (VI). The user can utilise the tool and simply dictate the memo.
Another example is if the user wants to add additional lines to the General Ledger account, within each General Ledger account. When the user is completing data entry using a General Ledger, there’s always a unique memo field for each GL account line.
The user can then utilise this feature to quickly add the information they need to add. Alternatively, you may have an interview with an employee. After the interview process is completed, the user can then make notes about the employee.
Speech to Text or Dictation is an extremely powerful tool. It is something that we at SapphireOne, as well as our clients, utilise daily. It is a massive time saver.
Print Destination Menu (Details Report)
The Print Destination Menu allows the user to choose the destination for the Report, and select from the options which are as follows:
| Printer | Selecting the Printer option from the default Print Destination menu and subsequently clicking the print button, will instruct SapphireOne to send the report directly to the designated printer. |
| Custom Report | Alternatively, when the Custom Report option is chosen, SapphireOne immediately requests the location of an existing Custom Report to be used as a template when the print button is is activated. SapphireOne then generates the report, incorporating the selected Custom Report as the template. |
| Quick Report | Selecting this option and then clicking the Print button will prompt SapphireOne to display the Quick Report screen, allowing the user to set up a quick report. For detailed instructions on setting up this report, please follow the link to the article on Quick Reports. |
| CSV | Selecting the CSV option within the Print Destination menu and then clicking the  Print button, will prompt SapphireOne to display a Select Report Range alert. You can find documentation for this alert immediately below. Print button, will prompt SapphireOne to display a Select Report Range alert. You can find documentation for this alert immediately below. |
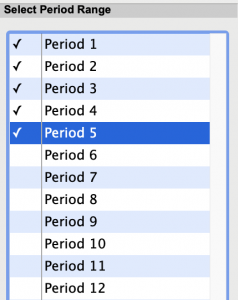
When you select the Print Destination option as CSV, please note that the Print Destination option for CSV differs from other areas of Sapphire One. Upon clicking the Print button, a Select Report Range alert will appear. Within this form, at the bottom, you will find a toggle button that allows you to switch between a period-based report and a date-based report.
- Period – If you opt for the default period-based report, you can use the mouse to select the periods that you want the report to encompass. It should be noted that provision has been made for the years to select from up to 30. Within your data file if required.
- Date – However, if you choose the date-based report, you will be presented with the option to enter a start date and an ending date for the report. This flexibility allows you to customize your report generation based on your specific requirements.
Report Type menu (Details Report)
Selecting the Report Type option will enable the user to print different layout styles of the Details Report.
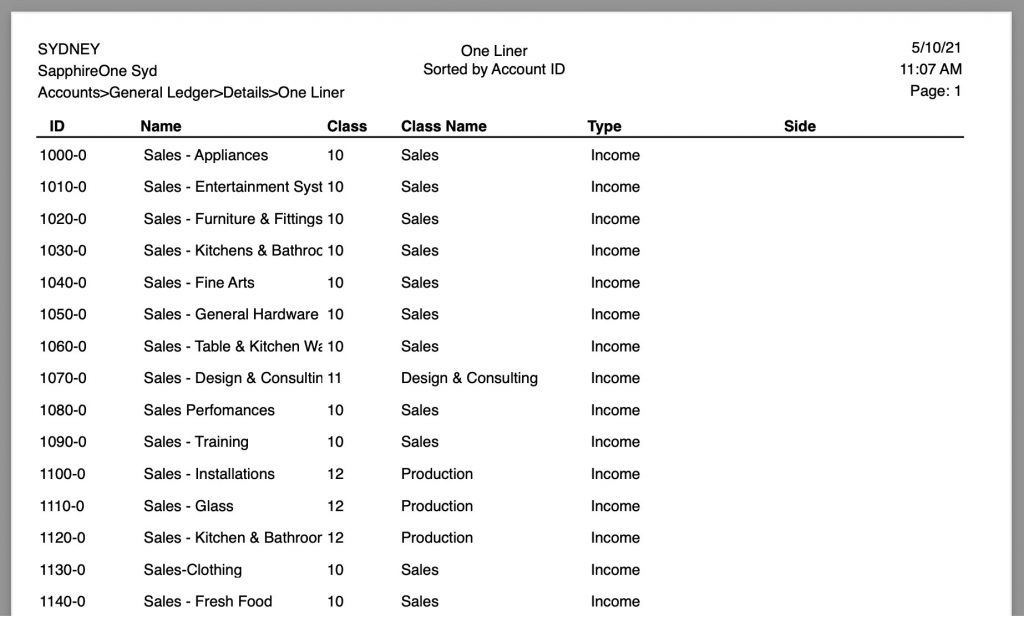
| One Liner: | This report supplies data similar to chart of accounts on a single line. |
| Two Liner: | This report supplies the alternate coding as well as above data in the One Liner Report. |
| Four Liner: | This report prints full specifications about each account excluding balances. |
| Audits Base Style: | This option enables the user to generate a Basic Audit report for the General Ledger. During the process the user will be asked if instead of printing it, SapphireOne will generate a CSV file which may be opened with any spreadsheet program. Documentation later in this section. |
| Audits Full Style: | This option enables the user to generate a Full Audit report for the General Ledger. During the process the user will be asked if instead of printing it, SapphireOne will generate a CSV file which may be opened with any spreadsheet program. |
| Audits Old Full Style | This option enables the user to generate a Full Audit report for the General Ledger with legacy styling. During the process the user will be asked if instead of printing it, SapphireOne will generate a CSV file which may be opened with any spreadsheet program. |
Report Sort Order menu (Details Report)
The Report Sort Order Menu allows the user to select from various sorting methods and criteria to organise data in different sequences while still maintaining the same fundamental report format. The user can sort data by:
| No Sort: | No sorting performed, the report is printed as it is in the list on screen. |
| By Account ID: | Sorted and totaled by each General Ledger Account ID. |
| By UDF-1: | Sorted and totaled by UDF-1. |
| By Alternate ID: | Sorted and totaled by Alternate ID. |
| By Class: | Sorted and totaled by Class. |
| By Department: | Sorted and totaled by Department. |
Report Selection menu (Details Report)
The Report Selection Menu allows for additional sorting of report criteria.
| All Records | This will display all General Ledger items, including inactive items. |
| Current Selection | This will display the current selection only |
Report Selection options
In SapphireOne, consistency in layout is maintained across all print dialogue screens, ensuring users do not need to constantly adapt to varying layouts. However, it’s important to note that the Report Selection options documented above, do differ for almost every print dialogue screen.
For additional filtering of reports using criteria from cells within related tables, refer to the following details. Once users enter data into either the third and fourth data entry fields below, the Selected Records radio button will become active, indicating that additional filtering is being applied to the report. A screenshot of this area is provided below for reference with the radio button active, (visible).
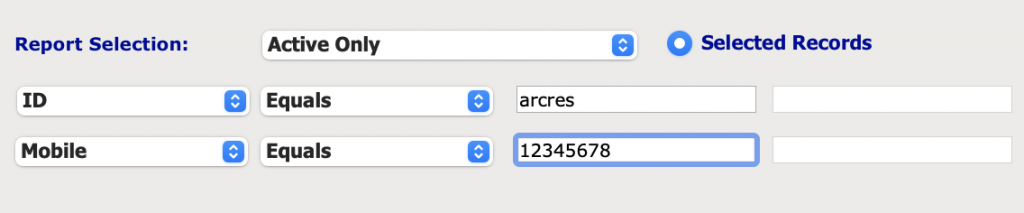
Directly beneath the Report Selection heading, you’ll find two rows, each containing four items, where you can establish additional selection criteria for your report. These rows consist of two drop-down menus and two data entry fields for user input.
In each row, the first drop-down menu allows users to select from various cells within related tables in the data file. These options in the first drop-down menu may or may not pertain to the same cells in the same table in the second row. To access the available options in these two drop-down menus, simply click on the respective item to display the drop-down menu and make your selections as required.
The second drop-down menu in both rows enables users to choose a mathematical option for each row. In this case, the available options are consistent and include: Equals, Not equal to, Less than, Greater than, Between, Contains, and Does not contain.
The last two columns in each row is where users input the data required for the mathematical calculations mentioned earlier. Typically, data is entered into the first data entry field. However, when selecting the Between option, data must be entered into both columns. This allows SapphireOne to filter the data based on the range defined by the user’s input in these two data entry fields.
Report Buttons
| This print button will take the user to your operating platforms Print dialog screen. | |
| Cancel | This button will cancel the current procedure. |
| Record List | Selecting this button brings up a list of all General Ledger items within the users SapphireOne data file. The user can then use the ‘command/F’ and ‘ctrl/F’ search function to search for the inventory item to be printed. |
| Options Button | The Options Button Is not used for this Details report so the user will find that it is greyed out and so unusable. |
Report Example (Details Report)
You can review our Blog and YouTube channel for additional information and resources on SapphireOne ERP, CRM and Business Accounting software.