The Sapphire Gateway II tables provided in this article enable users to understand which data can be imported into or exported from their SapphireOne data file. When creating a template for importing data, the user has two options. One option is to export data out of an existing data file and use the exported tab-delimited txt file as a template, which can then be populated with the new data intended for import. Alternatively, SapphireOne also has these tables saved as a Word document, allowing users to employ the cut-and-paste method to create the required template.
Never directly import gateway files into an active live data file. First, prepare a recent version of your production data file using the same build as the server, and initiate it in Single User Mode. Conduct a trial import with the intended data and meticulously review the outcome, ensuring particularly that the columns in the import file align correctly with the appropriate fields in your data file replica. After confirming the test import is accurate and everything appears in order, proceed to create a backup of the production (live) data file, and only then carry out the actual import. If discrepancies are detected, identify and rectify the issues in the import file, then re-attempt the import with a new copy of the production data file. Always prioritise testing before importing your data.
For detailed instructions, refer to the separate article in this section of the knowledge base titled “Sapphire Gateway II Templates,” which outlines this procedure.
Clients #CL? – API Gateway Tables
| A | CLA |
| B | [Clients]ID |
| C | [Clients]Name |
| D | [Clients]PostalAddr_Line1 |
| E | [Clients]PostalAddr_Line2 |
| F | [Clients]PostalCity_ Line3 |
| G | [Clients]PostalState_Line4 |
| H | [Clients]PostalZip_Code |
| I | [Clients]MainPhoneNo. |
| J | [Clients]Contact1_Name |
| K | [Clients]Contact1_Position |
| L | [Clients]Contact1_Phone |
| M | [Clients]Class |
| N | [Clients]Area |
| O | CLB |
| P | [Clients]PhysicalAddr_Line1 |
| Q | [Clients]PhysicalAddr_Line2 |
| R | [Clients]PhysicalCity_Line3 |
| S | [Clients]PhysicalState_Line4 |
| T | [Clients]PhysicalZip_Code |
| U | [Clients]Delivery_Instru |
| V | [Clients]Contact2_Name |
| W | [Clients]Contact2_Position |
| X | [Clients]Contact2_Phone |
| Y | [Clients]Facsimile (Client) |
| Z | [Clients]Open_Item |
| AA | [Clients]UDF1 |
| AB | [Clients]UDF2 |
| AC | [Clients]UDF3 |
| AD | [Clients]UDF4 |
| AE | [Clients]Client_Email |
| AF | [Clients]Tag |
| AG | [Clients]Tag2 |
| AH | CLC |
| AI | [Clients]EDI_Location |
| AJ | [Clients]Country |
| AK | [Clients]Tax_No |
| AL | [Clients]Tax_Exempt |
| AM | [Clients]Tax_Code |
| AN | [Clients]Tax_Rate |
| AO | [Clients]Default_GL |
| AP | [Clients]Credit_Limit |
| AQ | [Clients]Credit_Stop |
| AR | [Clients]Order_No |
| AS | [Clients]Discount1 |
| AT | [Clients]Discount_Days |
| AU | [Clients]Discount2 |
| AV | [Clients]Payment_Terms |
| AW | [Clients]Due_Days |
| AX | [Clients]Bank |
| AY | [Clients]Branch |
| AZ | [Clients]Drawer |
| BA | [Clients]Discount_price |
| BB | CLD |
| BC | [Clients]Total Due |
| BD | [Clients]Unposted_Total |
| BE | [Clients]Unposted_Receipt |
| BF | [Clients]Opening_Balance |
| BG | [Clients]Balance1 |
| BH | [Clients]30_Day_Balance |
| BI | [Clients]60_Day_Balance |
| BJ | [Clients]90+Day_Balance |
| BK | [Clients]Balance5 |
| BL | [Clients]Overdue |
| BM | [Clients]Notes |
| BN | [Clients]Last_Transaction |
| BO | [Clients]Last_Receipt |
| BP | [Clients]Last_Receipt_Am |
| BQ | [Clients[Rep |
| BR | [Clients]CLDept |
| BS | [Clients]Reseller |
| BT | [Clients]MCountry |
| BU | [Clients]PCountry |
| BV | [Clients]ParentClient |
| BW | [Clients]Auto_Client_Credit_Stop_Days |
| BX | [Clients]FX_Code |
Comments for Client Import
Specific items to watch for
- [Clients]Class – Client classification – the method of differences between clients (e.g based on purchases, tiers etc…)
- [Clients]Area – Separate grouping from class, it could refer to salesman territory if needed. Or refers to Client’s area (e.g Northern beaches area)
- [Clients]Open_Item – Allocate receipts to invoices – Not balance put forward. (1 = on, 0 = off) – usually, all modern clients have this feature on.
- [Clients]UDF X – The field can store any sortable / grouping type information. This field can be renamed as a record information. Can be used for many purposes including freight terms.
- [Clients]Client_Email – Client email field not related to invoices and statements. the one for invoices and statements appears in different spreadsheet.
- [Clients]Tag – Quite often used for data entry person.
- [Clients]EDI_Location – An internal location that is manually being set up in SapphireOne – for EDI customisation purposes.
- [Clients]Tax_No – ABN for Australian clients, NZBN for New Zealand.
- [Clients]Tax_Code – Enter “S” for when Standard GST applies.
- [Clients]Tax_Rate – GST Rate. e.g “10” for Australian customers and “15” for NZ customers.
- [Clients]Default_GL – Sales GL.
- [Clients]Credit_Stop – A toggle – on/off. On means credit stop enabled. Off means credit stop disabled. (1 = on, 0 = off)
- [Clients]Order_No – Order number required for this client – yes or no. (1 = on, 0 = off)
- [Clients]Discount1 – Manual discount. In order to manage regular discounts per client class use the Price Book functionality.
- [Clients]Discount_Days – If youre running prompt payment discount – you can set it a term of days. The due date is only set by terms.
- [Clients]Discount2 – Related to product discount. Simple product discount if you wish to use this.
- [Clients]Payment_Terms – “PaymentTerms” receives a few possible options with the following index: 1 – 7 Days.2 – 14 Days.9 – Other.
- [Clients]Due_Days – Optional term to payment terms that lets you choose other and how many days.
- [Clients]Bank – Useful for customers that have direct debit setups.
- [Clients]Discount_price – Relates to default price under client class. (1= standard, 2 = PriceA etc…)
- [Clients]MCountry – Mailing country.
- [Clients]PCountry – Physical country.
- [Clients]ParentClient – A child client can add a parent that receives statements for children.
- [Clients]Auto_Client_Credit_Stop_Days – Number of days for client to put a credit stop.
- [Clients]FX Code – Refers to currency used by client. the actual rates are set up in FX currency settings.
Importing Client Balances (NEW data files ONLY)
During the setting up of a new SapphireOne data file the current Client Balances will need to be entered. This may be done by the creation of special spreadsheets as seen below. Data must only be in the cells as seen below. The cells in the spreadsheet as listed below must have the correct data entered.
If any data is in other cells it will overwrite data already in the data file.
If the is no data in a cell in the spreadsheet, SapphireOne will leave these cells as they are, if they contain any existing data.
Client Balances Import table
| A | #CLD | Must be #CLD to enable importing data across to column BU. |
| B | [Clients]ID | ID must be unique. Duplicates will over write existing ID’s and new ID’s in the file will create new Clients. |
| BD | [Clients]Total Due | Total of the 30 60 and 90 balances in BI, BJ, BK. This value must be correct as the system will not add them up. |
| BE | [Clients]Unposted_Total | Un-posted should not generally be imported. Check with SapphireOne support if this is required |
| BF | [Clients]Unposted_Receipt | Un-posted should generally not be imported. Check with SapphireOne support if this is required |
| BG | [Clients]Opening_Balance | Opening balance for the Client. |
| BI | [Clients]30_Day_Balance | Client 30 day balances |
| BJ | [Clients]60_Day_Balance | Client 60 day balances |
| BK | [Clients]90+Day_Balance | Client 90 day balances |
Comments for Client Import
Specific items to watch for
- Checkboxes – Entering 0, zero will leave them as un-ticked. Entering 1 will tick them.
- Case Insensitive – True and False may also be used and is not upper or lower case dependent.
- Checkbox Selection – True or true will set a checkbox as active. False or false will set the checkbox as inactive.
- Blank Columns/Cells – Remember also that no entry into a cell tells SapphireOne to leave it as it is.
- AJ Cell – This column sets the Tax Code. For Australia enter an S. That will be for most of your Clients and alter any others as required. This will work and apply the tax but if the inventory item has a tax code set and the “Use” checkbox is selected it will override the setting in a Client or Vendor.
- AK Cell – Setting the tax code to S as above will not write in the actual rate into the data file so this must be forced. So, for a tax code of S enter in 10 for 10%. Other rates as applicable.
For importing the Client aged balances, the following details to be used
- CLD Syntax – Use the #CLD syntax with the applicable Client ID only, all other fields must be blank.
- BI, BJ & BK Cells – This where the aged 30 60 and 90 day balances in the order as listed here.
- BD Cell – This is where the sum of the 30 60 and 90 day balances is stored and it must be precise.
- Calculating Value of BD – Create a calculated cell beyond Column/Cell BU that adds up the balance of Columns/Cells BI, BJ and BK.
- For example any cell beyond BU may be used, BV, BW and so on as it will not be read by SapphireOne as it will ignore any data beyond Cell BU.
- Transferring Value – Then copy in the calculated values back into the BD field.
- Calculating Value of BD – Create a calculated cell beyond Column/Cell BU that adds up the balance of Columns/Cells BI, BJ and BK.
- BG Cell – This is where the the Clients opening balance is entered.
Vendors #VE – API Gateway Tables
| #VEA | #VEC | #VEX | ||||||
| [Vendors]ID | [Vendors]Tax_Exempt | [Vendors]ID | ||||||
| [Vendors]Name | [Vendors]Tax_Code | [Vendors]Alpha_1_20 | ||||||
| [Vendors]PostalAddr_Line1 | [Vendors]Tax_Rate | [Vendors]Alpha_2_20 | ||||||
| [Vendors]PostalAddr_Line2 | [Vendors]Default_GL | [Vendors]Alpha_3_20 | ||||||
| [Vendors]PostalCity_Line3 | [Vendors]Credit_limit | [Vendors]Alpha_4_20 | ||||||
| [Vendors]PostalState_Line4 | [Vendors]Credit_Stop | [Vendors]Alpha_5_40 | ||||||
| [Vendors]PostalZip_Code | [Vendors]Order_No | [Vendors]Alpha_6_40 | ||||||
| [Vendors]MainPhoneNo. | [Vendors]Discount_1 | [Vendors]Alpha_7_60 | ||||||
| [Vendors]Contact1_Name | [Vendors]Discount_Days | [Vendors]Alpha_8_80 | ||||||
| [Vendors]Contact1_Position | [Vendors]Discount_2 | [Vendors]Real_1 | ||||||
| [Vendors]Contact1_Phone | [Vendors]Finance_Terms | [Vendors]Real_2 | ||||||
| [Vendors]Class | [Vendors]Due_Days | [Vendors]Real_3 | ||||||
| [Vendors]Area | [Vendors]Payee | [Vendors]Real_4 | ||||||
| [Vendors]Bank_Name | [Vendors]Real_5 | |||||||
| #VEB | [Vendors]BSB | [Vendors]Real_6 | ||||||
| [Vendors]PhysicalAddr_Line1 | [Vendors]Bank_Account _No | [Vendors]Real_7 | ||||||
| [Vendors]PhysicalAddr_Line2 | [Vendors]MCountry | [Vendors]Real_8 | ||||||
| [Vendors]PhysicalCity_Line3 | [Vendors]PCountry | [Vendors]Date_1 | ||||||
| [Vendors]PhysiaclState_Line4 | #VED | [Vendors]Date_2 | ||||||
| [Vendors]PhysicalZip_Code | [Vendors]Total_Owing | [Vendors]Date_3 | ||||||
| [Vendors]Pickup_Instruct | [Vendors]Unposted_Total | [Vendors]Date_4 | ||||||
| [Vendors]Contact2_Name | [Vendors]Unposted_Paymen | [Vendors]Time_1 | ||||||
| [Vendors]Contact2_Position | [Vendors]Opening_Balance | [Vendors]Time_2 | ||||||
| [Vendors]Contact2_Phone | [Vendors]Balance1 | [Vendors]Text_1 | ||||||
| [Vendors]Facsimile (Vendor) | [Vendors]30+_Day_Balance | [Vendors]Text_2 | ||||||
| [Vendors]Open_Item | [Vendors]60+_Day_Balance | |||||||
| [Vendors]UDF1 | [Vendors]90+_Day_Balance | |||||||
| [Vendors]UDF2 | [Vendors]Balance5 | |||||||
| [Vendors]UDF3 | [Vendors]OverDue | |||||||
| [Vendors]UDF4 | [Vendors]Warning_Message | |||||||
| [Vendors]Vendor_Email | [Vendors]Notes | |||||||
| [Vendors]Tag | [Vendors]Company | |||||||
| [Vendors]Tag2 | [Vendors]VeDept | |||||||
| [Vendors]Tag3 | [Vendors]Active(0 or 1) CB | |||||||
| [Vendors]Tax_No | [Vendors]Parent_LK | |||||||
| [Vendors]FX_Code |
Vendors – Specific items to watch for
- [Vendors]ID:Is a unique identifier assigned to each vendor within SapphireOne.
- [Vendors]Name: The official name of the vendor.
- [Vendors]PostalAddr_Line1: The first line of the vendor’s postal address.
- [Vendors]PostalAddr_Line2: The second line of the vendor’s postal address.
- [Vendors]PostalCity_Line3: The city part of the vendor’s postal address.
- [Vendors]PostalState_Line4: The state part of the vendor’s postal address.
- [Vendors]PostalZip_Code: The postal or zip code for the vendor’s postal address.
- [Vendors]MainPhoneNo.: The main telephone number for the vendor.
- [Vendors]Contact1_Name: The name of the primary contact person at the vendor.
- [Vendors]Contact1_Position: The job position of the primary contact person.
- [Vendors]Contact1_Phone: The direct phone number for the primary contact person.
- [Vendors]Class: A classification field used to categorise vendors.
- [Vendors]Area: Used for grouping vendors for reporting purposes.
- [Vendors]PhysicalAddr_Line1: The first line of the vendor’s physical address.
- [Vendors]PhysicalAddr_Line2: The second line of the vendor’s physical address.
- [Vendors]PhysicalCity_Line3: The city part of the vendor’s physical address.
- [Vendors]PhysiaclState_Line4: The state part of the vendor’s physical address.
- [Vendors]PhysicalZip_Code: The postal or zip code for the vendor’s physical address.
- [Vendors]Pickup_Instruct: Instructions for picking up items from the vendor.
- [Vendors]Contact2_Name: The name of a secondary contact person at the vendor.
- [Vendors]Contact2_Position: The job position of the secondary contact person.
- [Vendors]Contact2_Phone: The direct phone number for the secondary contact person.
- [Vendors]Facsimile: The fax number for the vendor.
- [Vendors]Open_Item: Indicates whether the vendor operates on an open item basis.
- [Vendors]UDF1 – [Vendors]UDF4: User Defined Fields for additional vendor information.
- [Vendors]Vendor_Email: The email address for the vendor.
- [Vendors]Tag – [Vendors]Tag3: Tags for additional categorisation and reporting.
- [Vendors]Tax_Exempt: Checkbox is used to indicate whether a vendor is exempt from tax. This is particularly relevant for Australian companies dealing with overseas clients, where the overseas clients should not be charged Australian tax
- [Vendors]Tax_No: The vendor’s tax identification number.
- [Vendors]Tax_Code: The tax code applicable to the vendor.
- [Vendors]Tax_Rate: The tax rate associated with the vendor’s tax code.
- [Vendors]Default_GL: The default General Ledger code for transactions with this vendor.
- [Vendors]Credit_limit: The maximum credit limit set for the vendor.
- [Vendors]Credit_Stop: Indicates whether the vendor is on credit stop.
- [Vendors]Order_No: A field for the vendor’s order number requirement.
- [Vendors]Discount_1 and [Vendors]Discount_2: Fields for any applicable discounts.
- [Vendors]Discount_Days: The number of days within which a discount is applicable.
- [Vendors]Finance_Terms: Terms related to financial arrangements with the vendor.
- [Vendors]Due_Days: The number of days until payment is due to the vendor.
- [Vendors]Payee: The name of the payee for payments.
- [Vendors]Bank_Name: The name of the vendor’s bank.
- [Vendors]BSB: The Bank-State-Branch number for the vendor’s bank account.
- [Vendors]Bank_Account_No: The vendor’s bank account number.
- [Vendors]MCountry: The Mailing country where the vendor is located.
- [Vendors]PCountry: The Physical country where the vendor is located.
- [Vendors]Total_Owing: The total amount currently owed to the vendor.
- [Vendors]Unposted_Total: The total of unposted transactions with the vendor.
- [Vendors]Unposted_Paymen: Unposted payments related to the vendor.
- [Vendors]Opening_Balance: The opening balance for the vendor.
- [Vendors]Balance1 – [Vendors]Balance5: Various balance fields for financial tracking.
- [Vendors]30+_Day_Balance – [Vendors]90+_Day_Balance: Aged balance fields showing amounts overdue by 30, 60, and 90+ days.
- [Vendors]OverDue: Indicates if the vendor has any overdue amounts.
- [Vendors]Warning_Message: A field for any warning messages related to the vendor.
- [Vendors]Notes: A field for notes about the vendor.
- [Vendors]Company: The company within your organisation that is linked to the vendor.
- [Vendors]VeDept: The department within your organisation that deals with the vendor.
- [Vendors]Active(0 or 1) CB: A checkbox indicating whether the vendor is active (1) or inactive (0).
- [Vendors]Parent_LK: A reference to a field or identifier used within SapphireOne to denote the link or relationship between a vendor record and its parent entity in the database.
- [Vendors]FX_Code : Current currency traded with Vendor.
- [Vendors]Alpha_1_20 – [Vendors]Alpha_8_80: Alphanumeric fields of varying lengths for additional data.
- [Vendors]Real_1 – [Vendors]Real_8: Numeric fields for financial data.
- [Vendors]Date_1 – [Vendors]Date_4: Date fields for various purposes.
- [Vendors]Time_1 and [Vendors]Time_2: Time fields for time-specific data.
- [Vendors]Text_1 and [Vendors]Text_2: Text fields for additional information.
Inventory , Client and Vendor Classes
| Inventory Class #IC | |
| A | #IC |
| B | [InventoryClass]ID |
| C | [InventoryClass]Name |
| D | [InventroyClass]Department |
| E | [InventoryClass]IN_Type |
| F | [InventoryClass]PR_Type |
| G | [InventoryClass]Notes |
| Client Class #CC | |
| A | #CC |
| B | [ClientClass]ID |
| C | [ClientClass]Description |
| D | [ClientClass]Notes |
| Vendor Class #VC | |
| A | #VC |
| B | [VE_Class]ID |
| C | [VE_Class]Name |
| D | [VE_Class]Notes |
Base Inventory #IN?
| A | #INA | Y | [Inventory]Tax_Code | AX | [Inventory]Allocated | ||
| B | [Inventory]ID | Z | [Inventory]Tax_Rate | AY | [Inventory]Unposted | ||
| C | [Inventory]Name | AA | [Inventory]Vendor | AZ | [Inventory]Average_Cost | ||
| D | [Inventory]Class_LK | AB | [Inventory]Depart | BA | [Inventory]Last_Cost | ||
| E | [Inventory]Std_Units | AC | [Inventory]Tag1 | BB | [Inventory]Last_Date_In | ||
| F | [Inventory]PriceStdSellPrice | AD | [Inventory]Tag2 | BC | [Inventory]Price_Book | ||
| G | [Inventory]StockCtrlType | AE | [Inventory]Tag3 | BD | [Inventory]Decimals | ||
| H | [Inventory]StockCostType | AF | [Inventory]Tag4 | BE | [Inventory]Dec_Prices | ||
| AG | [Inventory]Tag5 | BF | [Inventory]No_Disc | ||||
| #INB | AH | [Inventory]Tag6 | BG | [Inventory]Print | |||
| I | [Inventory]Sec_Units | BH | [Inventory]OnCostFactor | ||||
| J | [Inventory]Minimum | BI | [Inventory]FX_code | ||||
| K | [Inventory]Maximum | #IND | BJ | [Inventory]Fixed_Cost | |||
| L | [Inventory]Carton_Qty | AI | [Inventory]Price_A | BK | [Inventory]Web | ||
| M | [Inventory]Gl_Sales_Acc | AJ | [Inventory]Price_B | BL | [Inventory]Project Link | ||
| N | [Inventory]GL_CostOfSale | AK | [Inventory]Price_C | BM | [Inventory]Discontinued | ||
| O | [Inventory]GL_Asset_Acc | AL | [Inventory]Price_D | BN | [Inventory]Season | ||
| P | [Inventory]GL_VarianceAcc | AM | [Inventory]Price_E | BO | [Inventory]Indent | ||
| Q | [Inventory]Notes | AN | [Inventory]Price_F | BP | [Inventory]CartonVol | ||
| AO | [Inventory]Price_G | BQ | [Inventory]Url | ||||
| #INC | AP | [Inventory]Price_H | BR | [Inventory]TableA | |||
| R | [Inventory]Weight | AQ | [Inventory]Price_Exempt | BS | [Inventory]TableB | ||
| S | [Inventory]Height | AR | [Inventory]UPC/Barcode | #INE | |||
| T | [Inventory]Width | AS | [Inventory]Second_ID | BT | [Inventory]BuildViaBGJ (CB) | ||
| U | [Inventory]Depth | AT | [Inventory]Table_ID | BU | [Inventory]Kit_Item (CB) | ||
| V | [Inventory]PalletQty | AU | [Inventory]Current_Stock | BV | [Inventory]Kit_Style (CB) | ||
| W | [Inventory]Location | AV | [Inventory]On_Order | BW | [Inventory]BillSerialOption | ||
| X | [Inventory]Stocktake | AW | [Inventory]On_Backorder | BX | [Inventory]NeedToBuild |
- ID – Identification Name/Number.
- Name – Inventory Item Name / Short description.
- Class_LK – Classification linked to.
- Std_Units – Standard Units.
- PriceStdSellPrice – Standard Price to be listed.
- StockCtrlType – Stock Control Type to be listed.
- StockCostType – Stock Costs Type to be listed.
- Sec_Units – Second Units.
- Minimum – Minimum amounts to be listed.
- Maximum – Maximum amounts to be listed.
- Carton_Qty – Quantity in a Carton.
- Gl_Sales_Acc – General Ledger Sales Account.
- GL_CostOfSale – General Ledger Cost of Sale.
- GL_Asset_Acc– General Ledger Assets Account number.
- GL_VarianceAcc – General Ledger Variance account number.
- Notes – Additional Inventory Items notes.
- Weight – Total Weight of Inventory Item.
- Height – Total Height of Inventory Item.
- Width – Total Width of Inventory Item.
- Depth – Total Depth of Inventory Item.
- PalletQty – Total quantity per Pallet of Inventory Item.
- Location – Location of inventory item e.g Warehouse, Bay, Storage Unit, ETC…
- Stocktake – Inventory Count.
- Tax_Code – Taxation current code.
- Tax_Rate – Taxation current rate.
- Vendor – Vendor Name/ID.
- Depart – Departure date.
- Tag1 – Customisable tag – any additional information can go here (Gender, Size, Style Code).
- Tag2 – Additional Customisable tag – any additional information can go here.
- Tag3 – Additional Customisable tag – any additional information can go here.
- Tag4 – Additional Customisable tag – any additional information can go here.
- Tag5 – Additional Customisable tag – any additional information can go here.
- Tag6 – Additional Customisable tag – any additional information can go here.
- Price_A – Optional Price.
- Price_B – Additional Optional Price.
- Price_C – Additional Optional Price.
- Price_D – Additional Optional Price.
- Price_E – Additional Optional Price.
- Price_F – Additional Optional Price.
- Price_G – Additional Optional Price.
- Price_H – Additional Optional Price.
- Price_Exempt – Additional Optional Price.
- UPC/Barcode – Barcode / Sequence.
- Second_ID – Additional Identification number/name.
- Table_ID – Table identification number/name (for linking / grouping purposes)
- Current_Stock – Current Stock amount.
- On_Order – Amount of inventory items on order.
- On_Backorder – Amount of inventory items on back-order.
- Allocated – Amount of inventory items allocated.
- Unposted – Amount of inventory items un-posted.
- Average_Cost – Average cost per item.
- Last_Cost – Last cost per item.
- Last_Date_In – Last arrival date in.
- Price Book – Is a list that provides information regarding the inventory item existing.
- Dec_Prices – Decimal prices.
- Decimal – Mark if item has been measured in decimal quantities.
- No_Disc – Mark for unavailability of stock.
- Print – Physical copy / document for the inventory item.
- OnCostFactor – Additional expenses or costs regarding the inventory item.
- FX_code – Tax code / rate.
- Fixed_Cost – Fixed cost / rate.
- Web – Website link to inventory item.
- Project_Link – Project code to link to.
- Discontinued – Mark if item is no longer being carried/sold.
- Season – Season for the inventory item.
- Indent – Sold / requested whilst not in stock.
- CartonVol – Volume per storage unit.
- Url – URL per item.
- TableA – Additional information for linking/grouping. (Colour, Size, Gender, Collection…)
- TableB – Additional information for linking/grouping. (Colour, Size, Gender, Collection…)
Notes for #INE from above
- BuildViaBJI = BGJ only.
- Kit_Item = Manufacture from Invoices Kit.
- Kit_Style = Copy lines to Invoice.
Leave them all blank if you want to manufacture from Invoice, since this is the default.
- BillSerialOptions are as follows.
| 1= Auto Serialise. | 2= Use Component. | 3= Enter Serial on Sale. | 4= Leave as zero for none. |
There are additional Inventory tables following in this article.
Column W. The SapphireOne will override gateway with the Default Location specified in Master Defaults, Inventory page Default Location, and ignore the location entered here in column W.
Check Boxes:
The entry of either 0, zero or False will un-tick the check box. Remember also that no entry into a cell tells SapphireOne to leave it as it is. The entry of either 1 or True will tell the system to enter a tick into the checkbox. Upper or lower case is ignored by the system as it just looks for the word true True or false False.
Additional Base Inventory import tables
Note that these are stand alone tables that all commence with A cell with the table syntax.
| A | #INF | A | #INX | |
| B | [Inventory]ID | B | [Inventory]ID | |
| C | [Inventory]Name | C | [Inventory]Alpha_1_20 | |
| D | [Inventory]Class_LK | D | [Inventory]Alpha_2_20 | |
| E | [Inventory]Std_Units | E | [Inventory]Alpha_3_20 | |
| F | [Inventory]Std_sale_Price | F | [Inventory]Alpha_4_20 | |
| G | [Inventory]Stock_Ctrl_Type | G | [Inventory]Alpha_5_40 | |
| H | [Inventory]Stock_Cost_Type | H | [Inventory]Alpha_6_40 | |
| I | [Inventory]Bin’Bin Nº | I | [Inventory]Alpha_7_60 | |
| J | [Inventory]Bin’Bin_Qty | J | [Inventory]Alpha_8_80 | |
| K | [Inventory]Bin’Bin Nº | K | [Inventory]Alpha_9_80 | |
| L | [Inventory]Bin’Bin_Qty | L | [Inventory]Alpha_10_80 | |
| M | RepeatBinNo&Qtyasdesired | M | [Inventory]Alpha_11_80 | |
| N | [Inventory]Alpha_12_80 | |||
| A | #INP | O | [Inventory]Real_1 | |
| B | [Inventory]ID | P | [Inventory]Real_2 | |
| C | [Inventory]Name | Q | [Inventory]Real_3 | |
| D | [Inventory]Class_LK | R | [Inventory]Real_4 | |
| E | [Inventory]Std_Units | S | [Inventory]Real_5 | |
| F | [Inventory]Std_sale_Price | T | [Inventory]Real_6 | |
| G | [Inventory]Stock_Ctrl_Type | U | [Inventory]Real_7 | |
| H | [Inventory]Stock_Cost_Type | V | [Inventory]Real_8 | |
| I | [Inventory]Price_A | W | [Inventory]Date_1 | |
| J | [Inventory]Price_B | X | [Inventory]Date_2 | |
| K | [Inventory]Price_C | Y | [Inventory]Date_3 | |
| L | [Inventory]Price_D | Z | [Inventory]Date_4 | |
| M | [Inventory]Price_E | AA | [Inventory]Time_1 | |
| N | [Inventory]Price_F | AB | [Inventory]Time_2 | |
| O | [Inventory]Price_G | AC | [Inventory]Text_1 | |
| P | [Inventory]Price_H | AD | [Inventory]Text_2 | |
| Q | [Inventory]Price_Exempt | AE | [Inventory]CAlpha_1 | |
| R | [Inventory]UPC | AF | [Inventory]CAlpha_2 | |
| S | [Inventory]Long_Desc | AG | [Inventory]CAlpha_3 | |
| T | [Inventory]UDF1 | AH | [Inventory]CAlpha_4 | |
| U | [Inventory]UDF2 | AI | [Inventory]CAlpha_5 | |
| V | [Inventory]UDF3 | AJ | [Inventory]CAlpha_6 | |
| W | [Inventory]UDF4 | AK | [Inventory]CAlpha_7 | |
| X | [Inventory]last_cost | AL | [Inventory]CAlpha_8 | |
| Y | [Inventory]Last_Date_IN | AM | [Inventory]CAlpha_9 | |
| Z | [Inventory]Ven_Inv_ID | AO | [Inventory]CAlpha_10 | |
| AA | [Inventory]Ven_Inv_Desc | AP | [Inventory]CBool_1 | |
| AB | [Inventory]Lead_time | AQ | [Inventory]CBool_2 | |
| AC | [Inventory]Stocking_Month | AR | [Inventory]CBool_3 | |
| AD | [Inventory]MarginCode | AS | [Inventory]CBool_4 |
Comments for Importing Base Inventory
The importing of base inventory will automatically create Location Inventory stock according to the location as set in master defaults.
- AC to AH Cells – These cells will write the tag names from Tag through to Tag6 that are displayed on the first page of an Inventory Inquiry.
- AZ & BA Cells – AZ is Average Cost and BA is Last cost. If price book is to be used and it is to be linked to a cost, both columns will have to be written with the same values as price book normally refers to the average cost for its calculations.
- BJ Cell – This cell will write a fixed cost into an Inventory item. It should be noted that when the Fixed Cost cell is entered, SapphireOne will use the Fixed cost when price book does its calculations.
- F Cell This data in this cell enters the Standard Price as seen on the first page of an Inventory Inquiry.
- Cell G – This is the stock control type and a number entered into this cell will determine how it is set. Once the inventory item is open the user has 10 options for setting the Stock Control Type.
- 1=Non-Diminishing, 2=Normal, 3=Serial, 4=Batch, 5=Item, 6+Activity, 7=Hire, 8=Asset, 9=Vouched and 10=General Ledger.
- Cell G – This is the stock control type and a number entered into this cell will determine how it is set. Once the inventory item is open the user has 10 options for setting the Stock Control Type.
- H Cell – This cell sets the Costing Type, 1=Average, 2=Standard, 3=Item & 4=Fixed.
- Y Cell – This cell set the Tax Code. If inventory items themselves are to set the tax code applicable to either a purchase or a sale this will have to be set accordingly. The most common usage in Australia would be a Tax code of S.
- Z Cell – This cell sets the actual Tax Rate. Setting the tax code to S as above will not write in the actual rate into the data file so this must be forced. So, for a tax code of S enter in 10 for 10-%. Enter other rates as applicable.
- BC Cell – If price book is to be used don’t forget to set this checkbox as active, 1 or true, otherwise price book will not be used when setting selling or purchase prices.
Additional Vendors Inventory Items #INV – API Gateway Tables
This is different to other importing functions within the SapphireOne system as the items contained in the table below are in a sub-table. Exporting data out of these sub tables is not recommended. Please check with SapphireOne support before attempting to do so.
| A | #INV |
| B | [Inventory_Vendors] Vendor_ID (As in a Vendor Inquiry) |
| C | [Inventory_Vendors] Inventory_ID (Base ID as in an Inventory Inquiry) |
| D | [Inventory_Vendors] Vendors Product ID (As supplied by the Vendor) |
| E | [Inventory_Vendors] Vendors Product Name (As supplied by the Vendor) |
| F | [Inventory_Vendors] Lead_Time (In Days) |
| G | [Inventory_Vendors] Price (In dollars and cents) |
There is provision in an Inventory Items master file to have a number of preferred Vendors on the second Page More Details. Normally the Vendors Product ID and Names as supplied by them are used for inventory items.
Sometimes these are not suitable and the most common cause for not using them would be if this would result in duplicate ID’s. So within this list there is provision for the entry of the Vendors Product ID and Name as supplied by them for an item if it is different to what is used as the main ID’s and Names.
So as follows:
- B & C Cells – These cells are the System ID’s as set up within the user’s data file system using either a Vendor Inquiry or an Inventory Inquiry.
- D & E Cells – These are the Vendors Product ID and Product Name for the item or product if different.
The tab delineated text file as seen below was imported into Bondi Blue for AACUT. This could be extended by the use of a different Inventory ID (Base) column entries.
Note that the first line does not have an entry in cell A1 so the complete row is ignored by the system.

The result was as seen below in the screenshot.
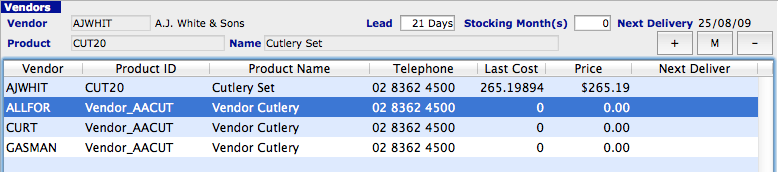
In this list of Vendors on the second page of an Inventory Inquiry the user has to first highlight a line and double click. The details will be displayed in a small alert allowing the user to make modifications as required.

Remember to TEST all imports into a copy of your data file before importing into a live data file.
Base Inventory MSDS page #MSDS
This table imports data into the MSDS Page of a Base Inventory Inquiry.
While the page name is MSDS all Alpha, Real and Date data entry field headings are able to be altered by the user the page may be used for the storing of virtually any type of data.
| A | #MSDS | AC | [Inventory]MSDS_Alpha23 | |
| B | [Inventory]MSDS_Sequence No | AD | [Inventory]MSDS_Alpha24 | |
| C | [Inventory]MSDS_Title | AE | [Inventory]MSDS_Alpha25 | |
| D | [Inventory]MSDS_Inventory Link | AF | [Inventory]MSDS_Alpha26 | |
| E | [Inventory]MSDS_Tag | AG | [Inventory]MSDS_Alpha27 | |
| F | [Inventory]MSDS_Order | AH | [Inventory]MSDS_Alpha28 | |
| G | [Inventory]MDSD_Alpha1 | AI | [Inventory]MSDS_Alpha29 | |
| H | [Inventory]MSDS_Alpha2 | AJ | [Inventory]MSDS_Alpha30 | |
| I | [Inventory]MSDS_Alpha3 | AK | [Inventory]MSDS_Real1 | |
| J | [Inventory]MSDS_Alpha4 | AL | [Inventory]MSDS_Real2 | |
| K | [Inventory]MSDS_Alpha5 | AM | [Inventory]MSDS_Real3 | |
| L | [Inventory]MSDS_Alpha6 | AN | [Inventory]MSDS_Real4 | |
| M | [Inventory]MSDS_Alpha7 | AO | [Inventory]MSDS_Real5 | |
| N | [Inventory]MSDS_Alpha8 | AP | [Inventory]MSDS_Real6 | |
| O | [Inventory]MSDS_Alpha9 | AQ | [Inventory]MSDS_Real7 | |
| P | [Inventory]MSDS_Alpha10 | AR | [Inventory]MSDS_Real8 | |
| Q | [Inventory]MSDS_Alpha11 | AS | [Inventory]MSDS_Real9 | |
| R | [Inventory]MSDS_Alpha12 | AT | [Inventory]MSDS_Real10 | |
| S | [Inventory]MSDS_Alpha13 | AU | [Inventory]MSDS_Date1 | |
| T | [Inventory]MSDS_Alpha14 | AV | [Inventory]MSDS_Date2 | |
| U | [Inventory]MSDS_Alpha15 | AW | [Inventory]MSDS_Date3 | |
| V | [Inventory]MSDS_Alpha16 | AX | [Inventory]MSDS_Date4 | |
| W | [Inventory]MSDS_Alpha17 | AY | [Inventory]MSDS_Date5 | |
| X | [Inventory]MSDS_Alpha18 | AZ | [Inventory]MSDS_Date6 | |
| Y | [Inventory]MSDS_Alpha19 | BA | [Inventory]MSDS_Date7 | |
| Z | [Inventory]MSDS_Alpha20 | BB | [Inventory]MSDS_Date8 | |
| AA | [Inventory]MSDS_Alpha21 | BC | [Inventory]MSDS_Date9 | |
| AB | [Inventory]MSDS_Alpha22 | BD | [Inventory]MSDS_Date10 |
Barcodes #BC
The Inventory ID must be the Base ID, and not the location ID. Both read and write work the same. The system will read consecutive rows of data to the same Base Inventory ID as consecutive Barcodes for that same item and add them in the order as entered.
| A | #BC |
| B | [Inventory_Barcode]Barcode |
| C | [Inventory_Barcode]Base_Inventory_Lk |
| D | [Inventory_Barcode]Qty |
| E | [Inventory_Barcode]ref |
| F | [Inventory_Barcode]Client_ID |
Inventory Locations #IL?
| A | #ILA | #ILD | ||
| B | [Inv_Locations]MergedID | AC | [Inv_Locations]MTDB_COS | |
| AD | [Inv_Locations]MTDB_Purc_QTY | |||
| #ILB | AE | [Inv_Locations]MTDB_Purc_val | ||
| C | [Inv_Locations]Location | AF | [Inv_Locations]MTDB_Sales_Qty | |
| D | [Inv_Locations]Current | AG | [Inv_Locations]MTDB_Sales_val | |
| E | [Inv_Locations]Allocated | AH | [Inv_Locations]MTD_COS | |
| F | [Inv_Locations]On_Backorder | AI | [Inv_Locations]MTD_Purc_Qty | |
| G | [Inv_Locations]On_Order | AJ | [Inv_Locations]MTDPurch_val | |
| H | [Inv_Locations]Unposted | AK | [Inv_Locations]MTD_Sales_Qty | |
| I | [Inv_Locations]AvailableStock | AL | [Inv_Locations]MTD_Sales_val | |
| J | [Inv_Locations]Opening | AM | [Inv_Locations]Ord_Quote_Qty | |
| K | [Inv_Locations]Maximum | AN | [Inv_Locations]Ord_Quote_Value | |
| L | [Inventory_Locations]Minimum | AO | [Inv_Locations]Pur_Quote_Qty | |
| M | [Inventory_Locations]Site | AP | [Inv_Locations]Pur_Quote_val | |
| N | [Inventory_Locations]ProductionArea | AQ | [Inv_Locations]BayActive (CB) | |
| AR | [Inv_Locations]DefaultBuildBay (CB) | |||
| #ILC | AS | [Inv_Locations]Tax_Code) | ||
| O | [Inv_Locations]Average_Cost | AT | [Inv_Locations]Tax_Rate) | |
| P | [Inv_Locations]Last_Cost | AU | [Inv_Locations]Prod_Tax) | |
| Q | [Inv_Locations]Std_Sale_Price | AV | [Inv_Locations]Tax_V_Code) | |
| R | [Inv_Locations]Price_A | AW | [Inv_Locations]Tax_V_Rate) | |
| S | [Inv_Locations]Price_B | AX | [Inv_Locations]Tax_V) | |
| T | [Inv_Locations]Price_C | |||
| U | [Inv_Locations]Price_D | #ILE | ||
| V | [Inv_Locations]Price_E | AY | [Inv_Locations]TTDB_COS | |
| W | [Inv_Locations]Price_F | AZ | [Inv_Locations]TTDB_Purch_Qty | |
| X | [Inv_Locations]Price_G | BA | [Inv_Locations]TTDB_Purch_val | |
| Y | [Inv_Locations]Price_H | BB | [Inv_Locations]TTDB_Sales_Qty | |
| Z | [Inv_Locations]Price_Exempt | BC | [Inv_Locations]TTDB_Sales_Value | |
| AA | [Inv_Locations]Fixed_Cost | BD | [Inv_Locations]TTD_COS | |
| AB | [Inv_Locations]Floor Price | BE | [Inv_Locations]TTD_Purch_Qty | |
| BF | [Inv_Locations]TTD_Purch_val | |||
| BG | [Inv_Locations]TTD_Sales_Qty | |||
| BH | [Inv_Locations]TTD_Sales_val |
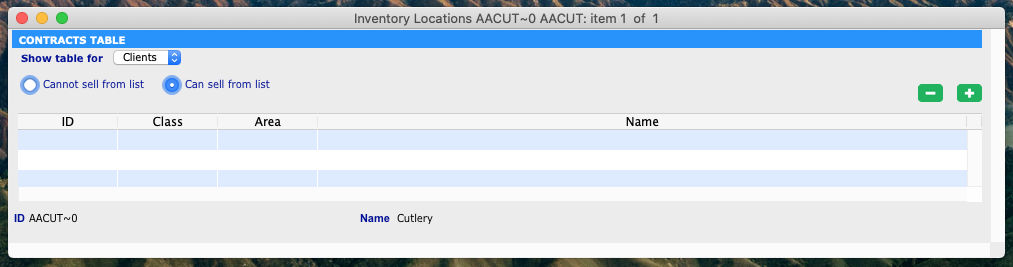
Inventory Location Contracts #ILX
Note that this gateway import function is for contracts and not Contacts!
This function will import a list of Clients or Vendors to sell to, or not to sell to.
This Contracts page may be viewed by going to Inventory > Inventory > Inventory Locations
Then select an Inventory item and select the Contracts Table Page.
| A | #ILX |
| B | [Inventory_Exclude]Inventory_ID |
| C | [Inventory_Exclude]Entry_ID |
| D | [Inventory_Exclude]Entry_type |
- Cell B – Enter in the Inventory ID.
- Cell C – Enter in the Client or Vendors ID.
- Cell D – Enter in either VE for Vendors or CL for Clients.
Sapphireone will blind import all ID’s so it would probably be better to import the Clients and Vendors in separate import files as the selection made at column D will force the table that the ID is placed in!
Once the list has been imported the user will have to select each inventory item in turn.
Then select from the Show Table for menu, either Clients or Vendors. Next select the required radio button to select either Cannot Sell/Purchase or Can Sell/Purchase as seen in the screenshot below.
Bay Import

This function which is in Custom Tools in Utilities, allows the importing of Bay Data in to the data file. The rules are the same as for any Gateway import including the requirement that the last row in column A contains %%%% symbols to indicate end of file to the system. The file must be a Tab delineated text file.
Since this function is very specific to Bays, the syntax #??? In column A is not required as in other Gateway Import files.
When SapphireOne finds a record that is the same it will overwrite the record with the data that is in the import file that is currently being imported.There are 5 Import functions available.
| Import Bay Location | Import Bay Location Distance | ||
|---|---|---|---|
| A | Location ID (Must be valid Location ID) | A | From Bay Name |
| B | Bay Location Name | B | To Bay Name |
| C | Bay Order number (0->?) | C | Location ID (Must be a valid Location ID) |
| D | Bay Level | D | Bay Level |
| E | Start Distance | E | Distance |
Import Bay Inventory
| A | Inventory Location ID (MUST be a valid Inventory Location ID) |
| B | Bay Name (Exact) |
| C | Current Stock |
| D | Unposted stock |
| E | Allocated Stock |
| F | Priority (0 ->? Determines which bay to first use when creating an invoice) |
Import Bay Invoice Line
| A | Location ID (MUST be a valid location ID) |
| B | Inventory Sequence number |
| C | Bay Name (Exact) |
| D | $ Order Value |
| E | $ Back Order Value |
| F | Quantity (Known as Delivery or Arrival as well) |
| G | Type (E.g. OVI, PMP) |
| H | Date (format dd/mm/yyyy) |
Projects #PR?
| A | #PRA | AH | [Projects]Markup | |
| B | [Projects]ID | AI | [Projects]Est_Stock | |
| C | [Projects]Name | AJ | [Projects]Est_StockC | |
| D | [Projects]Class | AK | [Projects]BroughtForwardCost | |
| E | [Projects]Client_LK | AL | [Projects]BroughtForwardCostA | |
| F | [Projects]Address1 | AM | [Projects]BroughtForwardCharge | |
| G | [Projects]Address2 | |||
| H | [Projects]City | #PRD | ||
| I | [Projects]State | AN | [Projects]Fnished (See Note) | |
| J | [Projects]Zip | AO | [Projects]Actual_Finish | |
| K | [Projects]Client_Order | AP | [Projects]Tag (On Details Page) | |
| L | [Projects]Client_Proj_No | |||
| M | [Projects]Contact1 | A | #PRX | |
| N | [Projects]Phone1 | B | [Projects]ID | |
| O | [Projects]Project_Brief | C | [Projects]Alpha_1_20 | |
| D | [Projects]Alpha_2_20 | |||
| #PRB | E | [Projects]Alpha_3_20 | ||
| P | [Projects]Delivery1 | F | [Projects]Alpha_4_20 | |
| Q | [Projects]Delivery2 | G | [Projects]Alpha_5_40 | |
| R | [Projects]DCity | H | [Projects]Alpha_6_40 | |
| S | [Projects]DState | I | [Projects]Alpha_7_60 | |
| T | [Projects]DZip | J | [Projects]Alpha_8_80 | |
| U | [Projects]Contact2 | K | [Projects]Real_1 | |
| V | [Projects]Phone2 | L | [Projects]Real_2 | |
| W | [Projects]Start_Date | M | [Projects]Real_3 | |
| X | [Projects]Estimated_Finis | N | [Projects]Real_4 | |
| Y | [Projects]Quoted | O | [Projects]Real_5 | |
| Z | [Projects]Quote_no | P | [Projects]Real_6 | |
| AA | [Projects]Quote_Date | Q | [Projects]Real_7 | |
| AB | [Projects]Quoted_Value | R | [Projects]Date_1 | |
| AC | [Projects]Notes | S | [Projects]Date_2 | |
| T | [Projects]Date_3 | |||
| #PRC | U | [Projects]Date_4 | ||
| AD | [Projects]Est_Disburse | V | [Projects]Time_1 | |
| AE | [Projects]Est_DisburseC | W | [Projects]Time_2 | |
| AF | [Projects]Est_Disburse_Charge | X | [Projects]Text_1 | |
| AG | [Projects]Est_Expenses | Y | [Projects]Text_2 |
- For the above items, each new code extends the code above, unless otherwise stated.
- #PRD AN Cell – Enter the numbers as follows, 1 = Finished, 2 = Hold and 3 = Active.
- #PRD AO Cell – On the Details Page it is the actual finish Date for the Project
- #PRD AP Cell – On the Details Page it is the ta1 heading.
Resource #RA
| A | #RA | G | [Resource]Cost/Unit | |
| B | [ResourceID | H | [Resource]Charge/Unit | |
| C | [Resource]Name | I | [Resource]Charge_FX | |
| D | [Resource]Activity_ID | J | [Resource]Units | |
| E | [Resource]Activity_Name | K | [Resource]Transfer | |
| F | [Resource]Allowance_ID |
When the word, SAPCLEAR is into column D Activity_ID field, SapphireOne will Delete all Activities currently set-up in the Resource as listed in cell B when the file is imported into the system.
Build #BU
| A | #BU |
| B | [BillMaterials]Link_ID |
| C | [BillMaterials]ID |
| D | [BillMaterials]Notes |
| E | [BillMaterials]Quantity |
Comments for the #BU table
- B Cell – The Link ID is the Base Inventory ID of the component inventory.
- C Cell – The ID is the base inventory ID of the Master Inventory item.
| Component Inventory #BUR | |
|---|---|
| A | #BUR |
| B | [BillMaterials]Link_ID |
| C | [BillMaterials]ID |
| D | [BillMaterials]Quantity |
| E | [BillMaterials]Notes |
| Master Inventory #BUR | |
|---|---|
| A | #BUR |
| B | [BillMaterials]Link_ID |
| C | [BillMaterials]ID |
| D | [Build]Quantity Markup quantity |
| E | Leave blank |
Comments for #BUR
- Master Inventory – Importing the master line will delete existing Bill of materials and update the mark-up quantity.
- Components Inventory – Importing the component line will add the line to the bill of materials.
The difference between #BU and #BUR are as follows:
- #BU – Using this syntax does not update the line if the line already exists.
- #BUR – This syntax requires the creation of the master item for new inventory. (eg a #BUR line with both ID and Link_ID to be the master inventory item)
Examples
In the following example, the bill of materials for KITPACKB will be deleted and the lines for AUTOBATCHB will be added to the existing bill of materials.
| #BUR | KITPACKB | KITPACKB | 2 | x |
| #BUR | KITPACKB | FLIGHTB | 4 | x |
| #BUR | KITPACKB | AASILB | 6 | x |
| #BUR | AUTOBATCHB | FFOVEB | 1 | x |
| #BUR | AUTOBATCHB | DWADLB | 2 | x |
| %%%% |
Using #BUR syntax will result in an empty bill of materials for KITPACKB.
| #BUR | KITPACKB | FLIGHTB | 4 | x |
| #BUR | KITPACKB | AASILB | 6 | x |
| #BUR | KITPACKB | KITPACKB | 2 | x |
| %%%% |
Transactions(#TR?)
The next files are transaction types, which have a header, and then allow for the inclusion of multiple detail lines, which are repeated until completed. These templates are unusual as the additional templates add additional functionality from cell N and not cell A as follows.
- #TR – This template ends at cell S and note again cell S. Other tables listed below overlap and start from cell N ignoring cells N to cell S when the #TR syntax is used.
- #TRA – This template carries on from cell N to Cell U inclusive.
- #TRB – This template carries on from cell N to cell V inclusive.
- #TRC – This template carries on from cell N to cell Z inclusive.
- #TRQ – This template carries on from cell N all the way to cell AFinclusive.
| A | #TR |
| B | [Transactions]Sequence **Overridden |
| C | [Transactions]Depart |
| D | [Transactions]Type |
| E | [Transactions]Period **Overridden, based upon the date in. |
| F | [Transactions]Date_In |
| G | [Transactions]Internal_Ref |
| H | [Transactions]External_Ref |
Note that I and J below follow H from above. Cells I & J will alter depending on the Type of transaction being imported at Cell D for these seven transaction types, GJ, MR, MP,C@, CR, VQ, and VP.
Please leave cells I and J blank for any other type of transaction.
| [Transactions]Type = GJ | |
| I | Leave Blank |
| J | Leave Blank |
| [Transactions]Type = MR | |
| I | Leave Blank |
| J | [Transactions]Bank_LK |
| [Transactions]Type = MP | |
| I | Leave Blank |
| J | [Transactions]Bank_LK |
| [Transactions]Type = C@ | |
| I | [Transactions]Client_LK |
| J | Leave Blank |
| [Transactions]Type = CR | |
| I | [Transactions]Client_LK |
| J | [Transactions]Bank_LK |
| [Transactions]Type = V@ | |
| I | [Transactions]Vendor_LK |
| J | Leave Blank |
| [Transactions]Type = VP | |
| I | [Transactions]Vendor_LK |
| J | [Transactions]Bank_LK |
| Everything Else ?? | |
| I | Leave Blank |
| J | Leave Blank |
Cell K follows cell J above.
| K | [Transactions]Notes |
| L | [Transactions]Drawer |
| M | [Transactions]Total |
When the #TR syntax is used SapphireOne will continue to read or write from cell N through to cell S as seen in the table below.
| #TR | Carries on from cell M when the #TR syntax is used. | |||
| N | [Transactions]Breakdown’GL_LK | Q | [Transactions]Breakdown’Tax_Code | |
| O | [Transactions]Breakdown’Project_LK | R | [Transactions]Breakdown’Tax | |
| P | [Transactions]Breakdown’Amount | S | [Transactions]Breakdown’Total |
When the #TRA, #TRB, #TRC and #TRQ syntaxes are used, SapphireOne will append these items commencing at cell N for these tables as seen below.
| #TRA | #TRB | |||
| N | [Transactions]Bank | N | [Transactions]Bank | |
| O | [Transactions]Branch | O | [Transactions]Branch | |
| P | [Transactions]Breakdown’GL_LK | P | [Transactions]Date_Due | |
| Q | [Transactions]Breakdown’Project_LK | Q | [Transactions]Breakdown’GL_LK | |
| R | [Transactions]Breakdown’Amount | R | [Transactions]Breakdown’Project_LK | |
| S | [Transactions]Breakdown’Tax_Code | S | [Transactions]Breakdown’Amount | |
| T | [Transactions]Breakdown’Tax | T | [Transactions]Breakdown’Tax_Code | |
| U | [Transactions]Breakdown’Total | U | [Transactions]Breakdown’Tax | |
| V | [Transactions]Breakdown’Total | |||
| #TRC | #TRQ | |||
| N | [Transactions]Bank | N | [Transactions]Bank | |
| O | [Transactions]Branch | O | [Transactions]Branch | |
| P | [Transactions]Date_Due | P | [Transactions]Date Due | |
| Q | [Transactions]Discount_Per | Q | [Transactions]Discount_Per | |
| R | [Transactions]Discount_Days | R | [Transactions]Discount_Days | |
| S | [Transactions]Expiry_Date | S | [Transactions]Expiry_Date | |
| T | [Transactions]Finance_Per | T | [Transactions]Finance_Per | |
| U | [Transactions]Breakdown’GL_LK | U | [Transactions]TRA1 | |
| V | [Transactions]Breakdown’Project_LK | V | [Transactions]TRA2 | |
| W | [Transactions]Breakdown’Amount | W | [Transactions]TRA3 | |
| X | [Transactions]Breakdown’Tax_Code | X | [Transactions]Breakdown’GL_LK | |
| Y | [Transactions]Breakdown’Tax | Y | [Transactions]Breakdown’Project_LK | |
| Z | [Transactions]Breakdown’Total | Z | [Transactions]Breakdown’Amount | |
| AA | [Transactions]Breakdown’Tax_Code | |||
| AB | [Transactions]Breakdown’Tax | |||
| AC | [Transactions]Breakdown’Total | |||
| AD | [Transactions]Breakdown’Retention Perce | |||
| AE | [Transactions]Breakdown’TRBalpha_1_35 | |||
| AF | [Transactions]Breakdown’TRBReal_1 |
For the #TR table previously, and the #TRA, #TRB, #TRC, and #TRQ, tables above, the detail lines in the table below are already included.
However, they are displayed below to indicate that they are detail lines, and that they are repeated until end of line (Packet). E.g. for #TR, the spreadsheet columns will run as follows:
(N O P Q R S), (T U V W X Y), (Z AA AB AC AD AE). You would continue repeating across the spreadsheet for each additional line in the transaction. For #TRA repeating the 6 columns starts at P, for #TRB at Q and so on.
| #TR | #TRA | #TRB | #TRC | #TRQ | |
| N | P | Q | U | X | [Transactions]Breakdown’GL_LK |
| O | Q | R | V | Y | [Transactions]Breakdown’Project_LK |
| P | R | S | W | Z | [Transactions]Breakdown’Amount |
| Q | S | T | X | AA | [Transactions]Breakdown’Tax_Code |
| R | T | U | Y | AB | [Transactions]Breakdown’Tax |
| S | U | V | Z | AC | [Transactions]Breakdown’Total |
General Ledger Journals – GJ’s. If value in amount, this becomes the debit figure, or the Total figure becomes the credit figure. * If period is negative then this period is used, or the system will override the period based upon the transaction date.
Invoices #IV?- API Gateway Tables
Cells E and G will change depending on the Type of transaction being imported.
Also note that they are not consecutiove.
#IV is the only table that ends at cell AL and is used when there is a single line in transaction/s. This is provided for with the cells from AD to AL. For multiple lines in transactions use the #IVJ syntax which is documented later in this article under the heading on vertical importing.
| A | #IV |
| B | [Invoices]Sequence |
| C | [Invoices]FX_Type |
| D | [Invoices]FX_Rate |
| E | [Invoices]Type See beow! |
| F | [Invoices]Period |
| Where: E & G are as follows | |
| E | [Invoices]Type = SCI |
| G | [Invoices]Client_LK |
| E | [Invoices]Type = SCC |
| G | [Invoices]Client_LK |
| E | [Invoices]Type = SMR |
| G | Blank |
| E | [Invoices]Type = SMP |
| G | Blank |
| E | [Invoices]Type = PVI |
| G | [Invoices]Vendor_LK |
| E | [Invoices]Type = PVC |
| G | [Invoices]Vendor_LK |
| E | [Invoices]Type = PMR |
| G | Blank |
| E | [Invoices]Type = PMP |
| G | Blank |
| E | [Invoices]Type = JCI |
| G | [Invoices]Client_LK |
| E | [Invoices]Type = JCC |
| G | [Invoices]Client_LK |
| E | [Invoices]Type = AGJ |
| G | Blank |
| E | [Invoices]Type = JGJ |
| G | Blank |
| E | [Invoices]Type = WGJ |
| G | Blank |
| H | [Invoices]Internal Ref |
| I | [Invoices]External Ref |
| J | [Invoices]Date In |
| K | [Invoices]Date Due |
| L | [Invoices]Delivery Date |
| M | [Invoices]Tax code |
| N | [Invoices]Tax rate |
| O | [Invoices]Mailing Address |
| P | [Invoices]Mailing State |
| Q | [Invoices]Mailing Zip |
| R | [Invoices]Delivery Addres |
| S | [Invoices]Delivery State |
| T | [Invoices]Delivery Zip |
| U | [Invoices]Delivery Instructions |
| V | [Invoices]Bank |
| W | [Invoices]Branch |
| X | [Invoices]Drawer |
| Y | [Invoices]Text |
| Z | [Invoices]Footer |
| AA | [Invoices]Bank_LK |
| AB | [Invoices]Sales Rep |
| AC | [Invoices]AreaAC |
| There must only be a single line in Invoice. | |
| AD | [Invoices]Stock Breakdown’Inventory ID |
| AE | [Invoices]Stock_Breakdown’Project_ID |
| AF | [Invoices]Stock_Breakdown’Description |
| AG | [Invoices]Stock_Breakdown’Quantity |
| AH | [Invoices]Stock_Breakdown’Rate |
| AI | [Invoices]Stock_Breakdown’Discount_Code |
| AJ | [Invoices]Stock_Breakdown’Discount_Percen |
| AK | [Invoices]Stock_Breakdown’Tax_code |
| AL | [Invoices]Stock_Breakdown’Tax_Rate |
| AD to AL are not used for #IVJ |
These tables follow on from #IV after AC in the table above and not after AL.
| #IVA | |||
| AD | [Invoices]Discount Percentage | ||
| AE | [Invoices]Discount Days | ||
| AF | [Invoices]Expiry Date | ||
| AG | [Invoices]Finance_Per | ||
| AH | [Invoices]contact link | ||
| AI | [Invoices]Stock Breakdown’Inventory | ||
| AJ | [Invoices]Stock_Breakdown’Project | ||
| AK | [Invoices]Stock_Breakdown’Description | ||
| AL | [Invoices]Stock_Breakdown’Quantity | ||
| AM | [Invoices]Stock_Breakdown’Rate | ||
| AN | [Invoices]Stock_Breakdown’Discount_Code | ||
| AO | [Invoices]Stock_Breakdown’Discount_Percen | ||
| AP | [Invoices]Stock_Breakdown’Tax_code | ||
| AQ | [Invoices]Stock_Breakdown’Tax_Rate | ||
| AR | [Invoices]Stock_Breakdown’Ordered | ||
| AS | [Invoices]Stock_Breakdown’Backordered | ||
| #IVB | |||
| AD | [Invoices]Discount Percentage | ||
| AE | [Invoices]Discount Days | ||
| AF | [Invoices]Expiry Date | ||
| AG | [Invoices]Finance_Per | ||
| AH | [Invoices]contact link | ||
| AI | [Invoices]Stock Breakdown’Inventory | ||
| AJ | [Invoices]Stock_Breakdown’Project | ||
| AK | [Invoices]Stock_Breakdown’Description | ||
| AL | [Invoices]Stock_Breakdown’Quantity | ||
| AM | [Invoices]Stock_Breakdown’Rate | ||
| AN | [Invoices]Stock_Breakdown’Discount_Code | ||
| AO | [Invoices]Stock_Breakdown’Discount_Percen | ||
| AP | [Invoices]Stock_Breakdown’Tax_code | ||
| AQ | [Invoices]Stock_Breakdown’Tax_Rate | ||
| AR | [Invoices]Stock_Breakdown’Ordered | ||
| AS | [Invoices]Stock_Breakdown’Backordered | ||
| AT | [Invoices]Stock_Breakdown’NewRate | ||
| AU | [Invoices]Stock_Breakdown’Amount | ||
| AV | [Invoices]Stock_Breakdown’Tax | ||
| AW | [Invoices]Stock_Breakdown’Total |
| #IVC | |
| AD | [Invoices]discount percentage |
| AE | [Invoices]discount days |
| AF | [Invoices]expiry date |
| AG | [Invoices]finance_per |
| AH | [Invoices]contact link |
| AI | [Invoices]Stock Breakdown’Inventory |
| AJ | [Invoices]Stock_Breakdown’Project |
| AK | [Invoices]Stock_Breakdown’Description |
| AL | [Invoices]Stock_Breakdown’Quantity |
| AM | [Invoices]Stock_Breakdown’Rate |
| AN | [Invoices]Stock_Breakdown’Discount_Code |
| AO | [Invoices]Stock_Breakdown’Discount_Percen |
| AP | [Invoices]Stock_Breakdown’Tax_code |
| AQ | [Invoices]Stock_Breakdown’Tax_Rate |
| AR | [Invoices]Stock_Breakdown’ordered |
| AS | [Invoices]Stock_Breakdown’back ordered |
| AT | [Invoices]Stock_Breakdown’NewRate |
| AU | [Invoices]Stock_Breakdown’amount |
| AV | [Invoices]Stock_Breakdown’tax |
| AW | [Invoices]Stock_Breakdown’total |
| AX | [Invoices]Stock_Breakdown’GL |
| #IVQ | AS | [Invoices]Stock_Breakdown’Description | ||
| AD | [Invoices]Discount Percentage | AT | [Invoices]Stock_Breakdown’Quantity | |
| AE | [Invoices]Discount Days | AU | [Invoices]Stock_Breakdown’Rate | |
| AF | [Invoices]Expiry Date | AV | [Invoices]Stock_Breakdown’Discount_Code | |
| AG | [Invoices]Finance_Per | AW | [Invoices]Stock_Breakdown’Discount_Percen | |
| AH | [Invoices]IVAlpha1_20 | AX | [Invoices]Stock_Breakdown’Tax_code | |
| AI | [Invoices]IVAlpha2_20 | AY | [Invoices]Stock_Breakdown’Tax_Rate | |
| AJ | [Invoices]IVAlpha3_30 | AZ | [Invoices]Stock_Breakdown’Ordered | |
| AK | [Invoices]IVAlpha4_30 | BA | [Invoices]Stock_Breakdown’Backordered | |
| AL | [Invoices]IVAlpha5_10 | BB | [Invoices]Stock_Breakdown’IVBAlpha1_20 | |
| AM | [Invoices]IVReal1 | BC | [Invoices]Stock_Breakdown’IVBAlpha2_20 | |
| AN | [Invoices]IVReal2 | BD | [Invoices]Stock_Breakdown’IVBAlpha3_30 | |
| AO | [Invoices]IVDate1 | BE | [Invoices]Stock_Breakdown’IVBAlpha4_30 | |
| AP | [Invoices]IVDate2 | BF | [Invoices]Stock_Breakdown’IVBAlpha5_10 | |
| AQ | [Invoices]Stock Breakdown’Inventory | BG | [Invoices]Stock_Breakdown’IVBReal1 | |
| AR | [Invoices]Stock_Breakdown’Project | BH | [Invoices]Stock_Breakdown’IVBDate1 | |
| BI | [Invoices]Stock_Breakdown’Retent |
Vertical Importing #IVJ – API Gateway Table
Vertical Importing of invoice line items is now supported. For single line invoices #IV may be used and the format for #IVJ follows this format through to cell AC.
By using #IVJ multiple lines for each invoice may be entered. SapphireOne will only stop writing lines into the current invoice when ^^^^ has been entered into cell T in the spreadsheet.
System Procedure:
- Correct Syntax – The syntax for this vertical import function is #IVJ which uses a combination of #IV and #IVJ as seen previously and below. This import function will contain 2 types of data. Invoice details and Line entry details.
- Invoice Details – These details are read from Cell A the cell containg the syntax through to cell AC. At this point it stops and looks to the next row expecting to find a valid Inventory ID in cell A.
- Line Details – SapphireOne expects to find an Inventory ID in cell A with additional details for the first line in the invoice ending with cell S.
- End of Invoice – It then looks to see if there are ^^^^ symbols in Cell T.
- Cell T – If this cell does not have ^^^^, SapphireOne will return to cell A on the next line looking for a valid Inventory ID and enter this as the second line in the invoice. It will then continue to repeat reading from Cell A to cell S entering a line for each line in the spreadsheet and checking the status of cell T for each line.
- End of Invoice – Once SapphireOne sees ^^^^ in column T, it closes of the current Invoice and goes to the next line in the template and expects to see the #IVJ syntax.
- Next Invoice – If the #IVJ syntax is on the next line it will commence the procedure for the next invoice from thre first sep in this list above.
- End of Invoice – The system uses the #IV chart on a previous page and reads all the way across to column AC. This gives it all of the information it needs about the transaction apart from the actual inventory lines in the transaction.
- End of File – The last row in the spreadsheet must have %%%% symbols in column A to indicate to the system that it has reached the end of the import file.
Invoice Lines #IVJ
Unlike other spreadsheets in gateway a number of columns actually perform two functions during this import. Also, unlike other import functions in gateway the first column does not require the instruction of #IVJ as it is assumed by the SapphireOne. Column A must contain the inventory ID as seen below and not have #IVJ in cell A as in all other import files.
#IVJ
| A | I[nvoices]Stock Breakdown’Inventory_ID | K | [Invoices]Stock_Breakdown’Backordered | |
| B | [Invoices]Stock_Breakdown’Project_ID | L | [Invoices]Stock_Breakdown’IVBAlpha1_20 | |
| C | [Invoices]Stock_Breakdown’Description | M | [Invoices]Stock_Breakdown’IVBAlpha2_20 | |
| D | [Invoices]Stock_Breakdown’Quantity | N | [Invoices]Stock_Breakdown’IVBAlpha3_30 | |
| E | [Invoices]Stock_Breakdown’Rate | O | [Invoices]Stock_Breakdown’IVBAlpha4_30 | |
| F | [Invoices]Stock_Breakdown’Discount_Code | P | [Invoices]Stock_Breakdown’IVBAlpha5_10 | |
| G | [Invoices]Stock_Breakdown’Discount_Percen | Q | [Invoices]Stock_Breakdown’IVBReal1 | |
| H | [Invoices]Stock_Breakdown’Tax_code | R | [Invoices]Stock_Breakdown’IVBDate1 | |
| I | [Invoices]Stock_Breakdown’Tax_Rate | S | [Invoices]Stock_Breakdown’Retent | |
| J | [Invoices]Stock_Breakdown’Ordered | T | [Invoices] ^^^^ Last Line item Indicator |
If you have a multi-line invoice the last line is terminated with a “^^^^” (shift-6, excluding quotations) in cell T which is the last column as seen above.
If you enter the characters PB into the rate field for an IVJ import, price book is looked up and the rate is calculated accordingly.
Periodic Invoices #PER – API Gateway Tables
This gateway function will import or export Periodic Invoices into the system.
The actual period is set by a number entered into column E as follows.
| A | #PER |
| B | [PerInvoice]Sequence_Number |
| C | [PerInvoice]End_Date |
| D | [PerInvoice]Internal-Ref_Number |
| E | [PerInvoice]Period. 1 = Weekly, 2 = Fortnightly, 3 = Monthly and 4 = Daily |
| F | [PerInvoice]Client_ID |
| G | [PerInvoice]Amount |
| H | [PerInvoice]Tax |
| I | [PerInvoice]Total |
Serial Number’s #SN and #SNA – API Gateway Tables
| A | #SN | #SNA | ||
| B | [Serial_Nºs]Serial_No | K | [Serial_Nºs]Common_ID | |
| C | [Serial_Nºs]Inventory_LK | L | [Serial_Nºs]Cost | |
| D | [Serial_Nºs]Qty | M | [Serial_Nºs]Expiry_Date | |
| E | [Serial_Nºs]Type | N | [Serial_Nºs]Period | |
| F | [Serial_Nºs]Date | O | [Serial_Nºs]Invoice_Seq **Overriden | |
| G | [Serial_Nºs]Status | P | [Serial_Nºs]Invent_Class | |
| H | [Serial_Nºs]Serial_Sequence **Overriden | |||
| I | [Serial_Nºs]Qty_Available **Overriden | |||
| J | [Serial_Nºs]Qty_Unposted |
PriceBook 2 #PB2 – API Gateway Table
| A | #PB2 | Q | [Price_book2]Min_Quantity | |
| B | [Price_book2]Reference_ID | R | [Price_book2]Max_Quantity | |
| C | [Price_book2]Inventory_Field | S | [Price_book2]Units | |
| D | [Price_book2]Inventory_FieldValue | T | [Price_book2]Ignore_Discounts | |
| E | [Price_book2]Master_Table | U | [Price_book2]Date_Start | |
| F | [Price_book2]Master_Field | V | [Price_book2]Date_Finish | |
| G | [Price_book2]Master_FieldValue | W | [Price_book2]Date_Alarm | |
| H | [Price_book2]Project_ID | X | [Price_book2]Department | |
| I | [Price_book2]Rule_Type | Y | [Price_book2]Inventory_Tag 1 | |
| J | [Price_book2]Rule_Number | Z | [Price_book2]Inventory_Tag 2 | |
| K | [Price_book2]LU_Code | AA | [Price_book2]Inventory_Tag 3 | |
| L | [Price_book2]Rate | AB | [Price_book2]Inventory_Tag 4 | |
| M | [Price_book2]Discount | AC | [Price_book2]Inventory_Tag 5 | |
| N | [Price_book2]Markup | AD | [Price_book2]Inventory_Tag 6 | |
| O | [Price_book2]Margin | AE | [Price_book2]Inventory_Ignore discount rule | |
| P | [Price_book2]Fixed_Quantity | AF | [Price_book2]NOT Used yet |
Price Book 2 Details
- Periods – If period is negative, then this period is used, else the system will override the period based upon the invoice date.
- Serial Numbers – These must appear in the next packet for linking with the invoice.
- Project ID’s – If JCI or JCC, the Project LK fields must be the same for each line as SapphireOne then copies this into the header file.
- B – This must be a Valid Unique Reference ID
- C – Enterable options are: ID CL LC (To select if it is Inventory ID, Class , Location)
- D – This must be a valid Inventory ID, Class ID or Location ID
- E – Enterable options are: C or V (To select eitherClient or Vendor).
- F –The enterable options are: ID CL ALL
- G – THis must be a valid Client ID, Vendor ID or Client Class ID, Vendor Class ID
- H – This must be a valid project ID
- I – This must be a number corresponding to the drop-down menu position in the list, 1, 2 or 3. (Note, oddly 3 is the first one at the top of the drop-down list! Test it and see).
- J – This must be a number corresponding to the drop-down menu the size of which will be determined by the selection made at I.
- K L M N O P Q R S – THese are linked to the selections made at I and J and will vary a lot.
- T – Enterable options are True Ticked or False Un-ticked. (Linked to I when number 2 is selected.
- U V W – These are entered as dates DD/MM/YY. If 00/00/00 the date is not set active.
- X – This is for a valid department ID
Contacts #CN – API Gateway Table
| A | #CN | AD | [Contacts]Phone2 | ||
| B | [Contacts]CN_ID | AE | [Contacts]Phone3 | ||
| C | [Contacts]First_Name | AF | [Contacts]Phone4 | ||
| D | [Contacts]Surname | AG | [Contacts]Email | ||
| E | [Contacts]Company | AH | [Contacts]Order | ||
| F | [Contacts]Address1 | AI | [Contacts]CNA1_20 | ||
| G | [Contacts]Address2 | AJ | [Contacts]CNA2_20 | ||
| H | [Contacts]City | AK | [Contacts]CNA3_30 | ||
| I | [Contacts]State | AL | [Contacts]CNA4_30 | ||
| J | [Contacts]Zip_Code | AM | [Contacts]CNA5_60 | ||
| K | [Contacts]Main_Phone | AN | [Contacts]CNA_6_40 | ||
| L | [Contacts]Salutation | AO | [Contacts]CNA_7_60 | ||
| M | [Contacts]Initails | AP | [Contacts]CNA_8_80 | ||
| N | [Contacts]Class | AQ | [Contacts]CNDate1 | ||
| O | [Contacts]Physical_1 | AR | [Contacts]CNDate2 | ||
| P | [Contacts]Physical_2 | AS | [Contacts]CNDate3 | ||
| Q | [Contacts]Physical_3 | AT | [Contacts]CN_Date4 | ||
| R | [Contacts]Physical_4 | AU | [Contacts]CNReal1 | ||
| S | [Contacts]List_Name | AV | [Contacts]CNReal2 | ||
| T | [Contacts]Al_Date | AW | [Contacts]CNReal3 | ||
| U | [Contacts]Last_Date | AX | [Contacts]CNReal4 | ||
| V | [Contacts]Area_LK | AY | [Contacts]CNReal5 | ||
| W | [Contacts]Type_Link_ID | AZ | [Contacts]CNReal6 | ||
| X | [Contacts]Active | BA | [Contacts]CNReal7 | ||
| Y | [Contacts]MailOut | BB | [Contacts]CNReal8 | ||
| Z | [Contacts]GenderIsMale | BC | [Contacts]CNText | ||
| AA | [Contacts]MobilePhone | BD | [Contacts]CNtext2 | ||
| AB | [Contacts]HomePhone | BE | [Contacts]CNTime1 | ||
| AC | [Contacts]Fax_No | BF | [Contacts]CNTime2 |
Comments:
To link these Contacts to the appropriate Client you will have to first Import all of the Clients. Then enter in the Client that they are to be associated with at column W Client ID in the above spreadsheet.
To complete the linking the CL_Type will have to be set at CLLink using an applied formula.
To link these Contacts to the appropriate Vendor you will have to first Import all of the Vendors. Then enter in the Vendor that they are to be associated with at column W Client ID in the above spreadsheet. To complete the linking the VE_Type will have to be set at VELink using an applied formula.
Note: data entry for cell Z, EmployeesIsMale is no longer entered as true or false as we now have 3 options as follows: 0 not given, 1 Male and 2 Female.
Timesheets #RS – API Gateway Table
| A | #RS | |||
| B | [Times]Sequence | G | [Times]Internal_Ref | |
| C | [Times]Type | H | [Times]Date_In | |
| D | [Times]Period | I | [Times]Start_Date | |
| E | [Times]Resource_LK | J | [Times]Fin_Date | |
| F | [Times]Project_LK | K | [Times]Memo |
Sublines (Repeat until end of line (packet))
| L | [Times]Sublines’Resource LK | #RSA | ||
| M | [Times]Sublines’Project LK | U | [Times]Sublines’TLAlpha_20 | |
| N | [Times]Sublines’Date | V | [Times]Sublines’TLReal | |
| O | [Times]Sublines’Hours | |||
| P | [Times]Sublines’Rate | |||
| Q | [Times]Sublines’Amount | |||
| R | [Times]Sublines’Activity LK | |||
| S | [Times]Sublines’Cost | |||
| T | [Times]Sublines’Act Description |
Comments
- C Cell – [Times]Type Either RS = Resource or PR = Project.
- D Cell – [Times]Period Leave blank if you want it to be the current period.
- H Cell – [Times]Date_In (Format is YYYYMMDD) (E.g. 20070428 is 28 April 2007).
Resources: #RR All fields Refer to the field listing for the names and order of the fields.
Diary: #DL ll fields Refer to the field listing for the names and order of the fields.
Thin 1-5:
#TH1 All fields Refer to the field listing for the names and order of the fields.
#TH2 All fields Refer to the field listing for the names and order of the fields.
#TH3 All fields Refer to the field listing for the names and order of the fields.
#TH4 All fields Refer to the field listing for the names and order of the fields.
#TH5 All fields Refer to the field listing for the names and order of the fields.
Award #AW? – API Gateway Table
Comments
#AWR and #AWT are very simple 1 and 2 cell tables both of which begin with cell A.
#AWA, #AWB and #AWC is the one table commencing with cell A.
| A | #AWR | #AWB | ||
| B | [Award]ID | W | [Award]UseLeave | |
| C | [[Award]Description | X | [Award]HourlyDailyhol | |
| Y | [Award]LLFirstyear | |||
| A | #AWT | Z | [Award]Hol1 | |
| B | [Award]ID | AA | [Award]Hol2 | |
| AB | [Award]Hol3 | |||
| A | #AWA | AC | [Award]Hol4 | |
| B | [Award]ID | AD | [Award]Hol5 | |
| C | [[Award]Description | AE | [Award]HolidayAnni | |
| D | [Award]Sal1 | AF | [Award]HolidayAnniDate | |
| E | [Award]Sal2 | AG | [Award]ResetLeave | |
| F | [Award]Sal3 | AH | [Award]AccumHoliday | |
| G | [Award]Time1 | AI | [Award]Sick1 | |
| H | [Award]Time2 | AJ | [Award]Sick2 | |
| I | [Award]Time3 | AK | [Award]Sick3 | |
| J | [Award]UseRDO | AL | [Award]Sick4 | |
| K | [Award]RDOTrigger | AM | [Award]Sick5 | |
| L | [Award]RDOPerc | AN | [Award]SickAnni | |
| M | [Award]RDOAuto | AO | [Award]SickAnniDate | |
| N | [Award]RDOMax | AP | [Award]ResetSick | |
| O | [Award]RDOtrigperc | AQ | [Award]Usesetsick | |
| P | [Award]SuperRate | |||
| Q | [Award]SuperFixed | #AWC | ||
| R | [Award]ExemptionMin | AR | [Award]LSL1 | |
| S | [Award]SuperCPer | AS | [Award]LSL2 | |
| T | [Award]SuperCFixed | AT | [Award]LSL3 | |
| U | [Award]WorkCPer | AU | [Award]LSLAnni | |
| V | [Award]WorkCFixed | AV | [Award]LSLAnniDate | |
| AW | [Award]Deferred1 | |||
| AX | [Award]Deferred2 | |||
| AY | [Award]Deferred3 | |||
| AZ | [Award]Deferred4 | |||
| BA | [Award]Deferred5 | |||
| BB | [Award]Deferred6 | |||
| BC | [Award]Deferred7 | |||
| BD | [Award]AccumLSL |
Employee Payroll #EM? – API Gateway Table
#EMR and #EMT are very simple tables both of which begin with Cell A.
#EMA, #EMB, #EMC, #EMD, #EME, #EMF and #EMX are all the one very long table commencing with cell A. Select the read or write option carefully as the last couple of options will make the reading or writing spreadsheet very wide across to cell GR.
| A | #EMR | AE | [Employees]RoundDown | |
| B | [Employees]Code | AF | [Employees]LLAllow | |
| C | [Employees]Surname | AG | [Employees]Apprentice | |
| AH | [Employees]QuickPay | |||
| A | #EMT | AI | [Employees]Start_Date | |
| B | [Employees]Code | AJ | [Employees]Finish_Date | |
| AK | [Employees]Review_Date | |||
| A | #EMA | AL | [Employees]Paid_to_date | |
| B | [Employees]Code | AM | [Employees]Lastpaid | |
| C | [Employees]Surname | AN | [Employees]BSB1 | |
| D | [Employees]First_Names | AO | [Employees]BSB2 | |
| E | [Employees]Title | AP | [Employees]BSB3 | |
| F | [Employees]Job_Title | AQ | [Employees]BSB4 | |
| G | [Employees]Class | AR | [Employees]Bank1 | |
| H | [Employees]Department | AS | [Employees]Bank2 | |
| I | [Employees]AwardLink | AT | [Employees]Bank3 | |
| J | [Employees]Address_1 | AU | [Employees]Bank4 | |
| K | [Employees]Address_2 | AV | [Employees]BankAccName1 | |
| L | [Employees]Suburb | AW | [Employees]BankAccName2 | |
| M | [Employees]State | AX | [Employees]BankAccName3 | |
| N | [Employees]Zip | AY | [Employees]BankAccName4 | |
| O | [Employees]Country | AZ | [Employees]BankCode1 | |
| P | [Employees]Phone | BA | [Employees]BankCode2 | |
| Q | [Employees]MbPhone | BB | [Employees]BankCode3 | |
| R | [Employees]Email | BC | [Employees]BankCode4 | |
| S | [Employees]Date_of_Birth | BD | [Employees]Bank1per | |
| T | [Employees]Sex | BE | [Employees]Bank2Per | |
| U | [Employees]Next_of_Kin | BF | [Employees]Bank3per | |
| V | [Employees]NKinRelation | BG | [Employees]Bank4per | |
| W | [Employees]NKPhone | BH | [Employees]Cheque_per | |
| BI | [Employees]Cash_per | |||
| #EMB | BJ | [Employees]Bank1Max | ||
| X | [Employees]RDOtrigperc | BK | [Employees]Bank2Max | |
| Y | [Employees]RDOTrigger | BL | [Employees]Bank3Max | |
| Z | [Employees]RDOPerc | BM | [Employees]Bank4Max | |
| AA | [Employees]RDOMax | BN | [Employees]Cheque_Max | |
| AB | [Employees]RDOOwed | BO | [Employees]Cash_Max | |
| AC | [Employees]RDOAuto | BP | [Employees]Notes | |
| AD | [Employees]GcertDedName |
Employees Headers
- [Employees]Code: The unique identifier or code for the employee within SapphireOne.
- [Employees]Surname: The employee’s last name.
- [Employees]First_Names: The employee’s given names.
- [Employees]Title: The title or salutation of the employee (e.g., Mr., Mrs., Dr.).
- [Employees]Job_Title: The employee’s job title within your organisation.
- [Employees]Class: The classification or category of the employee’s role.
- [Employees]Department: The department in which the employee works.
- [Employees]Review_Date: The date scheduled for the employee’s next review.
- [Employees]Paid_to_date: The total amount paid to the employee up to the current date.
- [Employees]Lastpaid: The date on which the employee was last paid.
- [Employees]BSB1: The BSB number for the employee’s first bank account.
- [Employees]BSB2: The BSB number for the employee’s second bank account.
- [Employees]BSB3: The BSB number for the employee’s third bank account.
- [Employees]BSB4: The BSB number for the employee’s fourth bank account.
- [Employees]Bank1: The name of the employee’s first bank.
- [Employees]Bank2: The name of the employee’s second bank.
- [Employees]Bank3: The name of the employee’s third bank.
- [Employees]Bank4: The name of the employee’s fourth bank.
- [Employees]BankAccName1: The account name for the employee’s first bank account.
- [Employees]BankAccName2: The account name for the employee’s second bank account.
- [Employees]BankAccName3: The account name for the employee’s third bank account.
- [Employees]BankAccName4: The account name for the employee’s fourth bank account.
- [Employees]BankCode1: The bank code for the employee’s first bank account.
- [Employees]BankCode2: The bank code for the employee’s second bank account.
- [Employees]BankCode3: The bank code for the employee’s third bank account.
- [Employees]BankCode4: The bank code for the employee’s fourth bank account.
- [Employees]Bank1per: The percentage of the employee’s pay directed to the first bank account.
- [Employees]Bank2Per: The percentage of the employee’s pay directed to the second bank account.
- [Employees]Bank3per: The percentage of the employee’s pay directed to the third bank account.
- [Employees]Bank4per: The percentage of the employee’s pay directed to the fourth bank account.
- [Employees]Cheque_per: The percentage of the employee’s pay issued by cheque.
- [Employees]Cash_per: The percentage of the employee’s pay issued in cash.
- [Employees]Bank1Max: The maximum amount that can be paid into the employee’s first bank account per pay run.
- [Employees]Bank2Max: The maximum amount that can be paid into the employee’s second bank account per pay run.
- [Employees]Bank3Max: The maximum amount that can be paid into the employee’s third bank account per pay run.
- [Employees]Bank4Max: The maximum amount that can be paid into the employee’s fourth bank account per pay run.
- [Employees]Cheque_Max: The maximum amount that can be paid to the employee by cheque per pay run.
- [Employees]Cash_Max: The maximum amount that can be paid to the employee in cash per pay run.
Cell T [Employees]Sex is no longer entered as true or false as we now have 3 options as follows:
0 = Not given, 1 = Male and 2 = Female
#EMC and #EMD follow on from #EMB above
| #EMC | #EMD | |||
| BQ | [Employees]HolPay | CV | [Employees]Salary | |
| BR | [Employees]SickPay | CW | [Employees]HoursDay | |
| BS | [Employees]SuperPay | CX | [Employees]HoursWeek | |
| BT | [Employees]SuperCont | CY | [Employees]DaysPerWeek | |
| BU | [Employees]WorkComp | CZ | [Employees]Pay_Frequency | |
| BV | [Employees]LumpA | DA | [Employees]Rate_of_pay | |
| BW | [Employees]LumpB | DB | [Employees]Alt_Hourly1 | |
| BX | [Employees]ETPPreJuly83 | DC | [Employees]Alt_Hourly2 | |
| BY | [Employees]ETPPostJuly83 | DD | [Employees]Alt_Hourly3 | |
| BZ | [Employees]ETPPostJune94 | DE | [Employees]Fulltime | |
| CA | [Employees]LumpD | DF | [Employees]Permanent | |
| CB | [Employees]LongSLeave | DG | [Employees]Package | |
| CC | [Employees]PaidHoliday | DH | [Employees]Bonus | |
| CD | [Employees]LLAllow | DI | [Employees]SuperPerc | |
| CE | [Employees]TaxAdjust | DJ | [Employees]AddSuper | |
| CF | [Employees]UnPaidLeave | DK | [Employees]SuperFund | |
| CG | [Employees]RDO | DL | [Employees]MinSuperReq | |
| CH | [Employees]Fund1Allow | DM | [Employees]MemberNo | |
| CI | [Employees]Fund2Allow | DN | [Employees]Fund1Per | |
| CJ | [Employees]IRD_No | DO | [Employees]Fund2Per | |
| CK | [Employees]Hecs | DP | [Employees]Super1Fixed | |
| CL | [Employees]LeaveLoading | DQ | [Employees]Super2Fixed | |
| CM | [Employees]LeaveLoadPerc | DR | [Employees]Fund1Name | |
| CN | [Employees]zLeavLoadTax | DS | [Employees]Fund2name | |
| CO | [Employees]Resident | DT | [Employees]SuperCPer | |
| CP | [Employees]TaxThreshold | DU | [Employees]SCompFixed | |
| CQ | [Employees]Rebates | DV | [Employees]SuperCfund | |
| CR | [Employees]TakeAcc | DW | [Employees]WorkComp | |
| CS | [Employees]Zone | DX | [Employees]WorkFixed | |
| CT | [Employees]TaxScaleA | DY | [Employees]WorkCompFund | |
| CU | [Employees]FS_Credit | DZ | [Employees]TaxSSCWT |
#EME, #EMF and #EMX carry on from #EMD above.
| #EME | FJ | [Employees]zYTDGross | ||
| EA | [Employees]StandardSick | FK | [Employees]ZYTDTax | |
| EB | [Employees]StandardDaily | FL | [Employees]ZYTDNet | |
| EC | [Employees]Sick_Ent | FM | [Employees]ZYTDTaxhours | |
| ED | [Employees]Perc_Sick | FN | [Employees]ZYTDTaxall | |
| EE | [Employees]zSickOwed | FO | [Employees]ZYTDNTaxall | |
| EF | [Employees]zSicktaken | FP | [Employees]ZYTDTaxDed | |
| EG | [Employees]Holidays_Ent | FQ | [Employees]ZYTDNtaxDed | |
| EH | [Employees]Perc_Hol | FR | [Employees]ZYTDSuper | |
| EI | [Employees]zHolidayowed | FS | [Employees]ZYTDSuperC | |
| EJ | [Employees]zHolidaytaken | FT | [Employees]ZYTDFringe | |
| EK | [Employees]LSL_Ent | |||
| EL | [Employees]PercLSL | |||
| EM | [Employees]zLSL_Owed | #EMX | ||
| EN | [Employees]zLSL_Taken | FU | [Employees]Alpha_1_20 | |
| EO | [Employees]TermLSL1 | FV | [Employees]Alpha_2_20 | |
| EP | [Employees]LSLTakenSince78 | FW | [Employees]Alpha_3_20 | |
| EQ | [Employees]zLSLTakenSinc93 | FX | [Employees]Alpha_4_20 | |
| ER | [Employees]CasualHoliday | FY | [Employees]Alpha_5_40 | |
| ES | [Employees]HolBasis | FZ | [Employees]Alpha_6_40 | |
| ET | [Employees]DailyHourlyHol | GA | [Employees]Alpha_7_60 | |
| GB | [Employees]Alpha_8_80 | |||
| #EMF | GC | [Employees]Real_1 | ||
| EU | [Employees]zTTD_Gross | GD | [Employees]Real_2 | |
| EV | [Employees]zTTD_Paye | GE | [Employees]Real_3 | |
| EW | [Employees]zTTD_Net | GF | [Employees]Real_4 | |
| EX | [Employees]zTTd_Hours | GG | [Employees]Real_5 | |
| EY | [Employees]zTTD_Taxall | GH | [Employees]Real_6 | |
| EZ | [Employees]zTTD_NTaxAll | GI | [Employees]Real_7 | |
| FA | [Employees]zTTDDeduct | GJ | [Employees]Real_8 | |
| FB | [Employees]zTTDNdeduct | GK | [Employees]Date_1 | |
| FC | [Employees]ZTTDFringe | GL | [Employees]Date_2 | |
| FD | [Employees]zWitholding | GM | [Employees]Date_3 | |
| FE | [Employees]zTTD_FSTC | GN | [Employees]Date_4 | |
| FF | [Employees]PercLSL | GO | [Employees]Time_1 | |
| FG | [Employees]zTTDApprentice | GP | [Employees]Time_2 | |
| FH | [Employees]zTTD_Super | GQ | [Employees]Text_1 | |
| FI | [Employees]zTTD_SuperCont | GR | [Employees]Text_2 |
How to Use Import on Change ID
Column A should be the name of the table. This needs to match the wording on the Change ID screen. It only handles the tables listed in the screen e.g. employees, users.
Column B is the old ID. Column C is the new ID. It should end with 4 percentage marks and be saved as a CSV.
Other Employee Gateway #EO – API Gateway Table
| A | #EO | N | [EmplOther]LastYearSick | |
| B | [EmplOther]Employee ID | O | [EmplOther]LSLCurrent | |
| C | [EmplOther]HolCurrent | P | [EmplOther]LSLProRata | |
| D | [EmplOther]HolProRate | Q | [EmplOther]LSLSetAmount | |
| E | [EmplOther]HolSetAmount | R | [EmplOther]LSLSetDate | |
| F | [EmplOther]HolSetDate | S | [EmplOther]MonthSuperAccm | |
| G | [EmplOther]LastDeferredLSL | T | [EmplOther]SickCurrent | |
| H | [EmplOther]LastUpdateDef | U | [EmplOther]SickProRata | |
| I | [EmplOther]LastUpdateHol | V | [EmplOther]SickSetAmount | |
| J | [EmplOther]LastUpdateLSL | W | [EmplOther]SickSetDate | |
| K | [EmplOther]LastUpdateSick | X | [EmplOther]Store | |
| L | [EmplOther]LastYearHol | Z | [EmplOther]EmpOther | |
| M | [EmplOther]LastYearLSL | |||
Superannuation #SPR – API Gateway Table
| A | #SPR | |||
| B | [Superannuation]_ID | L | [Superannuation]_Name as account name | |
| C | [Superannuation]_Employee_LK | M | [Superannuation]_USI | |
| D | [Superannuation]_Vendor_LK | N | [Superannuation]_AddSuper true false | |
| E | [Superannuation]_Allowance SUPER | O | [Superannuation]_Active true false | |
| F | [Superannuation]_Project_LK | P | [Superannuation]_Super_Last Pay | |
| G | [Superannuation]_GL_LK | Q | [Superannuation]_super_MTD | |
| H | [Superannuation]_Compulsory true false | R | [Superannuation]_superYTD | |
| I | [Superannuation]_Percentage no % symbol | S | [Superannuation]_superTTD | |
| J | [Superannuation]_Fixed as a dollar amount | |||
| K | [Superannuation]_Account_number |
Allowances #AL – API Gateway Table
| A | #AL | |||
| B | [Allowances]_ID | Q | [Allowances]_CalcC | |
| C | [AllowMaximumances]_Description | R | [Allowances]_Hol_Calc | |
| D | [Allowances]_Type | S | [Allowances]_Sick_Calc | |
| E | [Allowances]_Int_Type | T | [Allowances]_Super_Calc | |
| F | [Allowances]_Calc_Method | U | [Allowances]_GCPosition | |
| G | [Allowances]_Apprenticepay | V | [Allowances]_GCName | |
| H | [Allowances]_Amount | W | [Allowances]_Position | |
| I | [Allowances]_Cost_Center_Allowed | X | [Allowances]_SuperCCalc | |
| J | [Allowances]_G/L Code | Y | [Allowances]_WorkCompCalc | |
| K | [Allowances]_HolidayPay | Y | [Allowances]_RDOCalc | |
| L | [Allowances]_BonusRate | Z | [Allowances]_EarnerPremiumCalc | |
| M | [Allowances]_SickPayTaken | AA | [Allowances]_FringebenefitCalc | |
| N | [Allowances]_Maximum | AB | [Allowances]_Class | |
| O | [Allowances]_CalcA | AC | [Allowances]_CustomSort | |
| P | [Allowances]_CalcB | AD | [Allowances]_Prov_gl |
Working Transactions #TTA- API Gateway Table
Comments
It cannot be emphasized enough that this function bypasses all checks and balances that SapphireOne makes when executing a Payrun. During testing I have noted that it will import anything into a Working Paysheet. The user will have to decide exactly what they will be importing and then see how SapphireOne manages the Pay runs from there.
While this function will import just about anything that appears in a Working transaction the user is probably advised to import the absolute minimum amount of data that is required to allow SapphireOne to complete the Payrun.
For employees working on an hourly basis the only items in the import would be, Employee ID. Start Date, End Date and the Hours worked and let the SapphireOne handle the rest.
Remember that the rules for Gateway Importing are as follows:
- Data in a spreadsheet Cell – Re-write the data file with the new data.
- Spreadsheet Cell is Blank – Leave the data for that cell in the data file as is.
This second rule aove only becomes a problem if a data field with data in it has to be removed and made blank. Note that this function in gateway imports Working Transactions only and once processed by executing a pay run will be immediately deleted from the system. Multiple lines for each Employee in the Working Paysheet area may be imported. The format is similar to the #IVQ table in that each additional Line in the spreadsheet appears in the Working Paysheet area as a new line.
Operational Procedure.
- Syntax – SapphireOne looks for the #TTA in Column A to indicate create a Working Transaction for an employee and then reads columns B, C and D to enter in the details as listed below into the Employee’s Payslip Details area.
- Reading Data – It stops after reading across to column D. SapphireOne now goes to the very next row in the spreadsheet starting with column A.
- First Line – It now reads from column A to column E and creates the first line in the Working Paysheet area.
- CEll F – It then checks column F for ^^^^ and if they do not exist it then goes to the next row in the spreadsheet.
- Additional Lines – It starts again at column A and reads from column A to E and adds a second line to the Working Paysheet area again checking for ^^^^ in column F.
- End of Transaction – It repeats the above until ^^^^ are found in Column F. SapphireOne will stop entering new lines into the Working Paysheet area for the current Employee save it.
- Next Transaction – It will start on the next employee by looking for the #TTA in the next row in the spreadsheet starting at column A and repeat the procedure.
- End of File – This is always indicated by the entry or %%%% in the last row in the import spreadsheet in cell A.
| A | #TTA |
| B | [Employees]Working_Transactions_Employee_ID |
| C | [Employees]Working_Transactions_StartDate |
| D | [Employees]Working_Transactions_FinishDate |
| Following Rows Working Paysheet lines: Repeat on a line by line basis until ^^^^ is entered into Column F. | |
| A | [Employees]Working_Transactions_Allowance_ID |
| B | [Employees]Working_Transactions_GL_Code |
| C | [Employees]Working_Transactions_Employee_Department_ID |
| D | [Employees]Working_Transactions_Number of Hours |
| E | [Employees]Working_Transactions_Rate |
| F | ^^^^ Last Line indicator in the current working transaction |
Note that for this import function, a number of columns are actually used to import two items as may be seen in the above table. For example, Column A will hold both the #TTA syntax and the Allowance _ID. Column B the Employee_ID and the GL_Code and so on.
Assets #AS
| A | #AS | AQ | [Assets]Residual_A | CG | [Assets] Real_8 | ||
| B | [Assets]ID | AR | [Assets]TTD_A | CH | [Assets] Date_1 | ||
| C | [Assets]Name | AS | [Assets]DepType_B | CI | [Assets] Date_2 | ||
| D | [Assets]Description | AT | [Assets]Percentage_B | CJ | [Assets] Date_3 | ||
| E | [Assets]ClassA | AU | [Assets]Residual_B | CK | [Assets] Date_4 | ||
| F | [Assets]ClassB | AV | [Assets]TTD_B | CL | [Assets] Time_1 | ||
| G | [Assets]DupID | AW | [Assets]Period | CM | [Assets] Time_2 | ||
| H | [Assets]Field7 | AX | [Assets]GL_Asset | CN | [Assets]Text_1 | ||
| I | [Assets]Serial_No | AY | [Assets]GL_Sale | CO | [Assets]Text_2 | ||
| J | [Assets]Active | AZ | [Assets]GL_Dep | CP | [Assets]Pict_1 | ||
| K | [Assets]Location | BA | [Assets]GL_ProvDep | CQ | [Assets]Pict_2 | ||
| L | [Assets]Location_Name | BB | [Assets]G/L_Disposal | CR | [Assets]DeprComp | ||
| M | [Assets]Location_Address1 | BC | [Assets]DepCurPeriod_A | CS | [Assets]Bar_Code | ||
| N | [Assets]Position | BD | [Assets]DepCurPeriod_B | CT | [Assets]Last_Read | ||
| O | [Assets]Location_Notes | BE | [Assets]Profit_A | CU | [Assets]Last_Read_Date | ||
| P | [Assets]Location_Class | BF | [Assets]Profit_B | CV | [Assets]AddCost_B | ||
| Q | [Assets]DepCurYear_A | BG | [Assets]CapGain_A | CW | [Assets]BalAdj_A | ||
| R | [AssetsDepCurYear_B] | BH | [Assets]Sell_Price | CX | [Assets]BalAdj_B | ||
| S | [Assets]AddCost_A | BI | [Assets]DepPreCurYear_A | CY | [Assets]GLBalAdj | ||
| T | [AssetsAdditionDate] | BJ | [Assets]DepPreCurYear_B | CZ | [Assets]RevReserve | ||
| U | [Assets]Keywords | BK | [Assets]RealValue_A | DA | [Assets]GLRevReserve | ||
| V | [Assets]Contact | BL | [Assets]RealValue_B | DB | [Assets]Old Asset | ||
| W | [Assets]Contact_Name | BM | [Assets]ReplacementV | DC | [Assets]Department | ||
| X | [Assets]OpenWDV_A | BN | [Assets]CapGain_B | DD | [Assets]ServiceUsage | ||
| Y | [Assets]Date_Purchased | BO | [Assets]Sale_Date | DE | [Assets]RepairDate | ||
| Z | [Assets]Purchase_Price | BP | [Assets]OpenWDV_B | DF | [Assets]ServiceDate | ||
| AA | [Assets]Warranty_Expiry | BQ | [Assets]GLCapGain | DG | [Assets]LoanDate | ||
| AB | [Assets]Depreciated | BR | [Assets]Alpha_1_20 | DH | [Assets]NextService | ||
| AC | [Assets]Disposal_Date | BS | [Assets]Alpha_2_20 | DI | [Assets]GL_TaxIn | ||
| AD | [Assets]Business_Use | BT | [Assets]Alpha_3_20 | DJ | [Assets]GL_TaxOut | ||
| AE | [Assets]Maximum_Depr | BU | [Assets]Alpha_4_20 | DK | [Assets]SelfAssessed | ||
| AF | [Assets]Insurance_Polic | BV | [Assets]Alpha_5_40 | DL | [Assets]MotorVehicle | ||
| AG | [Assets]Insurer | BW | [Assets]Alpha_6_40 | DM | [Assets]Calc | ||
| AH | [Assets]Ins_Expiry_Date | BX | [Assets]Alpha_7_60 | DN | [Assets]Write | ||
| AI | [Assets]Ins_Notes | BY | [Assets]Alpha_8_80 | DO | [Assets]Draw | ||
| AJ | [Assets]Percentage_Sold | BZ | [Assets]Real_1 | DP | [Assets]Notes | ||
| AK | [Assets]By | CA | [Assets] Real_2 | DQ | [Assets]Company | ||
| AL | [Assets]Mod_Date | CB | [Assets] Real_3 | DR | [Assets]First_Depr_Date | ||
| AM | [Assets]Life_A | CC | [Assets] Real_4 | DS | [Assets]OldAsset | ||
| AN | [Assets]Life_B | CD | [Assets] Real_5 | ||||
| AO | [Assets]DepType_A | CE | [Assets] Real_6 | ||||
| AP | [Assets]Percentage_A | CF | [Assets] Real_7 |
AS – Assets Table Information
- [Assets]ID: This is a unique identifier for each asset within SapphireOne.
- [Assets]Name: The name of the asset, which can be changed at a later date if necessary.
- [Assets]Description: A detailed description of the asset, providing additional information that may not be covered by the name alone.
- [Assets]ClassA and [Assets]ClassB: These fields allow for classification of assets into different categories or classes for reporting and sorting purposes.
- [Assets]DupID: This field is used to identify duplicate records within the asset database.
- [Assets]Field7: This field’s specific use may vary and could be customised for additional asset information as required by your organisation.
- [Assets]Serial_No: The manufacturer’s serial number for the asset, which is important for identification and warranty purposes.
- [Assets]Active: Indicates whether the asset is currently active or inactive within the system.
- [Assets]Location: The location ID where the asset is stored or used.
- [Assets]Location_Name: The name of the location where the asset is stored or used.
- [Assets]Location_Address1: The primary address for the asset’s location.
- [Assets]Position: This refers to the asset’s physical position within a location.
- [Assets]Location_Notes: Any additional notes regarding the asset’s location.
- [Assets]Location_Class: A classification for the asset’s location, which may be used for sorting or reporting.
- [Assets]DepCurYear_A and [Assets]DepCurYear_B: These fields represent the current year’s depreciation for the asset, possibly from different depreciation methods or for different financial reporting purposes (e.g., Tax vs. Company).
- [Assets]AddCost_A: Additional costs associated with the asset that may need to be capitalised.
- [Assets]AdditionDate: The date when the additional costs were incurred.
- [Assets]Keywords: Keywords associated with the asset for search and categorisation purposes.
- [Assets]Contact: A contact ID linked to the asset.
- [Assets]Contact_Name: The name of the contact person associated with the asset.
- [Assets]OpenWDV_A: The opening written down value (WDV) of the asset for a specific depreciation method or financial reporting purpose.
- [Assets]Date_Purchase: The date the asset was purchased.
- [Assets]Purchase_Price: The purchase price of the asset.
- [Assets]Warranty_Expiry: The date when the asset’s warranty will expire.
- [Assets]Depreciated: Indicates whether the asset has been depreciated.
- [Assets]Disposal_Date: The date the asset was disposed of.
- [Assets]Business_Use: The percentage of business use for the asset, which may affect depreciation calculations.
- [Assets]Maximum_Depr: The maximum depreciation limit for the asset.
- [Assets]Insurance_Polic: The policy number for the asset’s insurance.
- [Assets]Insurer: The name of the insurance provider for the asset.
- [Assets]Ins_Expiry_Date: The expiry date of the asset’s insurance policy.
- [Assets]Ins_Notes: Any notes related to the asset’s insurance.
- [Assets]Percentage_Sold: The percentage of the asset that has been sold or disposed of.
- [Assets]By: The user ID of the person who last modified the asset record.
- [Assets]Mod_Date: The date when the asset record was last modified.
- [Assets]Life_A and [Assets]Life_B: The expected life of the asset, which may differ based on different depreciation methods or reporting requirements.
- [Assets]DepType_A and [Assets]DepType_B: The type of depreciation method used (e.g., Straight Line, Diminishing Value).
- [Assets]Percentage_A and [Assets]Percentage_B: The depreciation rate for the asset.
- [Assets]Residual_A and[Assets]Residual_B: The residual value of the asset after depreciation.
- [Assets]TTD_A and [Assets]TTD_B: Total to date depreciation for the asset.
- [Assets]Period: The financial period to which the current asset record pertains.
- [Assets]GL_Asset, [Assets]GL_Sale, [Assets]GL_Dep, [Assets]GL_ProvDep,[Assets]G/L_Disposal: These fields link the asset to specific General Ledger accounts for asset value, sales, depreciation, provision for depreciation, and disposal, respectively.
- [Assets]DepCurPeriod_A and [Assets]DepCurPeriod_B: Depreciation for the current period, possibly from different depreciation methods.
- [Assets]Profit_A and [Assets]Profit_B: Profit from the disposal of the asset, calculated using different methods or for different reporting purposes.
- [Assets]CapGain_A and [Assets]CapGain_B: Capital gain from the disposal of the asset, calculated using different methods or for different reporting purposes.
- [Assets]Sell_Price: The selling price of the asset.
- [Assets]DepPreCurYear_A and [Assets]DepPreCurYear_B: Depreciation from previous years, calculated using different methods.
- [Assets]RealValue_A and [Assets]RealValue_B: The real value of the asset, which may be used for revaluation purposes.
- [Assets]ReplacementV: The replacement value of the asset.
- [Assets]Sale_Date: The date the asset was sold.
- [Assets]OpenWDV_B: The opening written down value for a secondary depreciation method or reporting purpose.
- [Assets]GLCapGain: The General Ledger account associated with capital gains from the asset’s disposal.
- [Assets]Alpha_1_20 through [Assets]Alpha_8_80: Customisable alphanumeric fields that can be tailored to specific data requirements for the asset.
- [Assets]Real_1 through [Assets]Real_8: Customisable numeric fields for additional asset-related data.
- [Assets]Date_1 through [Assets]Date_4: Customisable date fields for important asset-related dates.
- [Assets]Time_1 and [Assets]Time_2: Customisable time fields for asset-related timings.
- [Assets]Text_1 and [Assets]Text_2: Customisable text fields for additional descriptive information about the asset.
- [Assets]Pict_1 and [Assets]Pict_2: Fields for storing pictures related to the asset.
- [Assets]DeprComp: Indicates whether the asset’s depreciation is complete.
- [Assets]Bar_Code: The barcode associated with the asset for tracking and inventory purposes.
- [Assets]Last_Read: The last read value from the asset’s barcode scanner.
- [Assets]Last_Read_Date: The date when the asset’s barcode was last scanned.
- [Assets]AddCost_B: Additional costs associated with the asset for a secondary method or reporting purpose.
- [Assets]BalAdj_A and [Assets]BalAdj_B: Balancing adjustments for the asset, which may affect its book value.
- [Assets]GLBalAdj: The General Ledger account associated with balancing adjustments for the asset.
- [Assets]RevReserve: The revaluation reserve for the asset, which may affect its reported value.
- [Assets]GLRevReserve: The General Ledger account associated with the revaluation reserve.
- [Assets]Old Asset: Indicates whether the asset is considered old or has been replaced in the system.
- [Assets]Department: The department within your organisation that is responsible for or utilises the asset.
- [Assets]ServiceUsage: A record of the asset’s service usage, which may include hours of operation or other metrics.
- [Assets]RepairDate: The date when the asset was last repaired.
- [Assets]ServiceDate: The date when the asset was last serviced.
- [Assets]LoanDate: The date when the asset was loaned out or taken out of service.
- [Assets]NextService: The date when the next service for the asset is due.
- [Assets]GL_TaxIn and [Assets]GL_TaxOut: General Ledger accounts for tax-related transactions associated with the asset.
- [Assets]SelfAssessed: Indicates whether the asset’s depreciation is self-assessed.
- [Assets]MotorVehicle: Indicates whether the asset is classified as a motor vehicle for tax and depreciation purposes.
- [Assets]Calc: A field used for calculation-related data for the asset.
- [Assets]Write: A field used for recording write-off information.
- [Assets]Draw: A field used for recording drawdown information.
- [Assets]Notes: Additional notes or comments about the asset.
- [Assets]Company: The company within your organisation that owns or is responsible for the asset.
- [Assets]First_Depr_Date: The date when depreciation for the asset first commenced.
- [Assets]OldAsset: Indicates whether this is a record of an old asset that has been replaced or disposed of.
The Asset import function in the table should be used first to setup the assets with at least some basic details. The Asset ID listed in column B below then enables the system to place the details for the Computer Equipment Page in the correct record. Be careful if the ID entered in the table below does not match an Asset ID already in SapphireOne as it will create a new Asset record. Note column B is an Asset ID and ce is an abbreviation for Computer Equipment Page.
Asset Computer Equipment Page #ASC
| A | #ASC | Q | [Assets]ce_Host | |
| B | [Assets]ID ——Note ASSET ID | R | [Assets]ce_FireWallZone | |
| C | [Assets]ce_Owner | S | Assets]ce_IPrange_Mininum | |
| D | [Assets]ce_Address | T | Assets]ce_IPrange_Maximum | |
| E | [Assets]ce_Office | U | Assets]ce_Service | |
| F | [Assets]ce_Rack | V | Assets]ce_Software | |
| G | [Assets]ce_Shelf | W | Assets]ce_Software_version | |
| H | [Assets]ce_Box Configuration | X | Assets]ce_Software_Version_Date | |
| I | [Assets]ce_DeviceType | Y | Assets]ce_Serial # | |
| J | [Assets]ce_Manufacturer | Z | Assets]ce_License # | |
| K | [Assets]ce_Platform | AA | Assets]ce_User | |
| L | [Assets]ce_Version | AB | Assets]ce_Active | |
| M | [Assets]ce_ID_Address_Internal | AC | Assets]ce_Updated Date | |
| N | [Assets]ce_DHCP | AD | Assets]ce_Notes | |
| O | [Assets]ce_IP_Address_External | AE | Assets]ce_Remote Access_Procedure | |
| P | [Assets]ce_NetBIOS_Name |
Asset Class #AZ
| A | #AZ | C | [AssetClass]Name | ||||
| B | [AssetsClass]ID | D | [AssetClass]Notes |
Asset Locations #LO
| A | #LO | E | [Location]Phone | I | [Location]Contact_Name | ||
| B | [Location]ID | F | [Location]Field5 | J | [Location]Class | ||
| C | [Location]Name | G | [Location]Field6 | K | [Location]Blank | ||
| D | [Location]Location | H | [Location]Contact |
Asset Locations Class #LZ
| A | #LZ | C | [LocationClass]Name | ||||
| B | [LocationClass]ID | D | [LocationClass]Notes |
Asset Method #ME
| A | #ME | D | [MethodName]Order | G | [MethodName]Notes | ||
| B | [MethodName]ID | E | [MethodName]DateCreated | ||||
| C | [MethodName]Name | F | [MethodName]PeriodCreated |
Assets History #HJ
| A | #HJ | U | [HistoryAssets]Amount_B | |
| B | [HistoryAssets]Sequence | V | [HistoryAssets]GL_D | |
| C | [HistoryAssets]Type | W | [History Assets]DontTransfer | |
| D | [History Assets]Date | X | [HistoryAssets]Amount_C | |
| E | [HistoryAssets]Amount | Y | [HistoryAssets]GL_E | |
| F | [HistoryAssets]Internal_Ref | Z | [HistoryAssets]GL_F | |
| G | [HistoryAssets]External_Ref | AA | [HistoryAssets]RevsaleStore | |
| H | [HistoryAssets]Transfer | AB | [HistoryAssets]PurchaseFlag | |
| I | [HistoryAssets]GL_A | AC | [HistoryAssets]Amount_D | |
| J | [History Assets]GL_B | AD | [HistoryAssets]Amount_E | |
| K | [HistoryAssets]Period | AE | [History Assets]Amount_F | |
| L | [HistoryAssets]Asset_LK | AF | [HistoryAssets]MethodLk | |
| M | [HistoryAssets]Notes | AG | [HistoryAssets]GL_G | |
| N | [History Assets]Date_Due | AH | [HistoryAssets]RunNo | |
| O | [HistoryAssets]Location | AI | [HistoryAssets]GL_H | |
| P | [HistoryAssets]Contact | AJ | [HistoryAssets]Tax_Code | |
| Q | [History Assets]GL_C | AK | [History Assets]Vendor | |
| R | [HistoryAssets]Partial | AL | [HistoryAssets]Tax_Rate | |
| S | [HistoryAssets]Keywords | AM | [HistoryAssets]Tax_Amount | |
| T | [HistoryAssets]Reversed | AN | [HistoryAssets]Department |
Asset Audit Lines #AU
| A | #AU | K | [AuditLines]CapGain | |
| B | [AuditLines]AssetLk | L | [AuditLines]BalAdj | |
| C | [AuditLines]MethodLk | M | [AuditLines]AddCost | |
| D | [AuditLines]ClassA | N | [AuditLines]DepCurPeriod | |
| E | [AuditLines]ClassB | O | [AuditLines]DepCurYear | |
| F | [AuditLines]Location | P | [AuditLines]RevalValue | |
| G | [AuditLines]Period | Q | [AuditLines]DepPreCurYear | |
| H | [AuditLines]OpenWDV | R | [AuditLines]TransactionLk | |
| I | [AuditLines]Sale | S | [AuditLines]GST | |
| J | [AuditLines]Profit |
Asset Transactions #AV
| A | #AV | AA | [Asset_Transactions]RevsaleStore | |
| B | [Asset_Transactions]Type | AB | [Asset_Transactions]PurchaseFlag | |
| C | [Asset_Transactions]Date | AC | [Asset_Transactions]Amount_D | |
| D | [Asset_Transactions]Amount | AD | [Asset_Transactions]Amount_E | |
| E | [Asset_Transactions]Internal_Ref | AE | [Asset_Transactions]Amount_F | |
| F | [Asset_Transactions]External_Ref | AF | [Asset_Transactions]MethodLk | |
| G | [Asset_Transactions]Transfer | AG | [Asset_Transactions]GL_G | |
| H | [Asset_Transactions]GL_A | AH | [Asset_Transactions]RunNo | |
| I | [Asset_Transactions]GL_B | AI | [Asset_Transactions]GL_H | |
| J | [Asset_Transactions]Sequence | AJ | [Asset_Transactions]NextServiceDate | |
| K | [Asset_Transactions]Period | AK | [Asset_Transactions]NextServiceUnit | |
| L | [Asset_Transactions]Asset_Lk | AL | [Asset_Transactions]ReversedSeq | |
| M | [Asset_Transactions]Notes | AM | [Asset_Transactions]Vendor | |
| N | [Asset_Transactions]Date_Due | AN | [Asset_Transactions]TaxCode | |
| O | [Asset_Transactions]Location | AO | [Asset_Transactions]Doofus | |
| P | [Asset_Transactions]Contact | AP | [Asset_Transactions]Tax_Rate | |
| Q | [Asset_Transactions]GL_C | AQ | [Asset_Transactions]Tax_Amount | |
| R | [Asset_Transactions]Partial | AR | [Asset_Transactions]Department | |
| S | [Asset_Transactions]Keywords | AS | [Asset_Transactions]By | |
| T | [Asset_Transactions]Reversed | AT | [Asset_Transactions]Date_Created | |
| U | [Asset_Transactions]Amount_B | AU | [Asset_Transactions]Time_Created | |
| V | [Asset_Transactions]GL_D | AV | [Asset_Transactions]Post_Date | |
| W | [Asset_Transactions]DontTransfer | AW | [Asset_Transactions]Post_Time | |
| X | [Asset_Transactions]Amount_C | AX | [Asset_Transactions]Deleted | |
| Y | [Asset_Transactions]GL_E | |||
| Z | [Asset_Transactions]GL_F |
General Ledger #GL?
Notes
All values are to be entered without a plus or negative symbol leading the number. SapphireOne will determine from the data cell in the import spreadsheet if it is to be written in as a credit or debit.
These ID’s and details are from Bondi Blue.
Using #GLA or #GLB: For exporting data out, you may use either #GLA or #GLB as these have been setup so that the data may be exported to a text file and looked at using a spreadsheet.
If you use #GLA to import your data and take care to ensure that the ID written into E is a valid class ID that you have already created in the data file. SapphireOne will pick up the class ID entered and use that Class from then on. If it does not find a valid Class ID, the G/L account will not be linked to a Class and this will have to be done manually by going in to the G/L Account in error and typing in the Class ID required.
You do also have the option of using #GLB and directly creating the G/L account and the classes at the same time. But this increases the prospect of errors creeping in as each individual Class must have the same Sub A, Sub B, and Sub C positions. Any errors in setting these Class details will result in the errors being incorporated into the data file.
Remember that the #GLD table carries directly on from #GLA and does not access the #GLB table at all.
See the comments at the beginning of the section on the General Ledger.
Also, if the system finds an error with a line it will ignore the error and proceed to the next line.
Please check that ALL of the G/L accounts have been imported or exported correctly.
- A cell – Either #GLA or #GLB as required.
- B cell – This is the complete G/L account ID and the Department ID. E.g. 1000-0.
- C cell – This is the G/L Account Name. E.g. Sales – Appliances.
- D cell – This is the Department ID. E.g. 0.
- E cell – This is the Class ID. E.g 10
- O cell – This is the Class name E.g. Sales. (They are separated being in different tables, #GLA and #GLB).
- F cell – This is the G/L Account ID only. E.g. 1000.
- G cell – Debit = 1 and Credit = 0. This is in a G/L Inquiry, (Details Page, Data Entry Controls area)
- H cell – This is for the tax rate which is normally linked to K the tax code but in this Gateway import it is not yet linked and a Tax Code will have to be inserted into column K.
- K cell – Enter the tax code, for Australia it is usually S.
- I & J cells – Alternative ID and name for the GL Account. (2nd page GL Inquiry).
- L M N cells – These are all in GL Classes. Look in the first page and the Report Position Area.
- Order – Position A, Position B and Position C.
- BD 0 to 12 – A Budget Deficit, will write in a budget deficit. 100 will be displayed as ($100.00) indicating a negative amount.
- BC 0 – 12 – A Budget Credit will write in a budget credit. 100 will be displayed as $100.00 indicating a positive amount.
- Period Pairs – The user should also note that they are in 13 pairs, a pair for each period from period 0, zero all the way up to period 12.
- One entry – So, only a single entry for each period is required otherwise you will confuse the system badly. A single entry for BD0 or BC0, a single entry for BD1 or BC1 and so on until you get to BD12 or BC12 or as required.
| A | #GLA | #GLB | ||
| B | [GeneralLedger] Account ID & Dept ID | L | [GeneralLedger]Sub_A | |
| C | [GeneralLedger] AccountName | M | [GeneralLedger]Sub_B | |
| D | [GeneralLedger] Department_ID | N | [GeneralLedger]Sub_C | |
| E | [GeneralLedger] Class_ID | O | [GeneralLedger]Class_Name | |
| F | [GeneralLedger]Account_ ID | P | [GeneralLedger]Custom_Class | |
| G | [GeneralLedger]DebitOrCredit | |||
| H | [GeneralLedger]Tax_Rate | |||
| I | [GeneralLedger]Alter_ID | |||
| J | [GeneralLedger]Alter_Name | |||
| K | [GeneralLedger]Tax_Code |
GLA + GLB Headers:
- Account ID & Dept ID: These fields represent the unique identifier for a General Ledger account, which may include a Department ID appended to it. For instance, an Account ID of 1000 with a Department ID of 0 would be displayed as 1000-0.
- AccountName: This is the name given to the General Ledger account, which helps users identify the purpose of the account within financial records.
- Department_ID: This field holds the identifier for the department within your organisation. It is used in conjunction with the Account ID to form a full account identification.
- Class_ID: The Class ID is used to categorise General Ledger accounts into different classes, which aids in structuring the Income Statement and Balance Sheet.
- Account_ ID: Similar to the Account ID & Dept ID, this is the unique identifier for the General Ledger account without the departmental breakdown.
- DebitOrCredit: This field indicates the default side (Debit or Credit) on which the General Ledger account operates, which is essential for maintaining the correct balance during transactions (0 = debit, 1 = credit).
- Tax_Rate: This field specifies the tax rate that may be applicable to transactions within the General Ledger account (can be left blank and pulled from another component).
- Alter_ID: An alternative identifier that can be used for the General Ledger account, providing additional reference points.
- Alter_Name: The alternative name for the General Ledger account, which can be used for search or reference purposes.
- Tax_Code: This field holds the tax code associated with the General Ledger account, which is used to calculate the correct tax on transactions. for example Sales account would have code S – which means 10% GST.
- Sub_A, Sub_B ,Sub_C: These are sub-classifications within the General Ledger account that allow for more detailed categorisation and reporting – defaulted by the class.
- Class_Name: This field displays the name of the class to which the General Ledger account belongs.
- Custom_Class: A field that allows users to enter a custom class for the General Ledger account, providing flexibility in how accounts are categorised and reported.
Each of these fields plays a crucial role in the detailed record-keeping and financial analysis capabilities of SapphireOne. By utilising these fields effectively, users can maintain accurate and comprehensive financial records that are essential for informed decision-making within your organisation.
#GLA is as normal followed by #GLB as seen in the table above.
However, when the #GLD table is used below, #GLA is immediately followed by the table #GLD below. #GLB is ignored and not used. Columns L through to P in #GLB are not read or written and are replaced by columns L through to P, in #GLD.
GLD Headers
[GeneralLedger] BD0 – This Yr Per 0 to [GeneralLedger] BC12 + This Yr Per 12: These fields represent the balances for debit (BD) and credit (BC) for each period (0 to 12) of the current year. They are used to track the financial activity within the account for each accounting period.
General Ledger #GLR
This table is used to import existing General ledger accounts budgets from period 0, zero, to period 30.
| A | #GLR | |||
| B | [GeneralLedger] Account ID & Dept ID | R | [GeneralLedger]Revised-Budget Period_15 | |
| C | [GeneralLedger]Revised-Budget Period_0 | S | [GeneralLedger]Revised-Budget Period_16 | |
| D | [GeneralLedger]Revised-Budget Period_1 | T | [GeneralLedger]Revised-Budget Period_17 | |
| E | [GeneralLedger]Revised-Budget Period_2 | U | [GeneralLedger]Revised-Budget Period_18 | |
| F | [GeneralLedger]Revised-Budget Period_3 | V | [GeneralLedger]Revised-Budget Period_19 | |
| G | [GeneralLedger]Revised-Budget Period_4 | W | [GeneralLedger]Revised-Budget Period_20 | |
| H | [GeneralLedger]Revised-Budget Period_5 | X | [GeneralLedger]Revised-Budget Period_21 | |
| I | [GeneralLedger]Revised-Budget Period_6 | Y | [GeneralLedger]Revised-Budget Period_22 | |
| J | [GeneralLedger]Revised-Budget Period_7 | Z | [GeneralLedger]Revised-Budget Period_23 | |
| K | [GeneralLedger]Revised-Budget Period_8 | AA | [GeneralLedger]Revised-Budget Period_24 | |
| L | [GeneralLedger]Revised-Budget Period_9 | AB | [GeneralLedger]Revised-Budget Period_25 | |
| M | [GeneralLedger]Revised-Budget Period_10 | AC | [GeneralLedger]Revised-Budget Period_26 | |
| N | [GeneralLedger]Revised-Budget Period_11 | AD | [GeneralLedger]Revised-Budget Period_27 | |
| O | [GeneralLedger]Revised-Budget Period_12 | AE | [GeneralLedger]Revised-Budget Period_28 | |
| P | [GeneralLedger]Revised-Budget Period_13 | AF | [GeneralLedger]Revised-Budget Period_29 | |
| Q | [GeneralLedger]Revised-Budget Period_14 | AG | [GeneralLedger]Revised-Budget Period_30 |
GLR Headers
- Account ID & Dept ID: This field represents the unique identifier for a General Ledger account, along with the associated Department ID. The Account ID is used to track financial transactions within your organisation’s chart of accounts, while the Dept ID can be used to segment and report financial data by department.
- Revised-Budget Period_X : These fields represent the revised budget amounts for specific periods within the financial year. The numbers 0 to 30 indicate the period number, with 0 often being the opening balance and 1-12 representing the months of the year in a standard reporting format. Periods 13 to 30 may represent additional reporting periods or adjustments, depending on your organisation’s accounting practices.
For example:- Revised-Budget Period_15: This would be the revised budget for period 15.
- Revised-Budget Period_0: This would indicate the revised opening balance budget.
- Revised-Budget Period_16: This would be the revised budget for period 16, and so on.
Project General Ledger #PRGL
The table on the left above will only import general Ledger headers into a project.
The table on the right above will only import the period budget data into a project if the General Ledger header already exists in the project.
| A | #PRGL (Create headers only) | A | #PRGL (Project Data Import) | |
| B | [PR_GL] GL Code or ID | B | [PR_GL] GL Code or ID | |
| C | [PR_GL] Project Code or ID | C | [PR_GL] Project Code or ID | |
| D | [PR_GL] Period must be -1 | D | [PR_GL] Period 1 to 30 | |
| E | [PR_GL] Budget Debit. | |||
| F | [PR_GL] Budget Credit |
This could be done in the one import file as seen below.
| A | B | C | D | E | F | |
| 1 | G/L ID | Project ID | Per | Project_Debit | Project_Credit | |
| 2 | #PRGL | 1010-0 | 1A | -1 | ||
| 3 | #PRGL | 1010-0 | 1A | 1 | 111.11 | |
| 4 | #PRGL | 1010-0 | 1A | 2 | 222.22 | |
| 5 | #PRGL | 1010-0 | 1A | 3 | 333.33 | |
| 6 | #PRGL | 1010-0 | 1A | 4 | 444.44 | |
| 7 | #PRGL | 1010-0 | 1A | 5 | 555.55 | |
| 8 | #PRGL | 1010-0 | 1A | 6 | 666.66 | |
| 9 | #PRGL | 1010-0 | 1A | 7 | 777.77 | |
| 10 | %%%% |
- A1 cell – SapphireOne at A1 will ignore the whole line it as it has no instructions in column A.
- A2 cell – At A2, it will write the G/L header into project 1A as it sees the period -1.
- Remaining lines – For the remaining lines it will then proceed to write various credit and debit amounts in from period 1 through to period 7.
- Period #0 – You could go up to period 30 although this would get somewhat unwieldly.
For General Ledger account 1020-0 it will have to be repeated agai. Then repeated for each and every G/L header and subsequent budget period data that is to be written into the Sapphire Gateway.
When it sees #### or %%%% in column A, it will stop processing data as that indicates to the system that it is not to read or write any further doe the spreadsheet.
- Two Step – Or you could use a 2-step process as follows.
- For any G/L account that is not in a project it will have to be created manually one at a time, or created by using the left-hand table above as in line 2 above!
- Once this has been done the table on the right table may then be used to enter in the data for each period as required for the G/L headers that you have now imported into the project.
From the documentation for #GLD on a previously page E and F in the above tables will be one or the other, as the budget amount will either be written in as a Debit or a Credit!
Tracking Notes #TTN
This table has been provided fpr the import or exporting of tracking notes.
| A | #TN | |||
| B | [TrackingNotes]_Sequence No | M | [TrackingNotes]_Reference | |
| C | [TrackingNotes]_Record Type | N | [TrackingNotes]_Priority | |
| D | [TrackingNotes]_Title | O | [TrackingNotes]_Component | |
| E | [TrackingNotes]_Status | P | [TrackingNotes]_CustomA1 | |
| F | [TrackingNotes]_Type | Q | [TrackingNotes]_EmployeeLink | |
| G | [TrackingNotes]_Product | R | [TrackingNotes]_ProjectLink | |
| H | [TrackingNotes]_Document | S | [TrackingNotes]_Description | |
| I | [TrackingNotes]_TN_Alpha1_30 | T | [TrackingNotes]_RiskLevel | |
| J | [TrackingNotes]_TN_Alpha2_40 | U | [TrackingNotes] | |
| K | [TrackingNotes]_ClientLink | V | [TrackingNotes] | |
| L | [TrackingNotes]_VendorLink | W | [TrackingNotes] |
You can review our Blog and YouTube channel for additional information and resources on SapphireOne ERP, CRM and Business Accounting software.