Vendor Overview
SapphireOne’s Vendor Inquiry function in Accounts mode is a vital tool for efficiently managing all expenses or purchases within the SapphireOne application. Once a Vendor is set up in SapphireOne, it becomes the central repository for all transactions associated with that specific Vendor.
Master Record
It is essential to highlight that the knowledge base articles use the term master record. When a Vendor is opened and saved in SapphireOne, it becomes the Vendor’s master record, capturing all relevant and essential information for that particular Vendor. The Vendor’s master record then plays a pivotal role throughout SapphireOne, serving as a comprehensive and definitive reference for that specific Vendor. Any modifications or updates made to this master record are permanent and have far-reaching implications across the SapphireOne application. When transactions are carried out for the Vendor, they are based on the most current information available in the Vendor’s master record. Therefore, ensuring the accuracy and completeness of the Vendor’s master record is crucial for maintaining consistency and reliability in all Vendor-related activities within SapphireOne.
Locations for accessing a Vendor Inquiry
For the convenience of users, the Vendor Inquiry item has been thoughtfully included in the menus of both Inventory and Job Projects modes. It’s worth noting that regardless of the mode from which a Vendor Inquiry is accessed, it leads to the same Vendor Inquiry function within SapphireOne. Therefore, users can access the Vendor Inquiry function from various modes in SapphireOne.
The Vendor Inquiry function has been documented from the Accounts mode article only in the knowledge base. If you have accessed this Vendor Inquiry article from Inventory or Job Projects modes in the knowledge base, you can click on this Vendor Inquiry link to read the article from the Accounts mode, which will open in the same browser tab that you are now using.
SapphireOne incorporates a built-in Contact Relationship Management (CRM) system that diligently monitors all interactions across Clients, Vendors, Job Projects, Assets, Payroll/HR, Employees, and Workbook. It maintains a comprehensive history of all contacts throughout the entire duration of your data file.
The CRM functionality in SapphireOne is specifically designed to efficiently track and manage interactions with various contacts, including Clients, Vendors, Job Projects, Assets, Payroll/HR, Employees, Workbooks, and all contacts. Users can easily record and log various communication activities, such as emails, phone calls, meetings, notes, and actions associated with each contact.
By leveraging SapphireOne CRM, your organisation gains a deeper understanding of past, present, and potential Clients, Vendors, Job Projects, Assets, Payroll/HR, Employees and Workbook leading to analysis of Client buying behavior improved relationship management and customer retention. For example, through analysis of Client buying behavior, an organisation may identify that its Vendor base has not recently supplied a particular SKU inventory.
SapphireOne’s CRM (Contact Relationship Management) is seamlessly integrated into every aspect of the SapphireOne application, providing users with a powerful tool to manage and organise contact details for Clients, Vendors, Job Projects, Assets, Payroll/HR, Employees, and Workbook data. The CRM module efficiently gathers data from various communication channels, including the company’s website and the inbuilt SapphireOne Softphone. It records all outgoing and incoming telephone calls associated with a contact, ensuring a comprehensive interaction history.
The CRM module also manages emails, and it can be integrated with external tools like Mailchimp for monitoring email campaigns to contacts. It tracks when emails are sent, opened, and how many times they are opened. Additionally, all interactions with contacts are automatically recorded, streamlining communication tracking and simplifying follow-up processes.
Users have the convenience of adding actions to contacts, which are automatically populated within the SapphireOne calendar. This feature ensures that important actions and follow-ups are never missed, enhancing productivity and time management.
SapphireOne CRM allows users to attach an unlimited number of documents and digital assets to each contact. Whether it’s contracts, proposals, or multimedia files, this capability ensures all relevant information is readily accessible and organised, making collaboration and decision-making more efficient.
Summarising the Benefits of SapphireOne CRM
SapphireOne CRM delivers enhanced daily support to both Clients and Vendors by providing real-time information, enabling timely decision-making. The core benefits of SapphireOne CRM encompass centralized data management, offering a comprehensive view of contacts, fostering improved customer relationships, facilitating data-driven decision-making, streamlining marketing efforts, and optimizing sales and purchasing processes. Below are the eight core benefits of SapphireOne CRM:
- Centralised Data Management – All contact information is consolidated in one place, ensuring easy access and efficient organisation.
- Comprehensive View of Contacts – Gain a holistic perspective of Clients and Vendors, facilitating a deeper understanding of their needs and preferences.
- Improved Customer Relationships – Build stronger and more meaningful relationships with Clients and Vendors, fostering loyalty and satisfaction.
- Data-Driven Decision-Making – Utilise data insights to make informed decisions, enhancing operational efficiency and business performance.
- Streamlined Marketing Efforts – Targeted marketing campaigns can be devised, ensuring more relevant messaging and increased engagement.
- Optimized Sales and Purchasing Processes – Efficient sales and purchasing workflows lead to improved productivity and revenue generation.
- Identification of Profitable Clients & Vendors – Analyse Client & Vendor data to identify the most profitable partnerships and opportunities for growth.
- Seamless Integration – The CRM is fully integrated across all company departments within a single data file, facilitating smooth collaboration and information sharing.
In summary, SapphireOne CRM empowers businesses by offering tailored services, responsive pricing, and personalized messaging. It creates a cohesive ecosystem where all products and services are linked through contacts for all functions within SapphireOne. This synergy leads to superior supply chain effectiveness and overall operational efficiency, resulting in improved business performance and customer satisfaction.
Vendor Inquiry Pages
SapphireOne’s Vendor Inquiry consists of 19 unique pages, each with a sophisticated interface dedicated to a specific aspect of vendor information. These pages include:
- Details – Stores vendor ID, name, address, contact details, and unlimited CRM contacts.
- More Details – Provides additional information such as last transaction, tax details, miscellaneous details, user-defined fields, addition/deduction details, and general messages.
- Custom – Contains 12 alpha fields, 8 real fields, 8 date and time fields, 14 client custom fields, and 2 client text fields.
- Current Balances – Displays balances and payment performance.
- FX Balances – Shows aged transactions, notes, and contacts in the vendor’s home currency.
- Credit Control – Provides an interactive view of aged transactions with balances and notes.
- Terms – Includes payment terms, discounts, bank details, credit control settings, control accounts, commission details, and control log.
- Transactions – Lists all current transactions.
- History – Presents a complete list of every transaction since the beginning of the data file for that vendor.
- Purchase Analysis – Offers a graphical interpretation of purchases by product or service, with the ability to select a date range.
- Purchases – Displays all purchases from inventory and job projects mode, including historical data.
- Keywords & Notes – Allows unlimited keywords and notes per vendor.
- Addresses – Supports unlimited delivery or billing addresses per vendor, including contact details, marketing information, keywords, and notes.
- Period Balances – Records current period balances, turnover by period, and unlimited historical data.
- Job Project – Serves as a repository for all job projects linked to the vendor.
- Email Log – Maintains a complete history of all email interactions between SapphireOne and the vendor.
- Action – Provides a comprehensive list of all actions related to the vendor.
- Documents (DMS) – Stores all attached documents associated with the vendor.
- Digital Assets – Allows unlimited digital assets, including PDFs, videos, photographs, JPEG, RAW, and HEIC files.
These pages cover various aspects of vendor management and provide a comprehensive overview of vendor-related information within SapphireOne.
SapphireOne CRM is fully integrated into every aspect of the SapphireOne application and collects Contact, Client and Vendor data from a range of different communication channels, including a companies website, telephone, email and marketing materials. For example, feedback from technical support calls can help provide direction for marketing products and services to that particular client in the future.
SapphireOne CRM gives businesses the ability to learn more about past, present and potential Clients and Vendors in order to improve customer relationships and retention. As an example, through the analysis of Client buying behaviour, a company might be able to determine that a client base has not been recently purchasing a particular SKU inventory. After analysis of the client data in SapphireOne CRM, the company can use the opportunity to better focus their Materials Resource Planning (MRP) to better plan for their purchasing and supply from their vendors.
Vendor Benefits of SapphireOne CRM
With SapphireOne CRM Vendors are better supported on a daily basis with real-time information in a timely manner. Below are the eight core benefits of SapphireOne CRM.
- Identifying a businesses most profitable Vendors.
- Fully integrated across all companies and departments within the one data file.
- Superior supply chain team effectiveness and efficiency.
- Targeted and responsive pricing.
- Tailored products and services.
- Improved Vendor services.
- Personalised targeted messaging.
- All SapphireOne products and services linked by both Vendors and Clients.
Vendor Inquiry Overview
SapphireOne’s Vendor Inquiry screen is the single repository for all master Vendor information. There are many additional pages available in a Vendor Inquiry.
When opening a Vendor Inquiry the user is displayed with a list of the basic details of each Vendor, including ID, Name and Address as well as the Telephone number and Main Contact.
To obtain full details for the Vendor you can Look by selecting a Vendor and then selecting ![]() . To Modify a Vendor item, you can double click on the Vendor, you can click on the Vendor once and select the
. To Modify a Vendor item, you can double click on the Vendor, you can click on the Vendor once and select the ![]() icon or use keyboard shortcut. Both screens look the same but only by selecting Modify can you amend the data. To create a new Vendor item, click on the New icon or use the keyboard shortcut.
icon or use keyboard shortcut. Both screens look the same but only by selecting Modify can you amend the data. To create a new Vendor item, click on the New icon or use the keyboard shortcut.
SapphireOne retains strict audit control and therefore does not allow the deletion of Vendors, however SapphireOne does allow them to be made inactive providing certain criteria are met.
All inquiry screens in SapphireOne offer the option to customise the list of items displayed on the page. This feature, known as Custom Inquiry, allows you to select the data fields to be shown and the order in which the columns of data appear across the screen. Although a client list is used as an example below, any type of inquiry can be customised within SapphireOne.
The list below represents the standard inquiry list, displaying a basic set of data fields for each client record:
Swap to Custom Inquiry
When you select the ‘Swap to Custom Inquiry’ button in the lower left-hand corner of the screen, SapphireOne will display the default Custom Screen, as shown below. This Custom List screen provides the user with two main options for organising the data display:
- To add or remove the data field columns displayed on the screen, click the ‘Setup’ button in the bottom right corner of the screen. Within the Setup screen, you can right-click on the column lines and choose from Delete, Move Left, or Move Right. More information on the Setup screen is provided below.
- To change the order in which the data field columns are displayed, click the ‘Setup’ button in the bottom right corner of the screen. Within the Setup screen, you can right-click on the column lines and choose from Delete, Move Left, or Move Right. More information on the Setup screen is provided below.
Once you have customised the Custom Inquiry screen, the screen view will be unique to you, and each time you log in, you will see the same custom view. You also have the option to select and save an unlimited number of custom views. This can be done in the ‘Setup’ screen, as detailed below.
The Inquiry screen below is the initial Custom Inquiry screen, which can be modified by the user.
Custom Inquiry Screen ‘Setup’ Function
To begin setting up your Customised List screen, click the Setup button, as shown above. The Setup screen will appear, as displayed below.
From this screen, users can add and remove data columns as needed. Almost every field within the SapphireOne data tables can be included in the Custom List screen, provided the user has the necessary authorisation.
The screen features several menu items across the top, which include:
- Reset to Default – Clicking this button resets the display to the default settings determined by SapphireOne. When you add a new data field, SapphireOne will place it on the right-hand side of the data columns. You can then click on the field heading and drag it to your desired location on the screen.
- Show Related Record – This option allows you to add related fields from other tables. By ticking the Show Related checkbox
 at the top of the screen, you can select a related record, and a mini view of that related record for the chosen entry will be displayed for the currently selected record. You will need to select the fields to be displayed.
 - Favourite Set – Located at the top left of the screen, this option enables you to save a custom-created screen for future use. For instance, you can have a simple Inquiry screen for general use and a more complex screen view when auditing specific information.
Unless the user has been granted access to Payroll any Vendors that have a Class of SUPER entered will not be displayed in the list of Vendors nor will any of the related transactions be displayed. For payroll officers there is a specific Super Vendor Inquiry in Payroll mode which has exactly the same complete functionality as this Vendor Inquiry here.
SapphireOne does not allow the deletion of Vendors however they may be made inactive provided that the vendor has NO outstanding transactions, in other words a zero balance!
If the Vendor has been made inactive the user will have to go to the ![]() tools icon on the main toolbar, select the down arrow to display the tools drop down menu, and select the Include Inactive option
tools icon on the main toolbar, select the down arrow to display the tools drop down menu, and select the Include Inactive option
If any transactions are auctioned against an inactive Vendor the Vendor is at that point automatically made active again. This allows old or inactive Vendors to be tracked with ease. To make a Vendor inactive de-select the ![]() checkbox (Upper right-hand corner of the Vendor Inquiry screen),
checkbox (Upper right-hand corner of the Vendor Inquiry screen), ![]() and the Vendor will no longer appear in the Vendor Inquiry list unless as mentioned above, the user asks for Inactive Vendors to be listed.
and the Vendor will no longer appear in the Vendor Inquiry list unless as mentioned above, the user asks for Inactive Vendors to be listed.
The Australian Business Number or ABN is the key to the Australian Tax System. The Vendor must supply an ABN number to you before you make any payment for the supply. Alternatively they may elect to also supply their Tax File Number. (TFN). There are exceptions to this rule for further details on the exceptions that may be applied please refer to the ATO web site for more details.
These tax number details are stored on the second Page of the Vendor Inquiry More Details.
They are in the Tax Details area and this area is in two sections as documented in a later page in this section. The upper section is used when an ABN is supplied. The lower section is used when the Vendor supplies their TFN.
The Australian Business Number or ABN is the key to the new Tax System. An ABN must be quoted to you before you make any payment for the supply. To assist in the initial verification process, a Custom Function has been included. To access this function select go to: Utilities \Utilities \ Custom Functions.
Then select the Financials Tab.Then from there select Check Vendor ABN.
In SapphireOne, any data entry field with a light blue background ![]() is a linked data entry field. If you don’t know the exact ID to enter, you can replace some or all of the characters with the @ or ? characters. SapphireOne will then display a shorter list of records to select the correct ID from. For example, if you enter K@, SapphireOne will display all records beginning with K.
is a linked data entry field. If you don’t know the exact ID to enter, you can replace some or all of the characters with the @ or ? characters. SapphireOne will then display a shorter list of records to select the correct ID from. For example, if you enter K@, SapphireOne will display all records beginning with K.
Moreover, if a data entry field heading is underlined, it indicates that once an ID has been entered, you can click on the underlined heading. SapphireOne will then perform a specific query for the entered ID and display a list with only a single item in it. You can then view or modify the item as normal.
Vendor Inquiry Details Page
When first Looking ![]() or Modifying
or Modifying ![]() a Vendor Inquiry the Details page is the first page the user is presented with. You can change the Page you are viewing by navigating to the Page drop-down menu on the left hand side of the SapphireOne Toolbar.
a Vendor Inquiry the Details page is the first page the user is presented with. You can change the Page you are viewing by navigating to the Page drop-down menu on the left hand side of the SapphireOne Toolbar.
Vendor Area
- ID – The Vendor ID is the very first item to be created in the Vendor Inquiry screen. SapphireOne recommends establishing a criteria before entering any Vendor ID’s, as once saved these ID’s may not be deleted i.e. SapphireOne can be entered as Vendor ID SAPONE. Once the ID has been created it will become the default Vendor ID for the Client. Under normal circumstances the Vendor ID will not be changed or modified, however it can be amended by going to Utilities > Utilities > Sapphire Tools > Change ID. Only an authorised user can modify a Vendor ID.
- Name – The name of the Vendor will be entered here. The Vendor Name can be modified at any time.
- Area – This data entry field is used for grouping clients for reporting purposes. For example, if you wished to group your clients by a rating system i.e 1-9 or A-E, you would use the Area field.
- Class – This data entry field is used to assign the Vendor to a Vendor Class. These should be set up before any Vendor is is created in SapphireOne. To create a Vendor Class go to Accounts / Payables / Class Inquiry.
- Rep – This data entry field is used to assign a particular sales representative to the Vendor. Sales Representatives are set up through the Inventory screen. This is also important as Sales Reps can be limited to only viewing their own Vendors. This is an optional field.
- Risk – When the data entry field is selected that SapphireOne will pop a risk chart enabling the user to select a risk from 1 through to 25.
- Company – SapphireOne will by default enter the Company that the user is logged into and this may not be altered by a user logged into a specific company.
- Job Project – The Vendor may be linked to a Job Project if a Job Project ID is entered into the data entry field. Job Projects are set up in the Job Project Inquiry screen. This is an optional field.
- Department – The entry of a department is optional depending on a number of factors. One factor would be if reports are to be generated at the department level. This is an optional field.
- Service Center – When the Services Function is used there is provision for the selection of a Service Center. In the Services Function There is a data entry field for the selection of a Vendor which has a light blue background so it is a searchable field. Then when searched it will only display those vendors that have this checkbox selected,. If the address has been entered correctly SapphireOne will also display on Google maps the location when the button is selected.
- Open Item & Active Check Boxes – The checkbox when a new Vendor is created is automatically set as Active and its state may be altered to Inactive at any time provided that the Vendor has a ZERO balance. It is not advised to change these checkboxes as this can cause confusion in the Vendor datafile which can not be easily altered at a later point.
Paperclip Management Saves Time with Easy File Attachment
The SapphireOne Document Management System (DMS) features a convenient Paper Clip button on all data entry and inquiry screens. This enables users to attach relevant documents or files to every transaction or record. The system also includes a dedicated page for managing documents related to a specific transaction or record, providing robust version control of the attached documents.
The color of the paper clip serves as a visual indicator of the status of the attached documents. A red paper clip indicates that there are no documents currently attached to the transaction or record, while a green paper clip indicates the presence of one or more attached documents. Additionally, the word “Items” is preceded by the number of attached documents, providing a clear and concise representation of the current status.
SapphireOne’s Document Management System is highly versatile and can accommodate a wide range of document types, including Adobe Acrobat, spreadsheets, word processing documents, photo files, JPEGs, CSV files, HEIFs, and MP4 files. With the ability to store an unlimited number of documents for an indefinite amount of time, the system provides users with a comprehensive and efficient solution for managing all their important files and documents.
Master Defaults
In SapphireOne, users have the flexibility to control the size of individual documents and determine where they are stored through the Master Defaults settings. These settings can be accessed by navigating to Utilities > Controls > Master Defaults > System Page.
Within the Documents area of the SapphireOne page, there is a Document Size Limit setting with a default size of 10 MB, which can be adjusted as needed. Additionally, users can choose to store the documents either as part of the data file or as separate files, by selecting the appropriate option from the two radio buttons provided.
To attach a document to a transaction, simply click on either the ![]() or
or ![]() Paperclip button. The Document List window as seen below will be displayed allowing the the user to select the desired file to attach.
Paperclip button. The Document List window as seen below will be displayed allowing the the user to select the desired file to attach.
How to Attach Documents Using SapphireOne Paperclip
SapphireOne also provides users with the convenient Drag & Drop functionality to attach documents. To use this feature, simply drag a document from your local computer into the Document List screen and it will be attached automatically. This streamlined process saves time and effort and makes it easier to manage your important files and documents within SapphireOne.
If SapphireOne detects that the document name already exists, a pop-up will be displayed alerting the user. Alternatively, the user can also select the
If SapphireOne detects that the document name already exists, a pop-up will be displayed alerting the user. Alternatively, the user can also select the Plus  button to select a document to upload from the local computer.
SapphireOne’s document management system provides users with the ability to easily manage their attached documents. After a document has been attached, the user has the option to rename it by right-clicking on the file and selecting Rename This feature is useful for maintaining consistency in document names across all records and helps to keep the system organised and efficient.
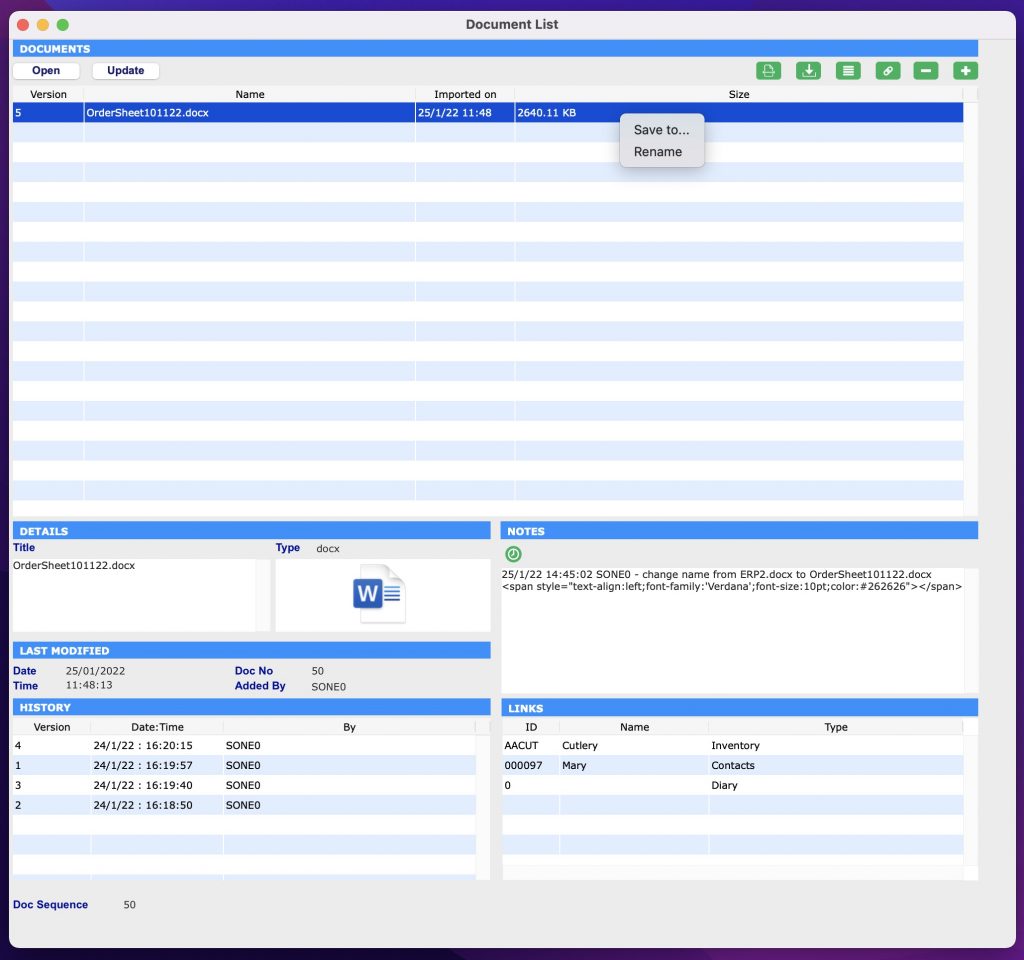
Documents Area within Document Management System (DMS)
- Open
 – By clicking on this button, the document will be opened for viewing, allowing users to review its contents without having to leave the SapphireOne system. This feature provides a convenient and streamlined way to access and review important documents within the context of the larger document management system.
 - Update
 – When this button is selected an alert is displayed allowing the user to import a new version of a highlighted document, enabling version tracking. After selecting a new version, the user enters a version number. The latest version becomes available, with previous versions accessible in the History area. The updated document remains linked to associated transactions.
 - Scan
 – This option in SapphireOne provides users with the ability to scan a document directly into the data file and link it to a transaction. This feature requires access to a local or network scanner, and the appropriate scanner and software must be installed on the local machine or network. By using the Scan option, users can quickly and efficiently digitise physical documents and associate them with the relevant transactions within SapphireOne.
 - Save
 – This button in SapphireOne allows users to save the currently highlighted document to disk. This feature provides a convenient way to export a copy of the document for backup or further use outside of the SapphireOne system. By clicking the Save button, users can easily access a digital copy of their important documents and ensure that they are properly preserved and accessible.
 - Link Documents
 – With SapphireOne, users have the ability to link a highlighted document to one or more transactions within the data file. To do this, the user simply clicks the “Link” button, which will bring up an alert allowing them to make their selection. This feature provides a convenient way to associate important documents with multiple transactions, ensuring that all relevant information is easily accessible from one central location. For more information about linked documents, refer to the Links Area documentation provided by SapphireOne.
 - Link Existing Documents
 – SapphireOne provides users with the ability to link existing documents in the data file to the current transaction or record. To do this, the user simply clicks the Link Existing button, which will bring up an Alert allowing them to choose from a list of available documents. This feature provides a convenient way to associate existing documents with additional transactions, ensuring that all relevant information is easily accessible from one central location. For more information about linked documents, refer to the Links Area documentation provided by SapphireOne.
 - Delete
 – This option in SapphireOne allows users to remove the currently highlighted document. By clicking the Delete button, the selected document will be removed from the system, providing users with a simple way to manage their attached documents and ensure that only relevant and up-to-date information is stored within the system.
 - Plus – SapphireOne includes a search function that makes it easy for users to select a document saved on their local computer. This feature provides a convenient way to quickly locate and attach the desired document, streamlining the process of adding and managing important files within the SapphireOne system.
Details Area within Document Management System (DMS)
The Details area within SapphireOne’s Document Management System (DMS) provides users with additional information about the selected document. When a document is selected in the Documents area, the Details area will automatically display the title of the document and the type of file. This information helps users to quickly identify and manage their important files and documents, providing a more efficient and organised system for document management.
Notes Area within Document Management System (DMS)
The Notes area is for entering any notes related to the document. The user can select the green clock button ![]() to create a time and date stamp for every note added.
to create a time and date stamp for every note added.
The Notes area will also keep an automatic user log when any changes are made to the document. For example, if the document is renamed or new links are created. SapphireOne will record the date, time and user that made the modifications.
Document Details Area within Document Management System (DMS)
The Document Details area within SapphireOne’s Document Management System (DMS) provides additional information about the selected document. This area automatically displays information such as the date and time the document was added, the document number, and the user who added the document. This information helps users to quickly understand the context of the selected document and provides a comprehensive history of the document’s status and interactions within the system. The Document Details area is a valuable resource for managing and tracking important documents within SapphireOne.
History Area within Document Management System (DMS)
The History area within SapphireOne’s Document Management System (DMS) provides a record of the complete version history of the selected document. SapphireOne tracks all version changes and automatically displays the document’s history in this area.
As new versions of the document are imported using the button, the History area will be automatically updated, ensuring that all previous versions of the document are recorded and available for viewing. This enables users to access the most recent version of the document, while still maintaining a complete history of all versions.
The History area provides a valuable resource for tracking the evolution of a document and understanding how it has changed over time. By having a complete record of the document’s history, users can easily review past versions and understand the context of the changes that have been made.
Links Area within Document Management System (DMS)
The Links area within SapphireOne’s Document Management System (DMS) is used to link documents to specific transactions or areas within SapphireOne. This area provides a comprehensive view of all linking information related to the document, including any functions used to import the document into SapphireOne.
By linking documents to transactions and areas within SapphireOne, users can easily associate important information and files with the relevant transactions, providing a more organised and efficient system for document management. The Links area is a valuable resource for understanding the relationships between documents and transactions within SapphireOne.
To add additional links to a document in SapphireOne, follow these steps:
- Select/highlight the document you wish to link.
- Click the
 Link Document button.
 - The Files pop-up window will be displayed.
- From the File drop-down menu, select the item you want to link the document to.
- In the Value data entry field, enter the necessary details (ID).
Note that the Value data entry field has a light blue background and is searchable by entering the wildcard symbols ‘?’ or ‘@’, making it easier to find the information you need. By linking documents to specific transactions and areas within SapphireOne, users can create a more organised and efficient system for document management.

Updating a Document within Document Management
The process for updating a document in SapphireOne is straightforward:
After clicking the “Update” button in SapphireOne, the user will be asked to confirm if they would like to import a new version of the document:
- Confirm that you wish to import a new version of the document by selecting Yes.
- The user will then be prompted to choose the updated document to open.
- After selecting the updated document, a secondary dialogue will appear, asking the user to enter an alphanumeric value for the new version.
- Enter the desired value for the new version and select OK
By following these steps, SapphireOne will replace the previous version of the document with the updated document. It will also maintain a complete record of all previous versions in the History area. This process ensures that the most up-to-date information is always readily accessible within the SapphireOne system.
Document Management using SapphireOne Documents Inquiry
In addition to SapphireOne’s Document Management Paperclip functionality, SapphireOne Documents Inquiry function in Workbook Mode provides users with a centralised repository of all documents and files stored within the SapphireOne data file. This function gives users the ability to add new documents, modify, view, or delete existing documents from within the Documents Inquiry screen.
Any revisions made to a document within the Documents Inquiry screen will be automatically updated across all areas where the document is linked within SapphireOne. Similarly, any modifications made to documents within the SapphireOne Paperclip Document List window will be reflected within the Documents Inquiry window.
For example, if a document is renamed within a transaction Paperclip Document List screen, the updated document name will be reflected when viewing the document in the Documents Inquiry screen.
You can learn more about SapphireOne Documents Inquiry functionality within the Documents Inquiry article.
Document Control within Document Management
In this example, we have an inventory item with documents attached, such as installation instructions and a packing checklist. The item is added to a sales order, manufactured, shipped, and the job is completed. SapphireOne’s Document Management Paperclip functionality allows for easy attachment and access to all relevant documents throughout the entire process, from sales order to completion. This improves efficiency and helps ensure all relevant information remains consistently available and up-to-date.
A year after the completion of the job, a revision of the inventory item is made, along with updates to its associated Documents (DMS). To keep the information organised and up-to-date, it is not necessary to create a new inventory item for the revision. Instead, the documents and files can be easily updated using SapphireOne’s DMS file that are attached.
By using the Update button within the DMS, users can import a new version of the document and SapphireOne will automatically keep track of all version changes, ensuring that the most recent information is readily available. This process saves time and effort by allowing users to simply update the documents and files, rather than creating a new inventory item for each revision.
In SapphireOne, when referring back to the original completed sales client invoice or job projects client invoice, the associated documents and files will be displayed in their original state or as they have been updated. The user has the option to view the documents and files as they were at the time of completion or as they currently are, providing a comprehensive and accurate record of all relevant information.
In the screen shot above, both the current and historical documents are attached to the inventory item. As a SapphireOne user, you have the ability to edit the list and choose to delete the historical document by simply selecting the Minus button.
Additionally, you also have the ability to modify the existing document, keeping a log file of each and every time the document has been revised. This ensures that a complete and accurate record of all revisions to the document is maintained, allowing you to easily reference the most recent version or any previous versions as needed.
The ability to manage both current and historical documents, as well as the option to modify and delete them, provides users with a flexible and efficient solution for document management within SapphireOne.
Inactive Record Management
In SapphireOne, all records are initially created with the Active checkbox selected on the first page, typically the details page, of the record.
In SapphireOne, designating a record as inactive will result in its removal from the standard inquiry list. This principle applies across various categories in SapphireOne, not just limited to Clients and Vendors, which are used as examples in this article. For instance, if there is a former employee, you can mark them as inactive within SapphireOne if they are no longer employed by the company.
Deleting records is prohibited in SapphireOne for the purpose of maintaining an audit trail. Instead, you have the option to mark a Client, Vendor, or any other record as inactive. This action ensures that the record no longer appears in standard inquiries while still retaining its information for future reference.
How to Make a Record Inactive in SapphireOne
To make a record inactive in SapphireOne, follow these steps:
- Access the record in SapphireOne.
- De-select the Active checkbox on the first page usually the Details Page.
- SapphireOne will display a warning to the user if the deletion is not allowed.
How to View Inactive Records in SapphireOne
To access the Include Inactive function when viewing a list of items in SapphireOne, the user has a number of options as follows:
- Tools Menu – Select the small arrow located just to the right of the Tools button
 . This will display a drop-down list with the Include Inactive function on it if it is available.
 - Options Menu – Go to the options menu which is one of the menu selections at the top of the screen:
- Find – Select the Find option or use the keyboard shortcut Command/Ctrl F and SapphireOne will display the Find pop-up as seen below.
- Drop down menu – From this pop-up select the All Records option.
- Finding – Select the Find button at the bottomof the screen. SapphireOne will now include all active and inactive records within your list on screen..
Grouping Area
The Grouping Area in the Vendor Inquiry screen includes three tags which are by default named: Tag, Tag2 and Tag3. These tags are default headings and the user may go to Utilities / Controls / Master defaults / Vendors Page and rename the tags as required.
These same three tags are also displayed as part of the details displayed when the list of Vendors is on screen. These tags are mainly used for reporting and reconciling Vendor details.
When a detailed query is executed they form part of the list of Fields when a Detailed Query is executed.
When a Quick Report is executed they are listed as part of the Master Table and all SapphireOne report writers have these fields accessible.
Address Area
The Address Area has two address options to select from in the drop-down menu, the Standard Addresses and Order addresses.
Standard Addresses
- Standard – This option from the drop down menu is for the storing of business addresses for the Vendor.
- SapphireOne currently has provision for storing of two business addresses, their Postal Address and Physical Address. If the Postal address is entered, this may be transferred to the Physical address area by selecting the
 arrow.
- SapphireOne currently has provision for storing of two business addresses, their Postal Address and Physical Address. If the Postal address is entered, this may be transferred to the Physical address area by selecting the
- Telephone Numbers – There is provision for the entering of the Main Phone and Facsimile numbers for the Vendor in this area.
- Email Address – When an email is to be sent by the SapphireOne automatically it will commence here in a Vendor Inquiry as the first precedence when an Invoice or Remittance is sent to be by email.
- Any email address entered into the Email data entry area on as seen above, is used by SapphireOne for the To field in the email. The user should be aware that there are additional locations within SapphireOne where SapphireOne will check for email addresses.
- When the To button is selected, in an email, this Address List appears as a pop up, allowing you to make a selection from a List of email addresses.
- For your convenience they are grouped under tabs namely, Clients, Vendors and Contacts.
- Selecting the
 checkbox nearby will allow the SapphireOne to group emails to the Vendor and send them as a batch.
The Vendors email address inserted here is essential for the correct functioning of the email process when emailing Remittances and Invoices. Unlimited email addresses can be entered by putting a comma ( , ) with no spaces between emails.
For further information on sending emails please refer to the Navigation and Procedures.
Order Addresses
To enter an address into this address data entry field select Orders from the address drop down menu. The address area will alter allowing the entry of an address that will be inserted to any Order or a Purchases that are raised.
The user should remember that these addresses will be printed on any reports that are hard coded into SapphireOne. Allowances will have to be made for the number of lines and character wide the address will be.
Contacts Area
The Vendors area in the Vendor Inquiry screen displays a list of Vendor contact details. This list will be limited to the contacts linked to this Vendor only.
To amend and update Vendor contact details, simply double click on the Vendor in the Contact Details area and enter the new details.
There are four icons just above the Vendor contact list for user management of the Contact list. These include:
Highlighting a contact and selecting the ![]() button will remove the selected contact.
button will remove the selected contact.
Selecting the ![]() button will start the creation of a new contact. This brings up a new screen to allow entry of all details for a contact. The user will have to complete all details required. Any contacts created here under the Vendor Inquiry function will automatically have a link to this Vendor.
button will start the creation of a new contact. This brings up a new screen to allow entry of all details for a contact. The user will have to complete all details required. Any contacts created here under the Vendor Inquiry function will automatically have a link to this Vendor.
The Link button ![]() is for the updating Contact links. It is strongly recommended that new contacts are added using the function that they are to be linked to, in this case, a Vendor Inquiry. This will automatically create the link to the client that is currently being modified.
is for the updating Contact links. It is strongly recommended that new contacts are added using the function that they are to be linked to, in this case, a Vendor Inquiry. This will automatically create the link to the client that is currently being modified.
If there are too many Contacts to comfortably view in the normal viewing mode of the Details Page of a Vendor Inquiry, select the ![]() button to view the list of contacts full screen.
button to view the list of contacts full screen.
The Update Contacts button is for the updating of Contact links. A pop up will be displayed asking for verification of this operation. It is strongly recommended that new contacts are added using the function that they are to be linked to, in this case, a Vendor Inquiry. This will automatically create the link to the vendor that is currently being modified.
The Open Contacts Inquiry button will perform an Inquiry for contacts linked to the currently open Vendor. It will then display them is a list enabling viewing and modification of these Vendors Contacts
There is a Contacts item on both the Inquiry Pallet drop-down menu and also from the General drop-down menu when using Workbook mode. Any contacts created there can be manually linked.
Importing Contacts
Selecting the ![]() button will display the Select Contact Master pop-up. There is a drop-down menu available for the user to select contacts.
button will display the Select Contact Master pop-up. There is a drop-down menu available for the user to select contacts.
For example, if Vendors is selected and the ‘@’ symbol is entered into the data entry field SapphireOne will display a list of Clients to choose from.
Highlight the Vendor that you want the contacts for and select OK. SapphireOne will then display a list of contacts for the selected Vendor. Tick the contacts that you want to Import and select OK.
NOTE: One or more contacts may be added at once and the contact is duplicated when imported. The contact may be copied from any function within SapphireOne not necessarily from another Vendor as documented here.
More Details Page
The More Details Page holds internal credit information and additional details about the Vendor.

Last Transaction Area
This area contains details taken from other areas of SapphireOne, including the amount of the Last Receipt, the date of the Last Transaction and when the Vendor details were Last Modified.
Tax Details Area
- Tax No – The Tax Number is the ABN of the Vendor (in Australia).
- Note that this Tax No is underlined. Double clicking on it will tell SapphireOne to execute the default web browser on SapphireOne and to go to ABN look up. It will then automatically enter in the number as entered on SapphireOne and check if the ABN is both valid and active.
- The user must enter the number without the spaces. When the user tabs away from this data entry field SapphireOne will automatically enter the space for you.
- Tax Code – Enter the tax code for the Vendor For example, in Australia this would usually be S for 10%GST.
- Tax Rate – The Tax Rate displayed depends on which Tax Code is entered. These are set up in Utilities Mode.
- Exempt Checkbox – The Exempt checkbox is used for Australian companies that deal with overseas clients. For example, selecting the Except Checkbox will mean that overseas will not be charged any Australian tax.
- Use Checkbox – Selection of the Use checkbox tells SapphireOne to override SapphireOne Settings and to use the tax rate entered in the Tax Code data entry field here.
- PAYG Checkbox – Selecting this checkbox will activate the data entry field allowing the withholding rate to be used with all associated vendor transactions to be entered. This is based on the Type control below.
- ATO Branch No – If applicable enter ATO Branch Number here.
- Type – This data entry field controls the type of PAYG Payment Summary form that SapphireOne Payroll will generate on the transfer of data.
- TFN – If supplied this is where the Vendors Tax File Number may be recorded.If a Vendor is to be exempt to apply the principle to SapphireOne you need only select the Exempt check box.
When entering a Vendor Invoice into SapphireOne where the Vendor does not have an ABN entered, SapphireOne will automatically withhold 46.5% providing the Exempt box has not been checked. If this transaction has then been posted prior to an ABN being entered when attempting to process the Payment SapphireOne will automatically withhold the 46.5%.
If the Vendor Invoice has not been posted you may edit the Invoice after entering the ABN in the More Details screen of your Vendor Inquiry. Alternatively, if the Vendor Invoice has been posted you will need to use the Reverse Transaction function located within Sapphire Tools and re-enter the transaction after entering the Vendor’s ABN in the More Details screen of your Vendor Inquiry.
Miscellaneous Area
- Facsimile No – Fax numbers can be entered here.
- Default GL Code – A Default GL Code account number can be recorded here. This will automatically enter the GL Code for any Vendor Invoices entered in Accounts mode.
- Currency – This Currency drop-down list is where the currency that the Vendor trades in is selected from a drop-down list. This drop-down menu will ONLY be displayed when a NEW Vendor is being created. Once a single transaction has been performed against this Vendor it will be permanently removed.
User Defined Area
In this area, four user defined fields can be set up as required. The first two fields are indexed and will appear in the Find ‘Command/ctrl F’ screen to allow fast searching for secondary data. All four fields can be queried by using the Detailed Query ‘Command/Ctrl Y’.
These fields can be renamed by going to Utilities / Controls / Master Defaults / Vendors
Addition/Deduction Area
- Ignore Levy Rules Checkbox – Selecting this checkbox will tell SapphireOne to ignore any levies setup in SapphireOne for this Vendor only.
- Ignore Royalty Rules – Selecting this checkbox will tell SapphireOne to ignore any Royalties setup in SapphireOne for this Vendor only.
General Message Area
Any comments or information about the Client may be entered here. When a new transaction is created for the particular Client this general message will automatically appear to alert the user. If nothing is entered here, no alert message will be displayed.
Custom Page
Custom Page Overview
SapphireOne’s Custom page features text fields designed for versatile, user-defined purposes. Each field is assigned a variable by SapphireOne, which is displayed as the default field heading label. Users can take note of the desired field or heading variable for customisation and modify it by navigating to Utilities > Controls > Change Names. Detailed instructions on this process will be provided below.
The Custom page is organised into the following sections:
- Alpha – Allows letters and numbers, but cannot be used for arithmetic functions
- Real – Allows numbers only, and can be used for arithmetic functions
- Date / Time – Date fields store date values and can be used for date functions, while Time fields store time values and can be used for time functions
- No Heading Defined – Features eight alphanumeric fields that cannot be used for arithmetic functions
- Text – Accepts letters, numbers, and special characters, but cannot be used for arithmetic functions
The data entry fields in these Custom Pages can also be employed in Sapphire Custom Reports, Quick Reports, Custom Inquiries, 4D View Pro, and 4D Write Pro Reports, just like any other data entry fields within SapphireOne.
The example Custom Page below is from an Asset Inquiry; however, the process for customising this page remains the same, irrespective of the function in which the Custom Page is located.
Default Variable Values
In the default variable values defined by SapphireOne, the first number signifies the position of the field within the group, while the second number denotes the maximum number of characters for the data entry field.
For instance, ASAlpha_1_20 indicates that it is the first data entry field in the group and can hold up to 20 characters. Similarly, ASAlpha_8_80 shows that it is the eighth data entry field in the group, with a capacity for a maximum of 80 characters.
To modify the headings on a Custom Page:
- Write down the exact names of the headings you wish to modify.
- Navigate to Utilities > Controls > Change Names. Keep in mind that when performing this procedure, you will be warned that only one user should be logged into the data file.
- Upon accessing the Change Names function, a dialogue box will appear. Then, refer to your list of names and scroll down the list to find the headings you want to modify.
- For each heading:
- Highlight the name.
- Enter your new name in the lower data entry field.
- Click the Update button to save the changes in SapphireOne.
Vendor Inquiry Current Balances Page
The Current Balances screen shows current aged balances for the Vendor.
Include Unposted Checkbox
The value of entered but un-posted transactions can be shown by ticking the un-posted checkbox in the center of the screen. The new values will not be visible in the chart until the screen has been re-drawn. You can force this by re-selecting the Column or Pie button radio button in sequence.
A Balances graph gives a visual appraisal of the Client’s current status as a Column chart.
Vendor Inquiry FX Balances Page
This screen displays the foreign exchange information for balances relating to the Vendor. The Currency that each Vendor trades in is set in the More Details Page when a new Vendor is first created.
We have selected USAABC for this FX page that is displayed above.
The user should note the Type column which is the third column from the left in the transaction lines area. For Vendors that trade in a foreign currency the currency Type will be added to the type as a suffix i.e. Vendor Invoice USD (VI USD).
The Aged area will display aged balances, in the top right hand corner of the screen in the currency selected, such as Current 30 Days, 60 Days, 90+Days and Total Due.
Transaction Details Footer
- Discount % – This displays any discounts applied for the Vendor.
- FX – This displays the current exchange rate for the FX Vendor.
- Discount Days – This displays the number of days that the discount will be applied to.
- Look Button – For the highlighted line selecting this button SapphireOne will display the transaction enabling the user to see what is in the transaction itself.
- Invoice Button – At the bottom of the screen, if it is an Invoice there will be an Invoice Button. This enables the viewing of the original Invoice
- Print Source Button – When this button is selected SapphireOne will print the currently selected transaction with today’s date on it.
Vendor Inquiry Credit Control Page
This screen displays all the Client information, i.e. all current Transactions, Balances, Contact Details and Notes.
This screen is designed for real time Credit Control and gives the user the ability to set notes and alarms for reminders.
By clicking on the column headings, you may sort any column into ascending or descending order. Highlighting a transaction brings up the allocations linked to it and this allows viewing of the data in more detail.
The top right-hand corner of the screen displays the Aged which includes the Opening Balance, Current, 30 Days, 60 Days, 90+ Days and Total Due. By selecting any one of these underlined headings in the Aged area, an immediate filtering for the ageing of the displayed transactions is performed. For example, in the screenshot below, the transactions have been filtered to display Current transactions only.
- Terms Based Checkbox – Alternatively, you may alter the data being displayed in the Aged Balances area by selecting the checkbox in the center of the screen.
- Credit Stop Checkbox – This checkbox puts the client on stop credit which prevents them from processing any new transactions until their account is bought back within their credit limit. This checkbox is linked to the Stop Invoices data entry on Credit Stop checkbox on the Vendor page of Master Defaults. If the Master default above is not selected, users will only receive a warning that the Vendor on Credit Stop, but will still be permitted to raise invoices for the Vendor. Once that has been selected, users will not be permitted to raise any invoices for any Vendor placed on Credit stop.
There are ten buttons across the lower section of the screen and the list below gives a short description of what each one does. A number of these buttons have provision for the E-Mailing of various reports to the selected Vendor. When a user selects a record within the Credit Control screen that is linked to an Inventory Mode Transaction, the Open Invoice and Print Invoice buttons will become active.
- Open Invoice – This button is for the purpose of E-Mailing invoices to customers. The procedure is as follows:
- First highlight the transaction in the list and then select the Open Invoice button. A list displaying the required invoice will then be displayed and the user may then view or modify it as required.
- Open the invoice by double clicking on the invoice. Once the invoice itself is displayed the user may then select the small arrow on the right side of the Print icon on the main toolbar. All of the standard print options are displayed in the drop-down menu including the Email option.
- From there the user is able to enter the relevant recipients if not pre-filled in and which type of report is to be attached to the email.
- Print Invoice – When this button is select SapphireOne will immediately display the print dialog popup enabling either the printing or re-printing of the linked invoice.
- Look – When the Look button is selected SapphireOne will display a screen showing the Transaction details.
- Retrieve Linked – When this button is selected SapphireOne retrieves linked transactions that have been moved into History via allocation. The user will be presented with a pop-up confirming this.
- Load – When this button is selected SapphireOne will display a pop up asking for a date to view a statements up to a specified date.
- Reload Screen – Selecting this button will reset the screen to its original view.
- Statement – Selecting the button will cause SapphireOne to display the Vendor Statement Reports print dialog popup. This allows the user a number of options for the printing of Vendor statements as of today’s date. It should be noted that one of the options is the provision for the E- Mailing of the statement to Vendors.
- Allocation – This button provides a convenient short cut to the Vendor Allocation function. When a transaction has been highlighted and the Allocation button selected, SapphireOne will then check to see what Vendor is linked to the transaction that was selected, and then display any un-allocated transaction for that Client in the list. To allocate any of the transactions in the list, first highlight it, and then select Allocation from the Tools menu on the main toolbar. The standard allocation page will then be displayed enabling the user to immediately allocate the transaction.
- Find – When this button is selected, SapphireOne will display the detailed query function enabling detailed query to be performed.
- Open – When this button is selected, SapphireOne does a specific search for historical transactions in SapphireOne for the currently selected, Vendor.
Vendor Inquiry Terms Page
The Terms screen is the main Credit Control Screen allowing you to set payment terms and credit limits for each individual Vendor. There is some default information entered by SapphireOne in this screen and these are from the settings in: Utilities / Controls / Master Defaults / Vendor Credit.
This Vendor Credit Page in Master Defaults has a Defaults area which allows you to enter default payment terms when setting up new Vendors.
What you see in the screen above has been entered by SapphireOne from the settings in Master Defaults. When you alter the details here on a Vendor by Vendor basis the information you enter will override the details that SapphireOne enters here from Master Defaults.
Payment Terms Area
Normal
For the Normal drop-down menu field, the options available are as follows:
- The 7 days, 14 days and 21 days drop-down data entry fields specify the normal payment terms for the Vendor.
- The 20th and the 25th of the month following options will cause the Vendor to be overdue from the end of the current month. The user will receive a warning when the Vendor exceeds their payment terms. Depending on the manner that the Vendor record is setup in Master defaults it may be possible to override this. These settings are to be found by going to: Utilities \ Controls \ Master Defaults \ Vendor Credit Page
Below are examples of payment term settings:
- If 30 days from invoice date, Select the: Other option and enter 30 days.
- If due date is end of the next month, select the Other option and enter -31 days (Note the minus symbol leading the number)
- If the due date is 60 days from the invoice date, select the Other option and enter 60 days.
- If the due date is 60 days and at the end of the following month, select the Other option and enter -61 days. (Note the minus symbol leading)
- If the due date is 45 days from the invoice date, select the Other option and enter 45 days.
- If the due date is 45 days and the following month, select the Other option and enter -45 days. (Note the minus symbol leading)
If the Vendor has been set up as Cash on Delivery or Prepaid SapphireOne will not allow an order, OVI, to be converted to a purchase, PVI, until the payment details have been correctly entered on the More Details Page of the Invoice.
Auto Credit Stop After
SapphireOne calculates the Credit stop terms on the oldest Invoice in SapphireOne for this Vendor based on the day it was entered. SapphireOne then monitors the number of days set in the terms data entry field plus the number of days set in the Auto Credit stop after data entry field. This may also be setup in Master Defaults for all Vendors. Users will not be able to raise any invoices for them until the credit balance is rectified.
Auto Credit Stop may be set here on a Vendor by Vendor basis or it may be set in master defaults for all Vendors. SapphireOne will check here first and if it is set at zero disabled, it will then check in Master Defaults.
Prompt
This is also where you set up any individual Prompt Payment Terms for a Vendor. Prompt is set as a percentage, and Discount Within is set within a number of days. This then becomes a default Prompt Payment Discount for this Vendor.
Discount Area
- Product Discount % – Entering a number (to the 2nd decimal place) in the field will apply a discount (e.g. 2.55%) to all products sold by this Vendor.
- Lookup – This data entry field links to Price Book if a price code beyond the standard ones is being used.
Bank Details Area
This area allows you to set up the Vendor’s Bank and any account details. Most of these details will automatically be inserted by SapphireOne to help speed up the entry of these details when transactions are created for the Vendor. You may alter these details on any individual transactions if the need arises.
- Type – Selecting a payment type option from this drop down menu tells SapphireOne the type of payments that are to be processed for this Vendor. When viewed in the list of transaction they will be flagged in the external reference column as either EFT or BPay transactions. These payments may then be easily found and then a Payment processed.
- Payee – The Payee name is entered here.
- Bank Name – Enter the name of the bank here, for Australia, ANZ, Westpac, Comm Bank etc.
- BSB & Account – Enter the BSB and account numbers with no spaces.
- Lodgement Reference – Enter a lodgement reference number if provided.
Credit Control Area
- Credit Limit – The Credit Limit field sets the maximum credit limit for each Vendor. When this limit is exceeded you will still be able to process new invoices for this client, however you will receive a warning that the Vendor is over their credit limit in the form of a dialog screen.
- Message – The Message area allows you to add additional text to the maximum credit limit message that will be shown to a user creating a transaction when the Vendor is over their credit limit.
- Credit Stop – When the Vendor has a negative Credit Limit and this checkbox is ticked this halts all invoicing to the Client.
- Once the status of this checkbox alters SapphireOne will make a log entry into the area just below the check box. This is a non-editable log that shows when users have activated and deactivated the credit stop of a client. This log is activated from all areas where a credit stop can be applied. A Vendor Inquiry on both the Credit Control & Terms Pages plus also from the Allocations Inquiry Screen.
- While you can ignore the warning dialog screen and continue to create an Invoice for the Vendor it will be saved with a Posted Status Code of err. When you look at the Invoice you will find in the Information area Controls Tab that the error code is set at CL.
- Order No Required – Selecting the Order No required checkbox will cause SapphireOne to prompt the user for an order number as seen to the right when creating a transaction for this Vendor. Saving of the transaction will not be allowed until an Order number is entered.
Control Accounts Area
SapphireOne has the ability to set up multiple control accounts. Default Control and Tax accounts may be set in this area on a Vendor by Vendor basis. These will then override the overall control accounts set up in System Controls.
- Control Default – This data entry field is used when an alternative GL account to SapphireOne GL account is to be used for this Vendor.
- Tax Default – This data entry field is used when an alternative GL account to SapphireOne GL account is to be used for this Vendor.
- Company – The data entry field is used when running a multi company or department data file and allows you to create Vendor or Client transactions for each company or location.
- Linked Vendor – This data entry field is used to link to another vendor.
- Payment Account – This data entry field may be used when a specific Bank account is to be used for specific Vendors. Normally the main bank account is used but if necessary a different account may be set up here. For example a Vendor does not take your normal account like American Express. The user may then set up a different account like a MasterCard or Visa account. This payment account may be setup on a Vendor by Vendor basis.
Vendor Inquiry Transactions Page
The Transactions screen shows details of the current transactions including Dates, References, Totals and Transaction types. It also shows whether or not the transaction has been posted in the Posted status column.
Double clicking onto a transaction will display the information as entered into SapphireOne including the GL Account detail lines as seen below. Note that the Invoice button is Inactive.
If the transaction was entered as a VI as seen below the button will activate. When the Invoice button is clicked the screen on the next page will be displayed showing the original invoice entry.
More Button – Selecting the More button will display an additional page that is linked directly to the Custom Page in a Vendor Invoice as seen in the screenshot below. This area is directly linked to the Custom Page in a Vendor Invoice (Inventory) and the data entered there is then displayed here. You will find that the field headings there in the VI will be the same as the field headings here. It is on the Page menu third item on the list the Custom Page.
Selecting the either the More or Details buttons will enable the user to switch between these two pages as required. To close from either of these pages select either the ![]() cancel or
cancel or ![]() save buttons on the main toolbar.
save buttons on the main toolbar.
Vendor Inquiry History Page
This screen shows details of all Current and Historical transactions for the selected Vendor.
Double clicking on a transaction will display the information as originally entered into SapphireOne including the GL Account detail lines.
Selecting the Open button will tell SapphireOne to open the same Inquiry that is performed when the user goes to: Utilities / History / Transactions.
The Posted status column indicates the current Status of the Transaction. Ent means that it has been correctly entered, Yes indicates that it has been posted, and Hist indicates that the transaction has been moved into History.
Vendor Inquiry Purchases Analysis Page
This screen displays Purchase Analysis for the selected Vendor.
- Line or Pie – The display is in both graphical as a Column or a Pie chart and numerical formats selectable by the appropriate radio button.
- Qty or Total – The two radio buttons Qty and Total enable the chart to display the breakdown by Qty (Quantity) or Total dollar amounts.
- Period Drop down Menu – The period that the Sales Analysis is displayed is selected by the drop-down menu on the left side of the screen. At present there are 6 options for periods, including roll your own.
- The user may also select using the checkboxes provided to Include Unposted and to Group the inventory items by their Classes.
Vendor Inquiry Purchases Page
This Page by default only shows transactions entered through the Purchases menu in Inventory Mode for the current period for the selected Vendor.
To include a full history of Transactions for the selected Vendor you have to select the Include All Purchases Checkbox in the bottom right-hand corner.
This Page updates from the History file and therefore does not show un-posted records.
Keywords & Notes Page
Keywords & Notes Overview
The Keywords and Notes page is a standard feature found on all inquiry pages in SapphireOne, providing a central location to add and manage keywords and notes for each record.
Keywords Area
The Keywords and Notes page is consistent across all inquiry pages in SapphireOne. Users can add customisable keywords to the list and reuse them. Additionally, keywords can be added that apply specifically to the current record. To remove keywords from the list, users can hold down the Command key on a Mac or the Ctrl key on Windows.
Notes Area
The notes area serves as a diary, allowing users to enter notes and include a date and time stamp by clicking on the green clock button. Users can also customise the font, style, colour, and background colour of the text in the Notes area by highlighting it and right-clicking.
Vendor Inquiry Address Page
This Page shows you the information pertaining to the address of a particular Vendor. It allows you to have more than one address for a Vendor.
You can review current address or add new ones by double clicking on the address or clicking the ‘+’ button in bottom right corner of the screen. This will bring up the below window for data entry.
These addresses may also be linked to a contact using the Lookup data entry field in a Contact Inquiry on the Details Page. This Lookup data entry field provides the Lookup names for the Address list seen above. It should be noted that while the Address and Contact forms are the same, the links that are Address here the Lookup field in Contacts operate differently.
Vendor Inquiry Period Balances Page
This screen displays the balances period by period for this Vendor as at the period end. It also displays the turnover for the current month.
Vendor Inquiry Job Project Page
Job Project Page displays all Job Projects that this Vendor is linked to. The screen is populated with consolidated data drawn from each Job Project that the Client is linked to. The data as seen below must be entered into each project before it will be displayed here.
For each Job Project a Start Date and the estimated Finish Date will be displayed. Each Job Projects Estimated Cost and Estimated Billing will also be displayed as it is entered into the Job Project. Finally, SapphireOne will display the Actual Cost and the Actual Billing at the present time.
Vendor Inquiry Email Log Page
When any email is sent from within SapphireOne a log is kept of the email. SapphireOne then filters all of these log entries and displays all emails unique to that Vendor. If the user double clicks on a log record they may then view the body of the email as it was sent.

Action Page
Action Page Overview
The Action Page is a versatile tool that can be added to major records and transaction tables. It includes various actionable items such as Calendar Reminders, Meeting Invites, Alarms, Emails, To-Do Lists, General Notes, Private Notes, Meeting Notes with Date and Time, Start and Finish stamps, as well as All Day Notifications. This provides users with a centralised location to manage and organise their tasks, meetings, and notes, improving efficiency and productivity.
The Action Page allows users to use the add ![]() or delete
or delete ![]() buttons to add or delete actions as required. Simply select the relevant button to add or delete an action.
buttons to add or delete actions as required. Simply select the relevant button to add or delete an action.
Diary Area
The Diary Area in SapphireOne provides users with a comprehensive range of options to customise their actions. It includes a sequence number, title, type, action, user, privacy settings, status, tag, and link fields.
- Sequence – SapphireOne automatically generates a unique sequence number for each action.
- Title – Enter a title for the action.
- Type – Choose from the customisable drop-down menu to input a type. This will subsequently become a permanent type within the drop-down.
- Action – Utilise the user-customisable drop-down menu to input an Action. This will then become a permanent action within the drop-down.
- User – SapphireOne automatically inputs the user creating this action, though it can be modified if necessary.
- Private – If this checkbox is selected, SapphireOne will only permit the specified user to view or modify this action.
- Status – The user has three options: Open, Hold, and Completed.
- Open – Action is open and active.
- Hold – Action is active, but no alarms will be active.
- Completed – Action is now Inactive and won’t be displayed in any list of actions.
- Tag – Users may attach a tag to an action, which will create a permanent tag within the drop-down. To add a new tag, type the name of the new tag into the tag box and press the tab key. Select “Yes” from the pop-up window to confirm. To remove a tag from the list, click on the tag name while holding down the Command (MacOS) or Control (Windows) key. Select “Yes” from the pop-up window to confirm the deletion.
- Link – When created within a transaction or record, SapphireOne automatically generates a link to the transaction or record. When created from the Options Menu, Palette, or Workbook, users must select an item or function from the drop-down menu to link the action. There are 12 items on this list, ranging from Clients to Manager.
Check List Area
SapphireOne offers a user-friendly checklist tool to create and track actions, allowing users to check off completed items as they progress.
Dates and Times Area
- Start/Finish – Set a Start and Finish time for the action, or select the checkbox for an all-day option.
- Completed – Entering a completion date for an action deactivates it, and it will no longer appear in action lists.
Alarm Area
Never forget a task again – set up alarms to send reminders via email at specific dates and times. Users can also receive email notifications with the provided email address.
Recurring Area
If necessary, the alarm can be set to recur at intervals selected from the Type drop-down menu. Additionally, the recurring period can be defined by date.
Notes Area
Click the green clock button to add time and date stamps to your notes. You can also customise the font, style, color, and background color of the text in the Notes area by highlighting it and right-clicking.
Invite Attendees Area
In the event module, you can invite multiple attendees to your event and track their acceptance or rejection of the invitation. You can also send them an email notification if their email addresses are provided. Additionally, you can manage and track attendees’ RSVP status in real-time.
Documents Page
Documents Page Overview
The Documents Page centralises document and information storage for transactions and master tables, streamlining organisation and management for easy access and improved efficiency.
Documents Area
The Documents Page simplifies file management by allowing various document types to be attached via drag and drop, including PDFs, spreadsheets, photos, and more. It provides a centralised location for document and information storage for transactions and master tables, streamlining organisation and management for easy access and improved efficiency.
Documents can only be attached once the corresponding record has an assigned ID.
Documents List Screen Options
There are eight buttons on the Document List screen, as follows:
- Open – Allows viewing of the currently selected document.
- Update – Prompts the user to import a new version of the selected document while maintaining links to any associated transactions.
- Scan – Accesses a scanner for scanning documents directly into the data file and linking them to the current transaction (requires a compatible scanner with software).
- Save – Saves the currently selected document.
- Link Document: Enables linking of the selected document to other transactions in the data file, presenting a popup for user selection.
- Link Document – Allows linking of an existing document in the data file to the current transaction or record, displaying a popup with a list of documents to choose from.
- Link Existing Document – Allows linking of an existing document in the data file to the current transaction or record, displaying a popup with a list of documents to choose from.
- Delete – Deletes the currently selected transaction or record.
- Add – Displays a search function for selecting a document from the local computer or device.
Details Area
The Details area allows users to add a custom name, description, and tags to each document, enabling easy search and location of specific documents. These details can be customised to meet the specific needs of the user or organisation, further improving the efficiency and organisation of the Documents Page.
Last Modified Area
The Last Modified section displays the date and time when the document was last modified, as well as the user who made the changes. This feature helps maintain accountability and enables efficient tracking of document modifications.
History Area
The History area records changes made to the document, including the date, time, and user who made the changes. This provides a valuable tool for tracking and managing document revisions.
Links Area
The Links area allows users to record links to other places where the document has been attached. Links can be added or removed using the (+) and (-) buttons, providing an efficient way to manage and organise related documents.
Notes Area
The Notes area allows users to add any relevant notes related to the document. Clicking the green clock button will add a date/time stamp, further improving document tracking and management.
You can review our Blog and YouTube channel for additional information and resources on SapphireOne ERP, CRM and Business Accounting software.