SapphireOne Custom Reports Editor Main Menu – Overview
When the SapphireOne Custom Reports Editor is open (Utilities > Controls > SapphireOne Custom Reports > [Report]), the SapphireOne Reports Editor main Menu will update to reflect the available options. The drop down menus included are File, Edit, Insert, and Test. This article provides an overview of the importing, exporting, and printing of Sapphire Reports utilising the options available in this main menu.
Here’s a brief explanation of each:
- File: Create, label, open, save, and manage reports with versatile options for file handling and modifications.
- Edit: Create, label, open, save, and manage reports with versatile options for file handling and modifications.
- Insert: The report consists of four default sections (Header, Body, Total, Footer), with additional headers and footers added exclusively through a specific menu.
- Test: Query Record enables detailed queries and record selection, while Print and Print Preview provide report viewing for Windows and MacOS respectively, and Test HTML offers an HTML preview in the default browser.
By using these menus in combination, SapphireOne users can create and modify reports, import and export data, and print and share their work with others.
SapphireOne Custom Reports Editor Main Menu – Menu Items
File Menu
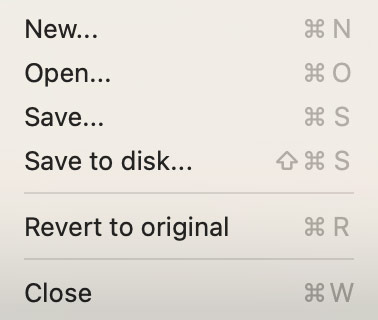
Options available in the File menu include:
- New: Commence the creation of a brand-new report with a blank page or a clean slate.
- New Label: Commence the creation of a brand-new label with a blank label sheet.
- Open: Open up the file dialogue so that an existing report saved in XML format may be opened for the purpose of either creating a new report or to modify an existing report.
- Save: Save the report directly into the data file in its current state. All undo states prior to saving will be unavailable after you save.
- Save to Disk: Selecting this option will tell SapphireOne to display the Save as dialogue so that the user may select a location to save the currently displayed report. It will be saved as an XML file.
- Revert to Original: Selecting this option will tell SapphireOne to revert the state of the report to its state when it was opened.
- Close: When this option is selected SapphireOne will display a dialogue seeking confirmation as to wether you would like to Save your changes or close thereby discarding all changes since the last save. Revert to Original does the same but differs in that it keeps the report open.
Edit Menu
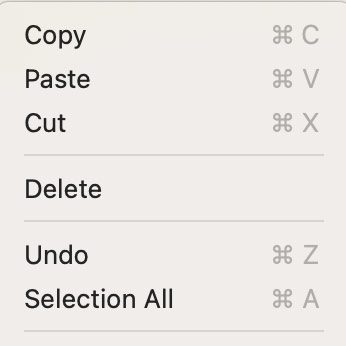
Options available in the Edit menu include:
- Copy: To duplicate the selected text or object, preserving the original.
- Paste: To insert a previously copied or cut text or object at the desired location.
- Cut: To remove the selected text or object while simultaneously placing it on the clipboard, allowing for pasting elsewhere.
- Delete: To permanently remove the selected text or object without placing it on the clipboard.
- Undo: To reverse the previous action or set of actions, restoring the previous state.
- Selection All: To highlight or choose the entire content within a document, text field, or workspace, allowing for further actions such as copy, cut, or delete.
Insert Menu
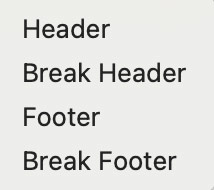
A new report has the following four sections by default, Header, Body, Total and Footer. Multiple header and footers may be added with this menu and this is the only menu where they may be added from. Options available in the Insert menu include:
- Header: When starting from scratch this adds a header.
- Break Header: Header for proceeding pages.
- Footer: When starting from scratch this adds a footer.
- Break Footer: Footer for proceeding pages.
Be cautious when inserting any of these sections in a Sapphire Custom report as they cannot be removed once inserted. Although you can make them invisible or hide them by setting their height to zero, they will remain in the report once installed.
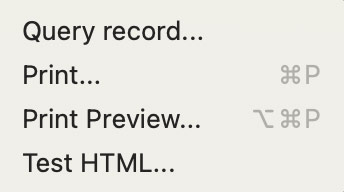
Test Menu
SapphireOne needs a transaction to display the details on a page so that the user may check the accuracy and placement of the objects on the page. The four items on this menu provide for the selection and the viewing of the placement of data on the printed page.
- Query Record: While SapphireOne will offer the user the opportunity to perform a detailed query as the custom report is first being opened, the user may also select the transaction or record for testing by going to this Query Record drop down menu and select the Query Record function. SapphireOne will then display the Detailed query function enabling the user to select the record for testing and/or viewing. If you do not select a record you will be warned that it will be opening x number of records and in some cases, this will be in the order of hundreds of records.
- Print (Windows): Use this option in Windows when creating a PDF for viewing/checking.
- Print Preview (MacOS): Use this option on MacOS. SapphireOne will present the preview function.
- Test HTML: Output the report in html format. This preview will open in your default browser.
SapphireOne Custom Reports Editor Main Menu – Importing
The steps below allow a SapphireOne user to quickly import a SapphireOne Custom report. For example, SapphireOne staff have sent you a report adjusted and ready for importing into your data file. It should be close to fulfilling your stated requirements. With this process it can be imported and then checked and minor corrections performed in the live data file. The process is as follows.
- Select a transaction from the custom report for testing and choose a unique object, such as Sequence, Internal or External reference numbers. Make a note of this object.
- Locate the report you want to re-write or install from the data file and make sure you know its location.
- Open the report for editing from the appropriate custom report editing selection menu.
- Choose Query Record from the Test drop-down menu and enter the details you noted in step 1. SapphireOne will now use only that record or group of records for testing or viewing, instead of everything in SapphireOne.
- From the File drop-down menu, select Open and locate the re-written or new XML file to import it.
- After importing the new file, verify the width and height of the paper on the right-hand side. For A4, it should be 595 by 842 for portrait and the inverse for landscape.
- Select the Setup button and make sure the report in SapphireOne is linked to the correct printer.
- Finally, select Print on Windows or Print Preview on MacOS from the Test drop-down menu. Refer to the Query Record documentation above for clarification.
- If you’re modifying a report, repeat step 8 as many times as necessary. Each time you make changes, print or preview to see the alterations.
You can review our Blog and YouTube channel for additional information and resources on SapphireOne ERP, CRM and Business Accounting software.