SapphireOne Custom Reports Editor – Overview
The SapphireOne Custom Reports Editor provides and inbuilt graphical tool, allowing your organisation to tailor every single outputted document whether for internal use or external use for both your clients and Vendors, allowing your Sapphire One to fully comply with your corporate identity.
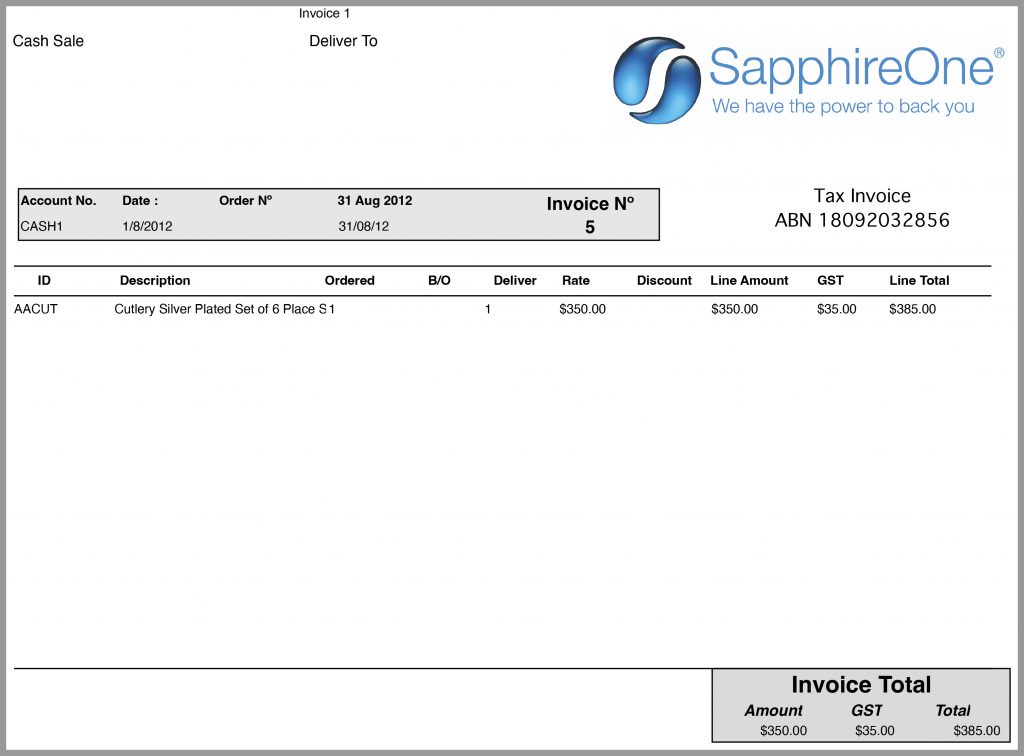
The image below showcases the SapphireOne Custom Report Editor displaying the ‘Invoice-1’ pre-defined template found in the Bondi Blue data file. To access this template, navigate to Utilities > Controls > SapphireOne Custom Reports.
And below is a report produced by the Editor as setup above.
Sapphire Custom Reports Editor – Report Page Layout
Upon selecting ‘New’ from the file menu located in the toolbar at the top of the screen, the following view should appear:
Down the left side of the screen are tools for placing various objects on the report.
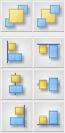
- The first group at the top is used for the selection of the type of object that is to be displayed.
- The second group is for alignment of the objects.
- The third group is for direct numerical sizing of all objects on the page.
- The last group is for re-sizing the editor. When it is difficult to get exact alignment, the user may make the editor much larger making it easier to precisely place objects on the page.
The right-hand side of the editor has the following feature areas
- A Report Properties table that displays all of the objects that are currently in the report. These may be from cells with data through to a simple rectangle, circle or line. If you are looking for a hidden object scroll through each object in the list until it is displayed on the main screen
- Next the report properties are listed for the selected object.
- script fields for Start, Body and End.
Each Report page comprises a Header, Body, Total and Footer with the following limitations.
- Multiple Headers and Footers are allowed. Limited options are available but the user has four checkboxes that enable exactly what page or pages these headers and footers are to be printed on. The check box options are to print on either; First Page, Odd Pages, Even Pages and the Last Page.
- The Body has just the two options to select, Visible and Fixed height. This area is normally set up to print the items that are in the line entry area on a transaction.
- The Total has three options, Visible, Fixed Height and Bind to the Bottom. This area usually contains totals for the transaction and if the report breaks over several pages may be set up to display subtotals.
- The Footer has the three options as seen immediately above for the Total, plus the same options for the printing of the header. They are: First Page, Odd Pages, Even Pages and the Last Page.
Sapphire Custom Reports Editor – Object Types
The first group of buttons select the type of object that is to be printed on the page.
- Selection button – Allows for the selection of objects currently on the report.
- Text button – SapphireOne will allow the user to insert a Text area. Text may then be entered into that area by entering it into the data entry field on the right-hand side of the report. It is not directly entered into the text box itself. On the right-hand side, the user will also note that attributes may be configured for the text in the box as well as the background colour. The entering of text attributes is similar to MS Word. The background may also be made transparent with the selection of the transparency checkbox.
- New Variable button – SapphireOne allows the user to insert an object that a variable may be linked to. This variable is selected by entering an item from an array item in this document into the sourced data entry field. Alternatively, the user may make a selection from the drop-down menu associated with the source data entry field. For most variable items, some formatting of the data entry will be required in the Format data entry field. ###,##0:(###,##0) will set up both positive and negative numbers while $###,##0.00;($###,##0.00) will set up dollar amounts. The # being used as place holder.
- New Field button – SapphireOne allows the user to insert an object that contains a variably displayed field. Script may be written so that this field will display dynamic text. For example, the one report could be used for quotes, orders and Invoices by changing the text in a few of these fixed fields with the addition of some script being written.
- New Rectangle button – The user may insert a rectangle with four lines. The line may be set as visible or invisible, non-printing. Line colour and thickness is user settable. Fill colour may also be selected. A common use is to make the rectangle a color then place objects on top of it. This would print as a coloured background with other text fields such as Headings for example, sitting on top of it.
- New Oval button – The user may insert a circle that shares the same behaviour and functionality as the rectangle button documented immediately above.
- New Line button – The user may insert a line. Both the thickness and colour may be selected. Horizontal and Vertical lines may be forced by selecting line widths of 1 or 0.
- New Picture button – The user may draw a box that will constrain an image. They would then select the button and SapphireOne will ask for the location of the image file. Please view the following advice for best practice with image optimisation.
The key to successful image optimisation for performance is finding the perfect balance between the lowest file size and acceptable image quality. There are three things that play a huge role in image optimisation:
Image File Format
For most website owners, the three image file formats that matter the most are JPEG, PNG, and GIF. Choosing the right file type is crucial in image optimisation. To simplify things, JPEGs are ideal for photos or images with lots of colors, PNGs are recommended for simple images or transparent images, and GIFs are suitable for animated images only. PNG images are uncompressed, making them higher-quality, but also much larger in file size. JPEGs are a compressed file format that slightly reduces image quality to provide a significantly smaller file size. GIFs only use 256 colors along with lossless compression, making them the best choice for animated images.
Compression
Image compression plays a significant role in image optimisation. Various types and levels of image compression are available, and the settings for each will depend on the image compression tool you use. Most image editing tools such as Adobe Photoshop, ON1 Photo, GIMP, Affinity Photo, among others, have built-in image compression features. You can also save images normally and use web tools such as TinyPNG or JPEGmini to compress images before uploading them to SapphireOne. Although they require some manual effort, these two methods allow you to compress images efficiently.
Image Dimensions
When you import a photo from your phone or a digital camera, it usually has a high resolution and large file dimensions (height and width). These photos typically have a resolution of 300 DPI and dimensions starting from 2000 pixels or more. Although high-quality photos are perfect for print or desktop publishing, their dimensions can still be optimised. Reducing the image dimensions can significantly decrease image file size. You can resize images easily using image editing software on your computer.
To illustrate the impact of image optimization, let’s consider an example. We optimized a photo with a resolution of 300 DPI and image dimensions of 4900 x 3200 pixels. The original file size was 1.8 MB. We selected the JPEG format for higher compression and adjusted the dimensions to 1200 x 795 pixels. The resulting file size was reduced to just 103 KB. That’s a remarkable 94% reduction in file size from the original.
Sapphire Custom Reports Editor – Sort and Alignment
This group of buttons performs the task of precision aligning groups of objects and determining the Z index, ie the order in which they stack (overlay) one-another.
Sapphire Reports determines the Z index of objects on the document by default based on the order in which they are loaded in to SapphireOne. Those loaded first will be at the rear while those loaded last will be at the forefront or the top level.
The top two buttons are used to move the selected object position forward and backward in this hierarchy.
Clicking on the left-hand button will bring the selected fields forward in the loading order in front of another field, while the right-hand button will send them back towards the beginning one step per mouse click at a time. Holding the Shift key down and Mouse clicking will either send them to the absolute front or absolute back respectively.
When multiple fields of the same type are selected, the buttons seen to the right perform the following alignment actions when selected. From the top left-hand corner: Align to the Left, Top, Center Vertically, Center Horizontally, Right and Bottom.
Sapphire Custom Reports Editor – Numerical Sizing
All measurements used in Sapphire Reports are in points, with an A4 page being 842 by 595 points in portrait format.
- When precise adjustment of objects is required, the Numerical Sizing area should be utilised.
- If a single object is selected and the first button at the top is clicked, the object’s left side will be set to the entered value of points from the left side of the report.
- If a group of objects, all of the same type, are selected, SapphireOne will set them all the same number of points from the left of the report.
- The most commonly used button in this area is the second button, which sets all the selected objects the same number of points from the top of the Sapphire Report. This is useful when doing a final precision alignment of a group of objects.
- The top four buttons set the position of the object as follows: Left, Top, Right, and Bottom.
- The last two buttons set the width and height of the selected objects in points.
- The adjustment will be made to the object’s right side, either left or right, or the bottom side, either up or down.
Sapphire Custom Reports Editor – Report Properties
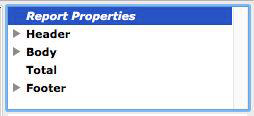
The layout of a SapphireOne Custom Report is defined in the Layout area, which contains the default Header, Body, Total, and Footer sections. Each section can be expanded to show a list of all objects within it, in the order they will be printed. This makes it easy to check for any hidden objects or to verify the print order of a specific object.
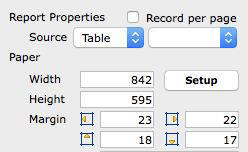
The Paper Size section allows you to set the paper size in points, and select portrait or landscape orientation for A4 paper. You can also set the margins for the report, which are displayed as a red dashed line around the outside.
The Setup button is used to access the printer settings for the report. When creating a new report, it’s important to thoroughly audit the print dialogue for the printer being used. Although printer settings can be entered into the report, the printer won’t read them. Therefore, you must select all the relevant parameters for the printer, including landscape or portrait modes, and then print at least one report to save the settings to the file. To view the report on-screen, printing to a PDF is recommended.
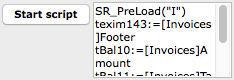
In the Start Script data entry area, you can enter a start script, which is required for Sapphire Reports to function. If needed, you can also enter scripts into the Body and End sections. If you need to modify a script, it’s best to copy and paste it into a text editor, revise it, and then import it back into the report.
Sapphire Custom Reports Editor – Individual Objects
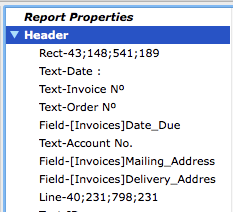
Once each area has been selected and opened, all objects in the area may be seen in the Report Properties hierarchical list.
The objects in the report may be selected and bought into focus within the report from this window and when selected will be displayed the same as when the mouse clicks on them with the 6 resize handles displayed. Accessing objects in this way is particularly useful when an object has become hidden and needs to be located. It is also a means of checking that there are no hidden items in the report which may cause print errors or impact optimisation.
Sapphire Custom Reports Editor – Repeating Objects
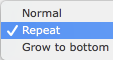
Some objects must have a repeating attribute as selected from the drop-down menu here. These are mainly used in the body area and are used when there are multiple lines in the report. The report prints each line in the report until it has printed them all, or it breaks to the next page and continues printing the lines. As many pages as required are generated until all lines in the report have been printed. This is one reason why footers and headers have a number of options for printing on certain pages. If SapphireOne inserts a page break, a different header and footer may be applied for example a unique footer for the last page only may be applied..
Sapphire Custom Reports Editor – Object Attributes
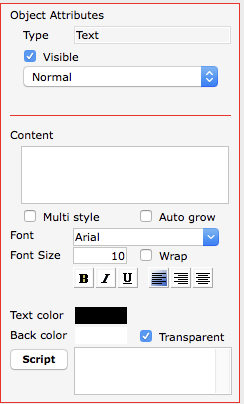
The selection of attributes for the fonts objects are similar to a Microsoft word document. A screenshot of this area is to the right.
- Multi Style checkbox – Not normally used
- Auto Grow checkbox – Not normally used.
- Font and Font Size selections – These are the same for any word processor program and will not be documented here.
- Text Colour and Background colours – May also be selected here.
- Transparent Checkbox – If the selected text object is in front of another object and its background colour is to be printed the user has the option of selecting the checkbox and making the background of this object transparent. This is desirable when the text is is in front of a coloured background.
- If required an individual script may also be added to objects in the report.
The Attributes for each type of object will vary and when selected the Objects area will update to reflect that.
The Text button when utilised will display the object attributes as seen above.
- Visible Checkbox – It can be useful for marking up the template with non-printing annotations
- Content Area – The text that you want this object to display.
- Formatting Options – text colour and Background colour for the object. The background for this object may also be made transparent.
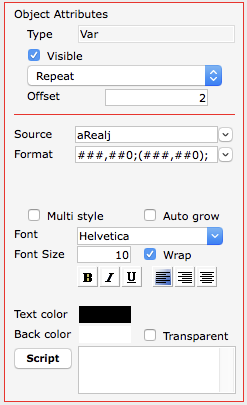
The Variable button will place an object that will display data from individual cells in a table when utilised the object attributes will be provided as follows
- Visible Checkbox – Hide this element but maintain it on the report.
- Repeat list box – Data from the lines area in a transaction may be set as repeating to mimic the lines area in the transaction.
- Offset Field –
- Source menu – Since the Variable object displays a cell from a table as the source, a particular cell from a table, must be selected from the Source drop down menu.
- Format Options – Select a format appropriate for this data to display.
Formatting Errors
Formatting details for data entries can be specified using placeholders, represented by the # symbol, as shown in the screenshot above. If SapphireOne fails to print data within this object, the formatting might be incompatible with the selected data.
Essentially, SapphireOne searches for the # symbols and replaces them with values or numbers from the data file, while printing any other characters as they are.
Please note that the Format window does not display all formatting options simultaneously. Users will need to click within the window and scroll left or right to view or modify all data in the window.
Modifications can be made as usual, but users should be aware that if SapphireOne displays no data, shows something odd like zeros, or 0.00, it might be due to an issue with the user’s entry in the Format data entry field above. Be mindful of the data you intend to print.
Formatting Examples
There are six default options when selecting formatting of numbers. Selecting one of these will result in SapphireOne printing the data entered into the report as seen below.
This should take most of the work out of setting up the number formatting.
- Option 1 = ###,###,##0.00;-###,###,##0.00;0.00 will print 123,456789.00 or -123,456,789.00
- Option 2 = ###,###,###;-###,###,###; will print 123,456,789 or -123,456,789
- Option 3 = $###,###,##0.00;($###,###,##0.00);0.00 will print $123,456,789.00 or (123,456.789.00)
- Option 4 = $###,###,###;($###,###,###); will print $123,456,789 or ($123,456,789)
- Option 5 = ###0.00%;-###0.00%; will print 12.34% or -12.34%
- Option 6 = ###0%;-###0%; will print 12% or -12%
These options may be used as provided or modified to suit the user’s requirements.
| # | SapphireOne will replace the # symbols with data or values from the data file and all other characters entered will be printed as they are entered into this formatting data entry field. |
| ; | The ; semi colon symbol is used by SapphireOne to identify how to print the values, positive, negative or zero. |
Option 3 (from the list above) would probably be the best one to use as an example.
Note the ; being used by SapphireOne as a separator.
$###,###,##0.00;($###,###,##0.00);0.00
Now lets break it up into its three sections the first 2 ending with the ; semi colon which is the separator.
| $###,###,##0.00; | ($###,###,##0.00); | 0.00 |
| Positive numbers | Negative numbers | Printed when there is a zero value |
or example with a value of $123,456,789.34, SapphireOne will print as follows from the above:
$123,456,789.34 for a positive value and ($123,456,789.34) for a negative value. Any zero values will be printed as 0.00
Zero Values or Balances
The user also has the option of printing anything they like when a zero balance is encountered. The rules are as follows.
- Commonly the default by SapphireOne 0.00.
- SapphireOne will use whatever is entered after the second ; semicolon, anything can be entered here, 0.00, Zero, None or nnnnn.
- When the data has a zero value SapphireOne prints it as entered after the second ; semicolon.
- Entering $0.00 will print exactly as entered $0.00
- If you want SapphireOne to print nothing at all, simply leave all after the second semicolon blank.
Again using our example above this option would be reduced to $###,###,##0.00;($###,###,##0.00);
SapphireOne would still print values to the second decimal point for positive negative values but when a zero balance was encountered it would print it as entered, nothing.
Objects Outside The Printable Area

Objects in the printable area, commonly referred to as ‘on the stage’, that are outside of the report itself can cause issues and should be audited and removed. The Report properties panel can assist with the task of identifying and removing or relocating these objects.
Earlier reporting iterations disregarded these objects so the user should be vigilant to identify these objects on historical or imported reports.
You can review our Blog and YouTube channel for additional information and resources on SapphireOne ERP, CRM and Business Accounting software.