Transactions > Sapphire Custom List Report
The user should note that the Sapphire Tools menu from Query by Formula, through to Custom List Report has the same tools on it throughout SapphireOne when any list is being displayed. These are referred to as Common tools.
Sapphire Custom List Report Overview
The Sapphire Custom List Report contains preexisting report templates which allow users to quickly create reports of different data set lists in SapphireOne. The Sapphire Custom List Report is a simplified version of the Sapphire Custom Report function, which allows for more extensive customisation of reports and takes considerably more time to develop and design.
Using this Custom List Report editor the user is able to keep the report design fairly simple, or make it as complex as they want. Although for complex reports the user is advised to use the Custom Report editor.
The ability of SapphireOne to export all reports to common mediums such as PDF, CSV and html formats means that reports can be quickly made in the Sapphire Custom List feature and exported for businesses and organisations specific requirements.
Sapphire Custom List Report Page
Custom List Report Editor
Accessing Sapphire Custom List Report Editor
- Once the Custom List Report option has been selected from the Sapphire
 Tools menu, SapphireOne will do one of two things.
- If there has not been any Custom List Reports created, SapphireOne will immediately display the Custom List Report editor ready for data entry as seen above.
- If a Custom list Report has been already been created, SapphireOne will display the Custom List Report alert that will list all existing Reports in SapphireOne. In this case the user has two options.
- Double click on an existing report which will open the Custom Lit Report editor with the existing data entered and available for modification.
- Select the
 button and a new blank Custom List Report will be displayed as seen above ready for data entry.
Main Toolbar Menu items
File Menu
- New – Selecting this option will commence the creation of a new Custom List Report with a blank page or a clean slate.
- Open – Selecting this option will tell your operating system to look or browse for a file, so that an existing report saved as a .json file, may be imported into a the editor to either use it as a template for a new Custom List Report, or replace an existing Custom List Report. (Overwrite).
- Save – Selecting this option will tell SapphireOne to save the report directly as a .json file.
- Cancel – Selecting this option will tell SapphireOne to cancel the editor without saving.
- Accept – Selecting this option will tell SapphireOne to save the Custom List Report into the data file and close the editor.
Edit Menu
The edit menu is identical to other functions in various parts of both the Mac and Windows operating systems, with options such as undo, redo, cut, copy and paste. It should be noted that if you are attempting to perform one of these actions from another menu in SapphireOne and it does not work, try selecting the action from the Edit menu.
Column Menu
This menu allows the user to change the order of the columns as required. The mouse may also be used to drag the columns one column at a time, to the left or right as well.
- Delete – Selecting this option deletes the currently selected column.
- Move Left – Moves the currently selected column one column to the left.
- Move Right – Moves the currently selected column one column to the Right.
Test Menu
- Query Record – The user may select the transaction or record for testing by going to this Test menu and selecting the Query Record item. SapphireOne will then display the Advanced Find function enabling the user to select the record for testing and viewing. Note well, if a query is not done, SapphireOne will produce the test print based on all items in the list, not just the ones on screen at the time. If there are 10,000 records in the list it will try and print them all
- Test – Use this option for Test Printing of the Report. For both operating platforms Mac or PC their respective Print alerts will be displayed giving the user a number of options for the printing job at hand. The user will usually have a couple of additional mouse clicks to get to the viewing of a pdf or the actual printing of the Custom Report List.
Editor Basic Layout
- Work Area – This is main or central area in the editor that has the following functionalities.
- Report Options – The top section contains various options that are used when establishing overall criteria or layout for the Report. Title/Name, Table and Sort Field.
- Work Area – This area, has three sections, Header, Body/Columns and Footer.
- Data Selection – This area displays the cells that are in the table as selected in the Report options area.
- Editing Areas – The right hand side of the report has two areas.
- Report Properties Area- This area displays what is in the report as a series of Folders or Sections, and Objects or Files in the same manner that both Mac and PC display the contents of a hard drive.
- Sections – To edit the attributes for the Header, Body and Footer of the report, the user must select these folders here as these sections of the report may not be selected from the Work Area.
- Attributes Area – Once selected the attributes for the selected section will be displayed in the lower section of this area for viewing and modification.
- Objects – Individual Objects may be selected from the work area or the folder area. The attributes will be displayed for viewing or editing in the lower area on the right-hand side of the editor.
- Attribute Area – This is used to set up various attributes for the selected section or object in the report.
- Report Properties Area- This area displays what is in the report as a series of Folders or Sections, and Objects or Files in the same manner that both Mac and PC display the contents of a hard drive.
Custom List Report Data Entry procedure
Report Options
- Title – By default SapphireOne will offer the title of New. Enter your title as required. It may be altered at a later date by using the Update Name button in the Custom List Report alert
- Table – SapphireOne will automatically select the Master Table that matches the list that the user has on screen when opening this Custom List Report function. Under normal circumstances this should not be altered.
- Sort Field – Any cell in the table selected above may be selected so that sorting may be performed on any column in the report. (This option would probably be performed as one of the last items)
- Output – there are currently 4 options for the output or printing from this Custom List Report as follows.
- Print – Send the Custom List Report directly to the Printer.
- CSV – This creates a CSV file. An alert will ask the user where the file is to be saved.
- Text – This creates a non-delineated. An alert will ask the user where the file is to be saved.
- html – This creates a html file able to be read by any browser. An alert will ask the user where the file is to be saved.
Work Area
- Header Options – There are six objects in two rows that are in the header of your Custom List Report. The data to be printed in these header objects is selected by using the Report Properties area on the right side of the work area.
- Presets – Five of them are preset and should be tested first as the default presets may be suitable. The user has the ability to alter these as required, but before changing them a note should be taken of the preset value so that it can be returned to if the new selection that a user has made is not wanted.
- No Preset – The same as the preset cells except the preset default option is not entered by SapphireOne.
- Body/Columns – Just below these six objects SapphireOne displays the area where the user sets up the columns for the report. To insert a column double click on an item in the data area below. By default SapphireOne inserts the Sequence number option for the first column in the report. There are two rows for each column. as follows.
- First Row – The first row displays the Cell name only as a name Header for the column. (Text Object)
- Second Row – The second row displays the Table name as well as the Cell name. (Text Object displaying data)
- Footer – As in the Header there are six objects in two rows that may be printed in the Footer section of the report. By default SapphireOne will enter a preset of Company Footer Picture into the first object in this section. Although a preset value is entered by SapphireOne in two of these data fields, the user can alter the data displayed in all of them as required. The data to be printed in these footer objects is selected by using the Report Properties area on the right side of the work area.
Data Area
- Data Selection – This area initially displays the cells that are in the Master Table that SapphireOne selects in the Report Options area at the top of the editor.
- Sort Alphabetically – Since some of the list of tables will be very long SapphireOne has provided this checkbox to sort the items in the list alphabetically if required so that individual items may be found quickly.
- Table Selection Menu – In the top right-hand corner on this cell selection area there is a drop down menu. For any reports where there is a requirement that other than the master table is to be used. This will require the creation of a single line of scripting to enable the activation of the additional table. Do not use this functionality before checking with SapphireOne support staff.
- Columns – Remember when cells are selected for a column, two rows are entered automatically as follows.
- First Row – On the first row the cell name is entered as text for the column heading. This may be altered by the user.
- Second Row – On the following row the editor enters the data for the column. This data object will then repeat down the page until all rows of data has been printed
- Cell Selection – Double Click on a cell to place it in the report. Each cell when placed into the report becomes a column of data in the report.
- Once each cell is imported into the report, SapphireOne will establish preset attributes for each cell entered. The may then go to the cell attributes to the right of the work area and alter them as required.
- Cell Movement – To move columns left or right, use the mouse to drag them or select an option from the Columns menu on the main toolbar.
Report Properties Area
This area displays the report in a Folder and file style approach as in the Mac and Windows method for displaying Folders and files. Folders being the Report Sections, the Objects being the files.
The following selection criteria should be observed.
Report Sections – The report Header, Body and Footer sections must be selected in this Report Properties Area, as selection from the Work area is not provided for. Editing of each sections attributes is then performed in the Report Attributes Area immediately below.
Objects – All objects may be selected from either the Work area or this Report Properties Area here. They then have their attributes edited in the Reports Attributes Area immediately below.
Sapphire Custom List Report Attributes Area
For most users the default settings here will be sufficient for most reports that are similar to the old Quick Reports function. Remember if the master table is not being used for an object please check with SapphireOne support staff before trying to use it.
It should be noted that for each section of the report different attributes are able to be set by the user.
Report Properties, Header, Body and Footer attributes are all separate to each other all have the ability to be set independently of each other. The lines that are in each area also have their own attributes.
Printing A Sapphire Custom List Report
They are then displayed in a list of reports which are available from the ![]() print icon on the main toolbar. When the small arrow is selected on the right side of the icon, the list of Custom List Reports currently in SapphireOne will be displayed. The user may then select one of these Custom List Reports for the printing job at hand. Each user can have their own easily recognisable reports in the list to select from. That is why there is a Renaming option within the Custom List Report function itself, in case a name change is required. This is so that the Custom List Report someone has already created may be better identified.
print icon on the main toolbar. When the small arrow is selected on the right side of the icon, the list of Custom List Reports currently in SapphireOne will be displayed. The user may then select one of these Custom List Reports for the printing job at hand. Each user can have their own easily recognisable reports in the list to select from. That is why there is a Renaming option within the Custom List Report function itself, in case a name change is required. This is so that the Custom List Report someone has already created may be better identified.
Usage
The setup for these reports have been made as simple as possible. Each Report has a Header, Body and a Footer.
- Headers And Footers – For both of these sections they are identical in both appearance and the editing procedures used for them.
- Placeholders – Each Header or Footer has 6 place holder for objects, in 2 rows of 3. These 6 placeholders are in a fixed position on the printed page and the height of the rows may be altered to suit the user.
- Presets – By default most of these placeholders are set up with a default preset object which will print a basic Report. These preset objects have the option of selecting the most commonly used items in a Report from the Source field. This is mainly used for moving items around the printed page. (About 8 at present).
- Formatting – The formatting of all objects in the editor is performed using a word stye type interface which should be familiar to most users.
- Object Options – For every placeholder with an object, the user has the option of printing data from almost every cell in the linked table.
- Body – When a cell is selected from the linked table below, it will the become a column of data for the report. When a cell is selected for a column, the editor inserts 2 rows of data into the editor as follows.
- Column Heading – The editor will insert the name of the cell in the top row as a text object as a heading. The user may then select the heading with the mouse and alter it as required.
- Column Data – The second row will contain the table name plus the cell name as a Field object. This Field object prints the data in the Field object and will repeat down the page for each row of data displayed on screen.
Aside from the Preset types of objects there are additional types of objects that the user may select from when additional functionality of the report is required. The idea is to keep it simple to start with and add to the report as required.
Objects
The reader of this article will note the extensive use of the word object. Almost all items that are inserted into the work area of a report are there to print something on usually an A4 page. There are a number of variations of how each item in the report work area receives its data that tells it what to print. For this reason they are referred to as Objects.
Formatting Numbers
The formatting options for numbers in Custom List Reports is now the same as in SapphireOne when currency settings are set up in SapphireOne. Most countries use the $ symbol and other currency symbols are already in SapphireOne. Others will be added as needed.
There are a number default options when selecting formatting of numbers and choosing one of these will tell SapphireOne to print the data entered into the report as seen below. You can of course create your own if required!
This should take most of the work out of setting up number formatting.
- ###,###,##0.00;-###,###,##0.00;0.00 will print 123,456,789.00 or -123,456,789.00
- ###,###,###;-###,###,###; will print 123,456,789 or -123,456,789
- $###,###,##0.00;($###,###,##0.00);0.00 will print $123,456,789.00 or (123,456.789.00)
- $###,###,###;($###,###,###); will print $123,456,789 or ($123,456,789)
- ###0.00%;-###0.00%; will print 12.34% or -12.34%
- ###0%;-###0%; will print 12% or -12%
These options may be used as is, or modified to suit the user’s requirements. They will probably have to be altered as these are mainly to be used a template to assist the user when setting up the formatting of the report although the user will still have to make some minor changes as needed.
SapphireOne will replace the # symbols with data or values from the data file and all other characters entered will be printed as they are entered into this formatting data entry field. For example, watch out for Japanese yen. The user will have to add in additional ###, place holders to allow for the small value of the yen exceeding the number of placeholders. The ; semi colon symbol, is used by SapphireOne to identify how to print the values, positive, negative or zero. The first group before the semicolon is positive, the second is negative and the last group after the semicolon zero or after the decimal point!
There are a number of options when this alert is on screen.
- Select Report – Double clicking on an existing report will tell SapphireOne to open the selected report ready for editing.
- Add Report – Selecting the
 new button will tell SapphireOne to open the editor ready for editing.
- To save this new report got to the File menu on the main toolbar and use the Accept option to immediately save your New Custom List Report into the data file. Note well the Accept option as the Accept option saves the report directly in to the the data file immediately!
- Delete Report – Any existing Custom List Report may be deleted using the
 button. An alert will be displayed asking for confirmation of your action. (You do have a backup?)
 - Update Name – First single click or select the Custom List Report that you want to change the name for. Then select the
 button. When it is selected SapphireOne will display an alert asking the user to enter in a new name for the Report.
Testing A Sapphire Custom List Report
Remember that to save the new custom list report into the active data file, the user will have to select the File menu and then the Accept option.
Also that this is a custom List Report. The emphases being on a List Report. While the user may select a single transaction from within the editor, to fully test the new report the user will have to first save the report using the accept option. Then select a group of transactions from the appropriate list on screen. Then select the arrow to the right of the print icon and select the new report. SapphireOne will only then print the list as selected on screen.
Report Property Attributes
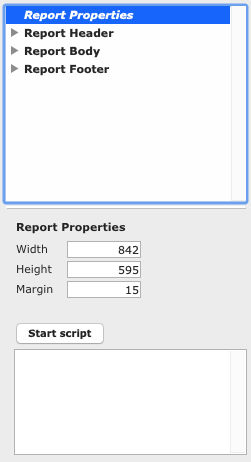
The only attributes that the user has to set up for Report Properties is to establish the page layout, by selecting Portrait or Landscape, and then entering the margins that are required. Any size paper may be entered, however fitting all your objects or items on the A4 page is usually the largest problem when creating custom reports.
- Portrait – For Portrait use 595 Wide by 842 High.
- Landscape – For Landscape use 842 Wide by 595 High.
- Margins – These are set as 15 by default. Set as required. These are not enforced as are the Width and Height Settings above. They are displayed as dashed guidelines for the user.
- Script – A script may be written for the report but should not be necessary under normal circumstances.
Header & Footer Attributes
Both the Header and Footer in the editor are to all intents and purposes identical. The header will be documented only, so when setting up attributes for the Footer, return here to the header documentation. Each Header and Footer contains 6 preset objects with the same setup and layout procedures.
The body is slightly different in that the user selects where the data from the data file is to be drawn from.
Header & Body Attributes

This is where the details for your Report Header are set up. It should be noted that the Report Header attributes area has a Light Pink background and the Footer is Light Blue. This helps the user identify the section that the user is currently editing. The user should remember that the each one of these has preset objects setup in it.
The attributes below determine items for the Header and Footer Sections.
- Row Height – Default is set as zero which is an automatic default.
- This determines the vertical spacing between the two rows of objects on the Header and the footer. Adjust as required allowing for the font size selected.
- Header or Object – The remainder of the attributes listed below will be applied all of the Preset Objects in the Header and Footer provided that one of the six preset objects in either has not been accidentally selected as it is very easy to do!
- Font Details – The formatting of objects in the editor is performed using a word stye type interface which should be familiar to most users. The options go from Font Selection through to Justification options.
- Text Color – Click in the text color data entry field. A Choose color for Text alert will be displayed allowing the user to select the text colour for the text in all of the objects in the Header.
- Back Color – Click in the Back color data entry field. A Choose color for Background alert will be displayed allowing the user to select the Background colour for all of the objects the Header.
- Transparent Checkbox – Not recommended for use in the header.
- Script – A script may be written for the report but should not be necessary under normal circumstances.
Header Object Attributes
This is where the individual object attributes for your Header and Footer are set up. There are six placeholders in each of these areas that where seven of them have objects with attributes already setup that will print details in the Header or Footer of the report.
It should be noted that for the various types of objects, the user must make a selection from the Source field as well as the Format field. The first option Preset, has a limited number of options to make the setting up of the report as simple as possible. Remember all six preset objects in each can have different attributes as documented below.
There 4 Type options for Objects as follows.
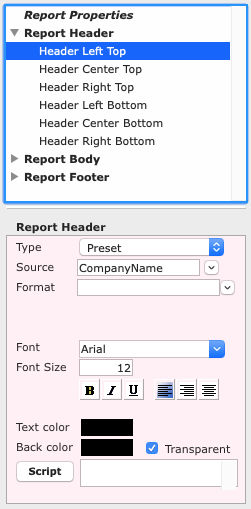
- Preset – There is a Preset object which will be displayed by default in the Source field.
- Source – The user is limited to selecting 8 of the most commonly used items required for reports in the Heading section of a report.
- Format – There 4 methods of formatting this object as follows.
- Date – There are ten options provided for selecting the date format.
- Time – There are ten options provided for selecting the Time format.
- Picture – There are six options for the insertion of a Picture.
- Number- There are a number of options for formatting number. Please go back and read the information earlier in this article. on Formatting Numbers.
- Field – The Field type setting for the object displays the data in exactly the same way that the Preset option does above.
- Source – This object may then be linked to any cell in the table. Use the 2 down arrows to select the table and then cell that you want use for the report.
- Calculate – Use this type of object when a calculation is to be performed on the data in the object.
- Format – There 4 options for the formatting of this object as follows.
- Date – There are ten options provided for selecting the date format.
- Time – There are ten options provided for selecting the Time format.
- Picture – There are six options for the insertion of a Picture.
- Number- There are a number of options for formatting number. Please go back and read the information earlier in this article. on Formatting Numbers.
- Format – There 4 options for the formatting of this object as follows.
- Text – When a text type of object is selected, it will display any text or characters entered by the user into the Source field.
- Source – Type in the Text that you want this object to display.
- Calculate – Not used for this option.
- Source – This object may then be linked to any cell in the table. Use the 2 down arrows to select the table and then cell that you want use for the report.
- Format – There 4 options for the formatting of this object as follows.
- Date – There are ten options provided for selecting the date format.
- Time – There are ten options provided for selecting the Time format.
- Picture – There are six options for the insertion of a Picture.
- Number- There are a number of options for formatting number. Please go back and read the information earlier in this article. on number formatting
- Font & Size Selection – The formatting of all objects in the editor is performed using a word stye type interface which should be familiar to most users.
- Text Color – Click in the text color data entry field. A Choose color for Text alert will be displayed allowing the user to select the text colour for the text in all of the objects in the Header.
- Back Color – Click in the Back color data entry field. A Choose color for Background alert will be displayed allowing the user to select the Background colour for all of the objects the Header.
- Transparent Checkbox – Not recommended for use in the header.
- Script – If the master table is not being used for this object, an individual script of one line must added to any Text Objects from the other table.
Body Attributes
This is where the objects for your Report Body are entered. It should be noted that the Body has an orange background to indicate that the user is working in the Body Section pf the editor.
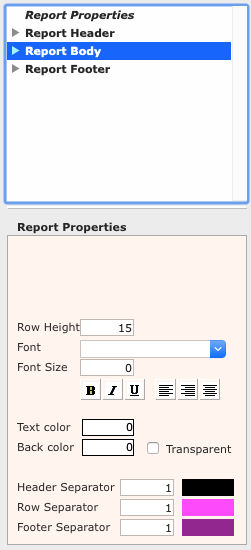
- Row Height – Default is set as zero which is automatic. If altered SapphireOne will set it as entered into the row height field. This will depend on user preferences and the size of the font selected.
- Header or Object – The remainder of the attributes will be applied to all of the objects in the Body provided that one of the objects in the Body has not been accidentally selected.
- Font & Size Selection – The formatting of all objects in the editor is performed using a word stye type interface which should be familiar to most users.
- Text Color – Click in the text color data entry field. A Choose color for Text alert will be displayed allowing the user to select the text colour for the text in all of the objects in the Body.
- Back Color – Click in the Back color field. A Choose color for Background alert will be displayed allowing the user to select the Background colour for all of the preset objects in the Body.
- Transparent Checkbox – Not recommended for use in the Body.
- Header, Row and Footer Separators – These lines in the report may be set for color for color only and are a default width.
Body Object Attributes
Although there is the preset option for the Type of an object in the body of a report it will probably not be used as all of the objects here will be populated from other cells in the data file. However, it is there if required.
When the user double clicks on a cell in the table and cell area to add a column to the report, SapphireOne enters two objects one above the other in a column automatically as follows.
- Column Headings – SapphireOne enters the cell name in the top of the column as a text object and then sets it as a Text Object. This object becomes a heading for the column of data in the report. To edit these headings the user must click on the column heading itself and directly alter this Text heading object as required.
- Data Fields – The second row contains the table name as well as the cell name to indicating that it is a Field Object and will display the linked data from the selected cell in the data file.
It should be noted that for the various types of objects, the user must make a selection from the Source field as well as the Format field. The first option Preset, has a limited number of options to make the setting up of the report as simple as possible.
The objects in the Report Body have 4 Types as follows.
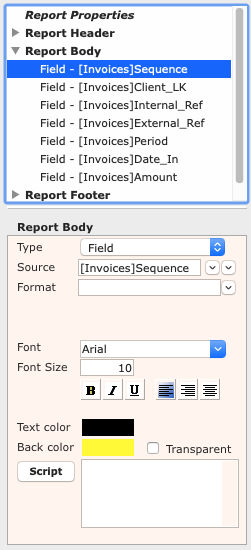
- Preset – There is a Preset object which will not be displayed by default in the Source field for the Body Section of a report . It has been left in the list in case a user requires the options linked to it as below.
- Source – The user is limited to selecting 8 of the most commonly used items required for reports in the Heading section of a report.
- Format – There 4 methods of formatting this object as follows.
- Date – There are ten options provided for selecting the date format.
- Time – There are ten options provided for selecting the Time format.
- Picture – There are six options for the insertion of a Picture.
- Number- There are a number of options for formatting number. Please go back and read the information earlier in this article on Formatting Numbers.
- Field – The Field type setting for the object is the default type when an object is selected in the Body of a report.
- Source – Unlike the preset item above, this object may be linked to any cell in the table. Use the 2 down arrows to select the table and then cell that you want use for the report.
- Calculate – Use this type of object when a calculation is to be performed on the data in the object.
- Format – There 4 options for the formatting of this object as follows.
- Date – There are ten options provided for selecting the date format.
- Time – There are ten options provided for selecting the Time format.
- Picture – There are six options for the insertion of a Picture.
- Number- There are a number of options for formatting number. Please go back and read the information earlier in this article. on Formatting Numbers.
- Text – When a text type of object is selected, it will display any text or characters entered by the user into the Source field.
- Source – Enter the Text that you want this object to display.
- Calculate – Not used for this option.
- Format – There 4 options for the formatting of this object as follows.
- Date – There are ten options provided for selecting the date format.
- Time – There are ten options provided for selecting the Time format.
- Picture – There are six options for the insertion of a Picture.
- Number- There are a number of options for formatting number. Please go back and read the information earlier in this article. on number formatting
- Font & Size Selection – The formatting of all objects in the editor is performed using a word stye type interface which should be familiar to most users.
- Text Color – Click in the text color data entry field. A Choose color for Text alert will be displayed allowing the user to select the text colour for the text in all of the objects in the Body.
- Back Color – Click in the Back color field. A Choose color for Background alert will be displayed allowing the user to select the Background colour for all of the preset objects in the Body. The user should be aware that these colors selected for an object will become part of the background.
- Transparent Checkbox – Select if this objects background is to be transparent.
- Script – If the master table is not being used for this object, an individual script of one line must added to any Text Objects from the other table.
You can review our Blog and YouTube channel for additional information and resources on SapphireOne ERP, CRM and Business Accounting software.