4D Write Pro Overview
4D Write Pro offers 4D users an advanced word-processing tool, fully integrated with your 4D database. Using 4D Write Pro, you can write pre-formatted emails and/or letters containing images, a scanned signature, formatted text and placeholders for dynamic variables. You can also create invoices or reports dynamically, including formatted text and images.
The key features of the product are:
- 4D Write compatibility: a 4D Write Pro object can open and convert legacy 4D Write documents while supporting most of their specific properties.
- Word processing: a 4D Write Pro object embedded in a form provides standard word-processing features, including text and style manipulation, image insertion, import and export, and much more.
- Database integration:
- A 4D Write Pro object can display variable parts which will be filled with data from the database, or data computed by 4D.
- 4D Write Pro documents can be stored within database fields or on disk.
Installation and activation
4D Write Pro is no longer a plug-in but is fully integrated into 4D itself, making it easier to deploy and manage. No additional installation is required; you can add 4D Write Pro areas to your forms and handle 4D Write Pro variables directly in your 4D applications.
However, note that 4D Write Pro uses the same license as 4D Write. You need to have this license installed in your application in order to enable the feature.
Requirements: On Windows, 4D Write Pro features rely on Direct2D. With Windows 7 or Windows Server 2008 machines, make sure the Platform Update for Windows has been installed so that the required Direct2D version is available.
About this manual
This manual is the 4D Write Pro Reference Guide. It covers all 4D Write Pro features, including the user interface and language commands.
Note that 4D Write Pro objects can be handled using specific commands (see “4D Write Pro Language” theme) as well as commands from other 4D themes (“Objects (Forms)” and “Styled Text” themes), documented in the 4D Language Reference manual.
Defining a 4D Write Pro Area
Using the 4D Write Pro area object
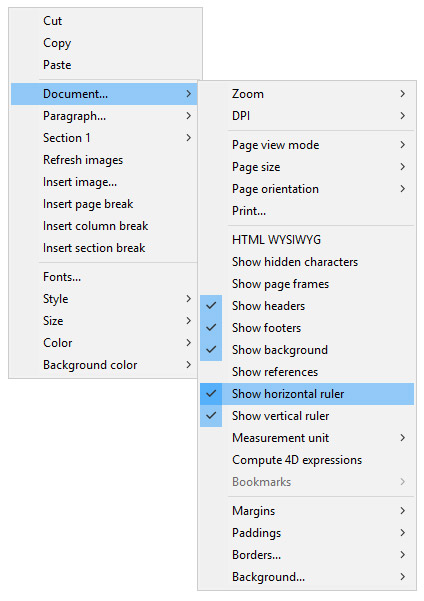
4D Write Pro documents are displayed and edited manually in a 4D form object: 4D Write Pro. This object is available as part of the last tool (Plug-in Area, Web Area, etc.) found in the object bar:

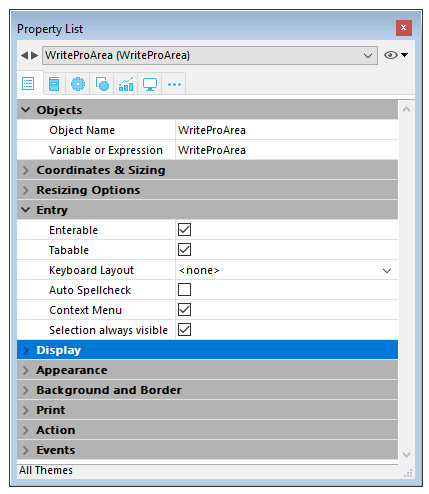
A 4D Write Pro form area is configured by means of standard properties found in the Property List, such as Object Name and Variable Name, Coordinates, Entry, Display, Appearance, and/or Events.
The Variable Name property can be used in the language as a reference to the 4D Write Pro area. Note that the variable must be of the Object type (for more information, refer to the C_OBJECT command).
“Entry” properties manage basic features for text entry:
- Enterable: enables you to lock/unlock the area in order to allow or prevent editing
- Auto Spellcheck: available for 4D Write Pro areas
- Context Menu: allows you to enable/disable the context menu when the form is executed at runtime (see the Using a 4D Write Pro area section)
- Selection always visible: handles text selection as in standard text areas.
Using the 4D Write Pro Widgets of the Object library
You can create preconfigured 4D Write Pro areas using the 4D Write Pro objects found in the Object library (“Entry areas” theme):
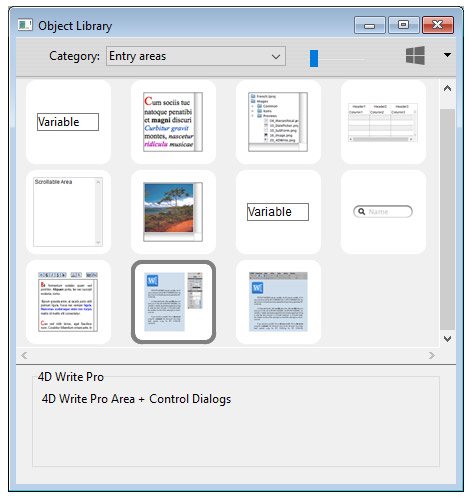
These areas come with either a control panel or a toolbar for managing all the attributes of the area (font, color, style, etc.):
For more information, refer to the 4D Write Pro areas section.
Configuring Drag and Drop
To configure the drag and drop features for your 4D Write Pro areas, you need to select the appropriate options in the “Action” theme of the Property List:
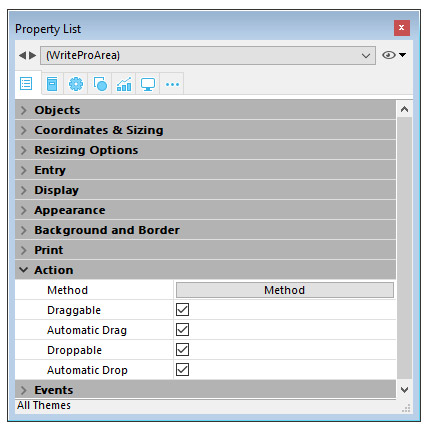
4D Write Pro areas support two drag and drop modes:
- Custom mode: only “Draggable” and “Droppable” options checked. In this mode, you can select text and start to move it. The object method is then called with the On Begin Drag Over event, and you can define the drop action using custom code.
- Automatic mode: “Draggable”, “Droppable”, “Automatic Drag” and “Automatic Drop” options checked. In this mode, you can automatically move or copy the selected text by pressing the Alt/Option key. The On Begin Drag Over event is not triggered.
Note: Selecting only “Automatic Drag” and “Automatic Drop” options will have no effect in the 4D Write Pro area.
Working with 4D Expressions
All SapphireOne table values are easily accessible for integration into a 4D Write pro document, either verbatim or utilised within a function to be dynamically processed at export. These inserted values are referred to as 4D Write Pro Expressions. The process is as follows.
- Open any Inquiry list screen. Either standard or custom.
- From the Sapphire Tools menu, select ‘4D Write Pro’.
- A new document is initially provided. Alternately the SapphireOne user may open a pre-existing document by selecting File > Open from the SapphireOne main menu.
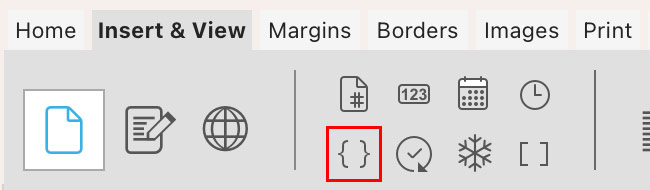
- Place the cursor within the document at the location you would like to insert the 4D Write Pro Expression.
- Select the ‘Insert & View’ Tab.
- Select the ‘Insert 4D Write Pro Expression’ button ({}).
All inquiry screens in SapphireOne offer the option to customise the list of items displayed on the page. This feature, known as Custom Inquiry, allows you to select the data fields to be shown and the order in which the columns of data appear across the screen. Although a client list is used as an example below, any type of inquiry can be customised within SapphireOne.
The list below represents the standard inquiry list, displaying a basic set of data fields for each client record:
Swap to Custom Inquiry
When you select the ‘Swap to Custom Inquiry’ button in the lower left-hand corner of the screen, SapphireOne will display the default Custom Screen, as shown below. This Custom List screen provides the user with two main options for organising the data display:
- To add or remove the data field columns displayed on the screen, click the ‘Setup’ button in the bottom right corner of the screen. Within the Setup screen, you can right-click on the column lines and choose from Delete, Move Left, or Move Right. More information on the Setup screen is provided below.
- To change the order in which the data field columns are displayed, click the ‘Setup’ button in the bottom right corner of the screen. Within the Setup screen, you can right-click on the column lines and choose from Delete, Move Left, or Move Right. More information on the Setup screen is provided below.
Once you have customised the Custom Inquiry screen, the screen view will be unique to you, and each time you log in, you will see the same custom view. You also have the option to select and save an unlimited number of custom views. This can be done in the ‘Setup’ screen, as detailed below.
The Inquiry screen below is the initial Custom Inquiry screen, which can be modified by the user.
Custom Inquiry Screen ‘Setup’ Function
To begin setting up your Customised List screen, click the Setup button, as shown above. The Setup screen will appear, as displayed below.
From this screen, users can add and remove data columns as needed. Almost every field within the SapphireOne data tables can be included in the Custom List screen, provided the user has the necessary authorisation.
The screen features several menu items across the top, which include:
- Reset to Default – Clicking this button resets the display to the default settings determined by SapphireOne. When you add a new data field, SapphireOne will place it on the right-hand side of the data columns. You can then click on the field heading and drag it to your desired location on the screen.
- Show Related Record – This option allows you to add related fields from other tables. By ticking the Show Related checkbox
 at the top of the screen, you can select a related record, and a mini view of that related record for the chosen entry will be displayed for the currently selected record. You will need to select the fields to be displayed.
 - Favourite Set – Located at the top left of the screen, this option enables you to save a custom-created screen for future use. For instance, you can have a simple Inquiry screen for general use and a more complex screen view when auditing specific information.
This will open the Formula Editor panel whereby a 4D Write Pro Expression can be prepared for placement in to your document.
Utilising the Formula Editor
The Formula editor provides many shortcuts for writing formulas. You can click field names, operators and commands, as well as any project methods, to add them to the formula. When you click on an item, it is automatically displayed in the editing area where you can then modify it using standard cut/copy/paste functions. You can also enter items directly in the editing area or drag and drop them from the list of items.
The Formula editor contains the following areas.
- List of tables and fields – This area displays the fields of the table. The menu located above the list lets you set the fields to be displayed. You can use fields of the current table, those of related tables or those of all the tables.
Note: Tables and fields with the Invisible property do not appear in the list. For more information about this property, refer to the “Attributes” section in Table properties and Field properties. - Operators list– The operators list lets you choose the operators to be used in the formula. The operators are grouped into themes found in the menu located above the list:

Each theme displays all the available operators for the corresponding type of data or operation. For example, the assignment operator := is available for all data types. For a description of each operator, refer to the following section. - Commands list – The commands list contains the 4D functions that can be used in formulas, as well as any project methods allowed by the developer. The menu located above the list lets you display the commands by theme or by alphabetical order. Refer to the 4D Language Reference manual for a description of the 4D commands that appear in this menu.
In principle, project methods that can be used in formulas must be declared beforehand using the 4D SET ALLOWED METHODS command. However, by default, the Designer and Administrator of the database have complete access to the 4D commands and user methods in the Formula editor. It is also possible to completely disable access control for all users. These options are set on the Security page of the Database settings.
Formula operators
Here is a brief description of the different operators available in the Formula editor. For a more detailed description of the possibilities provided by these operators, refer to the Undefined chapter of the 4D Language Reference manual.
- String Operators
A and B are character strings; N is a number.
OperatorUseDescription:= AssignmentA:=BAssigns the value B to A+ ConcatenationA+BReturns AB* RepetitionA*NRepeats the value of A N times[[ ]] Indexes[[A]]NReturns the Nth character of A”” Empty string””Inserts a pair of quotation marks - Numeric Operators
X and Y are numbers.
OperatorUseDescription:= AssignmentX:=YAssigns the value Y to X+ AdditionX+YReturns X plus Y- SubtractionX-YReturns X minus Y* MultiplicationX*YReturns X multiplied by Y/ DivisionX/YReturns X divided by Y\ Integer DivisionX\YReturns the integer division of X by Y (X and Y must be integers)% ModuloX%YDivides X by Y and returns the remainder^ ExponentiationX^YReturns X to the power of Y
Note: The modulo % operator returns significant values with numbers belonging to the long integer category (from -2^31 to +2^31 minus 1). To calculate the modulo of numbers outside of this interval, use the Mod command.
- Date Operators
D1 and D2 are dates; N is a number.
OperatorUseDescription:= AssignmentD1:=D2Assigns the value D2 to D1+ AdditionD1+NReturns D1 plus N days- DifferenceD1-D2 orReturns the number of days between D1 and D2D1-NReturns D1 minus N days!//! Blank date!00/00/00!Inserts a blank date - Time Operators
H1 and H2 are times; N is a number.
OperatorUseDescription:= AssignmentH1:=H2Assigns the value H2 to H1+ AdditionH1+H2 orReturns H1 plus H2H1+NReturns H1 plus N seconds, expressed in seconds elapsed since midnight- SubtractionH1-H2 orReturns H1 minus H2H1-NReturns H1 minus N seconds, expressed in seconds elapsed since midnight* MultiplicationH1*NReturns H1 multiplied by N, expressed in seconds elapsed since midnight/ DivisionH1/NReturns H1 divided by N, expressed in seconds elapsed since midnight\ Integer DivisionH1\NReturns the integer division of H1 by N, expressed in seconds elapsed since midnight% ModuloH1%NDivides H1 by N and returns the remainder?::? Blank hour?00:00:00?Inserts a blank hour - Comparison Operators
Z1 and Z2 can be of the string, numeric, date or time type.
OperatorUseDescription= EqualZ1=Z2Returns True if Z1 equals Z2# Not equalZ1#Z2Returns True if Z1 does not equal Z2> Greater thanZ1>DReturns True if Z1 is greater than Z2>= Greater than or equal toZ1>=Z2Returns True if Z1 is greater than or equal to Z2< Less thanZ1<Z2Returns True if Z1 is less than Z2<= Less than or equal toZ1<=Z2Returns True if Z1 is less than or equal to Z2 - Logical Operators
B1 and B2 must be Booleans (expressions that are TRUE or FALSE)
OperatorUseDescription& ANDB1 & B2Returns True if B1 is True and B2 is True| ORB1 | B2Returns True if B1 is True or B2 is True
Configuring View properties
Document view properties are directly available in the Property List for 4D Write Pro areas. They allow you to define how a 4D Write Pro document will be displayed by default in the 4D Write Pro area. These properties let you customize, for example, whether 4D Write Pro documents are displayed as they would be printed, or as they would be rendered in a browser. You can set different views of the same 4D Write Pro document in the same form.
Note: View settings can be managed dynamically using the WP SET VIEW PROPERTIES and WP Get view properties commands.
Document view settings are handled through specific items in the Appearance theme of the Property List for 4D Write Pro form objects:
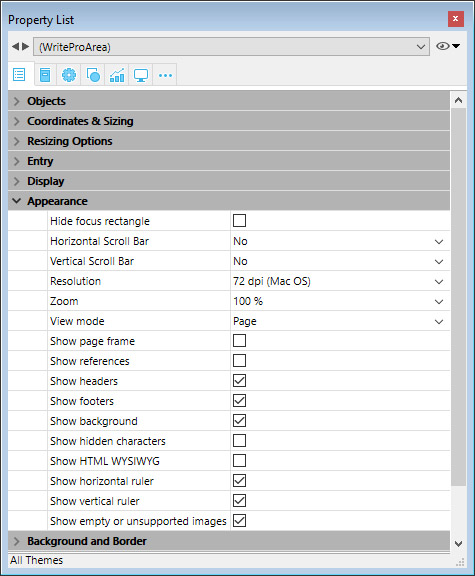
- Resolution: Sets the screen resolution for the 4D Write Pro area contents. By default, it is set to 72 dpi (macOS), which is the standard resolution for 4D forms on all platforms. Setting this property to Automaticmeans that document rendering will differ between macOS and Windows platforms. Setting a specific dpi value will make the document rendering the same on both macOS and Windows platforms.
- Zoom: Sets the zoom percentage for displaying 4D Write Pro area contents.
- View mode: Sets the mode for displaying the 4D Write Pro document in the form area. Three values are available:
- Page: the most complete view mode, which includes page outlines, orientation, margins, page breaks, headers and footers, etc. For more information, please refer to the Page view features paragraph.
- Draft: draft mode with basic document properties
- Embedded: view mode suitable for embedded areas; it does not display margins, footers, headers, page frames, etc.
This mode can also be used to produce a web-like view output (if you also select the 96 dpi resolution and the Show HTML WYSIWYG option).Note:
The View mode property is only used for onscreen rendering. Regarding printing settings, specific rendering rules are automatically used (see Printing 4D Write Pro documents).
- Show page frame: Displays/hides the page frame when Page view mode is set to “Page”.
- Show references: Displays all 4D formulas (or expressions) inserted in the document as references (see Managing formulas). When this option is unchecked, 4D formulas are displayed as values.
Note: Formula references can be displayed as symbols (see below).
 - Show headers/footers: Displays/hides the headers and footers when Page view mode is set to “Page”. For more information on headers and footers, please refer to the Using a 4D Write Pro area section.
- Show background: Displays/hides both background images and background color.
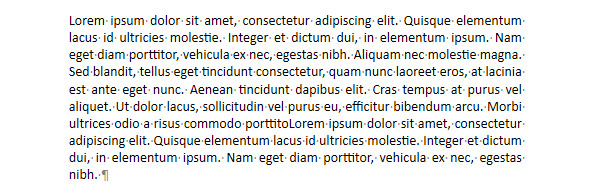
- Show hidden characters: Displays/hides invisible characters
- Show HTML WYSIWYG: Enables/disables the HTML WYSIWYG view, in which any 4D Write Pro advanced attributes which are not compliant with all browsers are removed.
- Show horizontal ruler: Displays/hides the horizontal ruler. For more information on rulers in 4D Write Pro areas, see the Handling rulers section.
- Show vertical ruler: Displays/hides the vertical ruler when the document is in Page mode. For more information on rulers in 4D Write Pro areas, see the Handling rulers section.
- Show empty or unsupported images: Displays/hides a black rectangle for images that cannot be loaded or computed (empty images or images in an unsupported format). For more information, see the Empty picturessection.
- Display formula source as symbol: Displays source text of formulas as symbols when expressions are shown as references (see above). Displaying formulas as symbols makes template documents more compact and more wysiwyg.
Compatibility notes:
- 4D Write Pro documents created with versions up to 4D v15 R5 are displayed using the default values for these properties, with the exception of the Resolution property, which is set to Automatic in this case.
- Horizontal rulers are available by default in databases created starting with 4D v16 R2; for databases converted from previous versions, this setting is not checked by default.
Storing 4D Write Pro documents in 4D Object fields
You can store your 4D Write Pro documents automatically in the 4D data file. If you created a 4D Write Pro area on a form and created an Object field to store the area’s contents, any text entered in the area is saved automatically with each record when the record is validated. You can then use the QUERY BY ATTRIBUTE command in order to select records based on the value of their internal attributes. You can also add and query your own attributes with 4D Write Pro areas.
This section describes the following features:
- Binding a 4D Object field to a 4D Write Pro area in a form
- Setting, getting, and querying custom attributes of stored 4D Write Pro documents using the OB SET, OB Getstandard object commands, and QUERY BY ATTRIBUTE.
Assigning a 4D Object field to a 4D Write Pro area
To bind a 4D Write Pro area with a 4D Object field, you just need to reference the field in the Variable Name property of the area.
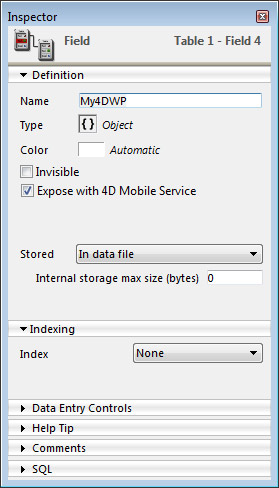
Creating the Object field in the Structure
In your database structure, any 4D Object field can be used to store 4D Write Pro documents. As with any Object field, you just have to define its standard properties, according to your needs:
- the field name,
- its attributes, such as “Expose with 4D Mobile Service,” as well as its index,
- its storage option (for more on this, see External data storage).
Assigning the Object field to the 4D Write Pro area
Once you have defined an Object field to store your 4D Write Pro document, you just need to reference it in the form containing the area. You can use any table or a project form.
In the Form editor, enter the field name using the standard “[Table]Field” notation in the Variable Name area of the Property list for the 4D Write Pro area:
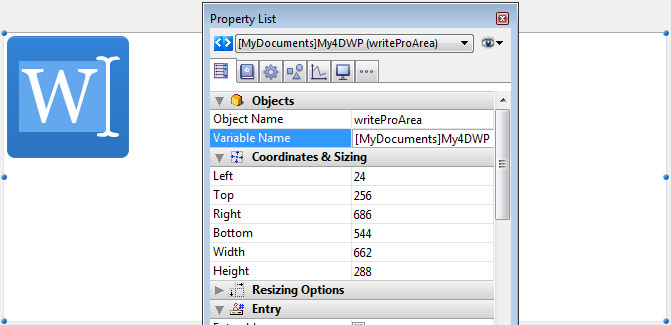
Your 4D Write Pro area is then associated with the field, ensuring that its contents will be saved automatically with each record. Note that if you do not use the 4D automatic action buttons, you will have to save the area manually using 4D commands.
Using custom attributes
When 4D Write Pro areas are stored in Object fields, you can save and read any custom attributes with the 4D Write Pro document, such as, for example, the writer’s name, the document category, or any additional information you may find useful. You can then query your custom attributes to select records matching the criteria.
Custom attributes will be exported with the WP EXPORT DOCUMENT or WP EXPORT VARIABLE commands. They will be exported as well when converting a 4D Write Pro Object field to JSON using the JSON Stringify command (along with the 4D Write Pro main document attributes).
To set or get custom attributes, you just need to use object notation or the OB Get and OB SET commands.
For example, in the form method, you can write:
 If(Form event code=On Validate)
[MyDocuments]My4DWP["myatt_Last edition by"]:=Current user
[MyDocuments]My4DWP.myatt_Category:="Memo"
[MyDocuments]My4DWP:=[MyDocuments]My4DWP //to record the edit
 End if
or:
 If(Form event code=On Validate)
OB SET([MyDocuments]My4DWP;"myatt_Last edition by";Current user)
OB SET([MyDocuments]My4DWP;"myatt_Category";"Memo")
 End if
You can also read custom attributes of the documents:
vAttrib:=[MyDocuments]My4DWP.myatt_Category
or:
vAttrib:=OB Get([MyDocuments]My4DWP;"myatt_Category")
If you have saved custom 4D Write Pro attributes in your data file, you can query these attributes to create a selection of records containing the appropriate attribute value. In the following example, you query the table containing the Object field to select records:
 QUERY BY ATTRIBUTE([MyDocuments];[MyDocuments]My4DWP;"myatt_Category";=;"Memo")
//selects all records in MyDocuments whose "myatt_Category" custom attribute has the value "Memo"
//in the My4DWP Object field (bound to a 4D Write Pro area)
Note about custom attribute names: Since custom attributes share the same naming space as 4D Write Pro internal attributes, we strongly recommend that you use prefixes when defining your own attribute names in order to avoid any conflicts between internal and custom attributes. Non-prefixed names are reserved for 4D Write Pro internal attributes. You can use any custom prefix (for instance, we used “myatt_” as a prefix in the above example).
Note: Starting with 4D v15 R4, 4D Write Pro internal attributes can also be accessed through programming using the standard QUERY BY ATTRIBUTE, OB Get and OB SET commands, but also using WP SET ATTRIBUTES, WP GET ATTRIBUTES and WP RESET ATTRIBUTES. For more information, please refer to the 4D Write Pro Attributessection.
See also
Using a 4D Write Pro area
Managing documents in 4D Write Pro areas
In 4D applications, 4D Write Pro documents are created, imported, and exported by means of specific commands found in the 4D Write Pro theme (WP EXPORT DOCUMENT, WP EXPORT VARIABLE, WP Import document, WP New).
You can also associate a 4D Write Pro area with an Object field in a database form. This way, each 4D Write Pro document is automatically saved with the record and stored in the database’s data (see Storing 4D Write Pro documents in 4D Object fields).
.4wp document format
You can save and re-open 4D Write Pro documents to and from disk without any loss using the native .4wp format.
The .4wp format consists of a zip folder whose name is the document title and whose contents are HTML text and images:
- HTML text combines regular HTML with 4D expressions (which are not computed) as well as 4D-specific tags, images are stored in a folder with the same name as the document title, next to the HTML file.
Since .4wp documents are based on HTML, they can be imported or opened in any external application supporting HTML.
Note: The 4D Write Pro internal document format is a proprietary HTML extension, compatible with HTML5/XHTML5, but which supports its own subset of HTML/CSS attributes and tags. As a result, only HTML documents exported by 4D Write Pro can be opened by 4D Write Pro without any risk of data loss. Importing HTML documents that were created externally could produce errors.
Backward compatibility
You can always reopen a .4dp document with a previous version of 4D Write Pro. If it contains attributes that were added in more recent versions, these attributes are just ignored. However, if you save the document, the attributes are removed from the document and will be lost.
Context menu
If the Context menu property is checked for a 4D Write Pro area (see Defining a 4D Write Pro area), a comprehensive context menu is available to users when the form is executed at runtime:
This menu offers access to all the 4D Write Pro user features.
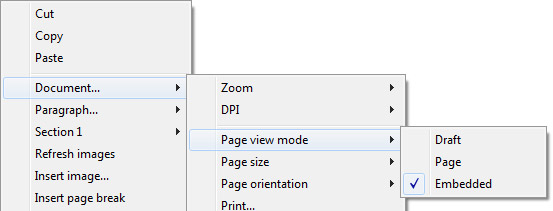
Selecting the view mode
4D Write Pro documents can be displayed in one of three page view modes:
- Draft: draft mode with basic properties
- Page (default): “print view” mode
- Embedded: view mode suitable for embedded areas; it does not display margins, footers, headers, columns, page frames, etc. This mode can also be used to produce a Web-like view output (if you also select the 96 dpi resolution and the HTML WYSIWYG option).
The page view mode can be configured by means of the area pop-up menu:
Note: The page view mode is not stored with the document.
For areas embedded in 4D forms, the view mode can also be set by default using the Property List. In this case, the view mode is stored as a property of the 4D Write Pro form object (for more information, please refer to the Configuring View properties paragraph).
Basic properties
When the document is in Page view mode, the following document properties are available for the user:
- Page outlines to represent printing limits
- Page width and Page height (default: 21×29.7 cm)
- Page orientation (default: Portrait)
- Page margin (default: 2.5 cm)
You can also use additional commands such as Document…/Page size or Document…/Page orientation.
Note: When a document is in Embedded or Draft view mode, page properties can be set, even if their effect is not visible. In Draft view mode, the following paragraph property effects are visible:
- Page height limitation (lines drawn)
- Columns
- Avoid page break inside property
- Widow and orphan control.
Paragraph breaks
When displayed in Page or Draft mode (or in the context of a document printing), 4D Write Pro paragraphs can break:
- automatically, if the paragraph height is greater than the available page height,
- depending on paragraph breaks set by programming or by the user.
Breaks can be added by programming or by the user. Available actions include:
- WP INSERT BREAK command
- insertPageBreak standard action
- Insert page break option of the default contextual menu
Controlling automatic breaks
You can control automatic breaks in paragraphs using the following features:
- Widow and orphan control: When this option is set for a paragraph, 4D Write Pro does not allow widows (last line of a paragraph isolated at the top of a page) or orphans (first line of a paragraph isolated at the bottom of a page) in the document. In the first case, the previous line of the paragraph is added to the top of the page so that two lines are displayed there. In the second case, the single first line is moved onto the next page.
- Avoid page break inside: When this option is set for a paragraph, 4D Write Pro prevents this paragraph from being broken into parts on two or more pages.
- Keep with next: When this option is set for a paragraph, that paragraph cannot be separated from the one that follows it by an automatic break. See wk keep with next and the corresponding standard action (keepWithNext, see Using 4D Write Pro standard actions).
These options can be set using the context menu, or attributes (wk avoid widows and orphans, wk page break inside paragraph, see 4D Write Pro Attributes), or standard actions (widowAndOrphanControlEnabled, avoidPageBreakInside, see Using 4D Write Pro standard actions).
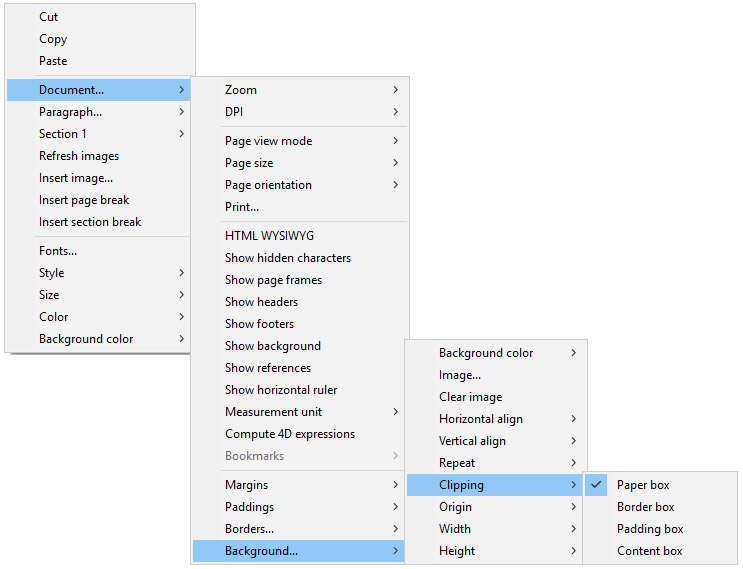
Background
The background of 4D Write Pro documents and document elements (tables, paragraphs, sections, headers/footers, etc.) can be set with the following effects:
- colors
- borders
- images
- origin, horizontal and vertical positioning
- painting area
- repeat
These attributes can be defined programmatically for either individual elements on a page and/or entire document backgrounds with the WP SET ATTRIBUTES command or by Using 4D Write Pro standard actions. To see the full list of available background attributes and where they can be applied, see the 4D Write Pro Attributes article.
Users can modify background attributes via the contextual menu as shown below:
For an example of adding a full-sized image as a background, see the How Do I (HDI) demo here.
Handling headers, footers, and sections
4D Write Pro documents support headers and footers. These headers and footers are related to sections.
A section is a part of a document which is defined by a page range and can have its own paging and common attributes. A document can contain any number of sections (from just one, up to the total number of pages). Each page can only belong to one section, except pages with continuous section breaks (see below).
You can define a set of headers and footers for each section.
Defining a section
A section is a subset of continuous pages in a 4D Write Pro document. A document can contain one or more sections. A section can contain any number of pages, from a single page to the total number of pages in the document. A section page can contain a single column or up to 20 column(s).
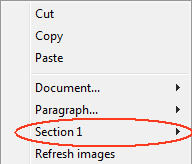
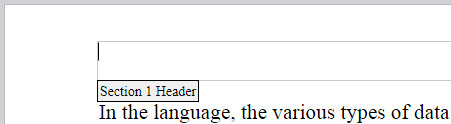
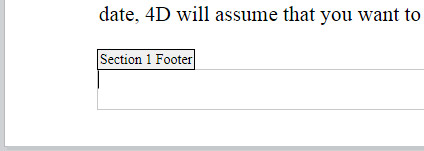
By default, a document contains a single section, named Section 1. The 4D Write Pro contextual menu displays this section number wherever you click in the document:
You create a new section by adding a section break in the text flow:
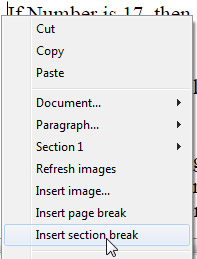
When a section break has been added, the contextual menu displays an incremented number for each section. You can, however, rename any section:
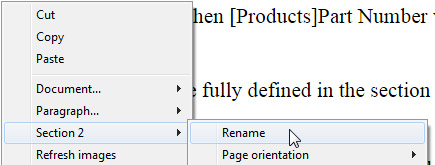
The name you entered is then used as the section name everywhere in the document:

Note that if you have defined a different first page or different left/right pages for a section, the page type is also displayed in the menu (see below).
Inserting a continuous section break
A continuous section break creates a new section on the same page. This allows you to create pages with sections that have different numbers of columns (see Creating a page with multiple-column and single column sections).
Sections created with continuous section breaks are counted in the document (they have section numbers), but unlike sections created with regular section breaks, their headers, footers, anchored images, etc. are only taken into account when a physical page break has occurred.
Note: If you change the page orientation for the new section after you insert a continuous section break, it turns into a regular section break.
Section attributes
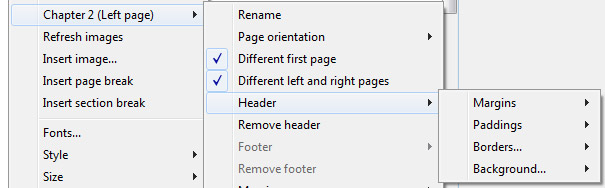
Sections inherit attributes from the document. However, common document attributes, including headers and footers, can be modified separately for each section. The contextual pop-up menu displays the properties and attributes available at the section level:
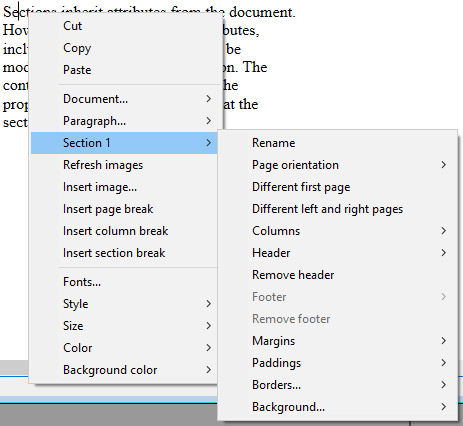
- Page orientation: allows you to set a specific page orientation (Portrait or Landscape) per section.
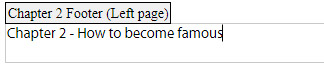
- Different first page: allows you to set different attributes for the first page of the section; this feature can be used to create flyleaves, for example. When this attribute is checked, the first page of the section is handled as a subsection itself and can have its own attributes.

- Different left and right pages: allows you to set different attributes for left and right pages of the section. When this attribute is checked, left and right pages of the section are handled as subsections and can have their own attributes.

- Columns commands: allow to define the number and properties of columns for the section. These options are detailed below.
- Header and Footer commands: these options allow you to define separate headers and footers. These options are detailed below.
- Margins / Paddings / Borders / Background: these attributes can be defined separately for each section. For more information on these attributes, please refer the 4D Write Pro Attributes article.
Inserting headers and footers
Each section can have specific header and footer. Headers and footers are displayed only when the document page view mode is Page.
Within a section, you can define up to three different headers and footers, depending on the enabled options:
- first page,
- left page(s),
- right page(s).
To create a header or a footer:
- Make sure the document is in Page view mode.
- Double-click in the header or footer area of the desired section and page to switch to editing mode.
- The header area is at the top of the page:
- The footer area is at the bottom of the page:
- The header area is at the top of the page:
You can then enter any static contents, which will be repeated automatically on each page of the section (except for the first page, if enabled).
You can insert dynamic contents such as the page number or the page count using the ST INSERT EXPRESSIONcommand (for more information, please refer to the Inserting document and page expressions paragraph).
Note: You can also handle footers and headers by programming using specific commands such as WP Get headerand WP Get footer.
Once a header or a footer has been defined for a section, you can configure its common attributes using the contextual menu:
For more information on Margins, Paddings, Borders, and Background attributes, please refer the 4D Write Pro Attributes section.
You can remove the entire definition of a header or a footer (contents and attributes) by selecting the Remove headeror Remove footer command in the contextual menu.
Compatibility
4D Write Pro handles headers and footers of documents converted from the 4D Write plug-in with a fixed height.
The following expressions and properties are also supported and converted from the 4D Write plug-in headers and footers:
- page number and page count variables
- distinct first page
- distinct left/right pages
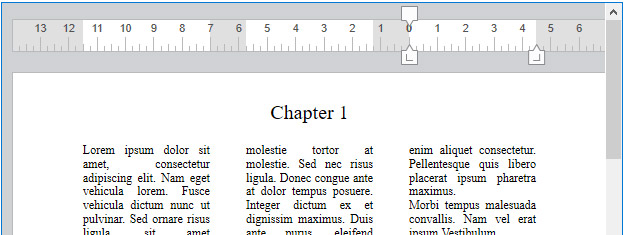
Handling rulers
Horizontal rulers are available in every viewing mode of 4D Write Pro and have the following characteristics:
- Graduations in cm, mm, inches or pt according to current layout unit defined in the 4D Write Pro document. You can change measurement units using the context menu or by modifying the wk layout unit attribute.
- First line indent symbol
- Left paragraph margin symbol
- Right paragraph margin symbol
- Tabs displayed along lower edge of ruler
- Visible color contrast representing left and right page margins
Vertical rulers are available in Page mode only and have the following characteristics:
- Graduations in cm, mm, inches or pt according to current layout unit defined in the 4D Write Pro document. You can change measurement units using the context menu or by modifying the wk layout unit attribute.
- Visible color contrast representing top and bottom page margins
You can change the display status of the rulers via standard actions (see Using 4D Write Pro standard actions) or by checking or unchecking the Show horizontal ruler or Show vertical ruler item in the context menu of the 4D Write Pro area:
Note: A specific 4D Write Pro area property allows defining the default display for the rulers (see Configuring View properties section).
Adjusting text margins and indents
Horizontal ruler
You can modify the left and right margins, indents and tab positions by clicking and dragging the corresponding symbols on the horizontal ruler:

When you hover the mouse over one of these symbols, the cursor changes to indicate that it can be moved, and a vertical guide line appears while you drag it:

When multiple paragraphs are selected, dragging margin or indent symbols applies these margins or indents to all selected paragraphs. Holding down the Shift key while dragging these symbols maintains existing intervals between indents or margins in the selected paragraphs.
Vertical ruler
You can modify the top and bottom margins with the vertical ruler. When you hover the mouse over the margin limit, the cursor changes to indicate that it can be moved, and a horizontal guide line appears while you drag it:

This action can be used to modify the spacing between the top and bottom of the page and the body and the header and footer of a document.
Managing tabs
You can use the horizontal ruler’s context menu to create, modify or delete tabs:
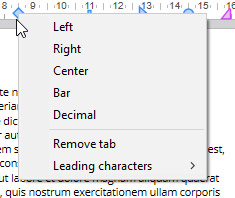
To create a tab, just right-click directly on the horizontal ruler and choose its type from the context menu; a single left click automatically creates a default left tab. You can also right-click on existing tabs to modify their type using the context menu.
Remove tab is only available when you right-click directly on an existing tab; you can also remove tabs by dragging them outside the horizontal ruler area.
Notes:
- Tabs can also be defined programmatically with the WP SET ATTRIBUTES, WP GET ATTRIBUTES, and WP RESET ATTRIBUTES commands with the wk tab default and wk tabs selectors.
- For decimal tabs, 4D Write Pro considers the first dot or comma character from the right as the decimal separator; this default setting can be modified with the wk tab decimal separator selector.
Define leading characters
The characters preceeding tabs (leading characters) can be defined by selecting from five predefined characters or by designating a specific character to use. The predefined characters are:
- None (no characters are displayed – default)
- …. (dots)
- — (dashes)
- __ (underscores)
- *** (asterisks)
Leading characters always appear before the tab and follows the text direction (left to right or right to left). They can be defined programmatically with the WP SET ATTRIBUTES, WP GET ATTRIBUTES, and WP RESET ATTRIBUTEScommands using wk leading with the wk tab default or wk tabs selectors, or via the horizontal ruler’s contextual menu (as shown below).

When Other… is selected, a dialog is displayed where a custom leading character can be defined.
Multi-column rulers
When two or more columns are defined for the document or the section, the horizontal ruler displays a specific area for each column:

Note: Multi-column feature is not available in Embedded view mode.
On After Edit event
An On After Edit form event is triggered for a 4D Write Pro area form object whenever any of the tab or margin controls are moved, added or deleted, whether by dragging them or using the context menu.
Handling columns
4D Write Pro allows you to manage columns in your documents. Columns are chained from the left-most column to the right-most column. In other words, when entering text, the text flow will start filling the left column and continue with the column directly to the right until it reaches the end of the page. Once the end of the page is reached, the text flow cycles through the next page. In order to be able to balance the page settings, 4D Write Pro allows you to insert column breaks.
Columns can be defined at the document level (they are displayed in the whole document) and/or at the section level (each section can have its own column configuration).
Note: Columns are supported in Page view mode and Draft view mode only (they are not displayed in Embeddedview mode), and they are exported to .docx using WP EXPORT DOCUMENT but not to HTML and MIME HTML formats (wk web page complete format).
Columns can be set using:
- the Columns submenu of the 4D Write Pro area context menu,
- 4D Write Pro attributes (see 4D Write Pro Attributes),
- 4D Write Pro standard actions (see Using 4D Write Pro standard actions).
You can set or get the following properties and actions for columns:
| Property | Description | Document attributes | Standard actions |
| Number of columns | You can define up to 20 columns for the document/section | wk column count | columnCount |
| Column spacing | Space between columns in pts, inches, or cm. Note that all columns will have the same size. Each column width is automatically calculated by 4D Write Pro according to the number of columns, the page width, and the spacing | wk column spacing | columnSpacing |
| Column width | (read-only attribute) Current width for each column, i.e. computed width | wk column width | – |
| Column rule style, color, and width | You can add a vertical separator (a decorative line) between columns. These options let you design the separator style, color and width. To remove the vertical separator, select None as a style. | wk column rule style, wk column rule color, wk column rule width | columnRuleStyle, columnRuleColor, columnRuleWidth |
| Insert break | Insert a column break | wk column break, see also WP INSERT BREAK | insertColumnBreak |
| Columns menu | Create a Columns sub-menu | – | columns |
Creating a page with multiple-column and single column sections
Inserting a continuous section break in your document allows you to have multiple-column sections and single column sections on the same page.
For example:
You can insert a continuous section break and change the number of columns to two for the first section:
Printing 4D Write Pro documents
4D Write Pro documents can be printed in two ways:
- As parts of 4D forms
- As independent documents
Printing documents in 4D forms
You can print 4D Write Pro embedded objects as part of any kind of 4D form (project, table, input, or output) using standard 4D printing commands such as PRINT SELECTION or PRINT RECORD.
The standard Print Variable Frame option is also supported(*) for 4D Write Pro areas, allowing you to manage size during printing. When this option is checked, the margins (outside and inside) and top border are only applied to the first page, and the margins (outside and inside) and bottom border are only applied to the last page. Pagination properties of the document are ignored: widow and orphan control is disabled and page breaks are not applied (these properties are only used for page rendering on screen, or for standalone printing of the document). When the Print Variable Frame option is selected, only objects located above the form area are printed. For more information about this option, refer to “Print Variable Frame” in the Design Reference manual.
(*) The Print object and Print form commands are not compatible with this option.
View mode for printing
Regardless of the View mode set for the 4D Write Pro area (see Configuring View properties), it is always printed as in the Embedded mode when you use a 4D printing command such as Print form. In this case, the following Appearance settings are not taken into account for the 4D Write Pro form objects: Page view mode (always “Embedded”), Show headers, Show footers, Show page frame (always “No”), Show hidden characters (always “No”).
Example
The following example shows the effect of the Print Variable Frame option on a 4D Write Pro area embedded in the default output form. The following code is executed:
 ALL RECORDS([Movies])
 ORDER BY([Movies]Title)
 PRINT SELECTION([Movies])
- Here is the result with the Print Variable Frame option unchecked (off):
- Here is the result with the Print Variable Frame option checked (on):
(Sample text source: Wikipedia)
Printing independent documents
Starting with 4D v15 R5, 4D Write Pro includes printing features allowing you to print independent 4D Write Pro documents as well as to control standard printing options such as the format, orientation, or page numbers.
4D Write Pro commands
Basically, two commands handle the 4D Write Pro printing features: WP PRINT and WP USE PAGE SETUP.
- WP PRINT launches a print job for a 4D Write Pro document or adds the document to a current print job.
- WP USE PAGE SETUP modifies the current printer page settings based on the 4D Write Pro document attributes for page size and orientation.
Note: On machines with Windows 7 or Windows Server 2008 R2, make sure that the Platform Update for Windows 7has been installed so that the printing features are supported.
Regular 4D commands
The following 4D commands support 4D Write Pro printing features:
- SET PRINT OPTION and GET PRINT OPTION: All options are supported for 4D Write Pro documents printed by WP PRINT. For Paper option and Orientation option, you may find it more efficient to call WP USE PAGE SETUP in order to easily synchronize these attributes with the 4D Write Pro document settings. The Page range option (15) allows you to specify the page range to print.
- PRINT SETTINGS: Defines print settings for the current printer; if WP PRINT is called afterwards, it takes any print settings modified by means of the Print Settings dialog boxes into account (except for margins, which are always based on the 4D Write Pro document).
- OPEN PRINTING JOB and CLOSE PRINTING JOB: WP PRINT can be called between these commands in order to insert one or more 4D Write Pro documents into a single print job.
Importing 4D Write documents
One of the main features of the new 4D Write Pro object is the ability to import and convert existing 4D Write documents. This will allow you to migrate applications that currently rely on the 4D Write plug-in.
Compatibility notes:
- Only 4D Write documents of the last generation (“4D Write v7”) are supported.
- Copying-pasting from a 4D Write document to a 4D Write Pro area is not supported for the moment. A 4D Write document can only be imported using 4D Write Pro language commands.
- Carriage returns (CR) in formulas behave differently in 4D Write and 4D Write Pro. In 4D Write, they are always interpreted as paragraph breaks, whereas in 4D Write Pro they are interpreted as line breaks by default. To maintain CR in formulas as paragraph breaks in imported 4D Write documents, after conversion use:
WP SET ATTRIBUTES(wp;wk break paragraphs in formulas;wk true)
For more information, see Managing formulas.
How to import a 4D Write document
4D Write Pro objects offer two ways to import 4D Write documents:
- For 4D Write files stored on disk, you use the WP Import document command,
- For 4D Write areas stored in BLOB fields, you use the WP New command.
For more information, please refer to the description of these commands.
Which properties will be recovered from 4D Write?
To facilitate your migration from the 4D Write plug-in to 4D Write Pro, we want to support as many 4D Write features as possible in 4D Write Pro objects.
This paragraph lists the 4D Write plug-in properties that are currently recovered in a 4D Write Pro area after an import using theWP Import document or WP New commands.
Note however that a few differences can be seen, which are not considered as bugs. This is due, for example, to the default font used in 4D Write Pro for bullets, or small conversions in the Underline type.
Document info
| 4D Write plug-in | 4D Write Pro |
| Creation date & time | Available |
| Modification date & time | Available |
| Locked | Not available (use read-only object property) |
| Title | Available |
| Subject | Available (only plain text) |
| Author | Available |
| Company | Available |
| Notes | Available |
Document view parameters
| 4D Write plug-in | 4D Write Pro |
| View page mode | Not imported (use Document/Page view mode in the context menu) |
| View rulers | Not imported (use object property) |
| View frames | Not imported (use object property) |
| View header | Not imported (use object property) |
| View footer | Not imported (use object property) |
| View first page header | Not available |
| View first page footer | Not available |
| View pictures | Not available |
| View HScrollbar | Not imported (use hor. scrollbar object property) |
| View VScrollbar | Not imported (use vert. scrollbar object property) |
| View invisible characters | Not imported (use object property) |
| View references | Not imported (use ST SET OPTIONS) |
| View column separators | Available (starting with v17) |
| View H Splitter | Not available |
| View V Splitter | Not available |
| View Wysiwyg | Not available |
| View zoom | Not imported (use Document/Zoom in the context menu) |
Document parameters
| 4D Write plug-in | 4D Write Pro |
| Unit | Not imported (use Document/Measurement unit in the context menu) |
| Language | Not available |
| Count of columns | Available (starting with v17) |
| Column spacing | Available (starting with v17) |
| Widows & orphans | Available |
| Default tab | Available |
| Leading tab | Available |
| URL color | Not available |
| URL visited color | Not available |
Note: The system separator (as returned by GET SYSTEM FORMAT) is used as decimal separator for decimal tabs. You can change this parameter using the WP SET ATTRIBUTES command.
Document pagination parameters
| 4D Write plug-in | 4D Write Pro |
| Page width | Available |
| Page height | Available |
| First page number | Available |
| First page header & footer are different | Available |
| Left & right page header & footer are different | Available |
| Page binding | Available |
| Opposite pages | Available |
| Page margins | Available |
| Header top margin | Available |
| Header bottom margin | Available |
| Footer top margin | Available |
| Footer bottom margin | Available |
| First page top margin | Available |
| First page bottom margin | Available |
| Header first page top margin | Available |
| Header first page bottom margin | Available |
| Footer first page top margin | Available |
| Footer first page bottom margin | Available |
| First page is right | Available |
Document printing parameters
| 4D Write plug-in | 4D Write Pro |
| Kind of paper | Not available |
| Landscape | Not available |
| Width | Not available |
| Height | Not available |
| User margins | Not available |
| Scale | Not available |
| X resolution | Not available |
| Y resolution | Not available |
Images
Compatibility notes:
- Picture display modes are automatically imported as of 4D Write Pro v19 R2, using WP Import document. You can restore the previous behavior (all images are scaled to fit) using the importDisplayMode attribute.
- On Windows, images having the Mac OS PICT format are imported but cannot be rendered in 4D Write Pro. If you import a document containing images of this type, you need to convert them to another format. Support of PICT format has been removed since 4D v18 and can no longer be used.
| 4D Write plug-in | 4D Write Pro |
| X (left) | (& position :absolute) (for images in page only) |
| Y (top) | (& position :absolute) (for images in page only) |
| Width | Available |
| Height | Available |
| Page number | Available (starting with v16 R6) |
| Behind | Available (starting with v16 R6) |
| Not in first page | Available (starting with v16 R6) |
| Viewport mode (scale to fit, etc.) | Available |
| Is expression | Available for inline pictures (starting with v16 R5) |
| Keep size | Not imported (automatic in 4D Write Pro) |
Character properties
| 4D Write plug-in | 4D Write Pro (span properties) |
| Italic | Available |
| Bold | Available |
| Strikeout | Available |
| Underline | Available |
| Shadow | Available |
| Exponent (superscript or subscript) | Available |
| Capitals (uppercase or small uppercase) | Available |
| Font Family | Available |
| Font Size | Available |
| Text Color | Available |
| Text Back Color | Available |
| Underline Color | Available |
| Strikeout Color | Available |
| Shadow color | Available |
| User property | Not available |
| Spell checking (syntax & grammar on or off) | Not imported (area property) |
| Appearance | Not available |
| Style sheet | Available (starting with 4D v18) |
Paragraph properties
| 4D Write plug-in | 4D Write Pro |
| Justification | Available |
| Interline | Available |
| Bullet | Available |
| Left margin | Available |
| Right margin | Available |
| Text indent | Available |
| Border line style | Available |
| Border line color | Available |
| Border back color | Available |
| Left border | Available |
| Right border | Available |
| Top border & top inside border | Available |
| Bottom border & bottom inside border | Available |
| Border spacing | Available |
| Style Sheet | Available |
| Tabulations | Available |
Hyperlinks
| 4D Write plug-in | 4D Write Pro |
| URL link | Available (*) |
| 4D method link | Available (**) (starting with v17 R5) |
| Open document link | Available (converted to a local file URL) |
- (*) Starting with 4D v16 R4, URL links are converted to editable attributes. For more information, please refer to Link commands.
- (**) You need to adapt parameters received within the called methods:
Parameters4D Write plug-in4D Write Pro$1Longint – 4D Write area referenceText – 4D Write Pro area name$2Text – Link labelObject – Link description:- .method – Link’s method name. Must be be allowed with the SET ALLOWED METHODS command.
- .parameter – User parameter value passed to the method (if used)
- .range – Range of the link’s label. See Range handling commands
$3Longint – User parameter (methodRef)-
4D expressions
| 4D Write plug-in | 4D Write Pro |
| 4D expression | Available* |
| Date & Time | Available |
| HTML expression | Not available** |
| RTF expression | Not available |
*Use the WP SET ATTRIBUTES command with the wk break paragraphs in formulas attribute to transform CR returned by formulas into paragraph breaks in the imported document (line breaks by default). (See Managing formulas)
**can be imported as text between ##htmlBegin## and ##htmlEnd## tags if you use the wk import html expressions as text constant.
Text data
| 4D Write plug-in | 4D Write Pro |
| Main text data | Available |
| Header text data | Available |
| Footer text data | Available |
See also
Migrate 4D Write documents stored in picture fields
Managing formulas
Overview
4D Write Pro documents can contain references to 4D formulas such as variables, fields, expressions, project methods, or 4D commands. Specific information such as the page number can also be referenced through formulas (see Inserting document and page expressions below).
Inserting formulas in 4D Write Pro areas is done with the WP INSERT FORMULA command and can be read using the WP Get formulas command. They are also returned by the WP Get text command.
Formulas are evaluated:
- when they are inserted in a form object which displays computed values
- when the 4D Write Pro object is loaded in a form object which displays computed values
- when the WP COMPUTE FORMULAS command is called
- when they are “frozen” using the WP FREEZE FORMULAS command (if not already computed)
- before printing (if not already computed)
- before exporting to .docx (if formula can’t be mapped with MS Word formulas)
- when the standard actions to freeze, print, export, or compute formulas are called. See Standard actions.
Formulas are not evaluated when a document is loaded (using WP New, WP INSERT DOCUMENT or wpArea:=[table]field):
- if the document is only offscreen,
- if the document is displayed onscreen but the form object only shows references.
Formulas become static values if you call the WP FREEZE FORMULAS command (except for page number and page count, see below).
Compatibility Note: Handling expressions using the ST INSERT EXPRESSION, ST Get expression, ST COMPUTE EXPRESSIONS, and ST FREEZE EXPRESSIONS commands is deprecated, however it is still supported in 4D Write Pro for compatibility.
Example
You want to replace the selection in a 4D Write Pro area with the contents of a variable:
 C_TEXT(fullName)
 C_OBJECT($sel)
 fullName:="John Smith"
 $sel:=WP Selection range(4DWPArea)
 Case of
:(Form event code=On Clicked)
 WP INSERT FORMULA($sel;Formula(fullName);wk replace)
 End case
Inserting document and page formulas
You can insert special expressions related to document attributes or page attributes in any document area (body, header, footer) using the WP INSERT FORMULA command.
| Formula syntax | Type | Description |
| This.title | Text | Title defined in wk title attribute |
| This.author | Text | Author defined in wk author attribute |
| This.subject | Text | Subject defined in wk subject attribute |
| This.company | Text | Company defined in wk company attribute |
| This.notes | Text | Notes defined in wk notes attribute |
| This.dateCreation | Date | Date creation defined in wk date creation attribute |
| This.dateModified | Date | Date modified defined in wk date modified attribute |
| This.pageNumber (*) | Longint | Page number as it is defined: from the document start (default) orfrom the section page start if it is defined by section page start. This formula is always dynamic, it is not affected by the WP FREEZE FORMULAS command. |
| This.pageCount (*) | Longint | Page count: total count of pages.
This formula is always dynamic, it is not affected by the WP FREEZE FORMULAS command. |
| This.document | Object | 4D Write Pro document |
(*) Important: This.pageNumber and This.pageCount must be used only directly in a 4D Write Pro formula (they must be present in the formula.source string). They will return incorrect values if they are used by the 4D language within a method called by the formula. However, they can be passed as parameters to a method called directly by the formula:
- This will work: « formatNumber(This.pageNumber) »
- This will NOT work: « formatNumber » with formatNumber method processing This.pageNumber.
For example, to insert the page number in the footer area:
 $footer:=WP Get footer(4DWP;1)
 WP INSERT FORMULA($footer;Formula(This.pageNumber);wk append)
//Using Formula(myMethod) with myMethod processing This.pageNumber
//would not work correctly
Compatibility Note: Existing $wp_ variables in documents from versions prior to 4D v18 R2 are still supported and evaluated.
Inserting date and time formulas
Date
When the Current date command, a date variable, or a method returning a date is inserted in a formula, it will automatically be transformed into text using system date short format.
Time
When the Current time command, a time variable, or a method returning a time is inserted in a formula, it must be enclosed within a String command because time type is not supported in JSON. Consider the following examples of formulas:
// This code is the best practice
 $formula1:=Formula(String(Current time)) //OK

// This code will work but is usually not recommended, except after "Edit formula"
 $formula2:=Formula from string("String(Current time)") //OK

// Wrong code because time values would be displayed as a longint for seconds (or milliseconds), not as a time
 $formula3:=Formula from string("Current time") //NOT valid
 $formula4:=Formula(Current time) //NOT valid
Support of virtual structure
Table and field expressions inserted in 4D Write Pro documents support the virtual structure definition of the database. The virtual structure exposed to formulas is defined through SET FIELD TITLES(…;*) and SET TABLE TITLES(…;*) commands.
When a virtual structure is defined:
- references to expressions containing fields display virtual names when the 4D Write Pro document shows references and not values.
- WP Get text returns virtual structure names if wk expressions as source option is set in expressionsparameter.
- WP INSERT FORMULA ignores the virtual structure and always expects real table/field names
Note: When a document is displayed in “display expressions” mode, references to tables or fields that do not belong to the virtual structure are displayed with “?” characters, for example [VirtualTableName]? when the field is not defined in the virtual structure.
Displaying formulas
You can control how formulas are displayed in your documents:
- as values or as references
- when shown as references, display source text or symbol.
Show references
By default, 4D formulas are displayed as values. When you insert a 4D formula, 4D Write Pro computes and displays its current value. If you wish to know which formula is displayed, you need to display it as a reference.
To display formulas as references, you can:
- check the Show references option in the Property list (see Configuring View properties), or
- use the visibleReferences standard action (see Dynamic expressions), or
- use the WP SET VIEW PROPERTIES command with the wk visible references selector to True.
When formulas are displayed as references, the source text of the formula appear in your document, with a gray background by default (can be customized using the wk formula highlight) selector.
For example, you have inserted the current date along with a format, the date is displayed:

If you display formulas as references, the reference is displayed:

References as symbols
By default, when formula references are displayed, the source text of the formula is written in the document. When you work on sophisticated templates using tables for example, and when source formulas are complex, the design could be confusing:
In this case, you can display formula references as symbols, so that the document is easier to read:

To display formula references as symbols, you can:
- check the Display formula source as symbol option in the Property list (see Configuring View properties), or
- use the displayFormulaAsSymbol standard action (see Using 4D Write Pro standard actions), or
- use the WP SET VIEW PROPERTIES command with the wk display formula as symbol selector to True.
You can always get the source text of a formula in a tip that is displayed when you hover on the symbol:

Note: The tip is actually available whatever the formula display mode.
See also
Download HDI database
Using commands from the Styled Text theme
Using 4D Write Pro standard actions
Overview
The user interface of 4D Write Pro areas can be handled through a wide set of standard actions. Standard actions can be assigned to:
- menu commands, available through the menu bar or the Dynamic pop up menu command
- list items, available through pop-up/drop-down lists or hierarchical pop-up menus,
- buttons, check boxes,
- or executed by the INVOKE ACTION command.
When assigned to interface objects, standard actions handle the activation/disabling of the object depending on the context. For more information, please refer to the Standard actions section.
Two kinds of actions are available for 4D Write Pro areas:
- 4D Write Pro specific actions, that can be used only with 4D Write Pro areas,
- Other actions, including fonts, expressions, spell check, and editing actions, that can be used with 4D Write Pro areas and other 4D areas (see Standard actions).
4D Write Pro actions
The following standard actions are available with 4D Write Pro areas.
Notes:
- Actions that display an automatic menu/list can only be attached to menu commands, pop-up/drop-down lists or hierarchical pop-up menus objects (see Submenu).
- Check boxes and 3D check boxes should be associated with status actions, such as “section/differentFirstPage” or “visibleHorizontalRuler”. Three-states option is supported with standard check boxes only.
- A section action status is always equal to the selected section actual status (inherited status if attribute is inherited from parent section or from default attribute) as it must reflect the selected section status (the status which is applied currently to the section). However, modifying a section attribute with a standard action will only override the selected section attribute.
- Submenu: When used without any parameters and associated to a menu command, a pop-up/drop-down list or a hierarchical pop-up menu object, these actions display an automatic submenu/list. For example, if you assign the “backgroundColor” action to a menu command, selecting this menu command at runtime will display the Background color submenu items. If you assign the “zoom” action to a hierarchical pop-up menu, it will automatically contain a list of predefined zoom values. Note that these actions cannot be assigned to buttons.
- showDialog: Adding the “/showDialog” string to the action name allows the display of the associated standard dialog box for the action. For example, you can use “paragraph/styleSheet/showDialog” to open the input dialog allowing the entry of a new stylesheet name.
| Action | Constant(if any) | Syntax | Availablewith | Description |
| anchorHorizontalAlign | wk anchor horizontal align | anchorHorizontalAlign?value={left | center | right} | Image, Submenu |
Defines the horizontal alignment of the image, relative to the anchorOrigin for images in page, or to the layout box for images in embedded mode. This action will reset the horizontal offset to 0. (not enabled for inline images). |
| anchorLayout | wk anchor layout | anchorLayout?value={inline | front | behind} | Image, Submenu |
Defines the anchor layout type for an image. May be used to transform an inline image to an anchored image in front of or behind text, or the reverse.
Note: if an image is moved from front/behind text to inline, the image is inserted at the beginning of the current selected text. |
| anchorOrigin | wk anchor origin | anchorOrigin?value={paper-box | header-box | footer-box} | Image, Submenu |
Defines the area relative to the absolute position of an anchored image. If an image is relative to the header-box/footer-box which is not visible on a page, the image is not displayed. This action will reset horizontal and vertical offsets to 0.
Page mode only, not enabled for inline images. |
| anchorPage | wk anchor page | anchorPage?value={all | current | currentSubSection} | Image, Submenu |
Defines the page(s) where the selected image is displayed (not enabled for inline images).
Page mode only. |
| anchorSection | wk anchor section | anchorSection?value={all | current} | Image, Submenu |
Defines the section(s) where the selected image is displayed. (not enabled for inline images).
Page mode only. |
| anchorVerticalAlign | wk anchor vertical align | anchorVerticalAlign?value={top | center | bottom} | Image, Submenu |
Defines the vertical alignment of the image, relative to the anchorOrgin for images in page, or to the layout box for images in embedded mode. This action will reset the vertical offset to 0 (not enabled for inline images). |
| avoidPageBreakInside | wk page break inside paragraph | {paragraph/}avoidPageBreakInside | Paragraph | |
| background | {doc | paragraph | image | section | header | footer | table | row | column | cell}/background | Document, Paragraph, Image, Section, Header, Footer, Table, Row, Column, Cell, Submenu |
For menu commands only. Default submenu for all background attributes. | |
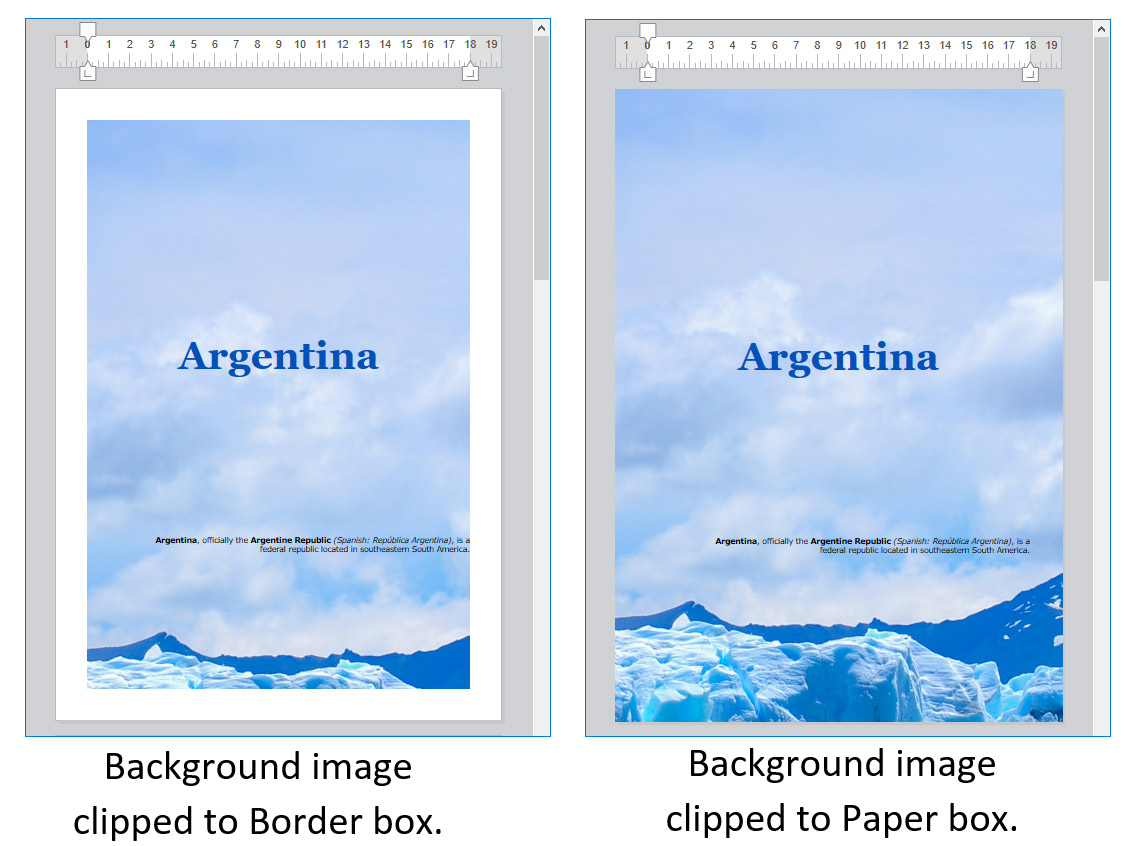
| backgroundClip | wk background clip | {doc | paragraph | image | section | header | footer | table | row | column | cell}/backgroundClip?value={paper-box | border-box | padding-box | content-box} | Document, Paragraph, Image, Section, Header, Footer, Table, Row, Column, Cell, Submenu |
Changes target background clipping box (default target is paragraph). Paper-box targets document and section only. |
| backgroundColor | wk background color | {doc | paragraph | image | section | header | footer | table | row | column | cell}/backgroundColor?value={<Css_color> | transparent} | Document, Paragraph, Image, Section, Header, Footer, Table, Row, Column, Cell, Submenu, showDialog |
Changes target background. |
| backgroundDisplayMode | wk background display mode | {doc | paragraph | image | section | header | footer | table | row | column | cell}/backgroundDisplayMode?value=scaledToFit | truncated | truncatedCentered | proportional | proportionalCentered | replicated | replicatedCentered | Document, Paragraph, Image, Section, Header, Footer, Table, Row, Column, Cell, Submenu |
Sets the display mode of images used as background. |
| backgroundImage | wk background image | {doc | paragraph | image | section | header | footer | table | row | column | cell}/backgroundImage?value=none | Document, Paragraph, Image, Section, Header, Footer, Table, Row, Column, Cell, Submenu, showDialog |
Clears target background image. (default target is paragraph) |
| backgroundOrigin | wk background origin | {doc | paragraph | image | section | header | footer | table | row | column | cell}/backgroundOrigin?value={paper-box | border-box | padding-box | content-box} | Document, Paragraph, Image, Section, Header, Footer, Table, Row, Column, Cell, Submenu |
Changes target background image origin box (default target is paragraph). Paper-box targets document and section only. |
| backgroundPositionH | wk background position horizontal | {doc | paragraph | image | section | header | footer | table | row | column | cell}/backgroundPositionH?value={left | right | center} | Document, Paragraph, Image, Section, Header, Footer, Table, Row, Column, Cell, Submenu |
Changes target background image horizontal alignment (default target is paragraph).
Ex: paragraph/backgroundPositionH?value=left |
| backgroundPositionV | wk background position vertical | {doc | paragraph | image | section | header | footer | table | row | column | cell}/backgroundPositionV?value={top | bottom | center} | Document, Paragraph, Image, Section, Header, Footer, Table, Row, Column, Cell, Submenu |
Changes target background image vertical alignment (default target is paragraph).
Ex: paragraph/backgroundPositionV?value=top |
| backgroundRepeat | wk background repeat | {doc | paragraph | image | section | header | footer | table | row | column | cell}/backgroundRepeat?value={no-repeat | repeat | repeat-x | repeat-y} | Document, Paragraph, Image, Section, Header, Footer, Table, Row, Column, Cell, Submenu |
Changes target background image repeat mode. (default target is paragraph) |
| backgroundSizeH | wk background width | {doc | paragraph | image | section | header | footer | table | row | column | cell}/backgroundSizeH?value={<Css_length> | <Css_percentage> | auto | cover | contain} | Document, Paragraph, Image, Section, Header, Footer, Table, Row, Column, Cell, Submenu |
Changes target background image width (default target is paragraph).
Ex: paragraph/backgroundSizeH?value=100%. section/backgroundSizeH?value=cover |
| backgroundSizeV | wk background height | {doc | paragraph | image | section | header | footer | table | row | column | cell}/backgroundSizeV?value={<Css_length> | <Css_percentage> | auto} | Document, Paragraph, Image, Section, Header, Footer, Table, Row, Column, Cell, Submenu |
Changes target background image height (default target is paragraph).
Ex: paragraph/backgroundSizeV?value=50%. Ex: section/backgroundSizeV?value=40pt |
| bookmark | bookmark?index=<number> | Submenu | Selects the Nth bookmark.
Ex: bookmark?index=2 // selects the second bookmark |
|
| borderCollapse | borderCollapse | Paragraph | Collapses selected paragraph borders and interior margins. | |
| borderColor | wk border color | {doc | paragraph | image | section | header | footer | table | row | column | cell/}{inside | outside/}{borderColor | borderColorLeft | borderColorRight | borderColorTop | borderColorBottom | borderColorLeftRight | borderColorTopBottom}?value=<Css_color> | Document, Paragraph, Image, Section, Header, Footer, Table, Row, Column, Cell, Submenu, showDialog |
Changes target border color (default target is paragraph).
Ex: paragraph/borderColorLeft?value=green |
| borderRadius | wk border radius | {doc | paragraph | image | section | header | footer}/borderRadius?value=<Css_length> | Document, Paragraph, Image, Section, Header, Footer, Submenu |
Changes target border radius (default target is paragraph).
Ex: paragraph/borderRadius?value=4pt |
| borders | wk border color | {doc | paragraph | image | section | header | footer | table | row | column | cell/}{inside | outside/}borders | Document, Paragraph, Image, Section, Header, Footer, Table, Row, Column, Cell, Submenu |
Default submenu for target borders. |
| borderStyle | wk border style | {doc | paragraph | image | section | header | footer | table | row | column | cell/}{inside | outside/}{borderStyle | borderStyleLeft | borderStyleRight | borderStyleTop | borderStyleBottom | borderStyleLeftRight | borderStyleTopBottom}?value={none | hidden | dotted | dashed | solid | double | groove | ridge | inset | outset} | Document, Paragraph, Image, Section, Header, Footer, Table, Row, Column, Cell, Submenu |
Changes target border style (default target is paragraph).
Ex: paragraph/borderStyleLeft?value=double. Ex: outside/borderStyle?value=solid //set selected paragraphs exterior borders to style solid. Ex: inside/borderStyle?value=none //remove selected paragraphs interior borders |
| borderWidth | wk border width | {doc | paragraph | image | section | header | footer | table | row | column | cell/}{inside | outside/}{borderWidth | borderWidthLeft | borderWidthRight | borderWidthTop | borderWidthBottom | borderWidthLeftRight | borderWidthTopBottom}?value=<Css_length> | Document, Paragraph, Image, Section, Header, Footer, Table, Row, Column, Cell, Submenu |
Changes target border width (default target is paragraph).
Ex: paragraph/borderWidthLeft?value=4pt |
| columnCount | wk column count | {section/}columnCount?value={1<=number<=20} | Document, Section, Submenu |
Number of columns in the current document and/or section. (default target is doc)
Ex: section/columnCount?value=3 |
| columnRuleColor | wk column rule color | {section/}columnRuleColor?value={CSS color} | Document, Section, Submenu, showDialog |
Color for the decorative line between document or section columns.
Ex: columnRuleColor?value=”#FFFFFF” |
| columnRuleStyle | wk column rule style | {section/}columnRuleStyle?value={none | dotted | dashed | solid | double | groove | ridge | inset | outset} | Document, Section, Submenu |
Style for the decorative line between document or section columns.
Ex: columnRuleStyle?value=”solid” |
| columnRuleWidth | wk column rule width | {section/}columnRuleWidth?value={CSS length} | Document, Section, Submenu |
Width of the decorative line between document or section columns.
Ex: columnRuleWidth?value=”2pt” |
| columns | {section/}columns | Document, Section, Submenu |
Only for a menu item: creates automatically a complete Columns sub-menu with all column actions sub-menus (except insertColumnBreak) | |
| columnSpacing | wk column spacing | {section/}columnSpacing?value={CSS length} | Document, Section, Submenu |
Space between two columns in the current document and/or section.
Ex: columnSpacing?value=”1cm” |
| deleteColumns | deleteColumns | Table | Deletes all selected columns. | |
| deleteRows | deleteRows | Table | Deletes all selected rows. | |
| deleteStyleSheet | {paragraph | image}/deleteStyleSheet?index={1<= number <= number of target style sheets} | Paragraph, Image, Submenu |
Removes the Nth stylesheet from the stored stylesheets for the selected target (default target is paragraph). Menu item name is replaced at runtime with style sheet name. | |
| direction | wk direction | direction?value={ltr | rtl} | Paragraph, Submenu |
Paragraph direction. |
| displayFormulaAsSymbol | wk display formula as symbol | displayFormulaAsSymbol | Document | Displays formula references as a symbol. Can only be used when formulas are displayed as references. |
| doc | doc | Document, Submenu |
Default submenu for document body layout (embedded mode attributes or default attributes for sections – but for margin which is reserved for embedded mode only). | |
| dpi | wk dpi | Modifies the dpi of the current view (independent of the document attribute wk dpi used internally for pixel conversion <-> points). | Submenu | Change view dpi.
Ex: dpi?value=72 |
| fontStyleWrite | fontStyleWrite | Submenu | For menu commands only. Displays default font styles submenu for 4D Write Pro. | |
| fontSubscript | wk style sheet | fontSubscript | Toggles subscript font attribute. | |
| fontSuperscript | wk superscript | fontSuperscript | Toggles superscript font attribute. | |
| footer | footer | Submenu | Displays the Footer submenu. | |
| footer/remove | footer/remove | Footer | Removes the selected footer. | |
| formulaHighlight | wk formula highlight | formulaHighlight?value={values | references | always | never} | Document, Submenu |
Formula highlight mode for the document. Can be used with a dropdown menu or a button |
| formulaHighlightColor | wk formula highlight color | formulaHighlightColor?value=<Css_color> | Document, Submenu,showDialog |
Formula highlight color for the document |
| formulaHighlightReferences | formulaHighlightReferences | Document | Toggles formula references highlighting. Can be used with a check box or a menu item | |
| formulaHighlightValues | formulaHighlightValues | Document | Toggles formula values highlighting. Can be used with a check box or a menu item | |
| header | header | Submenu | Displays the Header submenu. | |
| header/remove | header/remove | Header | Removes the selected header. | |
| height | wk height | {image | row}/height?value={<Css_length> | auto} | Image, Row, Submenu |
Target height.
Ex: image/height?value=50pt. For image/width, see width. Ex: row/height?value=12pt |
| headerRowCount | wk header row count | {table/}headerRowCount | Table, Submenu |
Sets the number of header rows in a table. Maximum is 5. |
| htmlWYSIWIGEnabled | wk html wysiwyg | htmlWYSIWIGEnabled | Document | Toggles between html wysiwyg mode. |
| image | wk image | image | Image, Submenu |
Displays image layout submenu. |
| image/displayMode | wk image display mode | image/displayMode?value=scaledToFit | truncated | truncatedCentered | proportional | proportionalCentered | replicated | replicatedCentered | Image, Submenu |
Sets the display mode of anchored and inline images.
Ex: image/displayMode?value=scaledToFit |
| image/verticalAlign | wk vertical align | image/verticalAlign?value={top | middle | bottom | baseline | super | sub} | Image, Submenu |
Image vertical alignment.
Ex: image/verticalAlign?value=super |
| insertColumnBreak | wk column break | insertColumnBreak | Paragraph | Inserts a column break at the selection. |
| insertColumnToTheLeft | insertColumnToTheLeft | Table | Inserts a column to the left of the first selected column(s). | |
| insertColumnToTheRight | insertColumnToTheRight | Table | Inserts a column to the right of the last selected column(s). | |
| insertContinuousSectionBreak | wk continuous section break | insertContinuousSectionBreak | Paragraph | Inserts a continuous section break at the selection. |
| insertImage | insertImage | Opens a picture selection dialog box and inserts the selected picture (if any) as a character in the area. | ||
| insertPageBreak | insertPageBreak | Paragraph | Inserts a page break at the selection. | |
| insertRowAbove | insertRowAbove | Table | Inserts a row above the selected row(s). | |
| insertRowBelow | insertRowBelow | Table | Inserts a row below the selected row(s). | |
| insertSectionBreak | insertSectionBreak | Paragraph | Inserts a section break at the selection. | |
| insertSoftHyphen | insertSoftHyphen | Inserts a soft hyphen at the cursor position. | ||
| keepWithNext | wk keep with next | keepWithNext | Paragraph | Links a paragraph with the next so that they cannot be separated by automatic page or column breaks.
If applied to the last paragraph of the last cell in a table, the last row of the table is linked to the following paragraph. |
| lineHeight | wk line height | lineHeight?value={<Css_length> | <Css_percentage>} | Paragraph, Submenu |
Paragraph line height.
Ex: lineHeight?value=120% |
| listStartNumber | wk list start number | listStartNumber?value={<number> (longint) | auto} | Paragraph, Submenu |
List start number. Ex: listStartNumber?value=10 |
| listStyleImage | wk list style image | listStyleImage/showDialog | Paragraph, showDialog |
Opens a file dialog to choose a image to display as list style bullet; it will set also list style type to disc – style to be used if image is not found. |
| listStyleType | wk list style type | listStyleType?value={none | disc | circle | square | hollow-square | diamond | club | decimal | decimal-leading- zero | lower-latin | lower-roman | upper-latin | upper-roman | lower-greek | decimal-greek | armenian | georgian | hebrew | hiragana | katakana | cjk-ideographic} | Paragraph, Submenu |
Paragraph list style type. |
| margin | wk margin | {doc | paragraph | image | section | header | footer | table/}{inside | outside/}{margin | marginLeft | marginRight | marginTop | marginBottom | marginLeftRight | marginTopBottom}?value={<Css_length> | auto} | Document, Paragraph, Image, Section, Header, Footer, Table, Submenu |
Changes target margin (default target is paragraph).
Ex: margin?value=4pt //sets all paragraph margins to 4pt. Ex: outside/margin?value=4pt //set exterior paragraph margins to 4pt. Ex: doc/marginLeft?value=1cm //sets left margin to 1cm for the document as used in embedded mode. Ex: section/marginLeft?value=1cm //sets left margin to 1cm for the pages of the first selected section |
| merge | merge | Paragraph | Merges paragraphs. | |
| minHeight | wk min height | {paragraph | image}/minHeight?value=<Css_length> | Paragraph, Image, Submenu |
Target min height (default target is paragraph).
Ex: paragraph/minHeight?value=50pt |
| minWidth | wk min width | {paragraph | image}/minWidth?value=<Css_length> | Paragraph, Image, Submenu |
Target min width (default target is paragraph).
Ex: paragraph/minWidth?value=50pt |
| moveToBack | moveToBack | Image | Moves image to the back. (not enabled for inline images) | |
| moveToFront | moveToFront | Image | Moves image to the front. (not enabled for inline images) | |
| newLineStyleSheet | wk new line style sheet | newLineStyleSheet?index={1<=number<=number of paragraph stylesheets | newLineStyleSheet?value=auto | Paragraph, Submenu |
Selected paragraph elements will use Nth stylesheet as stylesheet to use for new paragraphs created on Return or while splitting paragraphs; If value=auto, new paragraphs will use the same stylesheet (default). (menu item name is replaced at runtime with stylesheet name) |
| padding | wk padding | {doc | paragraph | image | section | header | footer | column | row| cell/}{inside | outside/}{padding | paddingLeft | paddingRight | paddingTop | paddingBottom | paddingLeftRight | paddingTopBottom }?value=<Css_length> | Document, Paragraph, Image, Section, Header, Footer, Row, Column, Cell, Submenu |
Changes target padding. (default target is paragraph) |
| pageMode | pageMode?value={embedded | page | draft} | Submenu | Changes view mode.
Ex: pageMode?value=page |
|
| pageOrientation | wk page orientation | {section/}pageOrientation?value={landscape | portrait} | Section, Submenu |
Changes document or first selected section page orientation (if section is not specified, it will apply to all sections otherwise to the first selected section).
Ex: pageOrientation?value=portrait //change orientation to portrait for the whole document. Ex: section/pageOrientation?value=landscape //change orientation to landscape for the first selected section |
| pageSize | wk page size | pageSize?index=<number> | Submenu | Changes document page size: number is Nth page size in the list of available pages sizes in the current printer.
Ex: pageSize?index=1 |
| paragraph | paragraph | Paragraph, Submenu |
Default submenu for paragraph layout. | |
| paragraph/avoidPageBreakInside | {paragraph/}avoidPageBreakInside | Paragraph | Allows/disallows page breaks inside paragraphs. | |
| Document | Prints document as rendered in page mode with view settings of the focused 4D Write Pro area. | |||
| refreshImages | refreshImages | Image | Reloads images from the network for images with URLs. | |
| removeSoftHyphens | removeSoftHyphens | Removes all soft hyphens in the current selection (if the selection is empty, removes soft hyphen before or after the caret if any) | ||
| row/avoidPageBreakInside | wk page break inside row | row/avoidPageBreakInside | Table, Row |
Allows/disallows page breaks inside table rows.
This action is disabled if: |
| section | section | Section, Submenu |
Default submenu for page layout for the first selected section. | |
| section/differentFirstPage | section/differentFirstPage | Section | Section has different first page or not. | |
| section/differentLeftRightPages | section/differentLeftRightPages | Section | Section has different left and right pages or not. | |
| section/name/showDialog | section/name/showDialog | Section, showDialog |
Displays a dialog allowing to enter the first selected section name. | |
| section/reset | section/reset | Section | Resets all first selected section attributes to default attributes – which are inherited from doc attributes for background, border and padding (same as for embedded mode) and 2.5cm for page margins. First selected section column properties are also removed (so only default section properties will apply). | |
| split | split | Paragraph | Splits paragraphs. | |
| styleSheet | wk style sheet | {paragraph | image}/styleSheet?value={1<=number<=number of target style sheets} | Paragraph, Image, Submenu, showDialog |
Applies Nth stylesheet to the selected target elements. With dialog, new stylesheet will use current attributes from the first selected target. (default target is paragraph)
Ex: styleSheet?value=1 //apply first paragraph style sheet to the selected paragraphs and set it as paragraph stylesheets. |
| styleSheets | {paragraph | image}/styleSheets | Paragraph, Image, Submenu |
Default submenu for editing target stylesheets. | |
| tabDecimalSeparator | wk tab decimal separator | tabDecimalSeparator?value={point | comma | pointOrComma | system} | Document, Submenu |
Defines the character used as decimal separator by decimal tabulations. |
| tableAlign | wk table align | tableAlign?value={left | center | right}
or table/tableAlign?value={left | center | right} |
Table, Submenu |
Specifies horizontal alignment for a table. |
| table/avoidPageBreakInside | wk page break inside table | table/avoidPageBreakInside | Table | Allows/disallows page breaks inside tables.
Disabled if: |
| table/bottomCarryOverRow | wk bottom carry over row | table/bottomCarryOverRow | Table | Toggles between display/not display of carry-over rows (see Carry-over rows). |
| textAlign | wk text align | textAlign?value={left | right | center | justify | initial} | Paragraph | Paragraph text alignment (initial=use right for rtl or left for ltr direction). |
| textIndent | wk text indent | textIndent?value=<Css_length> (may be negative) | Paragraph, Submenu |
Paragraph text indentation (first line indentation).
Ex: textIndent?value=2cm |
| textLinethrough | textLinethrough | Submenu | For menu commands only. Linethrough submenu (with style and color). | |
| textLinethroughColor | wk text linethrough color | textLinethroughColor?value={<Css_color> | currentColor} | Submenu, showDialog |
Ex: textLinethroughColor?value=red |
| textLinethroughStyle | wk text linethrough style | textLinethroughStyle?value={none | solid | dotted | dashed | double | semi-transparent | word} | Submenu | Ex: textLinethroughStyle?value=dotted |
| textShadow | textShadow | Submenu | For menu commands only. Default submenu for text shadow (with color and offset). | |
| textShadowColor | wk text shadow color | textShadowColor?value={<Css_color> | none} | Submenu, showDialog |
Changes shadow status or color for characters.
Ex: textShadowColor?value=green |
| textShadowOffset | wk text shadow offset | textShadowOffset?value=<Css_length> | Submenu | Only length in pt is supported.
Ex: textShadowOffset?value=2pt |
| textTransform | wk text transform | textTransform?value={none | capitalize | uppercase | lowercase | small-uppercase} | Submenu | Formats text.
Ex: textTransform?value=capitalize |
| textUnderline | textUnderline | Submenu | For menu commands only. Underline submenu (with style and color) | |
| textUnderlineColor | wk text underline color | textUnderlineColor?value={<Css_color> | currentColor} | Submenu, showDialog |
Ex: textUnderlineColor?value=red |
| textUnderlineStyle | wk text underline style | textUnderlineStyle?value={none | solid | dotted | dashed | double | semi-transparent | word} | Submenu | Ex: textUnderlineStyle?value=dotted |
| updateStyleSheet | {paragraph | image}/updateStyleSheet | Paragraph, Image, Submenu |
Updates first selected target stylesheet with first selected target current attributes (default target is paragraph) | |
| userUnit | wk layout unit | userUnit?value={cm | mm | in | pt} | Submenu | Changes document layout unit (will be reflected on rulers). |
| verticalAlign | wk vertical align | {paragraph | row | column | cell}verticalAlign?value={top | middle | bottom} | Paragraph, Row, Column, Cell, Submenu |
Paragraph vertical alignment.
Ex: verticalAlign?value=top. The effect depends on the minHeight value of the paragraph. |
| view | view | Submenu | For menu commands only. Default submenu for view settings. | |
| visibleBackground | wk visible background | visibleBackground | Document | Shows/hides background. |
| visibleEmptyImages | wk visible empty images | visibleEmptyImages | Document | Shows/hides a default black rectangle for images that cannot be loaded or computed (empty images or images in an unsupported format). |
| visibleFooters | wk visible footers | visibleFooters | Document | Shows/hides footers. |
| visibleHeaders | wk visible headers | visibleHeaders | Document | Shows/hides headers. |
| visibleHiddenChars | wk visible hidden characters | visibleHiddenChars | Document | Shows/hides hidden characters |
| visibleHorizontalRuler | wk visible horizontal ruler | visibleHorizontalRuler | Document | Shows/hides horizontal ruler. |
| visiblePageFrames | wk visible page frames | visiblePageFrames | Document | Shows/hides page frames. |
| visibleVerticalRuler | wk visible vertical ruler | visibleVerticalRuler | Document | Shows/hides vertical ruler (Page mode only). |
| widowAndOrphanControlEnabled | wk avoid widows and orphans | widowAndOrphanControlEnabled | Paragraph | Toggles between widow and orphan control mode. |
| width | wk width | {paragraph | image | column}/width?value=<Css_length> | auto | Paragraph, Image, Column, Submenu |
Target width (default target is paragraph). Auto value not available for columns.
Ex: image/width?value=50pt |
| zoom | wk zoom | zoom?value={25% <= percentage in Css <= 400%} | Document, Submenu |
Changes document view zoom.
Ex: zoom?value=120% |
Other actions
Several other standard actions are available in 4D forms and can be used in 4D Write Pro areas:
- Edit actions, such as copy/paste actions.
- Font actions, such as fontBold or fontSize.
- Dynamic expressions actions, allowing to handle inserted expressions..
- Spellchecking actions.
See also
Handling pictures
Background pictures
Pictures can be set as the background of 4D Write Pro documents and document elements (tables, paragraphs, sections, headers/footers, etc.).
Here is an example showing two different ways a picture can be used as a document’s background:
Background pictures can be set either programmatically or via the context menu. For more information, see the Background section in the Using a 4D Write Pro area article.
Background picture display can also be set either programmatically or via the context menu. Note that background display mode values actually define presets of background settings, as listed in the constant description:
| Constant | Comment |
| wk proportional | When used as value of wk image display mode, the image is aligned at the top left of the content box, not replicated, scaled to fit the content box, and it keeps its aspect ratio. When used as value of wk background display mode, presets the following attributes:wk background width = “contain”wk background height = “auto”wk background repeat = wk no repeatwk background origin = wk padding boxwk background position horizontal = wk leftwk background position vertical = wk top |
| wk proportional centered | When used as value of wk image display mode, the image is centered in the content box, not replicated, scaled to fit the content box and it keeps its aspect ratio. When used as value of wk background display mode, presets the following attributes:wk background width = “contain”wk background height = “auto”wk background repeat = wk no repeatwk background origin = wk padding boxwk background position horizontal = wk centerwk background position vertical = wk center |
| wk replicated | When used as value of wk image display mode, the image is aligned at the top left of the content box, replicated, and keeps its original size. When used as value of wk background display mode, presets the following attributes:wk background width = “auto”wk background height = “auto”wk background repeat = wk repeatwk background origin = wk padding boxwk background position horizontal = wk leftwk background position vertical = wk top |
| wk replicated centered | When used as value of wk image display mode, the image is centered in the content box, replicated, and keeps its original size. When used as value of wk background display mode, presets the following attributes:wk background width = “auto”wk background height = “auto”wk background repeat = wk repeatwk background origin = wk padding boxwk background position horizontal = wk centerwk background position vertical = wk center |
| wk scaled to fit | When used as value of wk image display mode, the image is scaled to fit the content box and is not replicated.When used as value of wk background display mode, modifies the following attributes:wk background width = “100%”wk background height = “100%”wk background repeat = wk no repeatwk background origin = wk padding boxwk background position horizontal = wk leftwk background position vertical = wk top |
| wk truncated | When used as value of wk image display mode, the image is aligned at the top left of the content box, not replicated, and it keeps its original size.When used as value of wk background display mode, presets the following attributes:wk background width = “auto”wk background height = “auto”wk background repeat = wk no repeatwk background origin = wk padding boxwk background position horizontal = wk leftwk background position vertical = wk top |
| wk truncated centered | When used as value of wk image display mode, the image is centered in the content box, not replicated, and it keeps its original size. When used as value of wk background display mode, presets the following attributes:wk background width = “auto”wk background height = “auto”wk background repeat = wk no repeatwk background origin = wk padding boxwk background position horizontal = wk centerwk background position vertical = wk center |
Adding pictures
Adding pictures to a 4D Write Pro document can be accomplished in multiple ways and depend on your needs:
- to add a background picture, use the wk background image or wk background image url attribute with the WP SET ATTRIBUTES command
- to add an inline picture, i.e. inserted in the text flow just like a character, use the WP INSERT PICTURE or the ST INSERT EXPRESSION command
- to add an anchored picture in the page (behind or in front of the text), use the WP Add picture command.
The way you add a picture determines the layer it is positioned in, as illustrated in the diagram below:

Positioning and displaying of anchored pictures
Anchored pictures are added with an absolute position, in front of/behind text, as well as anchored to the page or specific parts of a document (i.e., header, footer, sections). Setting an absolute position for a picture is accomplished with the WP Add picture andWP SET ATTRIBUTES commands.
Anchored picture positions can be modified with the following specific attributes and/or standard actions:
| Property (constant) | Standard action |
| wk anchor layout | anchorLayout |
| wk anchor horizontal offset | |
| wk anchor horizontal align | anchorHorizontalAlign |
| wk anchor vertical offset | |
| wk anchor vertical align | anchorVerticalAlign |
| wk anchor origin | anchorOrigin |
| wk anchor page | anchorPage |
| wk anchor section | anchorSection |
| moveToBack | |
| moveToFront |
All anchored pictures are displayed in the Page view mode only. They’re not displayed if:
- they are anchored to a header or footer which is not visible;
- the view mode is Draft;
- they are centered or anchored to sections and the Show HTML WYSIWYG option is checked;
- the “Show background” option is not selected.
Picture expressions
You can insert 4D expressions that return pictures in your 4D Write Pro areas. Expressions can be variables, fields, project methods, formulas, object attributes or collection elements.
You can see an expression’s reference in the picture tip(*):
(*)As there is no text associated with an anchored image, its expression reference cannot be displayed.
All image attributes can be applied to picture expressions (wk image and wk image url attributes can only be read). Note however, that since pictures have specific attributes, 4D Write Pro must evaluate the expression at least once to detect that its result is a picture and handle it as a picture expression. It means that when a picture expression is inserted with WP INSERT FORMULA, WP COMPUTE FORMULAS must be called before setting any picture attributes.
Note: As with other expressions, picture expressions are also impacted by the WP COMPUTE FORMULAS and WP FREEZE FORMULAS commands.
Anchored pictures
Anchored picture expressions are added with the WP Add picture command (without the second parameter), followed by a call to the WP SET ATTRIBUTES command with the wk image formula selector.
Example:
 obImage:=WP Add picture(myDoc)
 WP SET ATTRIBUTES(obImage;wk image formula;Formula(m_buildPict))
You can also insert picture expressions using WP SET ATTRIBUTES and wk image formula on existing anchored pictures.
Compatibility Note: wk image expression can still be used to define picture expressions through text. However, it is recommended to use wk image formula and objects.
Calling the WP RESET ATTRIBUTES command with wk image formula is similar to calling WP FREEZE FORMULAS(on the entire document) in that the expression is cleared from the image attribute. However WP FREEZE FORMULAScomputes the expression before clearing, whereas WP RESET ATTRIBUTES does not. If an expression has never been computed, the default black frame image will be displayed.
Inline pictures
Inline picture expressions are added with the WP INSERT FORMULA command.
Examples:
//Insert a picture variable
 WP INSERT FORMULA(wpRange;Formula($vpict);wk prepend)

//Insert a field
 WP INSERT FORMULA(wpRange;Formula([DOC]SamplePict);wk prepend)

//Insert a 4D method
 WP INSERT FORMULA(wpRange;Formula(M_ComputeChart);wk prepend)
Empty pictures
If an image is empty (e.g. it could not be loaded, or it results from an expression that could not be computed, or it uses an unsupported picture format), by default 4D Write Pro displays a black frame rectangle:
You can remove these black rectangles from the current view using:
- the “Show empty or unsupported images” option of the Property list (see Configuring View properties), or
- the WP SET VIEW PROPERTIES command with the wk visible empty images selector, or
- the visibleEmptyImage standard action (see Using 4D Write Pro standard actions).
You can also use the wk visible empty images selector with the WP EXPORT DOCUMENT and WP EXPORT VARIABLE commands to remove the black rectangles from exported contents.
Note that when this option is set, missing image elements will not be displayed at all even if they have borders, width, height, or background; this may impact the page layout for inline images.
Picture properties
All pictures have properties (attributes) such as height, width, borders, display mode, etc., that can be get or set via the 4D Write Pro language (WP GET ATTRIBUTES and WP SET ATTRIBUTES) or standard actions.
- The full list of properties available for pictures is provided on the 4D Write Pro Attributes page.
- The Image section contains attributes that are specific to pictures only.
- The Using 4D Write Pro standard actions page also lists available image properties.
Picture reference or picture URL
You can work with picture references (picture variables, fields, expressions) or picture URLs (text representing a local or network address of the picture).
Two sets of attributes allow you to define if you want to set or get picture reference or a picture URL:
- wk image, wk background image, wk list style image: to set or to get picture references.
When you get a picture using one of these attributes, you receive a 4D picture, no matter how the picture was defined. - wk image url, wk background image url, wk list style image url: to set or get picture URLs.
When you get a picture using one of these attributes, you receive a text. If the picture was defined through a reference (e.g. a picture variable), you get a local URI followed by the image in Base64.
Example:
 $range:=WP Get selection(WPArea) //get the picture selected by user
 $range:=WP Picture range($range) //create a range
 $url:="http://doc.4d.com/image/logo/poweredby4D_web.jpg"

 WP SET ATTRIBUTES($range;wk image;$url) //set an image reference from a URL

//get the image
 C_PICTURE(vPictureGet)
 WP GET ATTRIBUTES($range;wk image;vPictureGet) //vPictureGet contains an image
 C_TEXT(vPictureURLGet)
 WP GET ATTRIBUTES($range;wk image url;vPictureURLGet) //vPictureURLGet=$url
Retrieving pictures
The following commands can be used to return pictures:
- WP Picture range – applies only for inline images
- WP Selection range – applies only for user-selected images
Deleting pictures
You can remove inline and anchored pictures with:
- Mouse/keyboard actions
- the WP DELETE PICTURE command
Mouse/keyboard actions
Pictures can be manipulated via the mouse or the keyboard. Available actions include:
- SELECT
- Pictures in the Front layer can be selected by clicking on them;
- Background pictures can be selected by CTRL+ clicking on it (Windows) or COMMAND+clicking on it (Mac);
- Only a single picture with an absolute position can be selected: multiple selection is not possible.
- MOVE
- Pictures can be moved and resized using the mouse; (inline images cannot be dragged outside the document).
- INSERT
- If pictures with an absolute position are pasted in Draft mode, they are displayed inline at the beginning of the current keyboard selection.
- CUT/PASTE/COPY
- Pictures can be copied to the clipboard, or cut/pasted while selected.
- Pasting a picture with an absolute position in Page mode will paste the picture in the first selected page and anchor it to that page, no matter the original page anchoring settings; pasted pictures will retain their offsets, unless it is pasted into a different mode than the original (for instance if the picture is copied in Page mode and pasted in Embedded mode, the offsets are reset to 0).
- DELETE -Pictures can be deleted while selected with the:
- DELETE key, or
- keyboard shortcut for the action Clear
See also
WP Add picture
WP DELETE PICTURE
WP Picture range
Handling tables
4D Write Pro documents can contain tables. 4D Write Pro tables are created and defined by programming, but their contents can be modified and handled by the user. Various 4D Write Pro table attributes are editable, including row height, alignment, margins, text style, color, or borders.

Creating a table
4D Write Pro tables are created by calling the WP Insert table command. You can then add rows by using the WP Table append row command.
Note: A user can create a table by copying and pasting a range of cells:
Editing tables
Cell contents can be added by programming using the WP Table append row command.
Once a table is created, cell contents can also be edited at runtime by users. They can click into cells and select, edit, copy/paste, or delete text or pictures just like in regular paragraphs. They can navigate through cells using the Tab key (Shift+Tab to navigate in opposite direction).
Using the Carriage return key within a cell creates a new paragraph in the cell.
Note that cell width is fixed: when a user enters text or pastes a picture, the height of the row is automatically extended if necessary and text automatically wraps:
Users can also select columns, rows, or cells and apply available attributes regarding text style, colors, alignment, etc. using the built-in pop up menu or any customized interface. 4D Write Pro provides several commands to select any parts of a table:
- WP Table get rows to get a row range (or header row range)
- WP Table get columns to get a column range(*)
- WP Table get cells to get a cell range
(*) Columns do not have equivalent in html. In 4D Write Pro, a column range is actually a range of cells, which means that columns have the same priority as cells.
Once you have selected a range, you can apply any appropriate attribute using the WP SET ATTRIBUTES command. Within cells, attributes are applied to paragraphs, characters, or pictures, depending on their contents. For example, you can set the height, font size, border, padding, etc. of tables or table cells (for more information, please refer to the 4D Write Pro Attributes section).
When different attributes are applied to concurrent elements of a table, a priority order is applied for the rendering:
- Table is rendered first
- Rows are rendered (overriding table attributes)
- Cells/Columns are rendered (overriding row attributes).
Resizing columns
The width of table columns can be modified by dragging the column separator to the left or right. The cursor changes to indicate that it can be moved horizontally and vertical line is shown in the ruler:
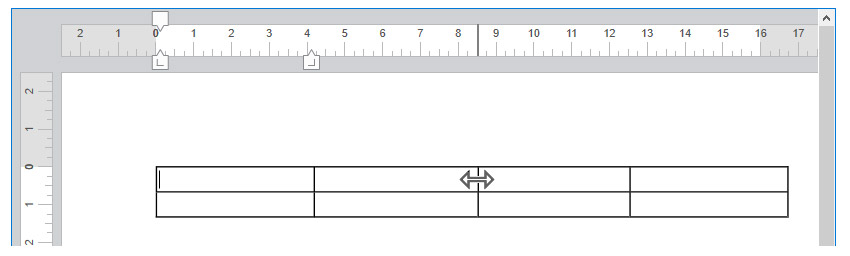
Resizing columns generates an On After Edit form event.
To resize a column, click on the column separator and drag it to the left or right. Miniumum column size is 8pt. If the adjacent column on the right reaches the minimum size, all columns on the right will be moved. If the first column or an adjacent column to the left reaches the minimum size, no further resizing can occur in that direction.
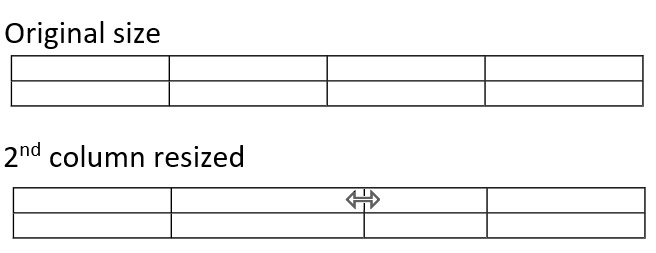
If you press the Shift key while resizing a column, the size of the adjacent column on the right will not be modified.
Note: The Enterable property must be enabled for the 4D Write Pro document to allow column resizing.
Table pagination
When displayed in Page or Draft mode (or the context of a document printing), 4D Write Pro tables can split:
- automatically, if the table height is greater than the available page/column height,
- depending on page/column breaks set by programming or by the user.
Tables can split between rows, and rows can split too. The table pagination is dynamically updated if the orientation or column number are modified.
Notes:
- You can disable automatic splits in tables by using the wk page break inside row / wk page break inside tableattributes (see 4D Write Pro Attributes) or the table/avoidPageBreakInside and row/avoidPageBreakInsidestandard actions (see Using 4D Write Pro standard actions).
- When a table row and a paragraph have different page break options, the options applied to the row have precedence. For example, when a paragraph allows page breaks, but its parent row does not, the row will not split.
Table pagination can also be controlled by programming or by the user. Available actions include:
- inserting a page break in a table:
- WP INSERT BREAK command
- insertPageBreak standard action
- Insert page break option of the default contextual menu
- inserting a column break in a table:
- WP INSERT BREAK command
- insertColumnBreak standard action
- Insert column break option of the default contextual menu
When a page break or a column break is inserted through a standard action or the contextual menu, it is added before the selected contents: the first row of the selection is moved at the beginning of the next page or column. For example:
 ===>
===> 
Notes:
- Only tables in the body part of a document can split. Breaks inserted in tables in headers and footers are ignored.
- Tables cannot be broken in different sections. Inserting a section break in a table will move the whole table to the new section.
- Breaks inside rows are not allowed when Carry-over rows are enabled.
Repeated headers
4D Write Pro allows you to define up to five header rows per table. Selected header rows will be repeated on every column or page when a column break or a page break occurs.
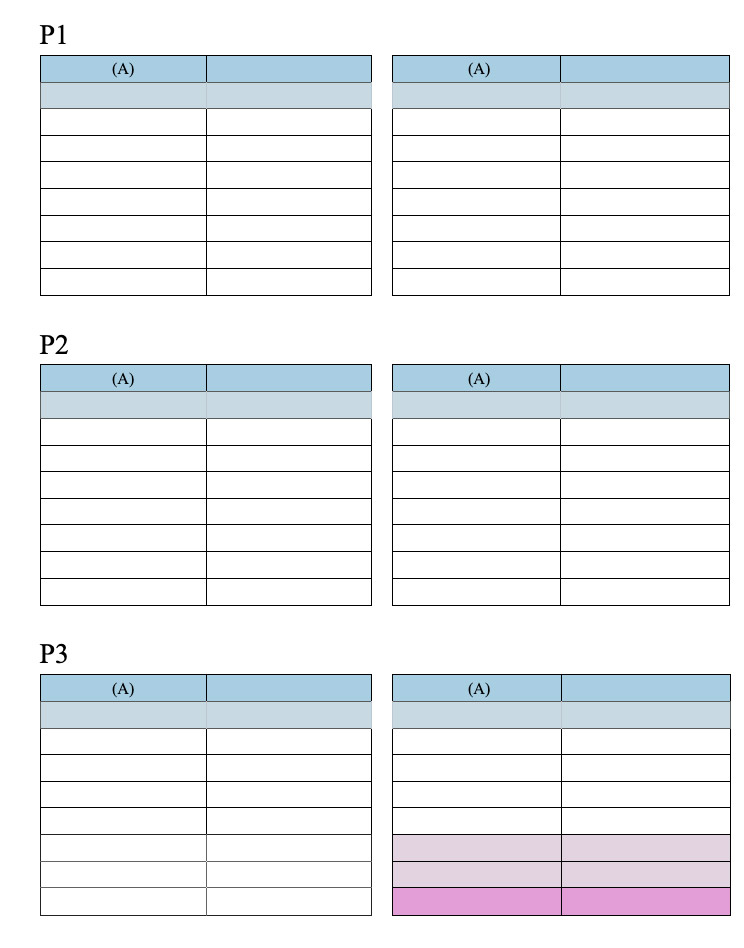
Table headers are the first row(s) of the table. To define header rows, you can:
- use the headerRowCount standard action (see Using 4D Write Pro standard actions), or
- use the WP SET ATTRIBUTES with wk header row count (on a table, see Tables), or wk header (on a row, see Rows and columns).
If you designate more than five rows as header (or if it results from an insertion of rows in an existing header), 4D Write Pro only uses the first five rows as header. If you remove row(s) defined in the header, the number of header rows is decreased.
Table datasource
You can assign a formula object as a datasource for a table and access the resulting value(s) from within the table using Expressions with This (see below). The datasource formula is processed by 4D Write Pro when formulas are computed (e.g. when the document is opened, when the WP COMPUTE FORMULAS command is called, etc.). This feature takes advantage of data contexts (see WP SET DATA CONTEXT).
To assign a datasource to a table, use the WP SET ATTRIBUTES command with the wk datasource and a 4D formula object as value. For example, to fill a table with a row for every person living in France:
 $formula:=Formula(ds.people.query("country = :1";"France"))
 WP SET ATTRIBUTES($table;wk datasource;$formula)
- If the datasource formula object returns a (non empty) collection or entity selection, the table is automatically filled when the formula is computed: it contains at least as many rows as there are elements in the collection or entities in the entity selection. The first table row (excluding header row(s)) is used as a template row, where you can insert expressions that use special keywords such as This.item.lastname. Expressions are replaced during processing by data from the collection or entity selection. This template row will be duplicated so that the number of item rows is equal to the number of items in the collection or entity selection after formulas are computed.
- If the datasource formula does not return a collection or a an entity selection, or if it returns an empty collection/entity selection, the table rows are not created automatically and all rows are treated as regular rows.
To remove a datasource from a table, use the WP RESET ATTRIBUTES command. It will set the datasource attribute value to null:
WP RESET ATTRIBUTES($table;wk datasource)
Building a table with datasource
A table design based upon a datasource can contains the following rows:
| Rows | Number | Mandatory | Conditions | Description |
| Header rows | up to 5 | – | – | Standard table header, see Repeated headers |
| Template row | 1 | yes | The datasource formula must return iterable elements | If the table does not have header rows, the template row is the first row of the table – otherwise, it is the first row following the header. It is usually filled with expressions using This (e.g. This.item.value) that give access to processed data when the document is in Display values mode and row is duplicated. |
| Bottom carry-over row | 1 | – | The datasource formula must return iterable elements | The first row following the template row. See Carry-over rows |
| Other rows | unlimited | – | – | Standard rows (not duplicated) |
Example (Show references mode):
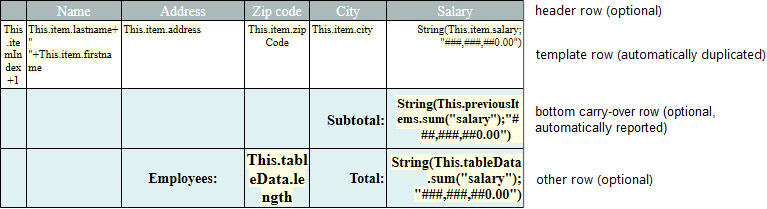
When the formulas are computed, the template row is automatically duplicated as needed to match all entities or collection items returned by the datasource formula:
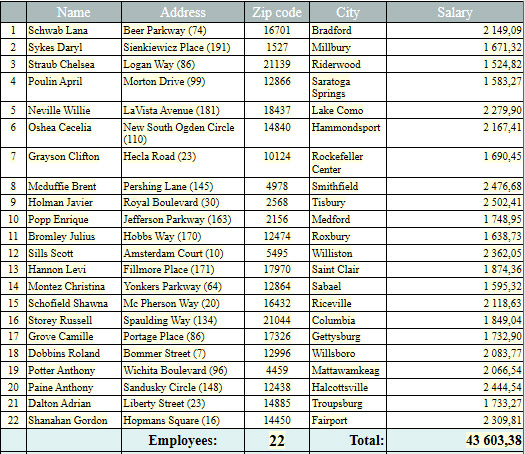
In any cases, the following statement returns the actual number of rows:
WP GET ATTRIBUTES($table;wk row count;$vcount) //24 for the example above
Carry-over rows
Tables based on datasources support bottom carry-over rows that are automatically displayed at the bottom of each page/column when the table is split over more than one page/column. A carry-over row can display extra information based on previously displayed/printed items, thanks to the This.previousItems expression (see Expressions with This). This feature allows you, for example, to add subtotal rows.
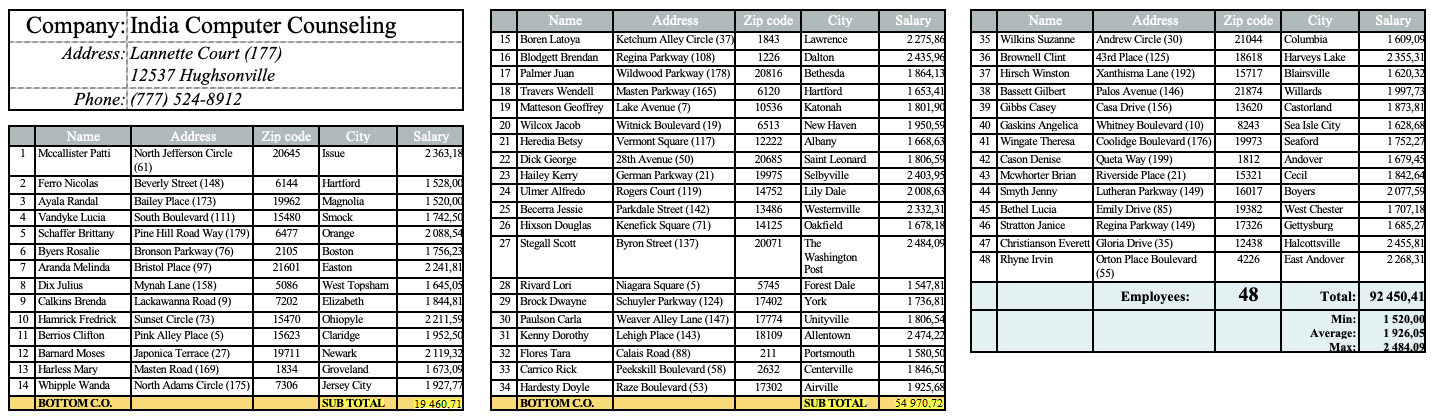
Carry-over rows are displayed:
- when a datasource table does not fit in a single page (or column)
- at the bottom of the table
- on the first page (or first column) and all other ones except on the last one.
Important: Carry-over rows are only available on tables filled by a datasource formula returning a non-empty collection or entity selection and in display values mode. In all other cases or when the datasource formula has not been computed, a carry-over row is displayed as a regular row.
To create carry-over rows:
- In the table template, add a row just after the template row and insert any necessary formulas inside, using for example This.previousItems.
- Enable the carry-over row feature for your document. You can:
– use the bottomCarryOverRow standard action (see Using 4D Write Pro standard actions), or
– use the WP SET ATTRIBUTES command with the wk bottom carry over row Tables attribute selector.
Note: Page breaks inside rows are not allowed when the carry-over row feature is enabled (see Table pagination). Corresponding options, if set, are ignored.
Expressions with This
When used in a formula within the table, the This keyword gives access to different data according to the context:
| Context | Expression | Type | Returns |
| Anywhere | This.table | Object | Current table |
| This.row | Object | Current table row element | |
| This.rowIndex | Number | Index of the current row, starting from 1 | |
| When a datasource has been defined for the table | This.table.dataSource | Object (formula) | Datasource as a formula |
| This.tableData | Collection or Entity selection (usually) | Evaluated table.dataSource | |
| In each duplicated template row when a table datasource returns a collection or an entity selection | This.item.xxx | Any | Mapped to each item of the table datasource collection or entity selection, for example This.item.firstName if the associated entity has the firstName attribute |
| This.itemIndex | Number | Index of the current item in the collection or entity selection, starting from 0 | |
| In any row (except header rows) when a table datasource returns a collection or an entity selection | This.previousItems | Collection or Entity selection | Items displayed on the pages before the bottom carry over row (if any) or before the row of the expression, including the page where is displayed the row containing the expression. This expression returns the same type of value as the This.tableData expression. |
In any other contexts, these expressions will return undefined.
Note: For more information about formula insertion, see WP INSERT FORMULA.
Working with a table datasource
When a table is filled from a datasource, rows are automatically created when references are computed. You can insert or delete rows, edit cell contents, change the style, etc.:

However, keep in in mind that if the table datasource is recomputed, any modifications made on computed rows (except on the first row, see hereafter) are lost. On the other hand, since the first row is the template row, any modification made to the this row will be propagated to all rows if the table datasource is recomputed. For example:

After recomputing expressions:

When the cursor is inserted in a cell of a table filled with a datasource, a warning icon is displayed on the left side along with a tip that displays information:

When formulas are displayed as references or when you save the document, only the first row is displayed/saved as template (if formulas are not frozen).
When the formulas are frozen, the table becomes a standard table and the table datasource is reset.
Note: freezeExpressions standard action does not recompute formulas.
Importing and Exporting in .docx format
4D Write Pro can both import and export documents in the .docx format. This format is supported by word processing applications such as Microsoft Word.
Compatibility note: Support for 4D Write Pro documents imported or exported in .docx format is only certified for Microsoft Word 2010 and newer. Older versions, particularly Microsoft Word 2007, may not be able to open the documents.
How to import .docx format
Documents in .docx format can be imported into 4D Write Pro with the WP Import document command. For more information, please refer to the description of this command.
Behavioral changes
While the majority of .docx settings are preserved, some settings are known to be either unsupported or behave differently in 4D Write Pro. These are:
Alignment / Layout
| Setting | Description |
| Anchored text areas | Anchored text areas are not supported. The content can be ignored or imported as inline text (option to set when using the WP Import document command). |
| Paragraph layout | Only Western text layouts are supported. Distributed, Thai and Asian paragraph styles are not supported. |
| Page Size | Different page sizes per section are not supported. Only the page size from the first section is imported. |
Background
| Setting | Description |
| Watermark | Not supported |
Expressions
| Setting | Description |
| MS Word equations | Not supported. Data is not imported. |
| MS Word charts | Not supported. Data is not imported. |
Lists
| Setting | Description | |
| Hierarchical lists | Multi-level lists are not supported. Multi-level lists are converted to a single level lists so list appearance and/or numbering may be different |
Pictures / Images
| Setting | Description |
| DrawingML shapes | Only simple DrawingML images (inline or anchored) are imported. Complex DrawingML shapes are not supported. |
| VML shapes or images | Not supported. VML is obsolete in MS Word and should not be used in documents created with MS Word 2010 or older. |
| 3D models | Not supported, however the last rendered 2D image of the 3D model may be imported if present in the .docx. |
| SmartArt | Not supported. |
References / Review
| Setting | Description |
| Comments | Not supported. Content is not imported. |
| Footnotes | Not supported. Content is not imported. |
Spacing
| Setting | Description |
| “At least” line spacing | Not supported. “At least” line spacing is converted to fixed (single) line spacing. |
| Fit text | Not supported. The normal 4D Write Pro style is used. |
Tables
| Setting | Description |
| Tables | Contiguous tables do not merge automatically. Column or row span is not supported. |
Text
| Setting | Description |
| Themes | Text themes are not imported. If a color or font definition references a color or font in a theme, the last computed color or font will be used. Otherwise, the |
| color or font defined in the theme is used. |
Import log
When importing .docx format into 4D Write Pro, a log object is created and included within the imported document object. This object can be retrieved with the WP GET ATTRIBUTES command:
 $myDoc:=WP Import document("test.docx")
 if($myDoc#Null)
C_OBJECT($log)
WP GET ATTRIBUTES($myDoc;wk import log;$log)
 End if
The import log object contains the following properties:
| Constant | Comment |
| wk import log | Log object containing information about the .docx import operation. Properties are read-only and cannot be set: Property TypeDescriptionstatus TextImport status: successful – the document is imported into 4D Write Pro failed – an empty 4D Write Pro document is returneddeveloper CollectionCollection of message object(s) for 4D Write Pro developers. [ ].typeTextThe kind of message logged: infowarningerror [ ].messageTextMessage about the import operation.user CollectionCollection of message object(s) for 4D Write Pro users. [ ].typeTextThe kind of message logged: infowarning [ ].messageShortTextBrief message about the import operation. [ ].messageLongTextExtended message about the import operation. |
How to export in .docx format
4D Write Pro objects offer two ways to export 4D Write Pro documents in .docx format:
- as .docx file exported to disk, use the WP EXPORT DOCUMENT command.
- as .docx file exported to a BLOB variable, use the WP EXPORT VARIABLE command.
For more information, please refer to the description of these commands.
Behavioral changes
While the majority of 4D Write Pro settings are preserved, some settings are known to be either unsupported or behave differently in Microsoft Word. These are:
Alignment / Layout
| Setting | Paragraphs | Sections | Images |
| Anchoring | In Microsoft Word, anchored images are positioned relative to the top left origin of the page and first paragraph. This could result in images being displayed in different locations than desired due to text layout differences between 4D Write Pro and Microsoft Word. | ||
| Vertical align | Not supported by Microsoft Word (all items will be top-aligned) | Not supported for inline images (all items will be baseline) |
Background
| Setting | Paragraphs | Sections | Images |
| Background clipping | Not supported by Microsoft Word (background color fills entire paragraph, not including borders and margins) | Not supported by Microsoft Word (background clipping will be equal to the padding box) | |
| Background image | Not supported by Microsoft Word | Different background pictures/colors not supported by Microsoft Word (converted to anchored images or shapes) | Microsoft Word allows either a background color or a background image. If a background image is defined, the background color will be “transparent”. |
| Background image repeat | Horizontal or vertical tiles are converted to full tiles in Microsoft Word | Horizontal or vertical tiles are converted to full tiles in Microsoft | |
| Background origin | Origin box is converted to the same value as background clipping box. | Not supported by Microsoft. |
Borders
| Setting | Paragraphs | Sections | Images |
| Border color | Different border colors for each border line is not supported by Microsoft Word. The first defined 4D Write Pro image border line (in this order: top, right, bottom, left) will be used for all of an image’s borders. | ||
| Border radius (rounded borders) | Not supported by Microsoft Word | ||
| Border width | Microsoft Word maximum is 12pt, borders exceeding this size will be reduced. | Microsoft Word maximum is 12pt, borders exceeding this size will be reduced. |
Expressions
| Setting | Paragraphs | Sections | Images |
| Expressions | Only simple 4D expressions such as “Current date” or “Current time”, or 4D Write Pro reserved local variables ($wp_title, $wp_pageNumber, etc.) are converted to Microsoft Word fields. Other 4D expressions are computed and converted to text or images during the export process. |
Lists
| Setting | Paragraphs | Sections | Images |
| Indent | Converted to 0 for list items (list item indent is converted to hanging indent in Microsoft Word) | ||
| Ordered list type | Greek, Armenian, and Georgian are converted to decimal and Hiragana is converted to Katakana in Microsoft Word. |
Pictures
| Setting | Paragraphs | Sections | Images |
| SVG | Not supported by Microsoft Word (images in SVG format will be converted to PNG format) |
Size
| Setting | Paragraphs | Sections | Images |
| Minimum height | Not supported by Microsoft Word (height is handled automatically) | ||
| Width / Minimum width | Not supported by Microsoft Word (paragraph width is handled automatically) |
Spacing
| Setting | Paragraphs | Sections | Images |
| Padding | Microsoft Word maximum is 31pt, padding exceeding this size will be reduced. | Microsoft Word maximum is 31pt, padding exceeding this size will be reduced. |
Tables
| Feature | Description |
| Bottom carry-over row | Not exported. |
Tabs
| Setting | Paragraphs | Sections | Images |
| Default tab stop | Not supported by Microsoft Word (will be converted to absolute tab stops) | ||
| Tab leading characters | Microsoft Word supports “dot” (….), “dash” (—-), and “underscore” (____) leading characters, all others will be converted to “none”. |
Text
| Setting | Paragraphs | Sections | Images |
| Linethrough | Line color different from text color is not supported by Microsoft Word; only solid and double styles are supported | ||
| Style Sheets | Paragraph style sheets are converted to paragraph styles. | ||
| Text align | Microsoft Word compresses spaces, so justified text layout may be reconfigured. | Microsoft Word compresses spaces, so justified text layout may be reconfigured. | |
| Text shadow | 4D Write Pro shadow will be converted to blur and offset, using the default color in Microsoft Word. | ||
| Underline | Semi-transparent underlines will be converted to solid. |
See also
WP EXPORT DOCUMENT
WP EXPORT VARIABLE
Exporting to HTML and MIME HTML formats
4D Write Pro documents can be exported to the HTML and MIME HTML formats using the WP EXPORT DOCUMENTand WP EXPORT VARIABLE commands. Use these tables to check which 4D Write Pro attributes and features are exported to HTML and MIME HTML. The attributes/features are sorted alphabetically. For a detailed list of attributes, see 4D Write Pro Attributes.
Common attributes
| Attribute/Feature | Exported | Comment |
| Background clip | yes | |
| Background color (for element, not character) | yes | |
| Background image | yes | |
| Background repeat | yes | |
| Background origin | yes | |
| Background position | yes | |
| Background width and height | yes | |
| Border color | yes | |
| Border radius | yes | |
| Border style | yes | |
| Border width | yes | |
| Element id | yes | |
| Margin | yes | |
| Padding | yes | |
| Protected | no | |
| Style sheet | yes |
Characters
| Attribute/Feature | Exported | Comment |
| Background color | yes | |
| Font and font styles | yes | |
| Font size | yes | |
| Strikethrough color | no | |
| Strikethrough styles | partially | Only solid is exported |
| Superscript, subscript | yes | |
| Text color | yes | |
| Text shadow | yes | |
| Text transform | partially | Small uppercase is not exported |
| Underline color | no | |
| Underline styles | partially | Only solid is exported |
Columns
| Attribute/Feature | Exported | Comment |
| Column count | no | |
| Column rule color | no | |
| Column rule style | no | |
| Column rule width | no | |
| Column spacing | no |
Document
| Attribute/Feature | Exported | Comment |
| Break paragraphs in formulas | no | |
| Document (meta) information | partially | Only title and subject are exported |
| Dpi | no | |
| Font default | no | |
| Header and footer autofit | no | |
| Page margin | no | |
| Page orientation | no | |
| Page width/height | no | |
| Protection enabled | no | |
| Tab decimal separator | no | |
| User unit | no |
Images
| Attribute/Feature | Exported | Comment |
| Alternate text | yes | |
| Anchor align | partially | Only right, left, top or bottom |
| Anchor embedded | yes | |
| Anchor offset | yes | |
| Anchor origin | partially | Only for the container box (borders of the web page) |
| Anchor to a single page | no | |
| Anchor to all pages | no | |
| Anchor to all sections of a page | no | |
| Background image (and related background attributes) | yes | |
| Image display mode | partially | If an image has a background image, it is exported as scaled to fit. |
| Image URL | yes | |
| Vertical align | yes |
Paragraphs
| Attribute/Feature | Exported | Comment |
| Absolute tab stops | no | |
| Column break after | yes | Single column only (multiple columns are not supported) |
| Direction | yes | |
| Keep with next | yes | |
| Line height | yes | |
| List font | no | |
| List image | yes | |
| List image height | no | |
| List start number | yes | |
| List string format (custom format) | no | |
| List style type | partially | Hollow-square, diamond, and club are not exported, decimal-greek is the same as lower-greek |
| Min-height | yes | |
| Min-width | no | |
| New line style sheet | no | |
| Page break after | yes | |
| Page break inside | yes | |
| Section break after (continuous or not) | no | |
| Text align | yes | |
| Text indent | yes | |
| Vertical-align | yes | |
| Widow and orphan control | no | |
| Width | yes |
Sections and page elements
| Attribute/Feature | Exported | Comment |
| First page sub-section | no | |
| Headers and footers | no | |
| Left and right page sub-sections | no | |
| Main sections | no | Only document-level attributes are exported to the html body |
| Page margin | no | |
| Page orientation | no |
Tables
| Attribute/Feature | Exported | Comment |
| Background image (and related attributes) | yes | |
| Column break after | yes | Single column only (multiple columns are not supported) |
| Horizontal alignment | yes | |
| Page break after | yes | |
| Page break inside | yes | |
| Section break after | no | |
| Bottom carry-over rows | no |
Table cells
| Attribute/Feature | Exported | Comment |
| Background image (and related attributes) | yes | |
| Height | yes | |
| Vertical align | yes | |
| Width | yes |
Table rows
| Attribute/Feature | Exported | Comment |
| Background image (and related attributes) | yes | |
| Column break after | yes | Single column only (multiple columns are not supported) |
| Height | yes | |
| Page break after | yes |
Other features
| Attribute/Feature | Exported | Comment |
| 4D formulas | no | Computed and freezed for export |
| 4D method links | no | |
| Bookmarks and bookmark links | yes | |
| URL links | yes |
See also
WP EXPORT DOCUMENT
WP EXPORT VARIABLE
Exporting to SVG format
You can export 4D Write Pro document pages to SVG format using the WP EXPORT DOCUMENT and WP EXPORT VARIABLE commands. This page contains additional information and notes on SVG export.
SVG Rendering
SVG images are rendered according to page settings displayed in Page view mode. The following properties are taken into account:
- Background attributes (if exported)
- Borders
- Margins
- Orientation
- Padding
- Page size
- Sections (SVG rendering takes into account the section attributes, but the sections themselves are not exported)
Parts of the document that are exported to SVG:
- Body
- Inline images
- Title (metadata wk title)
Parts of the document that are exported to SVG depending on the option parameter:
- Headers
- Footers
- References or values (regarding values, the wk recompute formulas option determines if the formulas are evaluated before export)
- Background colors
- Images defined as background images and anchored images
The following elements are not exported to SVG:
- Fonts (converted to CSS styles, but not embedded in the exported SVG. See Font management)
- Links to bookmarks (rendered but not active)
- Links to URLs (rendered but not active)
- Customized formula highlighting
- Metadata
- Author
- Subject
- Creation date
- Modification date
Font management
Fonts are not embedded in the exported SVG, so text will be rendered correctly only if the font family and style are supported on the platform where the SVG image is rendered.
If you want to make sure that the rendering will be equivalent on all platforms, even when fonts are not available, you can use the wk import google fonts option when exporting a 4D Write Pro document.
Imported Google fonts override native fonts when the SVG is rendered. If you intend to render the SVG image on the same platform, we recommend not using the wk import google fonts option as rendering with native fonts is always better.
Note: Only bold and italic styles are preserved. 100% compatibility between native font styles and font style definition in CSS (and thus SVG) is not guaranteed. Export to PDF is more suited for distribution to all platforms or for better WYSIWYG support for fonts, as fonts are embedded in PDF.
Example
This example exports a document page to SVG format and creates an image preview using SVG EXPORT TO PICTURE.
 var $preview : Picture
 var $options : Object
 var $svgRoot : Text
 var $options : Object

 $options:=New object
 $options[wk max picture DPI]:=96
 WP EXPORT VARIABLE(wpDoc;$text;wk svg;$options)
 $svgRoot:=DOM Parse XML variable($text;False)
 SVG EXPORT TO PICTURE($svgRoot;$preview;Own XML data source)
4D Write Pro Language
About 4D Write Pro objects
Using commands from the Objects (Forms) theme
Using commands from the Styled Text theme
Accessing document contents by programming
 WP Add pictureWP Bookmark rangeWP COMPUTE FORMULAS WP DELETE BOOKMARK WP DELETE FOOTER WP DELETE HEADER WP DELETE PICTURE WP DELETE STYLE SHEET WP DELETE SUBSECTION WP EXPORT DOCUMENT WP EXPORT VARIABLE WP Find all WP Find next WP Find previous WP FREEZE FORMULAS WP GET ATTRIBUTES WP Get body WP GET BOOKMARKS WP Get breaks WP Get data context WP Get element by ID WP Get elements WP Get footer WP Get formulas WP Get frame
WP Get header WP Get links WP Get page count
WP Get position WP Get section WP Get sections WP Get style sheet WP Get style sheets WP Get subsection WP Get text WP Get view properties WP Import document WP IMPORT STYLE SHEETS WP INSERT BREAK WP INSERT DOCUMENT WP INSERT FORMULA WP INSERT PICTURE WP Insert table WP Is font style supported WP New WP NEW BOOKMARK WP New footer WP New header WP New style sheet WP New subsection
WP Paragraph range WP Picture range WP PRINT WP RESET ATTRIBUTES WP SELECT WP Selection range WP SET ATTRIBUTES WP SET DATA CONTEXT WP SET FRAME WP SET LINK WP SET TEXT WP SET VIEW PROPERTIES WP Table append row WP TABLE DELETE COLUMNS WP TABLE DELETE ROWS WP Table get cells WP Table get columns WP Table get rows WP Table insert columns WP Table insert rows WP Table range WP Text range WP USE PAGE SETUP 4D Write Pro Constants
 4D Write Pro Attributes
.
See also
4D Write Pro
Exporting to HTML and MIME HTML formats
Handling pictures
Importing and Exporting in .docx format
Managing formulas
OBJECT Get horizontal alignment
OBJECT SET HORIZONTAL ALIGNMENT
Using a 4D Write Pro area
You can review our Blog and YouTube channel for additional information and resources on SapphireOne ERP, CRM and Business Accounting software.