Sapphire Gateway II Overview
Gateway II facilitates seamless interaction with the SapphireOne Database, enabling data retrieval and controlled data entry. Data can be transmitted to SapphireOne either as a text file or via TCP/IP, which is particularly useful when migrating from another database to SapphireOne. Most databases can export data into a Tab delimited (.txt) text file. After exporting, the text file can be accessed with a spreadsheet application, allowing you to rearrange the data columns for compatibility with SapphireOne’s import requirements. For successful data import into SapphireOne, the information must be formatted as a tab delimited text file . You can use any spreadsheet software that supports saving files in Text (Tab Delimited) format.
Never directly import gateway files into an active live data file. First, prepare a recent version of your production data file using the same build as the server, and initiate it in Single User Mode. Conduct a trial import with the intended data and meticulously review the outcome, ensuring particularly that the columns in the import file align correctly with the appropriate fields in your data file replica. After confirming the test import is accurate and everything appears in order, proceed to create a backup of the production (live) data file, and only then carry out the actual import. If discrepancies are detected, identify and rectify the issues in the import file, then re-attempt the import with a new copy of the production data file. Always prioritise testing before importing your data.
Import / Export Syntax
SapphireOne requires that column A of any table contain a sequence of 2 to 4 letters that follow either a % or # symbol. This combination provides the necessary commands for processing the data in the corresponding row.
- % Export – The % symbol instructs SapphireOne to read data out of the data file and then write it into a tab delineated text file.
- # Import – If SapphireOne is instructed to import a tab delineated file into a data file, the % symbol must be replaced with the # symbol so that it knows that all after the #CLA from column B through to column N in the row is to be read and written into the data file. #CLB would tell SapphireOne that it is to import every thing from column B through to Column BC
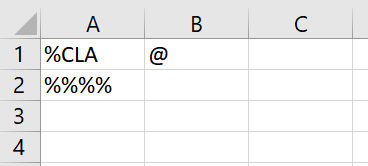
The following is an example of a file that uses the @ symbol in the B column. SapphireOne examines the initial cell, A1, and deduces that it should retrieve the CLA fields from the database. Cell B1, the second one, instructs the system to fetch all of the CLA fields. Finally, cell A2 signals that it is the end of the file.
SapphireOne is capable of extracting a wide range of data from the database and converting it into a Tab-delimited text file, starting with the information in the primary cell labeled ‘A’. For comprehensive information on the types of data that can be extracted, please refer to the tables provided in a separate article within the knowledge base.
Usage Procedure
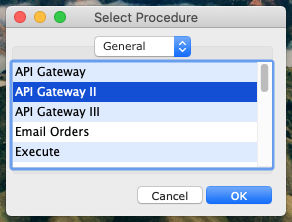
- Access Sapphire Gateway II by navigating to Utilities > Utilities > Sapphire Functions > General Tab > Sapphire Gateway II.
- % To Export Data – . When the user selects gateway II they will be directed by MacOS or Windows, to select a file for this operation.
- SapphireOne will look at the file and determine that is is to export data out.
- The user will see an alert requesting a name of the exported file and then the save location is selected.
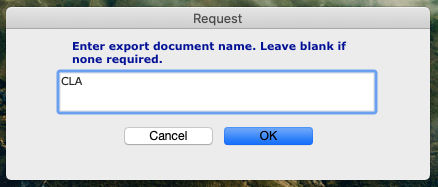
# Importing data – When a file has the # symbol prefixing the letters in column A a dialogue will be displayed. Do not enter any name or details just select OK. SapphireOne will import and merge the data with your data file.
Selecting Data
Please look at the Client table below. It is an import table as the syntax’s all start with the # symbol. The letters from A to Z, then carrying on from AA to AZ, are the columns of data in the table article. Some import tables go beyond this and will commence with BA through to BZ as may be seen in the Client import file below.
| A | #CLA | AO | [Clients]Order_No | I | [Clients]Phone1 | |||
| B | [Clients]ID | AP | [Clients]Discount1 | J | [Clients]Physical_Line1 | |||
| C | [Clients]Name | AQ | [Clients]Discount_Days | K | [Clients]Physical_Line2 | |||
| D | [Clients]PostalAddr_Line1 | AR | [Clients]Discount2 | L | [Clients]PhyCity | |||
| E | [Clients]PostalAddr_Line2 | AS | [Clients]Payment_Terms | M | [Clients]PhyState | |||
| F | [Clients]PostalCity_ Line3 | AT | [Clients]Due_Days | N | [Clients]PhyZip_Code | |||
| G | [Clients]PostalState_Line4 | AU | [Clients]Bank | O | [Clients[Rep | |||
| H | [Clients]PostalZip_Code | AV | [Clients]Branch | P | [Clients]Fax_No | |||
| I | [Clients]MainPhoneNo. | AW | [Clients]Drawer | Q | [Clients]Active | |||
| J | [Clients]Contact1_Name | AX | [Clients]Discount_price | R | [Clients]Real_2 | |||
| K | [Clients]Contact1_Position | AY | [Clients]EDI_Link | S | [Clients]UDF1 | |||
| L | [Clients]Contact1_Phone | AZ | [Clients]EDI_ShipID | T | [Clients]UDF2 | |||
| M | [Clients]Class | BA | [Clients]EDI_Location | U | [Clients]UDF3 | |||
| N | [Clients]Area | BB | [Clients]EDI_DCLocation | V | [Clients]Real_3 | |||
| BC | [Clients]Country | W | [Clients]UDF4 | |||||
| #CLB | X | [Clients]Class | ||||||
| O | [Clients]PhysicalAddr_Line1 | #CLD | Y | [Clients]Alpha | ||||
| P | [Clients]PhysicalAddr_Line2 | BD | [Clients]Total Due | |||||
| Q | [Clients]PhysicalCity_Line3 | BE | [Clients]Unposted_Total | A | #CLX | |||
| R | [Clients]PhysicalState_Line4 | BF | [Clients]Unposted_Receipt | B | [Clients]ID | |||
| S | [Clients]PhysicalZip_Code | BG | [Clients]Opening_Balance | C | [Clients]Alpha_1_20 | |||
| T | [Clients]Delivery_Instru | BH | [Clients]Balance1 | D | [Clients]Alpha_2_20 | |||
| U | [Clients]Contact2_Name | BI | [Clients]30_Day_Balance | E | [Clients]Alpha_3_20 | |||
| V | [Clients]Contact2_Position | BJ | [Clients]60_Day_Balance | F | [Clients]Alpha_4_20 | |||
| W | [Clients]Contact2_Phone | BK | [Clients]90+Day_Balance | G | [Clients]Alpha_5_40 | |||
| X | [Clients]Facsimile (Client) | BL | [Clients]Balance5 | H | [Clients]Alpha_6_40 | |||
| Y | [Clients]Open_Item | BM | [Clients]Overdue | I | [Clients]Alpha_7_60 | |||
| Z | [Clients]UDF1 | BN | [Clients]Warning_Message | J | [Clients]Alpha_8_80 | |||
| AA | [Clients]UDF2 | BO | [Clients]Notes | K | [Clients]Real_1 | |||
| AB | [Clients]UDF3 | BP | [Clients]Last_Transaction | L | [Clients]Real_2 | |||
| AC | [Clients]UDF4 | BQ | [Clients]Last_Receipt | M | [Clients]Real_3 | |||
| AD | [Clients]Client_Email | BR | [Clients]Last_Receipt_Am | N | [Clients]Real_4 | |||
| AE | [Clients]Tag | BS | [Clients[Rep | O | [Clients]Real_5 | |||
| AF | [Clients]Tag2 | BT | [Clients]CLDept | P | [Clients]Real_6 | |||
| AG | [Clients]Tag3 | BU | [Clients]Reseller (CB) | Q | [Clients]Real_7 | |||
| R | [Clients]Real_8 | |||||||
| #CLC | A | #CLL | S | [Clients]Date_1 | ||||
| AH | [Clients]Tax_No | B | [Clients]ID | T | [Clients]Date_2 | |||
| AI | [Clients]Tax_Exempt | C | [Clients]Name | U | [Clients]Date_3 | |||
| AJ | [Clients]Tax_Code | D | [Clients]Address_Line1 | V | [Clients]Date_4 | |||
| AK | [Clients]Tax_Rate | E | [Clients]Address_Line2 | W | [Clients]Time_1 | |||
| AL | [Clients]Default_GL | F | [Clients]City | X | [Clients]Time_2 | |||
| AM | [Clients]Credit_Limit | G | [Clients]State | Y | [Clients]Text_1 | |||
| AN | [Clients]Credit_Stop | H | [Clients]Zip_Code | Z | [Clients]Text_2 |
If you use %CLA syntax in column A in the text file, SapphireOne will write data out of the data file into the tab delineated file from column B only up to column N and no further.
If you create a text file and use #CLA syntax in Column A in the text file, SapphireOne import all rows of data commencing with column B through to column N. Even though you may have data in column M the very next column it will not read it.
The read write rules are as follows.
- % or # CLB extends the read write to column AG.
- % or # CLC continues to extend this read write functionality to column BC.
- % or # CLD continues this functionality on to extend this to column BU.
- % or # CLL is different as it is an independent table starting at column A through to column Y.
- % or # CLX is differentas it is another independant table from column A through to column Z.
For most tables column A holds the read write syntax, and the actual data commences at column B.
In certain cases, data read and write operations begin at column A, which is an exception to the standard procedure. This deviation is detailed in the article about table formatting. For instance, when handling a multi-line invoice using SapphireOne, the system processes the data columns until it reaches the final designated import column. If this terminal column lacks the necessary four consecutive caret symbols (^^^^), which are generated by pressing Shift-6, SapphireOne anticipates recording an ID in column A before inputting the specifics of the line item. For more comprehensive information, please refer to the article on Table formatting.
Formatting
Before importing data into the data file, it’s essential to eliminate all formatting that could lead to issues. Instead of using tabs, substitute them with any character whose ASCII value exceeds 138. For line item returns, such as those in mailing details, use a specific sequence of three characters, “=|=”, which consists of two equal signs and a vertical pipe in the exact order displayed. To signal the end of the file, append “%%%%” at the file’s conclusion, as certain applications necessitate an end-of-file marker.
TCP/IP
SapphireOne is designed to accept text commands through TCP/IP for executing specified tasks. To initiate, establish a connection to the TCP/IP address specified in the remote access default settings. Once a session is created, you will be assigned a unique session number. Using this session number, you can transmit text packets which will be acknowledged and processed based on the session identifier. Sending a packet with the appropriate command will yield a response containing the Serial Number, Company Name, and Version Number.
You can review our Blog and YouTube channel for additional information and resources on SapphireOne ERP, CRM and Business Accounting software.