Client Journal Overview
The Client Journal screen can be found as the fourth item on the ‘Data Entry’ dropdown menu within Accounts Receivables. It serves as a tool for users to make necessary adjustments to client balances in case of errors or mistakes.
Adjustments to client balances can be either positive or negative. In SapphireOne Accounting Software, negative amounts can be entered by prefixing the amount with a dash (-). When a negative amount is entered, SapphireOne will display it in brackets as follows: ($100.00), indicating a negative value. This formatting helps in accurately representing and distinguishing negative amounts within the system.
In SapphireOne, any data entry field with a light blue background  is a linked data entry field. If you don’t know the exact ID to enter, you can replace some or all of the characters with the @ or ? characters. SapphireOne will then display a shorter list of records to select the correct ID from. For example, if you enter K@, SapphireOne will display all records beginning with K.
Moreover, if a data entry field heading is underlined, it indicates that once an ID has been entered, you can click on the underlined heading. SapphireOne will then perform a specific query for the entered ID and display a list with only a single item in it. You can then view or modify the item as normal.
Details Page
The details page where data entry is required for this client Journal.
Transaction Area Data Entry
- Client ID – When a valid Client ID is entered in SapphireOne, the software automatically loads the remaining Client details from the Client’s master file. This feature ensures that users have the correct Client selected for the transaction by providing on-screen checking.
- External Ref – Users have the option to enter an External Reference Number if necessary. This field allows for the input of an external reference that may be relevant or required for the transaction..
- Journal – Users are prompted to enter the Journal Number in SapphireOne. Typically, these numbers are automatically generated in sequential order by the software. However, if necessary, users have the option to modify the Journal Number according to their specific needs or preferences.
- Date In –By default, the Date In field in SapphireOne is pre-filled with today’s date. However, users have the flexibility to modify the date as required. A date picking calendar is provided to facilitate easy selection of the desired date.
- Period – When entering data in SapphireOne, the Period field is initially populated with the period offered by the software.
ο Different Period – However, users have the flexibility to alter the period if needed. A Period picking pop-up is provided, enabling users to select the desired period from the available option
ο Locked Periods – It is important to note that certain periods may not appear on the list in the Period field. This is because those periods may be locked, indicating that transactions for that specific period have been completed and cannot be further modified. - Date Due – In SapphireOne, the Date Due is automatically generated based on the Client’s terms if they have been set up in the system. The software calculates the Date Due using the defined payment terms associated with the Client.
- Altering Date Due – However, users have the option to alter the Date Due if necessary. This flexibility allows users to adjust the payment due date as per specific requirements or agreements with the Client. By manually modifying the Date Due, users can accommodate unique payment arrangements or make adjustments as needed for the transaction.
- Memo – The Memo field provides users with the opportunity to enter any additional details or notes related to the Client Journal. This field allows users to provide specific information or explanations relevant to the journal entry for future reference or clarification purposes. By inputting relevant details in the Memo field, users can ensure clear and comprehensive documentation of the transaction within SapphireOne.


Paperclip Management Saves Time with Easy File Attachment
The SapphireOne Document Management System (DMS) features a convenient Paper Clip button on all data entry and inquiry screens. This enables users to attach relevant documents or files to every transaction or record. The system also includes a dedicated page for managing documents related to a specific transaction or record, providing robust version control of the attached documents.
The color of the paper clip serves as a visual indicator of the status of the attached documents. A red paper clip indicates that there are no documents currently attached to the transaction or record, while a green paper clip indicates the presence of one or more attached documents. Additionally, the word “Items” is preceded by the number of attached documents, providing a clear and concise representation of the current status.
SapphireOne’s Document Management System is highly versatile and can accommodate a wide range of document types, including Adobe Acrobat, spreadsheets, word processing documents, photo files, JPEGs, CSV files, HEIFs, and MP4 files. With the ability to store an unlimited number of documents for an indefinite amount of time, the system provides users with a comprehensive and efficient solution for managing all their important files and documents.
Master Defaults
In SapphireOne, users have the flexibility to control the size of individual documents and determine where they are stored through the Master Defaults settings. These settings can be accessed by navigating to Utilities > Controls > Master Defaults > System Page.
Within the Documents area of the SapphireOne page, there is a Document Size Limit setting with a default size of 10 MB, which can be adjusted as needed. Additionally, users can choose to store the documents either as part of the data file or as separate files, by selecting the appropriate option from the two radio buttons provided.
To attach a document to a transaction, simply click on either the  or
or  Paperclip button. The Document List window as seen below will be displayed allowing the the user to select the desired file to attach.
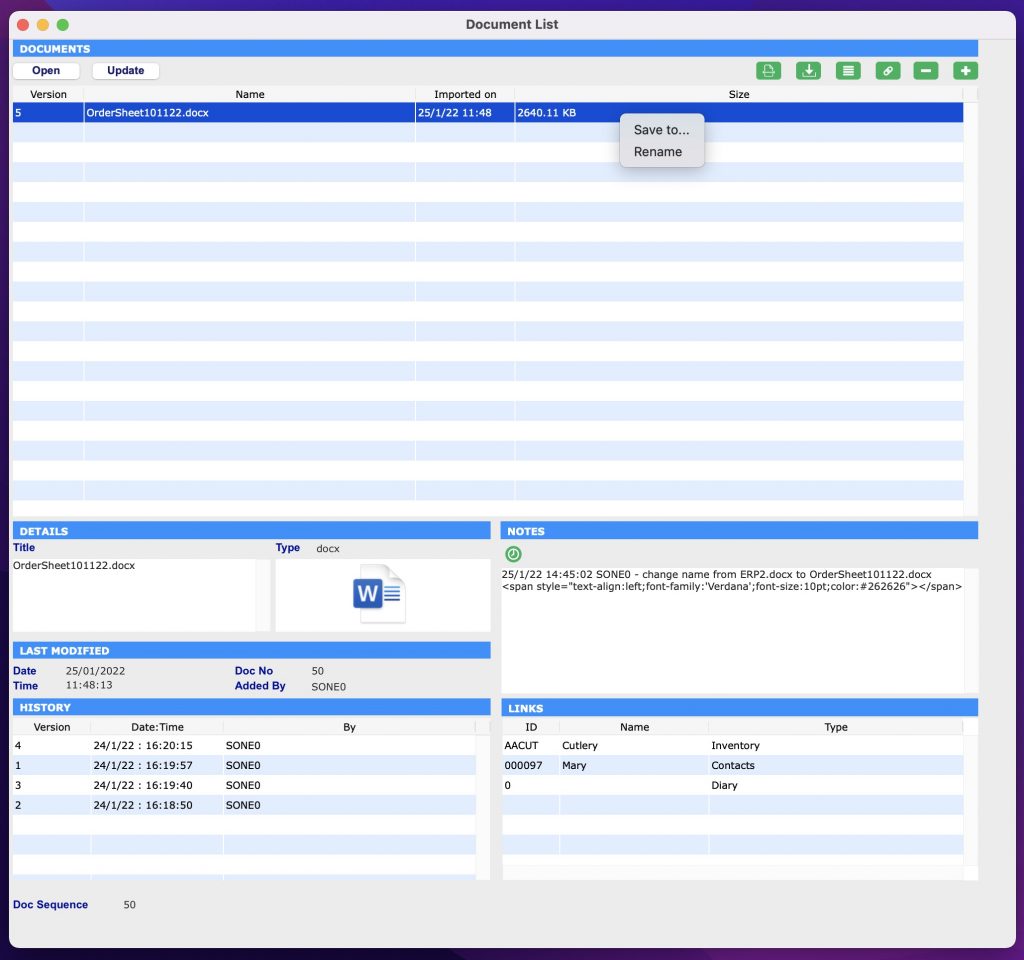
How to Attach Documents Using SapphireOne Paperclip
SapphireOne also provides users with the convenient Drag & Drop functionality to attach documents. To use this feature, simply drag a document from your local computer into the Document List screen and it will be attached automatically. This streamlined process saves time and effort and makes it easier to manage your important files and documents within SapphireOne.
If SapphireOne detects that the document name already exists, a pop-up will be displayed alerting the user. Alternatively, the user can also select the
If SapphireOne detects that the document name already exists, a pop-up will be displayed alerting the user. Alternatively, the user can also select the Plus  button to select a document to upload from the local computer.
SapphireOne’s document management system provides users with the ability to easily manage their attached documents. After a document has been attached, the user has the option to rename it by right-clicking on the file and selecting Rename This feature is useful for maintaining consistency in document names across all records and helps to keep the system organised and efficient.
Documents Area within Document Management System (DMS)
- Open
 – By clicking on this button, the document will be opened for viewing, allowing users to review its contents without having to leave the SapphireOne system. This feature provides a convenient and streamlined way to access and review important documents within the context of the larger document management system.
 - Update
 – When this button is selected an alert is displayed allowing the user to import a new version of a highlighted document, enabling version tracking. After selecting a new version, the user enters a version number. The latest version becomes available, with previous versions accessible in the History area. The updated document remains linked to associated transactions.
 - Scan
 – This option in SapphireOne provides users with the ability to scan a document directly into the data file and link it to a transaction. This feature requires access to a local or network scanner, and the appropriate scanner and software must be installed on the local machine or network. By using the Scan option, users can quickly and efficiently digitise physical documents and associate them with the relevant transactions within SapphireOne.
 - Save
 – This button in SapphireOne allows users to save the currently highlighted document to disk. This feature provides a convenient way to export a copy of the document for backup or further use outside of the SapphireOne system. By clicking the Save button, users can easily access a digital copy of their important documents and ensure that they are properly preserved and accessible.
 - Link Documents
 – With SapphireOne, users have the ability to link a highlighted document to one or more transactions within the data file. To do this, the user simply clicks the “Link” button, which will bring up an alert allowing them to make their selection. This feature provides a convenient way to associate important documents with multiple transactions, ensuring that all relevant information is easily accessible from one central location. For more information about linked documents, refer to the Links Area documentation provided by SapphireOne.
 - Link Existing Documents
 – SapphireOne provides users with the ability to link existing documents in the data file to the current transaction or record. To do this, the user simply clicks the Link Existing button, which will bring up an Alert allowing them to choose from a list of available documents. This feature provides a convenient way to associate existing documents with additional transactions, ensuring that all relevant information is easily accessible from one central location. For more information about linked documents, refer to the Links Area documentation provided by SapphireOne.
 - Delete
 – This option in SapphireOne allows users to remove the currently highlighted document. By clicking the Delete button, the selected document will be removed from the system, providing users with a simple way to manage their attached documents and ensure that only relevant and up-to-date information is stored within the system.
 - Plus – SapphireOne includes a search function that makes it easy for users to select a document saved on their local computer. This feature provides a convenient way to quickly locate and attach the desired document, streamlining the process of adding and managing important files within the SapphireOne system.
Details Area within Document Management System (DMS)
The Details area within SapphireOne’s Document Management System (DMS) provides users with additional information about the selected document. When a document is selected in the Documents area, the Details area will automatically display the title of the document and the type of file. This information helps users to quickly identify and manage their important files and documents, providing a more efficient and organised system for document management.
Notes Area within Document Management System (DMS)
The Notes area is for entering any notes related to the document. The user can select the green clock button  to create a time and date stamp for every note added.
The Notes area will also keep an automatic user log when any changes are made to the document. For example, if the document is renamed or new links are created. SapphireOne will record the date, time and user that made the modifications.
Document Details Area within Document Management System (DMS)
The Document Details area within SapphireOne’s Document Management System (DMS) provides additional information about the selected document. This area automatically displays information such as the date and time the document was added, the document number, and the user who added the document. This information helps users to quickly understand the context of the selected document and provides a comprehensive history of the document’s status and interactions within the system. The Document Details area is a valuable resource for managing and tracking important documents within SapphireOne.
History Area within Document Management System (DMS)
The History area within SapphireOne’s Document Management System (DMS) provides a record of the complete version history of the selected document. SapphireOne tracks all version changes and automatically displays the document’s history in this area.
As new versions of the document are imported using the button, the History area will be automatically updated, ensuring that all previous versions of the document are recorded and available for viewing. This enables users to access the most recent version of the document, while still maintaining a complete history of all versions.
The History area provides a valuable resource for tracking the evolution of a document and understanding how it has changed over time. By having a complete record of the document’s history, users can easily review past versions and understand the context of the changes that have been made.
Links Area within Document Management System (DMS)
The Links area within SapphireOne’s Document Management System (DMS) is used to link documents to specific transactions or areas within SapphireOne. This area provides a comprehensive view of all linking information related to the document, including any functions used to import the document into SapphireOne.
By linking documents to transactions and areas within SapphireOne, users can easily associate important information and files with the relevant transactions, providing a more organised and efficient system for document management. The Links area is a valuable resource for understanding the relationships between documents and transactions within SapphireOne.
To add additional links to a document in SapphireOne, follow these steps:
- Select/highlight the document you wish to link.
- Click the
 Link Document button.
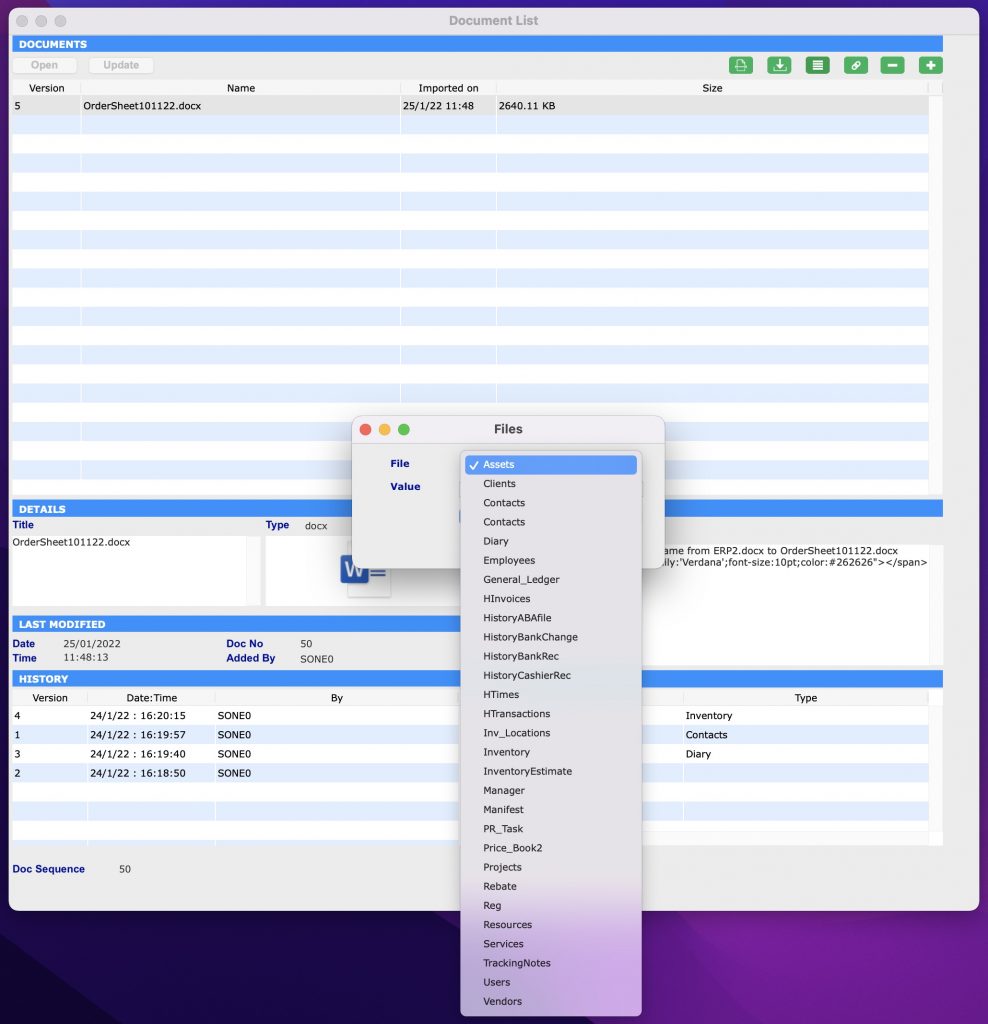
 - The Files pop-up window will be displayed.
- From the File drop-down menu, select the item you want to link the document to.
- In the Value data entry field, enter the necessary details (ID).
Note that the Value data entry field has a light blue background and is searchable by entering the wildcard symbols ‘?’ or ‘@’, making it easier to find the information you need. By linking documents to specific transactions and areas within SapphireOne, users can create a more organised and efficient system for document management.
Updating a Document within Document Management
The process for updating a document in SapphireOne is straightforward:
After clicking the “Update” button in SapphireOne, the user will be asked to confirm if they would like to import a new version of the document:
- Confirm that you wish to import a new version of the document by selecting Yes.
- The user will then be prompted to choose the updated document to open.
- After selecting the updated document, a secondary dialogue will appear, asking the user to enter an alphanumeric value for the new version.
- Enter the desired value for the new version and select OK
By following these steps, SapphireOne will replace the previous version of the document with the updated document. It will also maintain a complete record of all previous versions in the History area. This process ensures that the most up-to-date information is always readily accessible within the SapphireOne system.
Document Management using SapphireOne Documents Inquiry
In addition to SapphireOne’s Document Management Paperclip functionality, SapphireOne Documents Inquiry function in Workbook Mode provides users with a centralised repository of all documents and files stored within the SapphireOne data file. This function gives users the ability to add new documents, modify, view, or delete existing documents from within the Documents Inquiry screen.
Any revisions made to a document within the Documents Inquiry screen will be automatically updated across all areas where the document is linked within SapphireOne. Similarly, any modifications made to documents within the SapphireOne Paperclip Document List window will be reflected within the Documents Inquiry window.
For example, if a document is renamed within a transaction Paperclip Document List screen, the updated document name will be reflected when viewing the document in the Documents Inquiry screen.
You can learn more about SapphireOne Documents Inquiry functionality within the Documents Inquiry article.
Document Control within Document Management
In this example, we have an inventory item with documents attached, such as installation instructions and a packing checklist. The item is added to a sales order, manufactured, shipped, and the job is completed. SapphireOne’s Document Management Paperclip functionality allows for easy attachment and access to all relevant documents throughout the entire process, from sales order to completion. This improves efficiency and helps ensure all relevant information remains consistently available and up-to-date.
A year after the completion of the job, a revision of the inventory item is made, along with updates to its associated Documents (DMS). To keep the information organised and up-to-date, it is not necessary to create a new inventory item for the revision. Instead, the documents and files can be easily updated using SapphireOne’s DMS file that are attached.
By using the Update button within the DMS, users can import a new version of the document and SapphireOne will automatically keep track of all version changes, ensuring that the most recent information is readily available. This process saves time and effort by allowing users to simply update the documents and files, rather than creating a new inventory item for each revision.
In SapphireOne, when referring back to the original completed sales client invoice or job projects client invoice, the associated documents and files will be displayed in their original state or as they have been updated. The user has the option to view the documents and files as they were at the time of completion or as they currently are, providing a comprehensive and accurate record of all relevant information.
In the screen shot above, both the current and historical documents are attached to the inventory item. As a SapphireOne user, you have the ability to edit the list and choose to delete the historical document by simply selecting the Minus button.
Additionally, you also have the ability to modify the existing document, keeping a log file of each and every time the document has been revised. This ensures that a complete and accurate record of all revisions to the document is maintained, allowing you to easily reference the most recent version or any previous versions as needed.
The ability to manage both current and historical documents, as well as the option to modify and delete them, provides users with a flexible and efficient solution for document management within SapphireOne.

Dictation and Speech to Text Overview
SapphireOne’s implementation of both Dictation (MacOS) and Speech to Text (Windows) is a game changer for data entry. Any data entry field you can type into using a keyboard can use this feature.
You can also use this functionality on all inquiry screens within SapphireOne. For example, the user is in a Contact within a Client. They may have made a phone call to that particular client using the Softphone technology. Consequently, this will automatically date and time stamp both the contact and the phone number you called.
As soon as the call is completed, the user has the ability to use Speech to Text (Windows) or Dictation (MacOS). They can dictate into the memo field of the CRM contact, adding as much description as they require.
Dictation and Speech to Text Procedure
This functionality applies across every single Data Entry screen. For example, the SapphireOne user is entering a Vendor Invoice (VI). Additionally, you may want to add a memo within the Vendor Invoice (VI). The user can utilise the tool and simply dictate the memo.
Another example is if the user wants to add additional lines to the General Ledger account, within each General Ledger account. When the user is completing data entry using a General Ledger, there’s always a unique memo field for each GL account line.
The user can then utilise this feature to quickly add the information they need to add. Alternatively, you may have an interview with an employee. After the interview process is completed, the user can then make notes about the employee.
Speech to Text or Dictation is an extremely powerful tool. It is something that we at SapphireOne, as well as our clients, utilise daily. It is a massive time saver.
Information Tab Area (Viewing Only)
The Client Journal Information area in SapphireOne provides users with additional details and information about the current entry. It is important to note that the information displayed in this area is for viewing purposes only and cannot be altered. The tabs in the Client Journal Information area automatically change based on the type of transaction currently being viewed. There are seven tabs available in the Client Journal Information area, including:
- Client Tab – This tab provides various details about the Client associated with the journal entry. It displays important information such as the Total Due based on the relevant payment terms, the Credit Remaining for the Client, and any Warning Messages that may be applicable. This tab offers a comprehensive overview of the Client’s financial status, helping users to better understand their payment obligations and credit situation.
- Controls Tab – This tab lists the details of when the transaction was entered, posted, and by whom. This tab provides a clear record of the timeline and ownership of the transaction. Additionally, the Controls tab displays the total value of any allocation made, offering users a comprehensive view of the allocation details associated with the transaction. It helps in tracking and monitoring the progress of the transaction from entry to posting and provides transparency regarding the allocation of values.
- Allocation Tab – The Allocation tab displays any linked data records when there has been an allocation against the current invoice. This tab provides visibility into any transactions or records that have been allocated to the invoice, such as payments, credits, or adjustments. Users can view the details of these allocations, helping to track and reconcile the invoice with associated transactions. The Allocation tab offers a comprehensive view of the allocated data records, facilitating accurate financial management and analysis.
- G.L Tab – The G.L (General Ledger) tab displays the General Ledger details for the account entered in the current invoice. This tab provides a breakdown of the account’s transactions, including debits and credits, associated with the invoice.
- Project Tab – If a Project ID has been entered, the Project tab displays the project details associated with the current invoice. This tab provides information such as the Project Name and other relevant project details.
- Trans. Tab – The Transactions) tab provides a list of the last 20 transactions associated with the client journal entry. Users can view the transaction details such as the date, type, and amount. By selecting a historical transaction in the Trans. tab and right-clicking, users have access to several options:
- Copy Transaction – This option allows users to copy the entire selected transaction, enabling easy duplication or reference for similar transactions.
- Copy Lines – Users can choose this option to copy specific lines within the selected transaction, facilitating efficient data entry and reducing manual effort.
- Open Inquiry –: Selecting this option opens the selected transaction in an inquiry window, providing a detailed view of the transaction for further analysis or modification.
- Right Click – The Trans. tab and its associated right-click options offer users the ability to review and manage past transactions conveniently, enhancing productivity and data management capabilities.
- Error Code Tab – The Error Code tab displays additional information on any errors encountered within a transaction. While concise error information is typically displayed under the Controls tab, the Error Code tab provides more detailed information about the specific error. It offers insights into the nature and cause of the error, enabling users to troubleshoot and address any issues related to the transaction. This is especially useful when there are multiple errors within the one transaction.
Standing Transactions area
The Client Journal Standing Transactions area in SapphireOne enables users to set up recurring transactions. This section provides control over the frequency with which the record is created for each period. Typically, a Standing Transaction is assigned a Start Date and a Finish Date to define the duration of the recurring transactions.
By utilizing the Standing Transactions area, users can establish automated and repetitive transactions that are generated based on the specified frequency and duration. This feature streamlines the process of handling recurring transactions, saving time and ensuring consistency in financial operations.
Standing Transactions Data Entry
- Scheduled – By default, the Scheduled drop-down menu in the Standing Transactions area is set to None indicating that no recurring schedule is currently assigned to the transaction. When the user clicks on the area displaying the word None, a fixed drop-down menu appears, offering the user various options for selecting the frequency of the standing transaction to be created. Within this menu, users can choose one of the frequency options listed below to set a recurring schedule.
- Other Than None – If a schedule other than None is selected, users will have an additional option to specify Start/NextDate and Stop Dates for the scheduled task.
- Scheduled Options – The Scheduled options in the Standing Transactions area offer flexibility in selecting the frequency of transaction creation. Users can choose from the following options:
- Monthly – This option enables the creation of the transaction on a monthly basis.
- 30 Day – Selecting this option enables the transaction to be created every 30 days.
- Fortnightly –:This option creates the transaction every two weeks.
- Weekly – This option sets the frequency to create the transaction every week.
- Yearly – Selecting this option creates the transaction once a year.
- Other –: By choosing this option, users can define a custom frequency for the transaction, specifying the desired number of days, weeks, or months between each transaction.n each transaction.
- Start/Next Date and Stop Date – When selecting any of these scheduled options, users must pay close attention to the Start/Next Date and Stop Date as provided by Sapphire One. It is important to note that the current computer date will be automatically populated in these fields. However, these dates may or may not align with the user’s specific requirements. Therefore, it is crucial to enter the correct dates carefully to ensure accurate scheduling.
- Date Picking Calendar – As these date headings are underlined SapphireOne offers options for choosing these dates through a date picking calendar or manual entry. Users can utilise the date picking calendar to easily select the desired Start/Next Date and Stop Date for the scheduled task. Alternatively, they can manually enter the dates as per their specific needs.
- Flexibility – SapphireOne offers users the flexibility to customise the Start/Next Date and Stop Date, allowing for personalised scheduling of recurring tasks based on individual preferences and business needs. This level of control empowers users to determine the duration and timing of their recurring transactions, ultimately enhancing efficiency and adaptability within the software.
- Disabling the Date function – Remember that setting the dates at 00/00/00 effectively disables the date function for either the Start/Next Date or the Stop Date.
In SapphireOne, the creation of Standing Transactions relies on the posting of Standing Transactions from the previous period. The system generates Standing Transactions only after the transactions from the previous period have been posted.
If a Standing Transaction has a Stop Date set as 00/00/00, it signifies that there is no specific end date defined for the recurring transaction. In such cases, the system will keep generating the transaction until the user manually modifies or deletes it. This ongoing recurrence of transactions offers flexibility and control in managing recurring transactions, allowing them to persist indefinitely until intentionally changed.
Destination Area
The Client Journal Destination area stores the lines that go into making up this transaction. Depending on the transaction, this can be from a single line in accounts mode to a hundred or more in Inventory mode.
In SapphireOne, the Destination area displays a list of all the lines in the transaction. However, only the basic details of each line are visible in the list, and you cannot edit them directly. To view or modify any line, you need to select or highlight it. When you do so, all the additional data entry fields for that line will appear above the list.
To add a new line quickly, you can use the keyboard shortcut by holding down the Command or Control key and selecting the forward slash (/) key. SapphireOne will then place the cursor in the Account ID data entry field, ready for you to enter a new line. Alternatively, selecting the button will also place the cursor in the Account ID data entry field, ready for the entry of a new line.
Lines may also be added to the transaction by clicking on the button or selecting the button to delete the currently highlighted line.
Destination area Data Entry
- Account – Enter the General Ledger Account ID. Once the ID is entered, SapphireOne will display the Account name. The User can also use the Wildcard [ (@ or ?) + TAB ] option to search for the Account ID.
- Net Amount – Next enter in the Net Amount or tab through and enter the full amount including Tax in the Total field. SapphireOne will either forward or reverse calculate as required using the last used entry field as a reference. SapphireOne will then automatically calculate the remaining fields including the Tax. This is used mainly in Australia, New Zealand and USA.
- Tax Code – You may accept the default Tax Code or change it by over-typing (not recommended). This will allow you to bring in another tax code. The Tax Codes are set up on a Company by Company basis and may be viewed or set up by going to: Utilities \ Controls \ Company Inquiry \ Periods & Taxes to set up the Tax Codes.
- Project – The Project data entry field is used if this journal is part of a Project so that the Project ID may be entered here and linked to the Client Journal.
- % Applied – The % Applied will be entered by SapphireOne when the Project ID is entered, however the user may over ride this if necessary.
- Notes – The Notes data entry field is for the entry of any notes for this Client Journal transaction.
Transaction Footer Area
The Client Journal Transaction Footer is the information bar along the bottom of the screen, allowing you to easily check the critical details of a transaction. These details include:
- Sequence and Batch – Sequence and Batch numbers that SapphireOne automatically generates for the transaction are displayed.
- Out of Balance – Saving of the transaction will not be allowed until the Out of Balance value is 0.00.
- Rules Level – If a rule is attached by SapphireOne to the transaction it will be displayed here.
- Tag & Tag 2: Within SapphireOne Accounting Software, a user createable drop-down menu is available to enable users to mark a record with up to two tags. For all tags in SapphireOne please follow the procedure below to add or delete a tag.
- Adding a Tag –To add a new tag to the list, follow these steps.
- Enter the desired new name into the tag box on the screen.
- When you press the tab key an alert will be displayed.
- From the alert select the
 button to confirm the addition of the new tag.
 - Check that the item has been added to the list, if not repeat the procedure above.
- Removing a Tag – To remove a tag from the list, follow these steps:
- Select the
 arrow to display the items in the drop-down menu.
 - Hold down the Command key (MacOS) or Control key (Windows).
- Click on the name of the tag in the list that you wish to remove.
- An alert will be displayed, asking for permission to delete the selected tag.
- From the alert select the button to confirm the deletion from the list of tags.
- Check that the item has been removed from the list, if not repeat the procedure above.
- Select the
- Adding a Tag –To add a new tag to the list, follow these steps.
Custom Page
Custom Page Overview
SapphireOne’s Custom page features text fields designed for versatile, user-defined purposes. Each field is assigned a variable by SapphireOne, which is displayed as the default field heading label. Users can take note of the desired field or heading variable for customisation and modify it by navigating to Utilities > Controls > Change Names. Detailed instructions on this process will be provided below.
The Custom page is organised into the following sections:
- Alpha – Allows letters and numbers, but cannot be used for arithmetic functions
- Real – Allows numbers only, and can be used for arithmetic functions
- Date / Time – Date fields store date values and can be used for date functions, while Time fields store time values and can be used for time functions
- No Heading Defined – Features eight alphanumeric fields that cannot be used for arithmetic functions
- Text – Accepts letters, numbers, and special characters, but cannot be used for arithmetic functions
The data entry fields in these Custom Pages can also be employed in Sapphire Custom Reports, Quick Reports, Custom Inquiries, 4D View Pro, and 4D Write Pro Reports, just like any other data entry fields within SapphireOne.
The example Custom Page below is from an Asset Inquiry; however, the process for customising this page remains the same, irrespective of the function in which the Custom Page is located.
Default Variable Values
In the default variable values defined by SapphireOne, the first number signifies the position of the field within the group, while the second number denotes the maximum number of characters for the data entry field.
For instance, ASAlpha_1_20 indicates that it is the first data entry field in the group and can hold up to 20 characters. Similarly, ASAlpha_8_80 shows that it is the eighth data entry field in the group, with a capacity for a maximum of 80 characters.
To modify the headings on a Custom Page:
- Write down the exact names of the headings you wish to modify.
- Navigate to Utilities > Controls > Change Names. Keep in mind that when performing this procedure, you will be warned that only one user should be logged into the data file.
- Upon accessing the Change Names function, a dialogue box will appear. Then, refer to your list of names and scroll down the list to find the headings you want to modify.
- For each heading:
- Highlight the name.
- Enter your new name in the lower data entry field.
- Click the Update button to save the changes in SapphireOne.
Action Page
Action Page Overview
The Action Page is a versatile tool that can be added to major records and transaction tables. It includes various actionable items such as Calendar Reminders, Meeting Invites, Alarms, Emails, To-Do Lists, General Notes, Private Notes, Meeting Notes with Date and Time, Start and Finish stamps, as well as All Day Notifications. This provides users with a centralised location to manage and organise their tasks, meetings, and notes, improving efficiency and productivity.
The Action Page allows users to use the add or delete buttons to add or delete actions as required. Simply select the relevant button to add or delete an action.
Diary Area
The Diary Area in SapphireOne provides users with a comprehensive range of options to customise their actions. It includes a sequence number, title, type, action, user, privacy settings, status, tag, and link fields.
- Sequence – SapphireOne automatically generates a unique sequence number for each action.
- Title – Enter a title for the action.
- Type – Choose from the customisable drop-down menu to input a type. This will subsequently become a permanent type within the drop-down.
- Action – Utilise the user-customisable drop-down menu to input an Action. This will then become a permanent action within the drop-down.
- User – SapphireOne automatically inputs the user creating this action, though it can be modified if necessary.
- Private – If this checkbox is selected, SapphireOne will only permit the specified user to view or modify this action.
- Status – The user has three options: Open, Hold, and Completed.
- Open – Action is open and active.
- Hold – Action is active, but no alarms will be active.
- Completed – Action is now Inactive and won’t be displayed in any list of actions.
- Tag – Users may attach a tag to an action, which will create a permanent tag within the drop-down. To add a new tag, type the name of the new tag into the tag box and press the tab key. Select “Yes” from the pop-up window to confirm. To remove a tag from the list, click on the tag name while holding down the Command (MacOS) or Control (Windows) key. Select “Yes” from the pop-up window to confirm the deletion.
- Link – When created within a transaction or record, SapphireOne automatically generates a link to the transaction or record. When created from the Options Menu, Palette, or Workbook, users must select an item or function from the drop-down menu to link the action. There are 12 items on this list, ranging from Clients to Manager.
Check List Area
SapphireOne offers a user-friendly checklist tool to create and track actions, allowing users to check off completed items as they progress.
Dates and Times Area
- Start/Finish – Set a Start and Finish time for the action, or select the checkbox for an all-day option.
- Completed – Entering a completion date for an action deactivates it, and it will no longer appear in action lists.
Alarm Area
Never forget a task again – set up alarms to send reminders via email at specific dates and times. Users can also receive email notifications with the provided email address.
Recurring Area
If necessary, the alarm can be set to recur at intervals selected from the Type drop-down menu. Additionally, the recurring period can be defined by date.
Notes Area
Click the green clock button to add time and date stamps to your notes. You can also customise the font, style, color, and background color of the text in the Notes area by highlighting it and right-clicking.
Invite Attendees Area
In the event module, you can invite multiple attendees to your event and track their acceptance or rejection of the invitation. You can also send them an email notification if their email addresses are provided. Additionally, you can manage and track attendees’ RSVP status in real-time.
Documents Page
Documents Page Overview
The Documents Page centralises document and information storage for transactions and master tables, streamlining organisation and management for easy access and improved efficiency.
Documents Area
The Documents Page simplifies file management by allowing various document types to be attached via drag and drop, including PDFs, spreadsheets, photos, and more. It provides a centralised location for document and information storage for transactions and master tables, streamlining organisation and management for easy access and improved efficiency.
Documents can only be attached once the corresponding record has an assigned ID.
Documents List Screen Options
There are eight buttons on the Document List screen, as follows:
- Open – Allows viewing of the currently selected document.
- Update – Prompts the user to import a new version of the selected document while maintaining links to any associated transactions.
- Scan – Accesses a scanner for scanning documents directly into the data file and linking them to the current transaction (requires a compatible scanner with software).
- Save – Saves the currently selected document.
- Link Document: Enables linking of the selected document to other transactions in the data file, presenting a popup for user selection.
- Link Document – Allows linking of an existing document in the data file to the current transaction or record, displaying a popup with a list of documents to choose from.
- Link Existing Document – Allows linking of an existing document in the data file to the current transaction or record, displaying a popup with a list of documents to choose from.
- Delete – Deletes the currently selected transaction or record.
- Add – Displays a search function for selecting a document from the local computer or device.
Details Area
The Details area allows users to add a custom name, description, and tags to each document, enabling easy search and location of specific documents. These details can be customised to meet the specific needs of the user or organisation, further improving the efficiency and organisation of the Documents Page.
Last Modified Area
The Last Modified section displays the date and time when the document was last modified, as well as the user who made the changes. This feature helps maintain accountability and enables efficient tracking of document modifications.
History Area
The History area records changes made to the document, including the date, time, and user who made the changes. This provides a valuable tool for tracking and managing document revisions.
Links Area
The Links area allows users to record links to other places where the document has been attached. Links can be added or removed using the (+) and (-) buttons, providing an efficient way to manage and organise related documents.
Notes Area
The Notes area allows users to add any relevant notes related to the document. Clicking the green clock button will add a date/time stamp, further improving document tracking and management.
Workflow Page
Workflow Page Overview
Before setting up any workflow functions, the Organisation Chart must be setup first. please read the article titled Organisation Chart.
The Workflow Rules function in SapphireOne enables users to establish rules and procedures for the approval and processing of transactions. You can create Workflow Rules in the following location: Utilities > Controls > Workflow Rules.
Once you’ve set up the Workflow Rules, they can be viewed from most Inquiry Lists in SapphireOne when a transaction is opened for viewing or modification. The Workflow Rules Page displays the rules applicable to the currently opened transaction. Users can view this page with the following restrictions:
- User Access – Although all users can view the Workflow Rules relevant to the currently opened transaction on screen, they are not allowed to modify the Workflow Rules.
- Workflow User – When the user responsible for performing a task for the transaction accesses the Workflow Rules Page, they can approve or reject the transaction for further processing.
In Management mode, you can access the Workflow Centre from the main menu: Management > Analysis > Workflow Centre.
To access this function, users must have the Workflow Centre item selected or ticked on the menus page in their User Access file. The Workflow Centre provides a list of all transactions in the data file that have a workflow restriction incorporated into them. This feature allows users or groups of users to manage all transactions with a workflow restriction or error placed on them.
A Workflow Rule must be set up before entering any transactions. The rule is embedded into the transaction itself upon entry and will persist even if the workflow rule related to the transaction is removed. If a workflow rule is modified and there are existing transactions that need the updated workflow rule applied to them, these transactions will have to be deleted and re-entered under the new Workflow rule.
Setting Workflow Rules in SapphireOne
Once you’ve created the stages, you can assign the appropriate user or group of users to each stage. SapphireOne allows for the creation of any number of groups with multiple users within each group, enabling various workflows and approvals to be applied to different transaction types or departments within a company. You can also set a time limit for each stage, which facilitates automated reminders to be sent to users who haven’t yet approved or notified the workflow rule.
SapphireOne has the capability to generate email notifications and reminders to be sent to users at each stage of the workflow process. These email notifications can be customised to include specific information about the transaction, such as the transaction ID, date, and amount.
Once a workflow rule has been created and applied to a transaction, it will be displayed on the Workflow Rules Page for that transaction. The user responsible for approving or notifying the workflow rule can access the Workflow Rules Page and take action accordingly. Once all stages of the workflow rule have been completed, the transaction will be authorised and can proceed to the next stage in the process.
Overall, setting workflow rules within SapphireOne provides a powerful tool for companies to manage their approvals and authorisation processes while also improving their efficiency and accuracy in handling transactions.
Workflow Example
Imagine you’ve set up a workflow rule with five stages. To progress from Stage 1 to Stage 2, it requires approval from a minimum number of users authorised to approve Stage 1, which could be set to 3 out of 5 users, for example. These authorised users can be assigned to a level within Stage 1, and you can choose to assign a type to the level, such as User, Level, or Creator. For each type, you can enable or disable checkboxes for Authorisation Required, Hierarchical Authorisation, and Email Notification.
Another example could be a workflow rule for Leave Requests. Stage 1 might involve an employee entering a Leave Request, which then moves directly to Stage 2, where the manager is notified. Stage 3 could involve HR approving the leave, and Stage 4 could be notifying the original creator (employee) whether their leave has been approved or not.
When a new transaction is created with a workflow rule, it will have an error status of “WF” and cannot be printed, converted, emailed, or posted until it has been authorised by the assigned user, group, level, or creator. If a transaction is rejected, it will remain in the list with an ongoing “WF” error status. It can then be left as is or deleted as needed.
For each rule that includes a Workflow entry, a user or group of users must be designated with a restriction, which will result in them generating all or some transactions with an error code of WF.
Moreover, a user or group of users must be set up to approve these transactions. The selection is made using the two checkboxes: ‘Authorisation Required’ and ‘Hierarchical Authorisation’.
Workflow Rules Details Page
The Change button, as seen in the screenshot below, is directly linked to the Organisation Chart function found in the Controls drop-down menu. The Organisation Chart function serves as a means to organise multiple users within a hierarchical group. This feature is further documented in a separate article on the Organisation Chart.
Details Area
The available options are as follows.
- Sequence – SapphireOne will enter a sequentially generated number, and it cannot be altered.
- Title – Enter a Name or Title for this workflow entry.
- Tag – Enter a Tag if required. Keep in mind that this list of tags can be set up by the user as needed.
- Company – SapphireOne should enter the company, but if it doesn’t, enter the company manually.
- Department – Enter a department if required.
- Transaction – Choose from the extensive list of transactions when the blue arrow is selected. For every type of transaction, the user can set up individual rules as needed.
- Rules Trigger – Next, select a rule from the Rules Trigger list box to be applied. Once the selected rule is violated, the workflow function will become active and activate the Workflow function.
- Transactions – The first three rules will generate a WF error if the user tries to Create a New Transaction, or Modify or Delete a transaction.
- Above $ – This option will generate a WF error when any transaction exceeds a specified dollar amount.
- Average Cost – Any transactions below average cost will generate a WF error.
- Credit Limit and Stop – These two options will generate a WF error when the conditions are met.
- Negative stock – Any transaction that takes inventory into a negative stock level will also generate a WF error if this option is selected.
- Leave Request – If any user makes a leave request, a WF error will be displayed, alerting the HR officer.
- Tracking Notes – This will generate a WF error, used to alert the user responsible for managing tracking notes.
- Bank Details – This is linked to SapphireOne’s G/L accounts that are bank accounts.
- Floor Price – When this option is selected, a WF error will be sent to the chosen user, allowing them to approve or disapprove the sale.
Workflow Stages
- Stages – Next, set the number of hierarchical stages that must be navigated before the WF error is removed. Each stage will occupy a column in each row in the flow list. Up to 6 stages or levels of authorisation are provided, although managing 6 levels could be challenging. To simplify it, entering the number 3 here will set up three columns in the flow area below with default headings.

- Single Stage – If only a single level of approval is required, leave the Stage set at 1 for a single level of approval. The flow area below will display just one item across the entire row, as seen to the right.

- Multiple Stages – If more stages or levels are required, enter a number from 2 to 6. The additional stages will be added as extra columns in the flow area, as seen to the right.
- Notes – Any notes for this workflow rule can be entered here.
Now that we have created a rule for a transaction, we need to select how it is to be applied. In the Flow area, enter the Users or the Level of users to whom the rule will be applied.
Flow Area
- New Button – To enter in a new event the following procedure must be followed.
- Column or Stage Selection – The user must first select the column and then click the New button in the top right-hand corner of the Flow area. SapphireOne will place the word “User” in the column that was selected.
- Multiple Stages – Repeat the procedures above for each column or stage in the workflow function. From now on, once one of the stages in the line has been selected, it will change to the orange colour, as seen below.
- Column or Stage Selection – The user must first select the column and then click the New button

- Stage Selection – The user must now select each stage in sequence and set up the following details for every stage.
- Stage – SapphireOne will add a suffix of the stage number to the name “Stage”. The user may then enter a column heading name for the stage if required.
- Type – The user has 2 choices here: Approve or Notify. If “Approve” is selected, the user will have to go through the approval process before the Workflow error is removed for them. If “Notify” is selected, the user will only have to open the transaction for viewing.
- Number – The number entered here indicates the number of users that have to approve this transaction before the WF error is removed from the transaction. Zero means none, and 5 means five. Be careful here, as the default is usually not wanted, so a number will have to be manually entered.

Party Group
For each stage, this area sets up the users and the tasks they are to perform for this Workflow function.
- Type – This will determine how the workflow rule will be applied as follows.
- User – When this option is selected, a data entry field will be displayed, allowing the user to enter a selected user’s ID, linking the rule to a single chosen user. Once a user ID has been selected, SapphireOne will display the selected user’s ID.
- Level – When this option is selected, the Change button will be displayed. When it is clicked, SapphireOne will display the organisational chart, allowing the user to select an organisational level for this rule to be applied to. Once a level has been selected, SapphireOne will display the name of the level selected.
- Creator – When this option is selected, SapphireOne will allow the creator of the transaction to process the transaction.
- Authorisation Required checkbox – This checkbox is crucial in relation to the Workflow Rules function. When selected, SapphireOne will enforce the WF error for the selection made in the Link radio buttons. If it is not selected, SapphireOne will allow the user to create and save transactions as listed without a WF error as normal. However, they will also receive the active message pop-up dialogue when there are transactions within SapphireOne created by other users that meet the criteria set up in the Workflow rule.
- Selected – Restricted saving of the selected transactions with WF error.
- De-Selected – All transactions saved normally and permission to approve selected transactions.
- Hierarchical Authorisation Checkbox –If this checkbox is selected, SapphireOne will allow anyone above the level that has been entered for the stage to authorise the transaction.
- Notes – Finally, enter any notes for this workflow entry.
Dictation and Speech to Text Overview
SapphireOne’s implementation of both Dictation (MacOS) and Speech to Text (Windows) is a game changer for data entry. Any data entry field you can type into using a keyboard can use this feature.
You can also use this functionality on all inquiry screens within SapphireOne. For example, the user is in a Contact within a Client. They may have made a phone call to that particular client using the Softphone technology. Consequently, this will automatically date and time stamp both the contact and the phone number you called.
As soon as the call is completed, the user has the ability to use Speech to Text (Windows) or Dictation (MacOS). They can dictate into the memo field of the CRM contact, adding as much description as they require.
Dictation and Speech to Text Procedure
This functionality applies across every single Data Entry screen. For example, the SapphireOne user is entering a Vendor Invoice (VI). Additionally, you may want to add a memo within the Vendor Invoice (VI). The user can utilise the tool and simply dictate the memo.
Another example is if the user wants to add additional lines to the General Ledger account, within each General Ledger account. When the user is completing data entry using a General Ledger, there’s always a unique memo field for each GL account line.
The user can then utilise this feature to quickly add the information they need to add. Alternatively, you may have an interview with an employee. After the interview process is completed, the user can then make notes about the employee.
Speech to Text or Dictation is an extremely powerful tool. It is something that we at SapphireOne, as well as our clients, utilise daily. It is a massive time saver.
Checking for WF Transactions
User Work Flow Alert – For any user required to approve workflow transactions, there will be an additional button displayed at the right-hand end of the toolbar, as seen here  .
.
When the user clicks this button , SapphireOne will display an alert dialogue indicating how many workflow transactions require their attention for processing.
Organisation Levels and Mixed Permissions
Note that the Organisation Levels referred to here are from the Organisation Chart function in the Controls drop-down menu.
When Organisational Levels are used when setting permissions for Workflow Rules, the Levels are not hierarchical. In the level above, a user will not have automatic authorisation permissions granted. If this were allowed, everyone above the working level would be viewing authorisation alerts, including the General Manager or CFO.
Authorisation may only be assigned at a particular level by selecting the Authorisation Required checkbox for any user or groups of users in SapphireOne.
If authorisation permission is to be set at the User Level, the users should not have the Rules Level set in their user file on the first page of a User Inquiry (Details Page). Care will also have to be exercised when Organisation levels are used with users on a user-by-user basis.
Probably the most common error when setting up this function is the creation of a conflict. For example, authorisation has been granted for Sales Managers and Authorisation Required for the user SapphireOne Sydney, who is also in the Sales Managers group. That is a direct conflict that must be avoided at all costs, as the user has been included as part of the Sales Managers level.
Do not mix permissions. Ensure that a specific user who is not allowed to authorise transactions does not also form part of any organisational level that may authorise transactions.
Workflow In Operation (Restrictions)
When a user creates a transaction and saves it, SapphireOne determines if a workflow rule should be enforced. If a rule is broken and the checkbox has been selected, SapphireOne proceeds to save the transaction with a status of “err” for error. The error code will be “WF” for Workflow, meaning that a user with appropriate authorisation must approve the transaction in order to remove the error code and enable further processing, as documented on the previous page.
From SapphireOne’s setup, there are two types of users who will require authorisation or be able to authorise transactions:
- User who initiates or creates the Transaction – The user’s ID will be recorded by SapphireOne, and they will be the only user to receive the Active Message pop-up for the transactions they create. Until a user actually creates a transaction, they will not receive any Active Message authorisation pop-ups. OR Specific Users, for example, SONE0 SapphireOne Syd, i.e., a new staff member whose transactions management wants to check before processing. They will also only receive the Active Message pop-up for the transactions they create.
- User Level – This is different, as it refers to a group of users who share the same Rules Level set in the first page of their User Access Inquiry. Once a transaction has been created by a single member of the Rules Level Group, all users in the same group will receive the Active Message pop-up. For example, if there is more than one user with a Level of Sales Manager set in their user file, they would all be presented with the Active Message pop-up.
Workflow In Operation (Approvals)
The rules for approvals follow the same logic as for restrictions, only in reverse. Some planning will be required when setting up the rules to ensure the desired outcome is achieved. If organisational chart levels are used throughout, and you have 100 sales staff and 1 sales manager set to authorise transactions, the Active Message pop-up will be displayed to all 101 users. This may not be the desired outcome, as it could lead to inefficiencies and unnecessary notifications for some users.
To prevent this issue, it is crucial to carefully plan and set up the Workflow Rules according to your organisation’s structure and requirements. You may choose to have specific users or levels to handle approvals, or you may implement a more hierarchical approach to ensure that only the necessary users are notified and involved in the approval process.
By carefully considering the organisational structure and the roles of each user in the Workflow Rules, you can create an efficient and effective approval process that meets the needs of your organisation without causing unnecessary confusion or delays in transaction processing.
Setting Up Rules
The Authorisation Required checkbox must only be selected for users who are permitted to authorise transactions.
There are three options for selecting users when setting authorisation rules, which are detailed below:
- User by User Basis: The user ID of each individual user must be entered. This option can be used in two ways: for a specific user who is authorised to approve transactions, or for a new staff member whom management wants to monitor by checking all transactions they create before further processing.
- Organisational Level Basis: This option can be used when a group of users is selected from the organisational chart. For example, all sales staff could be set up so that any transaction they create requires authorisation. However, it should be noted that this could create a problem where all sales staff are presented with an “Active Message” for every transaction created by any user in the sales staff group, which could become annoying.
- User Who Starts Transaction: This is likely the best option for setting authorisation rules. By not selecting the “Authorisation Required” checkbox, SapphireOne will require that all transactions be authorised, but only the user who created the transaction and any user with the checkbox selected will be presented with the “Active Message” popup.
Two Events per Rule
As shown below, for every rule set up, there must be a minimum of two events established. One that necessitates authorisation and one that doesn’t, as shown below. It’s not enough to have a WF error on a transaction; there must be at least one staff member who can authorise any WF transactions that are created.
Examples
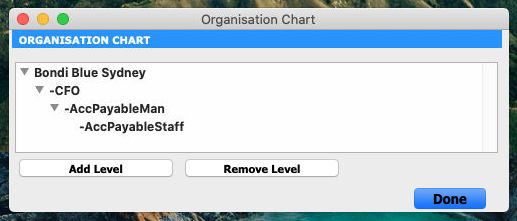
For every rule created, there must be at least two events set up: one that requires authorisation and one that does not. It is important to have at least one staff member who can approve any WF transactions that are created. From the Organisation Chart referred to above we will discuss three scenarios.
Scenario 1
- Sales Staff – Set up users performing sales or purchases in the AccPayableStaff level.
- The Authorisation Required checkbox is selected.
- Sales Managers- Set up one or more users as Sales Managers in the AccPayableMan level.
- The Authorisation Required checkbox would not be selected.
- End result – All sales staff will create transactions with a WF error requiring the Sales Manager to approve them. The Active Message alert will be displayed to the user who created the transaction and the Sales Manager. Even if another user modifies the transaction, only the user who created the transaction and the Sales Manager will receive notification messages.
Scenario 2
- User Who creates the Transaction- For the user who creates the transaction.
- The Authorisation Required checkbox is selected.
- Sales Managers- As above, set up one or more users as Sales Managers in the AccPayableMan level.
- The Authorisation Required checkbox would not be selected.
- End Result – All Sales staff will create transactions with an WF error requiring the Sales Manager to approve them all. The Active Message alert will be displayed to the user who created the transaction and the Sales Manager. Even if another user modifies the transaction the only user who receives notification messages will be the user who created the transaction and the Sales manager.
Scenario 3
- User – If necessary for any created transaction, a specifically selected user may be set up to receive notifications about all transactions with workflow errors. This Sales Staff user must not have a Level of Sales Staff set in their user file, or a conflict will arise.
- Select User from the Change button options.
- The Authorisation Required checkbox is selected.
- Sales Managers – Set up one or more users as Sales Managers in the AccPayableMan level.
- The Authorisation Required checkbox would not be selected.
- End Result – Only the Accounts Manager and the entered user will receive any alerts for Workflow.
Ensure that only one user has been granted authorisation privileges and does not belong to any other group or organisational level. If two specific users or levels have authorisation privileges, all of them will have to authorise transactions before the WF error code is released, unless they are part of an organisational level.
Note that many of the Tag Headings are user-configurable, so you can rename them to suit your needs.
To rename Tag Headings, follow these steps:
- Navigate to Utilities > Controls > Master Defaults.
- Select the appropriate function’s page.
- Click on the Tag Headings menu to open it.
- Double-click on the heading you wish to rename.
- Enter the new name for the heading and click OK.
- To create customised tag drop-down menus, simply enter a new item that is not currently on the list and then tab away. SapphireOne will prompt you to add the new tag to the list.
- To remove a tag, hold down the Control or Command key and select the tag you want to remove. You will be asked to confirm its removal from the list.
SapphireOne has a tag named HOLD integrated into it. When this tag is selected, the transaction cannot be posted until the HOLD tag status is removed or changed to a different status other than HOLD.
SapphireOne ensures that each transaction entry is complete and balanced before allowing any saving operation. When the ‘Out of Balance’ is at $0.00, the tick button  will activate in the top toolbar, indicating to the user that the transaction is ready to be saved. When multiple transactions are selected, the navigation buttons
  will also appear on the main toolbar.
There are three ways to save a transaction in SapphireOne:
- Select the activated tick button . This will save the current transaction and return the user to the main toolbar or the list. When multiple transactions are selected, the user may click on the tick button in the toolbar to produce the same result.
- Click on either of the forward or back arrow buttons

 . This will prompt SapphireOne to save the current transaction and open the next transaction in the list, ready for data entry or modification. Note that SapphireOne will move to the same page in the next transaction, such as from Terms page to Terms page, which is convenient when reviewing the same data in multiple items.
 - Press the Enter key on the keypad. SapphireOne will save the current transaction and open another transaction of the same type, ready for data entry. This is helpful when entering multiple transactions of the same kind, such as a Client Receipt followed by another Client Receipt.
Watch how to enter a Client Journal in SapphireOne Accounting Software
You can review our Blog and YouTube channel for additional information and resources on SapphireOne ERP, CRM and Business Accounting software.