SapphireOne Web Pack Configuration Overview
This resource is designed to assist your organisation’s IT network administrator in effectively setting up and managing the SapphireOne Web Pack environment. The guide is divided into four key sections, each focusing on different aspects of the server configuration to ensure a smooth and efficient operation.
Web Pack Master Default Settings – This section provides detailed instructions on how to configure the default settings for the Web Pack. It is crucial to establish these settings correctly as they serve as the foundation for server operations and user interactions.
Web Server Local Network Access – Here, we explore the necessary steps to access SapphireOne within your organisation’s local network. This includes configuring internal IP addresses and ensuring proper network permissions are in place.
Web Server Remote Access – This part of the guide outlines the procedures for setting up remote access to SapphireOne. It covers the requirements for a fixed IP address and public IP configuration, along with the setup of port forwarding within your local network. This enables users to access SapphireOne from any location over the internet using a modern web browser.
Enabling Menus for Web Pack Users – The final section discusses how to customise and enable specific menus and functionalities for Web Pack users. This ensures that each user has access to the necessary tools and features required for their role within your organisation.
Each section of this guide is designed to provide you with clear and concise instructions to help you manage and optimise the use of SapphireOne Web Pack in your organisation. Whether you are setting up the server for the first time or looking to enhance existing configurations, this guide is an essential resource for ensuring effective deployment and utilisation of the SapphireOne Web Pack.
SapphireOne Web Pack Master Default Settings
Before the Web Pack interface is first used, settings in Master defaults must be checked and altered as required. Using Client Server mode go to Utilities > Controls > Master Defaults > Webpack Page.
It should be noted that the settings in some areas on this page will require routine maintenance from time to time especially if the pre-ordering functionality is used.
The WebPack Page is the sixteenth option in the page drop down list in the Master Defaults function.
Web Pack Page General Area
- Touch Style – Selecting this checkbox will tell SapphireOne to switch from normal sales entry procedure to touch screen style.
- Session Expire Time – This data entry field sets the time in minutes before the local device disconnects the current session from the server. (Standard security procedure).
- Default Printer – If necessary a default printer may be entered in the data entry field.
- Visitor Host Table – For security reasons access to the web pack from the internet the may be set as an employee or a visitor which allows different levels of access into the web pack function.
- Visitor Procedure – If a visitor is using the web pack they may need some instructions so these may be entered in the Visitor Instructions data entry area.
Web Pack Page Inventory Area
- Pre Order Season – This data entry field is directly linked to a data entry field in the first page of an inventory inquiry the grouping area. The first three items in the list are tags which have been re-named as seen in the screen shot above. The Pre Order Season when a valid season is entered will restrict web pack users to only see those inventory items with the matching Pre Order as entered above.
- Pre Order Selection – This data selection field may also be used to reduce the number of inventory items in the list even further by selecting a Class or one of the Inventory tags from the drop-down list as seen to the right.
- Customer Order Message – This text field may use to automatically attach a message to order taken while using the Web Pack
- Display Inventory Available On Current Order List – When this checkbox is selected only Inventory items available for delivery now will be displayed in the current order list.
- Display Invoice Item As Name On iPhone – When this checkbox is selected SapphireOne will the Invoices item name as its name on an iPhone instead of the Inventory ID.
- Scan/User Entry – By default this radio button is set on User Entry. The user will have to enter all inventory items by keyboard entry. If Scan has been selected and the device is able to scan bar codes, the user may then scan items into SapphireOne using barcodes.
- Delivery/Arrival Show Only User Location Items – When this checkbox is selected SapphireOne will only display to the user the items linked to the location that he is logged in to.
- Include Transfer On Arrival – When this checkbox is selected SapphireOne will show the TGJ on arrival. Any stock that has not arrived will have its value adjusted automatically.
- Sales Invoice Record As POS Invoice – When this checkbox is selected, any Sales Invoice’s, SCI’s will automatically be saved as a POS invoice a TCI.
- Modify Order On History Order Form – To be adivsed
- Favorite Base On – SapphireOne will create a list of favorites for each user. It bases the criteria for this from the selection made by the user form this drop down menu. The options are, ID, Class, Area, Tag1, Tag2 or Tag3.
- Delivery Check Packing Slip – This item allows the user to select the default printing option when a Deliver Check Packing Slip is processed
Web Pack Page Web Report Variable Heading Area
There are number of headings that may be customised in the Web reports and these headings are set up here as required. This the same as in other areas of SapphireOne. Find the heading in the Web Pack, then return here and enter in the new heading that is required.
SapphireOne Web Pack Local Server Access
A local network is a network that starts with an IP address of 10.x.x.x, 192.x.x.x or 172.x.x.x. By convention these addresses are not allowed to pass through any router on the internet keeping them as local/private networks. LAN’s (Local Area Networks).
The connection may be either wired through an ethernet connection or a local wireless (wi-fi) connection. The wireless connection could be used if employees were picking stock in a warehouse. They would have access to the data file as defined by the permissions set in their user file. As outlined in Enabling Menus for Web Pack Users.
SapphireOne Web Pack Remote Access
The SapphireOne Web server can be accessed on premises, and also remotely over the internet which we will outline here. This access would be established by your organisations IT network administrator, and is not the responsibility of SapphireOne. Very little setup is needed as a registered domain on the web is not required.
A Fixed IP Address on the local network in combination with your companies public IP address is essential. The traffic to the Web server would require that Port forwarding be set up within the company’s local network to the machine running the company’s data file.
Once this is established any device with a modern web browser and internet access may be used. Safari or Chrome browsers are recommended as they have been confirmed by us for compatibility.
The actual data that is displayed to the Web Pack user, used to be different as there was a large difference between what a telephone could display and a computer or a laptop. As of 2023 these differences have largely disappeared so that now a single web interface is utilised across all of these devices.
When the users login credentials have been verified, and the data file is initially accessed, SapphireOne will display the navigation page as seen below.
Enabling Menus For SapphireOne Web Pack Users
User Access in the SapphireOne Web Pack
The SapphireOne Web Pack allows unlimited users to access parts of the live data file from any browser enabled device in real-time. The Web Pack provides users with access to a selection of menus available with the SapphireOne Client Server and user access is easily controlled by the administrator, who has the ability to manage access and permissions to all areas of the Sapphire Web Pack. SapphireOne will then only display those menu items that are enabled/selected in the individual users file.
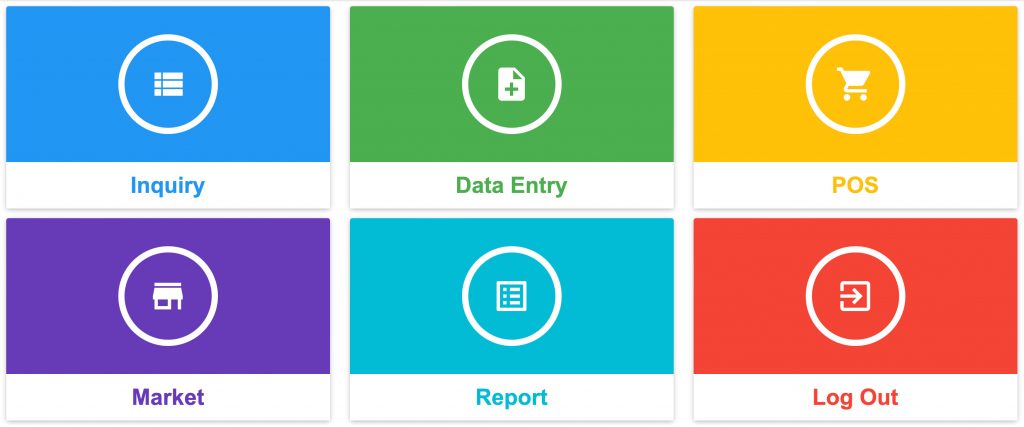
The full list of items that are allowed is displayed below. These are Inquiry, Data Entry, POS, Market and Report.
User access selections are set up by going to Utilities > Controls > User Access Inquiry > SapphireOne Web Pack Page. In the User File Web Access Page displayed below, only three items have been selected, which includes Clients, Customer Order and Tracking Notes.
Once saved, SapphireOne will then only display to the user the menu items that the user requires to perform their selected tasks in SapphireOne. If the user has Administrator access they will automatically have access to all of the items that are able to be accessed from the Web Pack.
The items that are on the main menu and the drop down menus will then alter to reflect the features that have been made available in the users SapphireOne Web Pack user access page as seen below.
For a user who has Administrator access to the data file, the menus will be complete plus one additional menu option ‘iNavigation’ under the Inquiry menu tab. The iNavigation button is only used by Administrators to see what the menus will look like when viewed on a mobile device.
You can review our Blog and YouTube channel for additional information and resources on SapphireOne ERP, CRM and Business Accounting software.