Sapphire Custom Reports Overview
The Sapphire Custom Reports feature allows users to create a myriad of different reports from all available data tables and fields from within SapphireOne. Sapphire Custom Report allows for the customisation of both the presentation and data displayed in a report to fulfill a company or organisations unique requirements. SapphireOne provides this facility to enable unhindered access to your entire SapphireOne data set, and in combination with powerful custom scripting features Sapphire Custom Report allows for virtually unlimited additional customisation when required. This is highly valuable for example when incorporating arithmetic functions for data visualisation in the output, for the identification of changes to patterns, ranking, sorting and filtering.
In regards to design capabilities, Sapphire Custom Reports provides pixel-perfect layouts that allow for the creation of consistent report layouts that adhere to your company or organisations existing branding/style guide requirements.
Build the specific reports you need for your business: Sales Quotes, Sales Orders, Sales Invoices, Purchase Order Invoices, Receipts, Remittances, Payslips, Human Resource Reports, Financial Reports. The possibilities are endless.
Sapphire Custom Reports Page
Sapphire Custom Reports Query In Page
Once a Report has been selected for editing or customisation the user will be presented with the following Sapphire Custom Report Query In Page that will allow the user to complete a custom query for desired items to test the report.
Scripts are utilised when setting up custom reports in SapphireOne. The scope of these scripts are not limited and if written improperly, can compromise your data file. For this reason your live data file SHOULD NOT be used when creating or setting up Custom Reports. A copy of an existing data file should be used and run up in single user mode.
Sapphire Custom Reports Editor Page
After the user has completed their custom queries selections, they will be directed to the Sapphire Report Editor Page as seen below, where the user has full control over the design of the report.
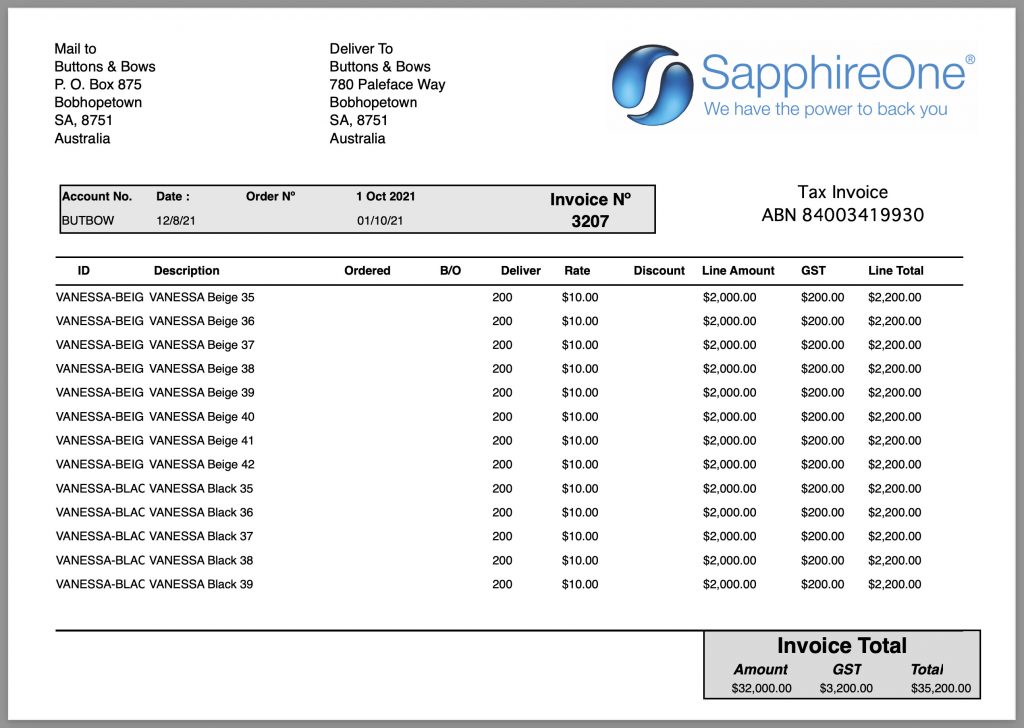
And below is a report produced by the Custom Report Editor as setup above.
Main Menu Toolbar Custom Reports
There are a number of items on the main editor toolbar and these are File, Edit, Insert and Test. The options available within the drop down menus are as follows.
File Menu
- New – Selecting this option will commence the creation of a new Custom Report with a blank page.
- Open – Selecting this option will tell your operating system to look or browse for a file, so that an existing report saved as an XML file may be imported into a Custom Report. This can be used as either a template for a new Custom Report or to replace (overright) an existing Custom Report.
- Save – Selecting this option will tell SapphireOne to save the report directly into the data file. After saving the document history will no longer be accessible using the undo command.
- Save to Disk – Selecting this option will tell the operating system to display the save function so that the user may select a location to save the currently displayed Custom Report. It will be saved in XML format.
- Revert to Original – Selecting this option will tell SapphireOne to revert the report back to the state it was when opened.
- Close – When this option is selected SapphireOne will display an alert asking to save any changes. This same alert will also be displayed when the red ‘close’ button in the top corner of the screen is selected in either a Mac or Windows.
If you have done something that you cannot fix, select the No option documented above, and all changes made since the report was first accessed will not be saved. Select Yes and the report will be saved in its current state. Revert to Original does the same but does not close the report editor window allowing you to recommence without needing to reopen the editor.
Edit Menu
The edit menu is identical to other functions in various parts of both the Mac and Windows operating systems, with options such as undo, redo, cut, copy and paste. It should be noted that if you are attempting to perform one of these actions from another menu in SapphireOne and it does not work, try selecting the action from the Edit menu.
Insert Menu
This menu allows for the insertion of additional Header and Footer sections to the report.
Think carefully before you insert any of these additional sections in the Sapphire Custom report as once they have been inserted into the report they cannot be removed. You can give them a height of zero which will make them invisible or hide them but once installed they cannot be removed!
A new report has the following sections by default.
- Header – The Header sits at the top of the report and contains items like Addresses, Logos, Customer and Vendor details to name a few items
- Body – The Body of the Custom Report usually contains the lines that go to make up the custom Report.
- Footer – The Footer is where banking details as well as other items relating to the Custom Report may be printed.
- Multiple Items – Multiple headers, Break Headers, Footers and Break Footers may be added with this menu and this is the only menu where they may be added.
Test Menu
SapphireOne requires a transaction to display the details on a page so that the user may check the accuracy and placement of the various details on the printed page. The four items on this menu provide for the selection and the viewing of the placement of data on the printed page as follows.
- Query Record – While will offer the user the opportunity to perform a detailed query as the custom report is first being opened, the user may also select the transaction or record for testing by going to this Test menu and select the Query Record item. SapphireOne will then display the Detailed Query function enabling the user to select the record for testing and viewing. If you do not select a record you will be warned that it will be opening x number of records and in some cases, this will be in the order of hundreds of records.
- Print – Use this option for Windows when creating a pdf for viewing and checking. The user will have a couple of additional mouse clicks to get to the viewing of a pdf. (See below for the Do no use Print preview below).
- Print Preview – Use this option for a Mac. SapphireOne will present the preview function immediately without the need for additional clicks of the mouse.
- Test HTML – Once this option is selected SapphireOne will generate a html version of your report. It will then open your systems default web browser to allow the preview of the report in html. This will typically be used for email distribution.
New Custom Report Page Layout
The Sapphire Custom Report feature also allows users to create their own report from scratch. This gives users full control over customisation, with hundreds of customisable features.
Left Side of the Custom Reports Editor
On the left side of the screen are the tools for placing and modifying various types of objects on the Custom Report. These tools are common to all areas of the editor. Therefore they are not altered as each section of the report is selected. These objects all have attributes which may be set using the Object Attributes available on the right side of the editor. These Object Attributes from the right side of the editor will be documented to follow.
There are three groups of icons down the left hand side of the editor. The group at the top is used for the selection of the type of object that is to be placed in the report. The middle group is for alignment of each object wile the last group is for pixel-perfect placement of objects on the printed page.
Object Types
There are various different objects for users to customise and control in the Sapphire Custom Report interface. Through combining different options, users are able to create hundreds of different combinations and develop reports specific to their requirements.
Select Object
The ![]() white Arrow (Select) button is used to place the cursor on the report. To place an object on the report
white Arrow (Select) button is used to place the cursor on the report. To place an object on the report
- Select the appropriate icon. It will then turn dark indicating that it has been selected.
- Draw a frame for the object on the Custom Report. As soon as you release the mouse the previously selected icon will resume its normal color. SapphireOne will then automatically return the cursor to the Select option which is the normal pointer.
Text Object
When the ![]() Text button is selected, this will allow the user to insert a text object by dragging out a rectangular marquee on the editor. Text may then be entered into the object by entering it into the data entry field on the right-hand side of the editor. Normal attributes may be set up for the text in the marquee as well as the background colour as follows. Note that text objects have a Red border around the object itself and the object attributes area as well for easy identification.
Text button is selected, this will allow the user to insert a text object by dragging out a rectangular marquee on the editor. Text may then be entered into the object by entering it into the data entry field on the right-hand side of the editor. Normal attributes may be set up for the text in the marquee as well as the background colour as follows. Note that text objects have a Red border around the object itself and the object attributes area as well for easy identification.
The Text Object Attributes are as follows.
- Type – This field displays the type of object that has been selected and is not user modifiable. (Text).
- Visible Checkbox – The
 by default is set visible. Objects may be made invisible if required.
 - Object Behavior Menu – This menu has 3 options as follows for its Behavior on the page.
- Normal – The default setting has no additional behavior for the object.
- Repeat – Some objects must have a repeating attribute selected from a drop-down menu. These are mainly used in the body area and are used when multiple lines are in the report. A list of transactions is one example.
- The report prints each line in the report until it has printed them all, or it breaks to the next page and continues printing the lines there until all lines in the report have been printed.
- This is one reason why footers and headers have a number of options for printing on certain pages. If SapphireOne inserts a break in the page, a different header and footer may be setup on the page break and a final footer for the last page only in the report.
- Offset – When a line is repeated there has to be a method of adding spacing between rows of data. By increasing the number here, the rows of data will be printed further apart. This could be for cosmetic reasons, or if the rows of data overlap and additional spacing is required.
- Grow To Bottom – When this is selected to object will grow to fill the page if space permits.
- Content – The content for your text object is entered here. Standard formatting procedures are accepted and a Carriage return is all that is required to place multiple lines in the text box.
- Hyper Link Checkbox – Select this checkbox if the text box is to be a Hyper link.
- Multi Style – Please check with SapphireOne support team before using this feature.
- Auto Grow Checkbox – If this checkbox is ticked the editor will extend the object downwards if space permits.
- Font & Size Selection – The options from Font and Font Size through to Text colour options are consistent with most word processor applications and therefor will not be documented in detail here.
- Object Background Colour – Background colours for the text object may also be selected.
- Transparent Checkbox – If the text object is in front of another object and its background color is to be printed the user has the option of selecting the
 check box and making the background of this object transparent. This is useful when it is in front of a coloured box which dictates the background for the object.
 - Script – If required, an individual script may also be added to any Text Objects in the report.
Variable Object
When the ![]() New Variable button is selected, this allows the user to insert an object that a variable may be linked to. This variable may then be linked to an array. Alternatively, the user may make a selection from the menu associated with the Source data entry field. For most variable items, some formatting of the data entry will be required in the Format data entry field. For details on number formatting please refer to the section to follow on formatting numbers. Note that Variable objects have a Red border around the object itself and the Object Attributes area as well for easy identification.
New Variable button is selected, this allows the user to insert an object that a variable may be linked to. This variable may then be linked to an array. Alternatively, the user may make a selection from the menu associated with the Source data entry field. For most variable items, some formatting of the data entry will be required in the Format data entry field. For details on number formatting please refer to the section to follow on formatting numbers. Note that Variable objects have a Red border around the object itself and the Object Attributes area as well for easy identification.
The Variable Object Attributes are established as follows.
- Type – This field displays the type of object that has been selected and is not user modifiable. (Var)
- Visible Checkbox – The by default is set to visible. Objects may be set to invisible if is required.
- Object Behavior Menu – This menu has three options as follows for the object in the Custom Report.
- Normal – The default setting no additional behavior for the object.
- Repeat – Some objects must have a repeating attribute selected from a drop-down menu. These are mainly used in the body are and are used when there are multiple lines in the report. A list of transactions is one example.
- The report prints each line in the report until it has printed them all, or it breaks to the next page and continues printing the lines there until all lines in the report have been printed.This is one reason why footers and headers have a number of options for printing on certain pages.
- If SapphireOne inserts a break in the page, a different header and footer may be setup on the page break and a final footer for the last page only in the report.
- Offset – When a line is repeated there has to be a method of adding spacing between rows of data. By increasing the number here, the rows of data will be printed further apart. This could be for cosmetic reasons, or if the rows of data overlap, and additional spacing is required.
- Grow To Bottom – When this is selected to object will grow to fill the page if space permits.
- Source – This can be an array from the list that is at the end of this article, or the user may select a table from the left hand drop down menu (arrow), then select a cell from that table.
- Format – There are four options for this item as follows.
- Date – There are ten options provided for selecting the date format.
- Time – There are ten options provided for selecting the Time format.
- Picture – There are six options for the insertion of a Picture.
- Number- There are a number of options for formatting numbers. Please read the additional information ticle.
- Multi Style – Please check with SapphireOne support team before using this feature.
- Auto Grow Checkbox – If this checkbox is ticked the editor will extend the object downwards if space permits.
- Font & Size Selection – The options from Font and Font Size through to Text colour options are consistent with most word processor applications and therefor will not be documented in detail here.
- Object Background Colour – Background colours for the text object may also be selected.
- Transparent Checkbox – If the text object is in front of another object and its background color is to be printed the user has the option of selecting the check box and making the background of this object transparent. This is useful when it is in front of a coloured box which dictates the background for the object.
- Script – If required, an individual script may also be added to any Text Objects in the report.
Field Object
When the ![]() Field button is selected, the user will be able to insert an object that displays a pre-defined field from a cell in your data file. This is mainly used for fields that do not normally change in a report for example address and delivery details.
Field button is selected, the user will be able to insert an object that displays a pre-defined field from a cell in your data file. This is mainly used for fields that do not normally change in a report for example address and delivery details.
Script may also be written so that this field will display dynamic text. For example, the one report could be used for Quotes, Orders and Invoices by writing a script that changes the text in a few of these fields. Note that the Field objects have an Orange border around the object itself and the Object Attributes area as well for easy identification.
The Field Object Attributes are as follows.
- Type – This field displays the type of object that has been selected and is not user modifiable. (Field)
- Visible Checkbox – The by default is set visible. Objects may be made invisible if is required.
- Object Behaviour Menu – This menu has 3 options as follows for this object in the Custom Report.
- Normal – The default setting no additional behaviour for the object.
- Repeat – Some objects must have a repeating attribute selected from a drop-down menu. These are mainly used in the body are and are used when there are multiple lines are in the report. A list of transactions for example.
- The report prints each line in the report until it has printed them all, or it breaks to the next page and continues printing the lines there until all lines in the report have been printed.This is one reason why footers and headers have a number of options for printing on certain pages.
- If SapphireOne breaks the page, a different header and footer may be setup on the page break and a final footer for the last page only in the report.
- Offset – When a line is repeated there has to be a method of adding spacing between rows of data. By increasing the number here, the rows of data will be printed further apart. This could be for cosmetic reason, or if the rows of data overlap and additional spacing is required.
- Grow To Bottom – When this is selected to object will grow to the bottom if space permits.
- Source – This can be an array from the list that is at the end of this article or the user may select a table from the left hand down arrow, then select a cell from that table.
- Format – – There four options for this item as follows.
- Date – There are ten options provided for selecting the date format.
- Time – There are ten options provided for selecting the Time format.
- Picture – There are six options for the insertion of a Picture.
- Number- There are a number of options for formatting number. Please go back and read the additional information below.
- Multi Style – Please check with SapphireOne support team before using this feature.
- Auto Grow Checkbox – If this checkbox is ticked the editor will extend the object downwards if space permits.
- Font & Size Selection – The options from Font and Font Size through to Text colour options are consistent with most word processor applications and therefor will not be documented in detail here.
- Object Background Colour – Background colours for the text object may also be selected.
- Transparent Checkbox – If the text object is in front of another object and its background color is to be printed the user has the option of selecting the check box and making the background of this object transparent. This is useful when it is in front of a coloured box which dictates the background for the object.
- Script – If required, an individual script may also be added to any Text Objects in the report.
Rectangle Object
When the ![]() Rectangle button is selected, the user may insert a rectangle as a design element. The lines of the rectangle may be set as visible or invisible, non-printing. Line colour and thickness are user settable. A fill colour may also be selected. A common use is to make the rectangle a color then place objects on top of it. This would the print as a coloured background with other text fields, headings for example, sitting above it.
Rectangle button is selected, the user may insert a rectangle as a design element. The lines of the rectangle may be set as visible or invisible, non-printing. Line colour and thickness are user settable. A fill colour may also be selected. A common use is to make the rectangle a color then place objects on top of it. This would the print as a coloured background with other text fields, headings for example, sitting above it.
The Rectangle Object Attributes are as follows.
- Type – This field displays the type of object that has been selected and is not user modifiable. (Rect)
- Visible Checkbox – The by default is set visible. Objects may be made invisible if is required.
- Object Behavior Menu – This menu has 3 options as follows for the object in the Custom Report.
- Normal – The default setting no additional behavior for the object.
- Repeat – Some objects must have a repeating attribute selected from a drop-down menu. These are mainly used in the body are and are used when there are multiple lines are in the report. A list of transactions for example.
- The report prints each line in the report until it has printed them all, or it breaks to the next page and continues printing the lines there until all lines in the report have been printed.This is one reason why footers and headers have a number of options for printing on certain pages.
- If SapphireOne break the page, a different header and footer may be setup on the page break and a final footer for the last page only in the report.
- Offset – When a line is repeated there has to be a method of adding spacing between rows of data. By increasing the number here, the rows of data will be printed further apart. This could be for cosmetic reason or if the rows of data overlap and additional spacing is required.
- Grow To Bottom – When this is selected to object will grow to the bottom if space permits.
- Line Color – Click on the box next to the heading. A Choose Color for Line option will be displayed enabling the user to select a color for the line
- Line Thickness – Select and enter a number for the line Thickness.
- Fill Checkbox – By default this in not selected so the rectangle will be transparent. When the checkbox is selected the rectangle will be filled with a black color by default.
- Fill Color – Click on the box next to the heading. A Choose Color for Fill alert will be displayed enabling the user to select a color for the color of the fill.
Oval Object
When the ![]() Oval button is selected, the user may insert a circle or oval that has the exact same attributes as the rectangle documented immediately above. The only difference is that the Type will be set as Oval.
Oval button is selected, the user may insert a circle or oval that has the exact same attributes as the rectangle documented immediately above. The only difference is that the Type will be set as Oval.
Line Object
When the ![]() Line button is selected, the user may insert a line that has the exact same attributes as the rectangle documented immediately above. The only difference will be that the Type will be as Line.
Line button is selected, the user may insert a line that has the exact same attributes as the rectangle documented immediately above. The only difference will be that the Type will be as Line.
Horizontal and Vertical lines may be forced by selecting line widths of 1 or 0, zero. in the precision alignment area in the bottom left-hand corner of the Custom report.
Picture Object
When the ![]() Picture button is selected, the user may draw a box that will contain a picture. They would then select the
Picture button is selected, the user may draw a box that will contain a picture. They would then select the ![]() button. The operating system will ask for the location of the picture file. Most common formats may be used jpeg, tiff etc but some limitations apply particularly to size.
button. The operating system will ask for the location of the picture file. Most common formats may be used jpeg, tiff etc but some limitations apply particularly to size.
The Picture Object Attributes are as follows.
- Type – This field displays the type of object that has been selected and is not user modifiable. (Pic)
- Visible Checkbox – The by default is set visible. Objects may be made invisible if is required.
- Object Behavior Menu – This menu has 3 options as follows for the object in the Custom Report.
- Normal – The default setting no additional behavior for the object.
- Repeat – Some objects must have a repeating attribute selected from a drop-down menu. These are mainly used in the body are and are used when there are multiple lines are in the report. A list of transactions for example.
- The report prints each line in the report until it has printed them all, or it breaks to the next page and continues printing the lines there until all lines in the report have been printed.This is one reason why footers and headers have a number of options for printing on certain pages.
- If SapphireOne breaks the page, a different header and footer may be setup on the page beak and a final footer for the last page only in the report.
- Offset – When a line is repeated there has to be a method of adding spacing between rows of data. By increasing the number here, the rows of data will be printed further apart. This could be for cosmetic reason or if the rows of data overlap and additional spacing is required.
- Grow To Bottom – When this is selected to object will grow to the bottom if space permits.
- Load from Disk – To load a new picture select this button. Your operating platform will display a search for file option enabling the user to select the picture that is to be installed in to the new picture object.
- Save to Disk – The reverse of above, enable the user to save the current picture in the picture Object to disc.
- Picture Original Dimensions – The editor will display in pixels the dimensions of the current picture in the object.
- Format – Some care will have to be take as some of these options will scale the picture according to the dimensions of the Picture Object so that the aspect ratio will be distorted. Select the item that best works for you.
- Truncated Centered – SapphireOne will truncate and center the picture.
- Scaled to Fit – SapphireOne will scale the picture to fit in the picture object. Watch the aspect.
- On Background – The image will be in the object but any background with it will be transparent.
- Scaled to fit Proportional – Will be scaled to fit the shortest direction in the object.
- Scaled to fit Prop Centered – Scaled to fit but will be centered.
Object Alignment
- Object Layering Management – This group of icons performs the task of aligning groups of objects and the manner in which they overlay each other. This overlay of objects is initially determined by the order in which they are entered into SapphireOne. Those loaded first will be at the rear while those loaded last will be at the top level.
- Forwards – Selecting this
 Forward button will cause the selected object to be brought forward of other objects one level at a time.
- Backwards – Selecting this
 Backwards button will cause the selected object to be sent behind other objects one level at a time.
 - Alignment – The remaining icons in this group are used to align objects.
- Multiple Objects – First select multiple objects by holding down the Shift Key, and then using the mouse to select the objects that are to be aligned.
- Icon Selection – Then click on the icon that will perform the action that you want. The options are Left, Top, Centered Vertically, Centered Horizontally, Right and Bottom.
- Forwards – Selecting this
Object Precision Positioning
- Numerical Size for Distance – It should be noted that all measurements used in Sapphire Reports are in points, an A4 page being 842 by 595 points so when precise adjustment of objects is required this area is used.
- Single Object – For example, if a single object is selected and the first icon at the top is selected, the objects left side will be the as entered number of points from the left side of the report. If a group of objects all of the same type are selected, SapphireOne will place them all the same as entered number of points from the left of the report. Note that they must all be the same type!
- Common uses – One of the most common use of an icon in this area is the second icon, distance to top option. This will set all the selected objects the same number of points from the top of the Sapphire Report. This is very handy when doing a final precision alignment of a group of objects in the Body section.
- Position Fields – Each of these icons performs a point by point setting for objects on the page as follows.
- This field
 sets the distance to the Left side of the page for the selected object or objects.
 - This field
 sets the distance to the Top of the page for the selected object or objects.
 - This field
 sets the distance to the Right side of the page for the selected object or objects.
 - This field
 sets the distance to the left of the page for the selected object or objects.
 - This field
 sets the overall Width of the selected object or objects.
- This field
- Zoom Buttons – The two buttons
 are for re-sizing the editor itself. When it is difficult to get exact alignment, the user may make the editor much larger making it easier to precisely place objects on the page or in my case be able to read it. It also helps when searching for objects that have been moved off the page.
Formatting Numbers
The formatting options for numbers in Custom Reports is now consistent when currency settings are set up in SapphireOne. Most countries use the $ symbol other currency symbols are already in SapphireOne.
There are a number of default options when selecting formatting of numbers and choosing one of these will tell SapphireOne to print the data entered into the report as seen below. You can alternately create your own if required.
This should take most of the work out of setting up number formatting.
- ###,###,##0.00;-###,###,##0.00;0.00 will print 123,456,789.00 or -123,456,789.00
- ###,###,###;-###,###,###; will print 123,456,789 or -123,456,789
- $###,###,##0.00;($###,###,##0.00);0.00 will print $123,456,789.00 or (123,456.789.00)
- $###,###,###;($###,###,###); will print $123,456,789 or ($123,456,789)
- ###0.00%;-###0.00%; will print 12.34% or -12.34%
- ###0%;-###0%; will print 12% or -12%
These options may be used as is or modified to suit the user’s requirements and they probably will have to be altered as they are mainly to be used as a template to assist the user when setting up the formatting of the report. Although the user may still have to make some minor changes as needed.
SapphireOne will replace the # symbols with data or values from the data file and all other characters entered will be printed as they are entered into this formatting data entry field.
The ; semi colon symbol is used by SapphireOne to identify how to print the values, positive, negative or zero. The first group before the semicolon is positive, the second is negative and the last group after the semicolon zero or after the decimal point!
Formatting Zero Values or balances
The user also has the option of printing anything they like when a zero balance is encountered and this is commonly the default by SapphireOne 0.00. However as SapphireOne will use whatever is entered after the second semicolon, anything can be entered here, 0.00, Zero, None or nnnnn.
When something has a zero value SapphireOne prints it as entered after the second semi colon.
Entering $0.00 will print exactly as entered $0.00. If you want SapphireOne to print nothing at all, simply leave all after the second semi colon blank! Again using our example above this option would be reduced to $###,###,##0.00;($###,###,##0.00); SapphireOne would still print values to the second decimal point for positive negative values but when a zero balance was encountered it would print it as entered, nothing.
Right Side of the Custom Reports Editor
The right-hand side of the editor displays data entry fields that are used for the currently selected section of the report. These sections are, Report Properties, Header, Break Header, Body, Totals, Footer and Break Footer.
On initially opening any Custom Report the editor will by default display the Report Properties option for the Custom Report. All reports by default have a Header, a Body and Footer areas. To return to these default options for the report as a whole, select the Report Properties option at the top of the table.
Individual Objects
Once each area has been selected and opened, all objects under the Report Properties item may be seen in the list. Each area may be expanded to show a list of all objects in the selected area. They are listed in the order that they are to be printed and every single object is listed.
These objects may be selected from this window and when selected will be displayed in the same manner as when selected with the mouse. The handles on each corner and centre line which appears as 8 dots. around them. This is particularly useful when an object has become hidden below other objects and needs to be located and selected. It is also a means of checking that there are no hidden items in the report which may cause print errors.
We will commence with the Report Properties attributes and then document each object individually. The user will note that for every object there will be common attributes plus some attributes that are specific.
Report Properties Attributes
When Report Properties is on screen SapphireOne displays attributes for the Custom Report as a whole.
The user must set up attributes in the Custom Report for your operating platform, (Mac or Windows), so that it will correctly print the Custom Report. A Starting Script is always required and Scripts may be entered for the Body as well as an End Script which runs post printing. If you have moved on to editing other sections of a Custom Report and you want to return to these proprtties, select the Report Properties folder in the top right-hand corner of the editor
The Report Properties are as follows.
- Record per page checkbox – Please ask SapphireOne support team about this function.
- Source – Three Options are available as follows
- Table – This default option tells SapphireOne to display a second list enabling a table to be selected.
- Array – This option tells SapphireOne to expect an Array to be entered.
- Fixed – When you select fix the user
- Paper – The data entered here dictates to SapphireOne the desired print settings as follows.
- Paper Dimensions – Paper Width 595 by Height 842 is for Portrait printing. 842 by 595 is for Landscape.
- Margins – The margins around the edge are set in pixels. Left, Right, Top and Bottom.
- Setup – A very important item to note is the
 button. When a new report is being used for the first time, or imported into SapphireOne, this button should be selected and the print properties checked for your operating system as follows.
- Select the printer from the drop-down menu, then Landscape or Portrait modes, and any other parameters for your printer that will be required.
- It is then highly recommend the user print at least one report out to PDF. It is not until a report is actually printed that the printer settings can be visually checked.
- Scripts – If modification of a script is required it it is recommended the user select all of the script then paste it in to a text or code editor. The script would then be edited and when complete pasted back into the report. There are three script areas provided as follows.
- Start Script – Loads with the document.
- Body script runs after the report has loaded in the editor.
- End Script runs after the report has printed.
- Sections – Each Custom Report comprises a Header, Body, Total and Footer. Optional is a Break Header and additional Footers.
- Printing Sections – Some sections have check box options to dictate that they are to be printed on to the, First Page, Odd .Pages, Even Pages and the Last Page. Typically for Headers the most common option would be the First Page only, and for Footers to print on the Last Page only.
- Multiple Headers and Footers – Multiple Headers and Footers are allowed.
- The user has four checkboxes that dictate exactly what page or pages these headers and footers are to be printed on.
Header Section Attributes
This displays objects that are currently in the Header section. These may be from cells displaying data or custom design/branding elements such as images or simple shapes such as a rectangle, circle or line. If you are looking for a hidden object scroll through each object in the list until the appearance of the handles (8 dots) indicate it’s selection in the editor.
- Header Attributes – This section displays attributes that are able to be set for the Header section by the user.
- Type – This displays the type of section that is currently selected, Header.
- Visible Checkbox – Select if this header is to be visible. (Default Selected). This checkbox is mainly used when the section is not used. Remember to set its height as 0, zero.
- Fixed Height Checkbox – Select if this header is to be a fixed height. (Default Not Selected).
- Break On – Select from the menu if the report is to break at a selected point.
- Script – Enter any script required for this Break Header.
Custom Reports Break Header Section Attributes
This Break header when Inserted from the main menu will be inserted Before the selected item in the Top right-hand corner of the editor
This displays objects that are currently in the Break Header section. These may be from cells displaying data or custom design/branding elements such as images or simple shapes such as a rectangle, circle or line. If you are looking for a hidden object scroll through each object in the list until the appearance of the handles (8 dots) indicate it’s selection in the editor.
- Break Header Attributes – This section displays attributes that are able to be set for the Break Header section by the user.
- Type – This displays the type of section that is currently selected, BreakHeader.
- Visible Checkbox – Select if this Break Header is to be visible. (Default Selected). This checkbox is mainly used when the section is not used. Remember to set its height as 0, zero.
- Fixed Height Checkbox – Select if this Break Header is to be a fixed height. (Default Not Selected).
- Break On – Select from the menu if the CustomRreport is to break at a selected point.
- Script – Enter any script required for this Break Header.
Body Section Attributes
This displays objects that are currently in the Body section. These may be from cells displaying data or custom design/branding elements such as images or simple shapes such as a rectangle, circle or line. If you are looking for a hidden object scroll through each object in the list until the appearance of the handles (8 dots) indicate it’s selection in the editor.
- Header Attributes – This section displays attributes that are able to be set for the Body section by the user.
- Type – This displays the type of section that is currently selected, Body.
- Visible Checkbox – Select if this header is to be visible. (Default Selected).
- Fixed Height Checkbox – Select if this header is to be a fixed height. (Default Not Selected).
- Break On – Not allowed.
- Script – Enter any script required for this Body.
Totals Section Attributes
This displays objects that are currently in the Totals section that are able to be set by the user. These may be from cells displaying data or custom design/branding elements such as images or simple shapes such as a rectangle, circle or line. If you are looking for a hidden object scroll through each object in the list until the appearance of the handles (8 dots) indicate it’s selection in the editor.
- Totals Attributes – This section displays attributes for the Totals Section.
- Type – This displays attributes that are able to be set the Totals section.
- Visible Checkbox – Select if this header is to be visible. (Default Selected).
- Fixed Height Checkbox – Select if this Totals Section is to be a fixed height. (Default Not Selected).
- Bind to Bottom Checkbox – Select this checkbox if this Totals section is to be bound to the bottom of the page.
Break Footer Section Attributes
This Break Footer when Inserted from the main menu will be inserted Before the Tools section in the Top right-hand corner of the editor.
This section displays attributes that are able to be set by the user for the Break Footer section. This Break Footer section usually contains totals for the transaction and if the report breaks over several pages may be setup to display subtotals. Placing a line here will cause the editor to draw the line under the last item in multi-page reports.
- Break Footer Attributes – This section displays attributes that are able to be set for the Break Footer section by the user.
- Type – This displays the type of section that is currently selected, BreakFooter.
- Visible Checkbox – Select if this Break Footer is to be visible. (Default value is selected). This checkbox is mainly used when the section is not used. Set its height as 0, zero to ensure correct printing.
- Fixed Height Checkbox – Select if this Break Footer is to be a fixed height. (Default Not Selected).
- Break On – Select from the menu if the report is to break at a selected point.
- Script – Enter any script required for this Break Footer.
Footer Section Attributes
This section displays attributes that are able to be set by the user for the Footer section. This Footer section usually contains totals for the transaction and if the report breaks over several pages may be setup to display subtotals.
- Footer Attributes – This section displays attributes that are able to be set by the user for the Footer section by the user.
- Type – This displays the type of section that is currently selected, Footer.
- Visible Checkbox – Select if this header is to be visible. (Default Selected). This checkbox is mainly used when the section is not used. Set its height as 0, zero to ensure correct printing.
- Fixed Height Checkbox – Select if this Footer is to be a fixed height. (Default Not Selected).
- Bind to Bottom Checkbox – Select this checkbox if the Footer section is to be bound to the bottom of the page.
- Printing On – This section may be set up to only print on certain pages of the report. This area usually contains totals for the transaction and if the report breaks over several pages, it may be setup to display subtotals. Placing a line here will cause the editor to draw the line under the last item in multi-page reports.
- First Page Check box – When this checkbox is selected SapphireOne will only print this footer on the first page of a Report.
- Odd Pages Checkbox – When this checkbox is selected SapphireOne will only print this footer on odd pages in the report
- Even Pages Checkbox – When this checkbox is selected SapphireOne will only print this footer on even pages in the report.
- Last Page Checkbox – When this checkbox is selected SapphireOne will only print this footer on the very last page in the report.
Object Types
The Attributes for every type of Object has been documented earlier in this article as part of the documentation for the tools on the left side of the work area and therefore will not be repeated here.
The objects are as follows, Object Selector, New Text, New Variable, New Field,New Line and New Picture.
Importing New Custom Reports
If you are importing a number of Custom Reports, repeat the steps below as many times for each report. Each time you make changes, select Print or Print Preview to asses what has been altered. Extended documentation for the details of the procedure documented below is available later in this article.
The steps listed below will allow a user to quickly import a SapphireOne Custom report without significant challenges. For example, SapphireOne support team have provided you with a Custom report that is ready for importing into your data file. It should be very close to what is required so you can import it in and then check if any minor alterations are desired. These final changes can be made in your live data file. The procedure is as follows.
- Transaction Selection – Select a transaction that will be used for the testing of the custom report and then select something in it that is unique. For example, Sequence, Internal or External reference numbers. Remember, whatever it is it must be unique and write it down.
- Locating the Old Custom Report – Go to the Print dialog location in your computer and take note of the name of the custom report that you want to modify or create from new.
- Open Custom Report Layouts – Next go to Utilities > Controls > Custom Report Layouts. A list of Custom Reports will be displayed on screen so select the one that is the same as the one that you have just noted down.
- Open the Custom Report – Next double click on the required Custom report. SapphireOne will open with the Query function on screen. You will be provided with two options.
- This option is not required however these details will have to be entered at step 10 as SapphireOne will not have a record to perform a test print of the report against.
- Alternately enter the details that you have written down at step 1 above.
- One of two things will occur.
- If there is an existing Custom Report SapphireOne will immediately open the report ready for editing.
- If there is no data in the selected report, SapphireOne will display an alert asking the user to choose between a Blank, Label or List Wizard report layouts.
- Creating Modify or Import -The Custom Report is now ready for creating or modifying as required. Details later in this article. The user has the following options:
- Create a new Custom Report.
- Modify an existing Custom Report.
- Import an xml file to overwrite this Custom Report as follows.
- Open from the File menu.
- when the find function is displayed for your Mac or Windows, find the new xml file and select it to import it.
- Paper Size – Once the new file has been imported, on the right-hand side of the editor check that the width and height of the paper is correct. 595 by 842 for A4 portrait and 842 by 595 for A4 landscape.
- Printer Selection – Select the Setup button on the right hand side of the editor and check that the new Custom Report in SapphireOne is associated with the correct printer in your system.
- Query Record – Next go to the Test menu and providing you have not done so at step four above, select Query Record. Perform your query by entering the details that you selected at step on. SapphireOne will now only use that record or group of records for testing. Rather than using everything currently in SapphireOne.
- Printing –The printing functionality is slightly different between a Mac and Windows.
- For a Mac select the Print Preview option
- For a Windows select the Print option.
SapphireOne has the ability to have unlimited companies within a single report data file, so it is important to note that reports can be Master Login specific. To view all of the reports in a data file users will have to login to each company in turn and view or modify the reports. The alternative is to use a master login, in which case the user will be able to access all of the reports in the data file. Although the entry of any financial data will be prevented when logged in this way, the viewing and modifying of Sapphire Reports is not recommended as they can become Master log in specific. The user will have to remember that when they log in as a master user, they need to log back out and edit the reports using a specific company log in.
Saving New Sapphire Custom Reports
When you save the new Custom Report, SapphireOne will request a name for the report. Once the new Custom Report has been saved it will be accessible from the Print menu drop down, which is the arrow adjacent to the print icon. This enables the report to be selected and printed as required.
Any number of reports may be set up and saved. Therefore it is recommended the user gives careful consideration when naming Custom Reports to aid in their identification from any location in SapphireOne.
Printing Sapphire Custom Reports
Transaction List – How to print from a list of Transactions on screen.
- By default SapphireOne will only print a single item from the list, so from the list of transactions on screen select the one that you want to print.
- Click on the arrow to right of the print icon.
- A print menu will be displayed listing any new Sapphire Custom Reports that have been setup.
- Select the New Custom report that is to be used for this print job.
- Follow the normal system prompts for a Mac or Windows when printing.
Individual Transactions – Once a transaction has been opened utilising ![]() Look or
Look or ![]() Modify.
Modify.
- Click on the arrow next to the print icon. A list of printing options will be displayed which will vary depending on the function being utilised at the time.
- At the bottom of this list select Custom.
- A print menu will be displayed listing any new Sapphire Custom Reports that have been setup.
- Select the New Custom report that is to be used for this print job.
- Follow the normal system prompts for a Mac or Windows when printing.
When the Print Icon is directly selected, SapphireOne will use a default printing option when printing any item in the data file. This default option is directly linked to the function that has focus at the time. To display the additional printing options, the user has to select the arrow to the right of the print icon.
Problem Solving
Printing Errors
Any reports that have printing errors are usually caused by an object that is off the bounds of the page or work area entirely. To locate these objects proceed as follows.
- Go to the reports list of objects in the top right-hand corner of the reports screen.
- Then select as an example the body of a report and select the first object in the list.
- Next use the down arrow key on your keyboard and select each one in turn from the folder type list in the top right-hand corner of the editor.
- In the Body of the report look for each object as you select them in the list of objects.
- As you scroll through with the arrow keys or mouse, each object will be selected. Within the editor the selected object will display with handles (8 dots).
- If you cannot see the handles to indicate that the object has been selected, you will need to select it from the list of objects and delete it blindly from there.
- To do this once the object has been selected, go to the Edit menu on the main tool bar at the top of the screen.
- Most items on the drop-down menu will be greyed out but the Delete button will be active so select it and delete the invisible object.
- Once you have done this do a print preview again and check the results of your object deletion.
Pagination and Printers
The user should note that the editor measures distances on the page in points.
Portrait or Landscape
An A4 sheet of paper for Portrait is 842 high by 595mm wide in size and this should be the size selected for most reports unless it is for a different size of paper. Landscape is 595 by 842mm.
- New Reports – When creating a new report this would be the first item to enter for your report, Portrait or Landscape. Printing to any size paper can be achieved including rolls that are used in Point Of Sale (POS).
- Printer Behavior – All printers can behave differently and each report may have to be individually setup for each printer. This is particularly important if the report has been set up on another printer and it is being imported into a foreign data file.
- Printer Page Size – If a report is being created new, or an existing report is being modified particular attention will have to be kept on the size of the page and the margins.
- Once the report has been commenced and then completed, the first and last thing to do is to check on the paper size and the margins as entered into the report are correct.
- The page size if incorrectly entered in a report will have an effect on how the printer manages the printing of a page. It is bad practice to set the page size incorrectly.
- Printer Margins – The margins as entered in a report have no effect on the printed layout of the report but are there as guidelines for the user when doing precise alignments of objects on the page.
- Print a pdf – For a final check, print the report to a PDF and see how the report looks.
- First Print – For the first print out
- Select the page orientation and all printer selections,
- Then select Print Preview.
Test Menu & Printing
- Test Transaction or Transactions – Before commencing to set up any Sapphire Report the user will need a transaction currently in SapphireOne to print a preview of the report that you are currently setting up.
- When setting these reports up what you see in the editor is usually not what gets printed.
- When creating the report, the user will have to constantly go to the Test drop down in the SapphireOne menu and preview the report so that they can see what it will look like when printed.
- To do this they will have to execute a transaction inquiry from the area that the report is intended for. Then make a note of one or more of the following. The Internal or External reference number. The Sequence number is probably the best item to use provided that they are unique to a single transaction or a small group of transactions.
- Editor Query – When a report is selected for editing SapphireOne will ask for a transaction to test with as seen above. The three items documented above are recommended although if required, any cell in the table may be used. The data entered must be uniquely applicable to the single transaction or a small number of transactions.
- If nothing is entered the user should be aware that when asked to print preview SapphireOne will try to print a pdf on screen of every transaction in the list.
- Test Menu – This menu has three options.
- If the user has forgotten to query for a record or they want to user different transaction for testing they may select Query Record and then select a new record for testing.
- The sequence number option is not always on the query on entry function but when the detailed query is accessed from within the report it is usually at the top of the list which makes it easier to find.
- Printing Mac and Windows – If the user wants to preview or print to a printer they should select one of the Print options. The first one Print is for Windows OS users while the Print Preview option is for Mac OS users.
- For Windows OS – select the Print option and this will take the user though the normal print alert menus enabling the selection of an option to display a pdf on screen. This will not work on an Mac.
- For Mac OS – select the Print Preview option and SapphireOne will immediately display the preview function with the pdf just asked for. Note that this will not work on a Windows.
SapphireOne Array Items
Below are the most commonly used cells in Custom Reports.
Arrays and Direct access to the Database
Array – An array is a variable that provides a compact way to access your data. An array is a variable that has multiple dimensions. These dimensions can have values stored in them. The size of these dimensions can be specified. You can use arrays in Sapphire Custom Reports. Substituting additional lines of code in the SapphireOne Custom report writer allows the user to reuse arrays for their own purposes. A complete list of these original arrays are later in this article.
Direct access to a Cell – The new Sapphire Custom Reports in part makes the array function redundant, as the user may now select any cell from any table in the data file when creating a custom report. Defining which table and cell can be challenging. For that reason these arrays are documented and the programming for them already exists in SapphireOne.
New Custom Reports – SapphireOne now supports both methods so that arrays may still be used in custom reports as they exist for some of the most common items in a Sapphire Custom Report and are easier than searching for the correct cell in a particular table.
What are Array items?
They are similar to a shortcut on either the Mac or Windows based systems. The programmers have made these shortcuts to commonly used cells when creating reports using the old Page Pro report editors.
Since we have created our own Sapphire Reports they have to a certain extent become redundant.
- Array Procedure – Instead of selecting the Source data entry field the going through and finding Stock Breakdown Quantity cell the user only has to directly enter into the variable, aReala and the link to the cell is established.
- These short cuts also depend on the SR_PreLoad that is used to set up the report.
- aReala for example when I for Invoices is entered, it is linked to:
- [Invoices]Stock_Breakdown’Quantity. Note the table and the cell.
- Source Procedure – Most other cells in the table may be printed by going to the Source drop down in the Sapphire Report editor and navigating to the required cell although this drop-down list is very long at times!
Array Names used in the Body Section of a Custom Report
| atextm | [Invoices]Stock Breakdown’Description, Reads the Inventory name/description as entered into an Inventory Inquiry. If it is altered in an Invoice it will read the altered name/description as entered by the user. You can alter the description in an Invoice With pack tally turned on, will it print ‘Pack(s)‘ before the batch number on each consecutive line. |
| Atextn | [Invoices]Stock Breakdown’Serial Number Serial number attached to the Inventory item. It will be in the format Serial No, Serial No, across the page |
| aReala | [Invoices]Stock Breakdown’Quantity |
| aRealb | [Invoices]Stock Breakdown’Rate Average cost of the item as set by the inventory rules |
| aRealc | [Invoices]Stock Breakdown’Newrate The above Breakdown’Rate but after discounts are applied. |
| ATemp2a25 | [Invoices]Stock Breakdown’Discount Code |
| aReald | [Invoices]Stock Breakdown’Discount Percentage |
| aReale | [Invoices]Stock Breakdown’Amount |
| aRealf | [Invoices]Stock Breakdown’Tax |
| aRealg | [Invoices]Stock Breakdown’Total |
| ATemp3A25 | [Invoices]Stock Breakdown’Tax code The tax code assigned to the line item |
| aRealh | [Invoices]Stock Breakdown’Tax Rate Normally the Tax Rate is locked to the Tax Code above but some tax codes are variable and may be entered here. |
| aReali | [Invoices]Stock Breakdown’Backordered The Quantity Backordered |
| aRealj | [Invoices]Stock Breakdown’Ordered The quantity Ordered |
| aTemp4A25 | [Invoices]Stock Breakdown‘Project LK The Project Data entry field |
| atexta | [Invoices]Stock Breakdown’IVBAlpha1_20 Custom Page cell in a QCI OCI or SCI |
| atextb | [Invoices]Stock Breakdown’IVBAplha2_20 Custom Page cell in a QCI OCI or SCI |
| atextc | [Invoices]Stock Breakdown’IVBAplha3_30 Custom Page cell in a QCI OCI or SCI |
| atextd | [Invoices]Stock Breakdown’IVBAlpha4_30 Custom Page cell in a QCI OCI or SCI |
| atexte | [Invoices]Stock Breakdown’IVBAlpha5_10 Custom Page cell in a QCI OCI or SCI |
| aRealaa | [Invoices_Stock_Breakdown]Weight |
| aRealab | [Invoices_Stock_Breakdown]Pallet |
| aRealac | [Invoices_Stock_Breakdown]Carton |
| ArealAE | [Invoices_Stock_Breakdown]Wet_Tax very last item in the very long list |
| ALongE | [Invoices]Stock Breakdown’LineNumbering, Starts at 1 and increments by 1 for each line in the transaction. 1 for the first line then 2 for the second line and so on. |
| Atexto | [Invoices]Stock Breakdown’UDF1 Displays data entered into UDF1 field’ |
| atextf | [Invoices]Stock Breakdown’BBSupPCode |
| atextg | [Invoices]Stock Breakdown’BBRef |
| aRealm | [Invoices]Stock Breakdown’IVBReal1 |
| aDate | [Invoices]Stock Breakdown’IVBDate1 |
| atextz | [Invoices]Stock Breakdown’BinText |
| atextt | [Invoices]Stock Breakdown’Unit |
| atextu | [Invoices]Stock Breakdown’Transfer Inv Lk |
| aRealq | [Invoices]Stock Breakdown’UnitQ |
| aReals | [Invoices]Stock Breakdown’Org_Lamount |
| aRealu | [Invoices]Stock Breakdown’Org_Ltax |
| aRealv | [Invoices]Stock Breakdown’Org_Ltotal |
| aRealw | [Invoices]Stock Breakdown’Org_Lrate |
| aRealx | [Invoices]Stock Breakdown’Org_LnewRate |
| alongd | [Invoices]Stock Breakdown’Record Order |
| s_fxtax | [Invoices]Stock Breakdown’Org_Ltax (in [Invoices]FX_Format) |
| s_fxTotal | [Invoices]Stock Breakdown’Org_Ltotal (in [Invoices]FX_Format) |
| s_fxAmount | [Invoices]Stock Breakdown’Org_Lamount (in [Invoices]FX_Format) |
| s_fxrate | [Invoices]Stock Breakdown’Org_Lrate (in [Invoices]FX_Format) |
| ATEMPJ | [Invoices]Stock Breakdown Line Rate per item, OVI |
| ATEMPK | [Invoices]Stock Breakdown Line Amount number of items, OVI |
| ATEMPL | [Invoices]Stock Breakdown Line Tax for the line, OVI |
| ATEMPM | [Invoices]Stock Breakdown Line Total including Tax for the line, OVI |
| atextq | SSCC No in a company inquiry. The SSCC number in the shipping page of an invoice |
Texim field variables
These are variable fields that may be set up so that the one report may be used with several types of transactions.
For example, there would normally be very little difference between an OCI and an SCI, so these texim variables would be used to print the same report for both but have different text on them.
Provided the texim number has not been used already in the report numbers between 120 and 200 would appear to be fairly safe to use. Some numbers that seem to be already commonly used are from texim110 through to texim113 for balances. A few others are listed in the following tables as well.
Variables used in the Header/Footer Area
| This preload command must be entered first and may vary according to the table accessed. I for Invoice and C for Clients. There would be others V for Vendor for example ?? | SR_PreLoad(“I”) SR_PreLoad(“C”) |
| ?????? | SR_packingInventory:=False |
| Enter the maximum N⁰ of characters. This then forces word wrap for the entire report at the N°, numbr entered. 70 in the example to the right. | SR_MAXLENGTH:=70 |
| This script converts an Invoice to Table layout styles. | TablePrintA(1) |
| This will enter the current date from the computers clock. | srdate |
| This will enter in the current page number in the Custom report. | srdate |
| This will enter in the total number of pages in the Custom Report. | srdates |
Commonly used variables with shortcuts
Since we have coded our own Sapphire Reports a lot of the variables which had to have script written for them are no longer needed. A simple field object may be selected and a link/source for the field linked to directly. And the list available for selection is very very large!
Of note is the six in the table below.
Tbal10 in AUD or local [Invoices]Amount Texim300 FX currency [Invoices]Org_Amount
Tbal11 in AUD or local [Invoices]Tax Texim301 FX Currency [Invoices]Org_Tax
Tbal12 in AUD or local [Invoices]Total Texim302 FX currency [Invoices]Org_Total
| tbal10 | [Invoices]Amount Variable usually the Amount Without Tax |
| tBal11 | [Invoices]Tax Variable usually the Tax only, in Australia the GST |
| tBal12 | [Invoices]Total Variable usually the Amount plus Tax Included |
| Texim100 | Company Address, ABN etc Variable |
| Texim102 | Transaction Type in Word Format Variable |
| Texim300 | [Invoices]Org_Amount In FX Format |
| Texim301 | [Invoices]Org_Tax In FX Format |
| Texim302 | [Invoices]Org_Total In FX Format |
| texim143 | |
| tdiscmess | Prompt Payment Discount Message |
| Clients Mail Address | [Invoices] Mailing Address |
| Clients Del Address | [Invoices] Delivery_Address |
| Clients ID | [Invoices] Client _LK |
| Delivery Date | [Invoices] Delivery_Date |
| Customer Order No | [Invoices] External_Ref |
| Date Due | [Invoices] Date_Due |
| Invoice No | [Invoices] Internal_Ref |
| Text Details | [Invoices] Text Text Details on the More Detail Page |
Other Values.
| Texim102 | Stores the paper type. |
| Texim140 | Loads the mailing details from System Defaults for SapphireOne. Company Inquiry |
| Texim141 | Loads the Tax File number from System Defaults. Company Inquiry |
| tdiscmess | Stores the prompt discount message. Company Inquiry \ Reports Page |
Statements
Arrays Used in the Body Section
| aTexta | Transaction Type in word format |
| atextn | [Transactions]Internal Ref |
| atextm | [Transactions]External Ref |
| aTextb | [Transactions]Internal Ref |
| adate | [Transactions]Date In |
| aReala | Running Total |
| aRealb | [Transactions]Allocated Amt |
| aRealc | [Transactions]Total |
| aReald | Amount still unallocated |
| aRealf | aReald if greater than 0 |
| aTextc | “*” (overdue) |
Other Values
| tCLPerDate | Statement Date |
| tlTotal | Running Total |
| tBal10 | Overdue Balance based upon due date. |
| tbalancea | Current amount Owing |
| tbalanceb | 30 days Owing |
| tbalancec | 32-60 days owing |
| Tbalanced | 61+ days owing |
Cheque & Remittance
Remember that remittances cannot be test printed directly from utilities mode as the linking from the VP to the invoice or VI is not established. An existing remittance will have to be re-printed from accounts mode. To do this select the payment’s option from the Payables drop down menu in Accounts mode.
The user will only be able to create the report with no lines displayed in utilities mode.
To test fully, the user will have to go back to the payments function and select the new report from there to display the actual lines in the transaction.
| atemp | “*” fully paid |
| adate | [Transactions]Date in |
| ainvoice | [Transactions]Internal Ref |
| aext | [Transactions]External ref |
| adesc | [Transactions]Notes |
| atotal | [Transactions]Total |
| tatotal | Credit Memo Value excluding Discounts, but including PPS Tax |
| taamount | Discount Value |
| tatax | Payment value |
| areale | PPS Value |
| Calcmoneywords ??? | In addition to the 2 below there are other versions of this function. |
| Calcmoneywords | Converts numerals in dollars followed by the word Dollars Then the cent numerals in words as well followed by the word Cents. Four Thousand Four hundred twenty dollars ten five cents. |
| CalcmoneywordsNumcent | As above but the numerals in cents remain as numerals. Four Thousand Four hundred twenty dollars 15 cents. |
| tStart1 | Cheque number as it can be different to the internal reference number. There is an option to enter the check numbers manually so thats why. |
Start Scripts
General Details
These scripts have been copied from a number of Sapphire Reports and will be left at the end of this article. These are taken from reports that are found with scripts of one type or another.
The hardest part of creating a Sapphire Report is establishing the layout and the items that will form part of that layout.
Even though these reports look different the underlining framework and the cells that are to be printed in the report are mostly the same.
Invoices have a start script which controls the loading of the arrays and other functions so for example.
The command to preload the arrays for Invoices is SR_PreLoad(“I”). I for Invoices.
The command to preload the arrays for Statements is SR_PreLoad(“C”). C for Clients.
By calling the function SR_Roll_Up in the start script after SR_Preload will collapse the lines for items which have the same description and rate (discounted). This allows multiple lines for the same product to be entered, but for different projects to be displayed as one line.
TablePrintA(1) in the start script converts an Invoice to Table layout styles.
Some examples of start scripts were copied from existing Sapphire Custom Reports and these are copied from the reports in this folder. The user will note that there are similarities between them as all of the reports follow a common line.
Sales Invoice-1
SR_PreLoad("I")
texim143:=[Invoices]Footer
tBal10:=[Invoices]Amount
tBal11:=[Invoices]Tax
tBal12:=[Invoices]Total
tBal20:=0
tBal30:=0
array text(ATEMPA;size of array(ATemp1A25))
array text(ATEMPB;size of array(ATemp1A25))
array text(ATEMPC;size of array(ATemp1A25))
array text(ATEMPD;size of array(ATemp1A25))
array text(ATEMPE;size of array(ATemp1A25))
array text(ATEMPF;size of array(ATemp1A25))
array text(ATEMPG;size of array(ATemp1A25))
array text(ATEMPH;size of array(ATemp1A25))
array text(ATEMPI;size of array(ATemp1A25))
array text(ATEMPJ;size of array(ATemp1A25))
array text(ATEMPK;size of array(ATemp1A25))
array text(ATEMPL;size of array(ATemp1A25))
array text(ATEMPM;size of array(ATemp1A25))
array text(ATEMPN;size of array(ATemp1A25))
array real(arealac;size of array(ATemp1A25))
array real(arealae;size of array(ATemp1A25))
array real(arealad;size of array(ATemp1A25))
array real(arealaf;size of array(ATemp1A25))
array real(arealag;size of array(ATemp1A25))
array real(arealah;size of array(ATemp1A25))
array real(arealai;size of array(ATemp1A25))
array real(arealaj;size of array(ATemp1A25))
for(i;1;size of array(ATemp1A25))
query([inventory];[inventory]id=ATemp1A25{i})
if(records in selection([inventory])=1)
ATEMPA{i}:=[inventory]UDF1
ATEMPB{i}:=[inventory]Alpha_3_20
ATEMPC{i}:=string([inventory]real_6)
ATEMPD{i}:=string([inventory]real_1)
Page 30 Sapphire Tools
Page 30 © SapphireOne Pty Ltd 2021
arealac{i}:=[inventory]real_2areala{i} ATEMPE{i}:=string(arealac{i};"###,###.## KG;(###,###.## KG)") arealad{i}:=[inventory]real_8areala{i}
ATEMPF{i}:=string(arealad{i})
ATEMPG{i}:=[inventory]UDF2
ATEMPH{i}:=string([inventory]real_2;"###,###.## KG;(###,###.## KG)")
arealae{i}:=arealb{i}/[inventory]real_2
ATEMPI{i}:=string(arealae{i};"$###,##0.00;($###,##0.00)")
arealaf{i}:=arealb{i}1 ATEMPJ{i}:=string(arealaf{i};"$###,##0.00;($###,##0.00)") arealag{i}:=areale{i}1
ATEMPK{i}:=string(arealag{i};"$###,##0.00;($###,##0.00)")
arealah{i}:=arealf{i}1 ATEMPL{i}:=string(arealah{i};"$###,##0.00;($###,##0.00)") arealai{i}:=arealg{i}1
ATEMPM{i}:=string(arealai{i};"$###,##0.00;($###,##0.00)")
arealaj{i}:=areald{i}*1
ATEMPN{i}:=string(arealaj{i};"###.##%;(###.##%)")
tBal20:=tBal20+arealac{i}
tBal30:=tBal30+arealad{i}
else
ATEMPA{i}:=""
ATEMPB{i}:=""
ATEMPC{i}:=""
ATEMPD{i}:=""
ATEMPE{i}:=""
ATEMPF{i}:=""
ATEMPG{i}:=""
ATEMPH{i}:=""
ATEMPI{i}:=""
ATEMPJ{i}:=""
ATEMPK{i}:=""
ATEMPL{i}:=""
ATEMPM{i}:=""
ATEMPN{i}:=""
end if
end for
i:=0Packing Slip-1
SR_PreLoad("I")
texim143:=[Invoices]Footer
tBal10:=[Invoices]Amount
tBal11:=[Invoices]Tax
tBal12:=[Invoices]Total
tBal20:=0
tBal30:=0
array text(ATEMPA;size of array(ATemp1A25))
array text(ATEMPB;size of array(ATemp1A25))
array text(ATEMPC;size of array(ATemp1A25))
array text(ATEMPD;size of array(ATemp1A25))
array text(ATEMPE;size of array(ATemp1A25))
array text(ATEMPF;size of array(ATemp1A25))
array text(ATEMPG;size of array(ATemp1A25))
array text(ATEMPH;size of array(ATemp1A25))
array text(ATEMPI;size of array(ATemp1A25))
array text(ATEMPJ;size of array(ATemp1A25))
array text(ATEMPK;size of array(ATemp1A25))
array text(ATEMPL;size of array(ATemp1A25))
array text(ATEMPM;size of array(ATemp1A25))
array real(arealac;size of array(ATemp1A25))
array real(arealae;size of array(ATemp1A25))
array real(arealad;size of array(ATemp1A25))
array real(arealaf;size of array(ATemp1A25))
array real(arealag;size of array(ATemp1A25))
array real(arealah;size of array(ATemp1A25))
array real(arealai;size of array(ATemp1A25))
for(i;1;size of array(ATemp1A25))
query([inventory];[inventory]id=ATemp1A25{i})
if(records in selection([inventory])=1)
ATEMPA{i}:=[inventory]Alpha_8_80
ATEMPB{i}:=[inventory]Alpha_3_20
ATEMPC{i}:=string([inventory]real_6)
ATEMPD{i}:=string([inventory]real_1)
arealac{i}:=[inventory]real_2areala{i} ATEMPE{i}:=string(arealac{i}) Page 32 Sapphire Tools Page 32 © SapphireOne Pty Ltd 2021 arealad{i}:=[inventory]real_8areala{i}
ATEMPF{i}:=string(arealad{i})
ATEMPG{i}:=[inventory]UDF2
ATEMPH{i}:=string([inventory]real_2)
arealae{i}:=arealb{i}/[inventory]real_2
ATEMPI{i}:=string(arealae{i})
arealaf{i}:=arealb{i}1 ATEMPJ{i}:=string(arealaf{i}) arealag{i}:=areale{i}1
ATEMPK{i}:=string(arealag{i})
arealah{i}:=arealf{i}1 ATEMPL{i}:=string(arealah{i}) arealai{i}:=arealg{i}1
ATEMPM{i}:=string(arealai{i})
tBal20:=tBal20+arealac{i}
tBal30:=tBal30+arealad{i}
else
ATEMPA{i}:=""
ATEMPB{i}:=""
ATEMPC{i}:=""
ATEMPD{i}:=""
arealac{i}:=0
arealad{i}:=0
ATEMPG{i}:=""
ATEMPH{i}:=""
ATEMPI{i}:=""
ATEMPJ{i}:=""
arealag{i}:=0
ATEMPL{i}:=""
ATEMPM{i}:=""
end if
end for
i:=0Statement-1
SR_PreLoad("C")
texim130:=[Clients]Name
texim131:=[Clients]Address1
texim132:=[Clients]Address2
texim133:=[Clients]City
texim134:=[Clients]State
texim135:=[Clients]Zip_Code
texim138:=[Clients]ID
texim139:=[Clients]Contact1
texim137:=[Clients]UDF1
Tltotal:=[Clients]Total_Due
tBal10:=[Clients]Balance1
tBal35:=[Clients]Balance2
tBal36:=[Clients]Balance3
tBal37:=([Clients]Balance4+[Clients]Balance5+[Clients]Overdue)Invoice-1
SR_packingInventory:=False
SR_MAXLENGTH:=70 Note this sets the number of characters in all fields before forcing wordwrap
SR_Preload ("I")
texim143:=[Invoices]Footer
tbal10:=[Invoices]Amount
tbal11:=[Invoices]Tax
tbal12:=[Invoices]Total
tbal13:=[Invoices]Payment_V
tbal14:=[Invoices]Total-[Invoices]Payment_V
QUERY([Contacts];[Contacts]CN_ID=[Invoices]Contact_lk)
RELATE ONE([Invoices]Client_LK)
QUERY([Department];[Department]ID_Code=[Clients]Department_LK)
tbal13:=[Invoices]Card_V+[Invoices]Cheq_V+[Invoices]Cash_V+[Invoices]Account_V
tbal14:=Round(tbal12-tbal13;2)
Case of
: ([Invoices]Type="SCC")
texim200:="CREDIT"
texim201:="Credit No."
: ([Invoices]Type="JCC")
texim200:="CREDIT"
texim201:="Credit No."
: ([Invoices]Type="OCI")
texim200:="ORDER"
texim201:="Order No."
Else
texim200:="TAX INVOICEStatement
SR_Preload ("C")
texim130:=[Clients]Name
texim131:=[Clients]Address1
texim132:=[Clients]Address2
texim133:=[Clients]City
texim134:=[Clients]State
texim135:=[Clients]Zip_Code
texim138:=[Clients]ID
texim139:=[Clients]Contact1
texim137:=[Clients]UDF1
tbal99:=tbalanceb+tbalancec+tbalanced
Case of
: ([Clients]Payment_Terms=1)
texim105:="7 days"
: ([Clients]Payment_Terms=2)
texim105:="14 days"
: ([Clients]Payment_Terms=3)
texim105:="21 days"
: ([Clients]Payment_Terms=4)
texim105:="Cash on Delivery"
: ([Clients]Payment_Terms=5)
texim105:="20th Month following"
Else
texim105:=String([Clients]Due_Days)+" days"
End case
ARRAY REAL(arealz;0)
While (Not(End selection([Transactions])))
APPEND TO ARRAY(arealz;[Transactions]Total-[Transactions]Allocated_Amt)
NEXT RECORD([Transactions])
End while
FIRST RECORD([Transactions])
You can review our Blog and YouTube channel for additional information and resources on SapphireOne ERP, CRM and Business Accounting software.