Workflow Rules Overview
Before setting up any workflow functions, the Organisation Chart must be setup first. please read the article titled Organisation Chart.
The Workflow Rules function located at Utilities > Controls > Workflow Rules enables the setting of workflow rules that require approval from a user or group of users, level, or creator. SapphireOne has the capability to create workflow rules on any data entry type of transaction within the system. The data entry can have any or multiple combinations of the 12 workflow rules applied to it. For example, these include New Transaction, Modify Transaction, Deleted Transaction, Transaction Above a Specific Dollar ($) Value, Transaction Sales Under Average Cost, Transaction for Client Over Credit Limit, Transaction for Client on Credit Stop, Transaction Sales with Negative Stock, Leave Request, Tracking Notes, Bank Details, and Sales under floor price.
Establishing Workflow Rules and Managing Transactions
A Workflow Rule must be established before entering any transactions. The rule is written into the transaction itself upon entry and will remain even if the workflow rule applying to the transaction is deleted. If a workflow rule is altered and there are existing transactions that require the new workflow rule to be applied to them, they will have to be deleted and re-entered under the new Workflow rule.
A list of all Workflow rules may be accessed from the Workflow center available at
Management > Analysis > Workflow Center. This Workflow Center can be accessed by any user with the correct permissions and will display all Workflow Rules for all users in the data file.
When SapphireOne detects that the logged-in user has an applicable workflow rule, it displays a button on the far right of the toolbar. The user can then view and approve transactions relevant to that specific logged-in user.
Customising Workflow Rules: Titles, Tags, and Notes
Each workflow rule can have a unique title and tag established by the user. Once the transaction type and rule trigger have been set, the user can add unique notes to each workflow rule. The SapphireOne user then proceeds to the flow, which contains stages where they can create up to 12 stages, though an unlimited number of stages is possible. The workflow rule can have one stage or multiple stages, often in a sequential manner. The user can set the number of stages required and, within each stage, set the number of people needed to approve or notify a workflow rule before authorisation is granted.
Levels and Types in Workflow Stages
For instance, if you set five stages, it will not progress to stage two until stage one has been approved. Within Stage 1, you may have five users authorised to approve Stage 1, but a minimum of three out of the five users must approve or notify stage one before it can advance to Stage 2. This is referred to as levels within the stage. You may assign a group of people to a level and assign a type, either by User, Level, or Creator. For each type, the user also has three checkboxes: Authorisation Required, Hierarchical Authorisation, and Email Notification.
Implementing Workflow Rules: Leave Request Example
In another example, if you’ve established a workflow rule for Leave Requests, Stage One may involve an employee entering a Leave Request. Stage One moves directly to Stage Two as established. Stage Two may involve notifying the manager, Stage Three may include the HR department approving the leave, and Stage Four may have the original creator (i.e., the employee) receive an email notification about whether their leave has been approved or not.
Initially, these new transactions will have a status of WF for Workflow and cannot be printed, converted, emailed, or posted until they are approved or authorised by the user or a group of users, level, and/or creator. If they are rejected, the transactions will remain in the list with a status of error indicating the ongoing WF error. They may be left as is and, since they remain unposted, can be deleted as or if required.
User Roles and Authorisation in Workflow Rules
For each rule with a Workflow entry, there must be a user or group of users set up with a restriction, causing them to create all or some transactions with an error code of WF. Additionally, a user or group of users must be set up to approve the transactions. The switch is determined by the setting of the checkbox, either selected to enforce authorisation required or unselected to approve transactions.
Workflow Rules Details Page
Entering a New Workflow Rule
The Change button, as seen in the screenshot below, is directly linked to the Organisation Chart function found in the Controls drop-down menu. The Organisation Chart function serves as a method for organising multiple users into a hierarchical group. This feature is documented in a separate article titled Organisation Chart.
Details Area
The available options are as follows.
- Sequence – SapphireOne will generate a sequentially numbered entry that cannot be altered.
- Title – Enter a name or title for this workflow entry.
- Tag – Enter a tag if required. Note that the list of tags can be customised by the user as needed.
- Company – SapphireOne should enter the company, but if it does not, enter it manually.
- Department – Enter a department if required.
- Transaction – Choose from the extensive list of transactions when the blue arrow is selected. Users can then set up individual rules as needed for each transaction type.
- Rules Trigger – Select a rule to be applied from the Rules Trigger list box. Once the selected rule is broken, the workflow function will activate and enable the Workflow function.
- Transactions – The first three rules will raise a WF error if the user tries to create new, modify, or delete a transaction.
- Above $ – This option raises a WF error when any transaction exceeds a specified dollar amount.
- Average Cost – Transactions below the average cost will raise a WF error.
- Credit Limit and Stop – These two options raise a WF error when the conditions are met.
- Negative Stock – Selecting this option raises a WF error if a transaction takes inventory into a negative stock level.
- Leave Request – A WF will be displayed when a user makes a leave request, alerting the HR officer.
- Tracking Notes – This generates a WF, alerting the user responsible for managing tracking notes.
- Bank Details – This is linked to SapphireOne’s G/L accounts that are bank accounts.
- Floor Price – Sends WF error to the selected user, allowing them to approve or disapprove the sale.
Stages
Set the number of hierarchical stages that must be navigated before the WF error is removed. Each stage occupies a column in each row in the flow list. Up to 6 stages or levels of authorisation are provided, although managing 6 levels could be challenging. Entering the number 3 will set up three columns in the flow area below with default headings.

- Single Stage – If only a single level of approval is required, leave the Stage set at 1. The flow area below will display just one item across the entire row.

- Multiple Stages – If more stages or levels are required, enter a number from 2 to 6. The additional stages will be added as columns in the flow area.
- Notes – Enter any notes for this workflow rule here.
After creating a rule for a transaction, select how it is to be applied. In the Flow area, specify the users or the level of users to whom the rule should be applied.
Flow Area
- New Button – To enter a new event, follow the steps below:
- Column or Stage Selection – First, select the column and then click the
 button in the top right-hand corner of the Flow area. SapphireOne will place the word “User” in the selected column.
 - Multiple Stages – Repeat the procedure above for each column or stage in the workflow function. Once one of the stages in the line has been selected, it will change to an orange colour, as seen below.
- Column or Stage Selection – First, select the column and then click the

- Stage Selection – The user must now set up the following details for each stage in sequence:
- Stage – SapphireOne will add a suffix of the stage number to the name “Stage”. The user may then enter a column heading name for the stage if required.
- Type – The user has two choices here, Approve or Notify. If “Approve” is selected, the user will have to proceed through the approval process before the Workflow error is removed for them. If “Notify” is selected, the user will only have to open the transaction for viewing.
- Number – The number entered here indicates the number of users required to approve the transaction before the WF error is removed. Zero means none, and 5 means five. Be cautious, as the default value may not be suitable, so you may need to manually enter a number.

Party Group
For each stage, this area sets up the users and the tasks they are to perform for this Workflow function.
- Type – This determines how the workflow rule will be applied:
- User – When selected, a data entry field will be displayed, allowing the user to enter a selected user’s ID, linking the rule to a single user. SapphireOne will display the selected user’s ID once entered.
- Level – When selected, the Change button will be displayed. Upon clicking, SapphireOne will display the organisational chart, allowing the user to select an organisational level for the rule to be applied. SapphireOne will display the name of the selected level.
- Creator – When selected, SapphireOne will allow the creator of the transaction to process the transaction.
- Authorisation Required checkbox – This checkbox is crucial for the Workflow Rules function. When selected, SapphireOne will enforce the WF error based on the selection made in the Type options. If not selected, SapphireOne will allow the user to create and save transactions without a WF error as usual. However, they will also receive an active message pop-up dialog when there are transactions within SapphireOne created by other users that meet the criteria set up in the Workflow rule.
- Selected – Restricted saving of the selected transactions with WF error.
- De-Selected – All transactions saved normally and permission to approve selected transactions.
- Hierarchical Authorisation Checkbox – If selected, SapphireOne will allow anyone above the level entered for the stage to authorise the transaction.
- Notes – Enter any notes for this workflow entry, if necessary.
Dictation and Speech to Text Overview
SapphireOne’s implementation of both Dictation (MacOS) and Speech to Text (Windows) is a game changer for data entry. Any data entry field you can type into using a keyboard can use this feature.
You can also use this functionality on all inquiry screens within SapphireOne. For example, the user is in a Contact within a Client. They may have made a phone call to that particular client using the Softphone technology. Consequently, this will automatically date and time stamp both the contact and the phone number you called.
As soon as the call is completed, the user has the ability to use Speech to Text (Windows) or Dictation (MacOS). They can dictate into the memo field of the CRM contact, adding as much description as they require.
Dictation and Speech to Text Procedure
This functionality applies across every single Data Entry screen. For example, the SapphireOne user is entering a Vendor Invoice (VI). Additionally, you may want to add a memo within the Vendor Invoice (VI). The user can utilise the tool and simply dictate the memo.
Another example is if the user wants to add additional lines to the General Ledger account, within each General Ledger account. When the user is completing data entry using a General Ledger, there’s always a unique memo field for each GL account line.
The user can then utilise this feature to quickly add the information they need to add. Alternatively, you may have an interview with an employee. After the interview process is completed, the user can then make notes about the employee.
Speech to Text or Dictation is an extremely powerful tool. It is something that we at SapphireOne, as well as our clients, utilise daily. It is a massive time saver.
Checking for WF Transactions
User Workflow Alert –
User Workflow Alert
For any user required to approve workflow transactions, an additional button will be displayed at the right-hand end of the toolbar, as seen in the screenshot ![]() .
.
Upon selecting this button ![]() , SapphireOne will display a pop-up dialog indicating the number of workflow transactions that require the user’s attention for processing.
, SapphireOne will display a pop-up dialog indicating the number of workflow transactions that require the user’s attention for processing.
Work Flow Example
After double-clicking on the alert mentioned above, SapphireOne will display a screen showing the transactions that require the user’s Approval or Rejection. These transactions currently have a WF error. The user simply needs to select each transaction in sequence and choose either the Approve or Reject button as required.
Organisation Levels and Mixed Permissions
Note: The Organisation Levels mentioned in this context are derived from the Organisation Chart function, which can be found in the controls drop-down menu within SapphireOne
When using Organisational Levels to set permissions for Workflow Rules, the Levels are not hierarchical; users at a higher level will not automatically have authorisation permissions granted. Allowing this would result in numerous people, including the General Manager or CFO, receiving authorisation pop-ups.
Authorisation can only be assigned at a specific level by selecting the Authorisation Required checkbox for any user or groups of users in SapphireOne.
If authorisation permission needs to be set at the User Level, users should not have the Rules Level set in their user file on the first page of a user inquiry, the Details Page. Caution must be exercised when using Organisation Levels with individual users.
A common error when setting up this function is creating a conflict. For example, authorisation has been granted for Sales Managers and Authorisation Required for the user SapphireOne Sydney, who is also in the Sales Managers group. This conflict must be avoided, as the user has been included as part of the Sales Managers level.
Do not mix permissions. Make certain that a specific user who may not authorise transactions does not also form part of any organisational level that may authorise transactions.
Workflow In Operation (Restrictions)
When a user creates a transaction and saves it, SapphireOne checks if a workflow rule needs to be enforced for that transaction type. If a rule is triggered and the corresponding checkbox is selected, SapphireOne saves the transaction with a status of Err (error) and an error code of WF (Workflow). This requires a user with the appropriate authorisation rule to approve the transaction, which will remove the error code and enable further processing.
In SapphireOne, there are two types of users who will require authorisation or be able to authorise transactions:
- User Initiating the Transaction: The user’s ID is recorded by SapphireOne, and they will be the only user to receive the Active Message pop-up for the transactions they create. Users will not receive any Active Message authorisation pop-ups until they create a transaction. This also applies to specific users, such as a new staff member whose transactions need management approval before processing. They will only receive Active Message pop-ups for transactions they create.
- User Level: This refers to a group of users who share the same Rules Level set in the first page of their User Access Inquiry. Once a transaction is created by a member of the Rules Level Group, all users in the group will receive the Active Message pop-up. For example, if multiple users have a Level of Sales Manager set in their user file, all of them will be presented with the Active Message pop-up.
It is essential to ensure that permissions and authorisations are set up correctly to avoid conflicts and maintain efficient processing of transactions within SapphireOne.
Workflow In operation (Approvals)
The rules for approvals operate in the same manner as restrictions, but in reverse. For instance, setting up approval rules requires careful planning. If the organisational chart levels are employed throughout the system, and you have 100 sales staff and one sales manager designated to authorise transactions, the Active Message pop-up will be displayed to all 101 users, which might not be the desired outcome. To avoid this, ensure that you carefully consider the authorisation rules and configure them accordingly, keeping in mind the specific needs of your organisation.
Setting up Rules
Ensure that the Authorisation Required checkbox is selected only for users who are permitted to authorise transactions.
There are three options when selecting users for setting authorisation rules, as detailed below:
- User by User Basis: This method can be used in two ways. You can either specify a particular user who is allowed to authorise transactions, or choose a single user whose transactions must be checked by management before further processing (e.g., new staff).
- Organisational Level Basis: This method involves selecting a group of users from the organisational chart (e.g., Sales Staff) to require authorisation for all transactions they create. However, this approach may cause all Sales Staff to be denied authorisation permissions and be presented with the Active Message for every transaction created by any user in the Sales Staff group, which could become bothersome.
- User Who Starts the Transaction Option: This is likely the best choice for setting Authorisation Rules. While the Authorisation Required checkbox can be selected or deselected, the usual procedure is to leave it unchecked. In this case, SapphireOne requires all transactions created to be authorised, but the Active Message pop-up will only be presented to the user who created the transaction and any user with the Authorisation Required checkbox selected.
Two Events per Rule
For each rule set up, there must be at least two events configured: one that requires authorisation and another that does not require authorisation, as seen below. It is crucial to have a Workflow error on a transaction, but there must also be at least one staff member who can approve any Workflow transactions that are created.
Examples
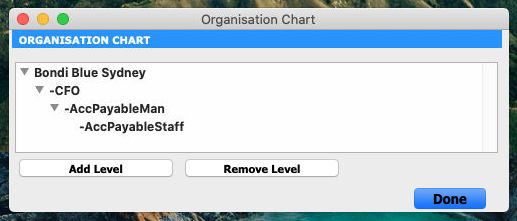
From the Organisation Chart referred to above, we will discuss three scenarios.
- Sales Staff: Set up users performing sales or purchases in the AccPayableStaff level.
- The Authorisation Required checkbox is selected.
- Sales Managers: Set up one or more users as Sales Managers in the AccPayableMan level.
- The Authorisation Required checkbox would not be selected.
- End result: All Sales staff will create transactions with a WF error, requiring the Sales Manager to approve them all. The Active Message alert will be displayed to all 100 staff members plus the Sales Manager.
- User Who Creates the Transaction: For the user who creates the transaction.
- The Authorisation Required checkbox is selected.
- Sales Managers: As above, set up one or more users as Sales Managers in the AccPayableMan level.
- The Authorisation Required checkbox would not be selected.
- End result: All Sales staff will create transactions with a WF error, requiring the Sales Manager to approve them all. The Active Message alert will be displayed to the user who created the transaction and the Sales Manager. Even if another user modifies the transaction, the only user who receives notification messages will be the user who created the transaction and the Sales Manager.
- User: If necessary for any transaction created, a specifically selected user may be set up to receive notifications regarding all transactions with workflow errors. This Sales Staff user must not have a Level of Sales Staff set in their user file, or else a conflict will arise.
- Select User from the Change button options.
- The Authorisation Required checkbox is selected.
- Sales Managers: Set up one or more users as Sales Managers in the AccPayableMan level.
- The Authorisation Required checkbox would not be selected.
- End Result: Only the Accounts Manager and the entered user would receive any alerts for Workflow.
Managing Authorisation Privileges for Users
Make sure that only a single user is granted authorisation privileges, and this user is not part of any other group or organisational level. If authorisation privileges are given to two specific users or levels, all parties must approve transactions before the WF error code is removed, except when they are members of an organisational level.
To accomplish this, set up the user and workflow rules in SapphireOne with care, ensuring the user’s authorisation privileges are separate from other groups or levels. By doing so, you can maintain control over the approval process and avoid conflicts or misunderstandings within the authorisation structure.
You can review our Blog and YouTube channel for additional information and resources on SapphireOne ERP, CRM and Business Accounting software.