SapphireOne Support Process Overview
Stage One of the SapphireOne support process requires clients who need technical support to email the support team with a detailed description of their issue. If a more immediate or interactive response is necessary due to urgency or complexity, clients are encouraged to arrange a support session.
To book support through the online portal, you need your support code, which consists of your client code plus a five-digit PIN. Find your client code on SapphireOne invoices, and locate your PIN on the SapphireOne toolbar. For example, it might look like “SAPONE12345”.
A SapphireOne technical support officer will reply to the appointment request, possibly with a straightforward solution or a reference to the SapphireOne Knowledge Base. Some cases might escalate to a detailed investigation by a SapphireOne engineer using TeamViewer, potentially revealing software functionality that could be improved in future updates.
Should the Support team determine the need for further training, Stage Two is initiated. This involves a training consultant providing additional instruction, which falls outside of the standard support package.
Stage Three is reached when it’s deemed that the client requires Sapphire Consulting. The client will upload their current data file to the secure SapphireOne File Station for review. A Support team member may audit this file for accuracy and consistency, while a Sapphire Consultant will support the client with professional services including software updates, data management, and financial reconciliations.
If Stage Four is reached, it suggests that the client and software engineer have recognised a need for new features in SapphireOne. The development team will then issue a quote based on a detailed brief provided by the client. Upon approval and payment, custom programming will commence to further tailor the software to the client’s specific needs.
Support with TeamViewer
SapphireOne utilises TeamViewer to provide remote support and training sessions for our clients. To facilitate this, please download and install the free or paid TeamViewer application on your MacOS or Windows server or workstation and set up an account.
SapphireOne will NOT require Full Disk Access. When allowed Full Disk Access grants background access to your file system for inbound connections. This allows files to be downloaded, moved, or deleted without on-screen indication. SapphireOne advises you to disable Full Disk Access for inbound connections. The process is outlined to follow.
MacOS Access Settings
The first step we recommend is to switch OFF the “New Interface” option, which is selected by default. We have found this new interface to be more complicated, so we have decided not to utilise or document this UI currently.

If TeamViewer is installed on MacOS, the Review System Access alert/button will appear. If the alert/button does not appear, go to the top left navigation bar, click Help, and select Check System Access.

Selecting this button will take the user to the TeamViewer Review System Access dialogue.
- Screen Recording – Allows SapphireOne developers to see what’s on your display
- Accessibility – Allows SapphireOne developers to control your mouse
- Full Disk Access – Allows SapphireOne access to your file system (not required)
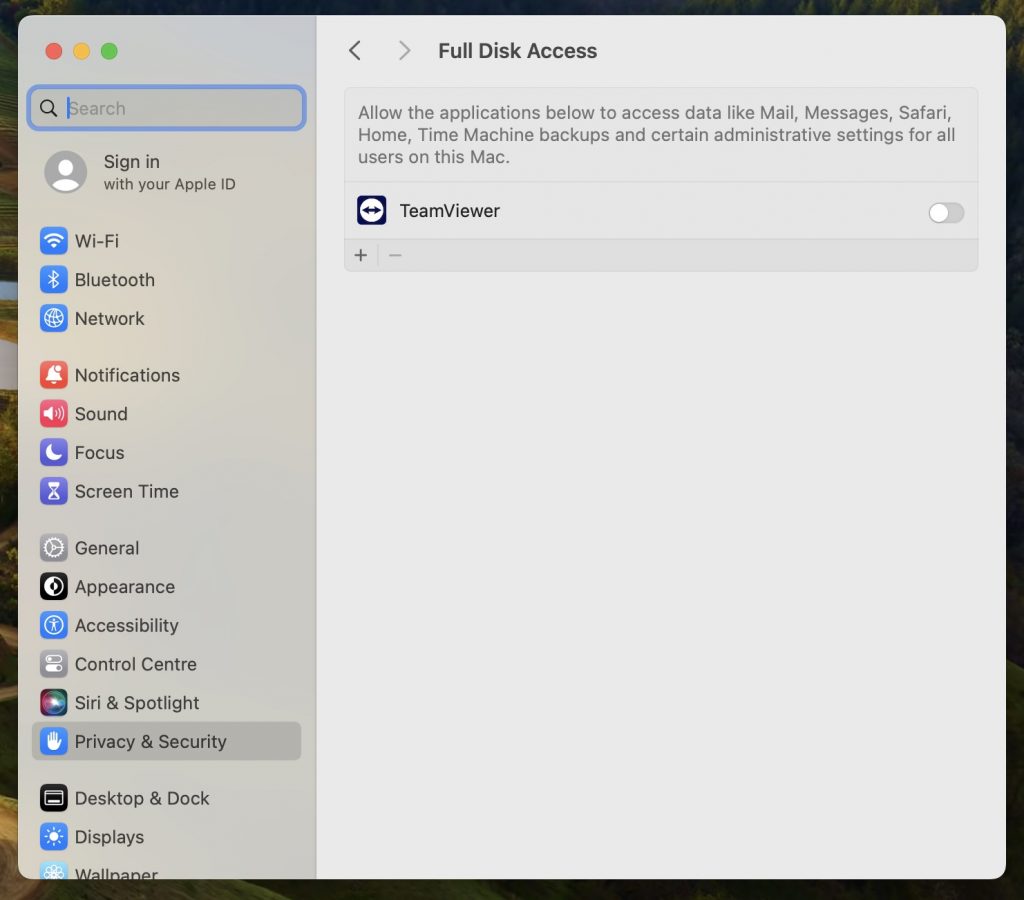
Select the Open Full Disk Access Preferences button and SapphireOne will open your MacOs System Preferences option at the Privacy & Security page.
- If you are not logged in as an Administrator, select the lock button in the lower left-hand corner of the screen and enter in an Administrator password to enable changes to be made to this screen.
- Select the Open Full Disk Access Preferences option
- If TeamViewer is not a listed option, Select the + button. A standard finder window will open
- Navigate to the Applications folder and select the TeamViewer application.
- Confirm TeamViewer is toggled to the off position
- If TeamViewer is open it will prompt to restart on each change. This can be deferred until all desired changes are complete
This completes the process of disabling file system access at the OS level. However more granular control of access settings available within the TeamViewer application and this should be audited. The procedure is outlined to follow.
TeamViewer (MacOS) Access Settings
- In the TeamViewer task bar at the top left of your screen, navigate to TeamViewer > Settings.
- Select the Advanced Tab
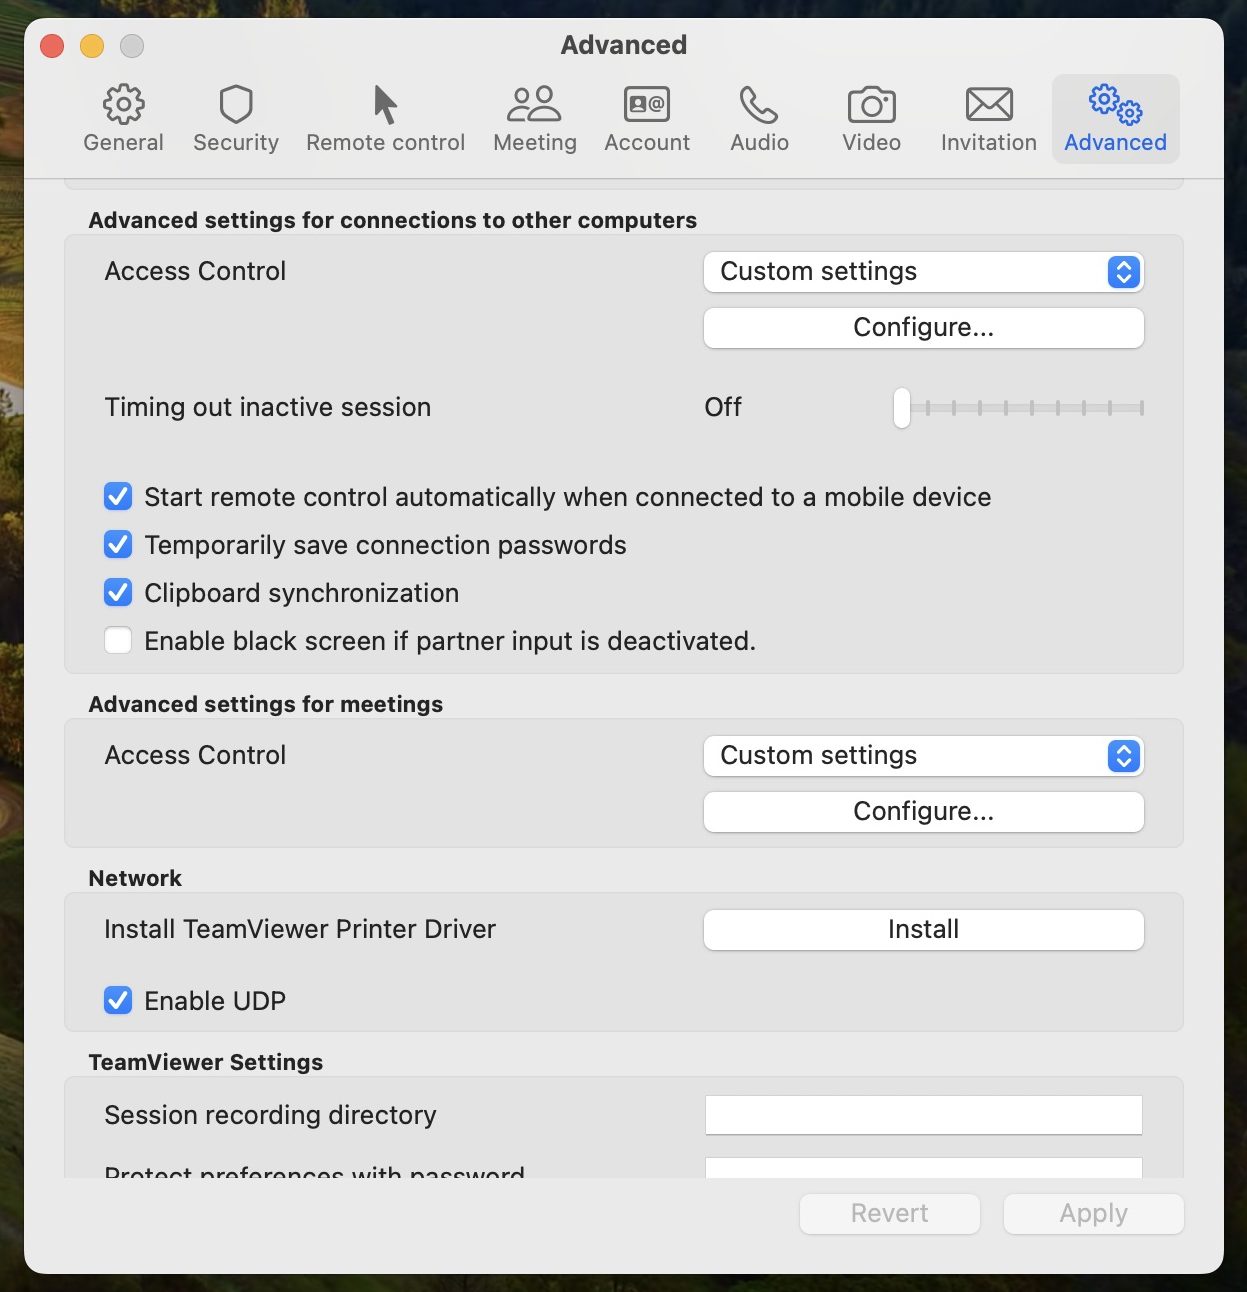
- Scroll to Advanced Settings For Connections on this Computer
- Within Access Control, select Custom Settings from the menu
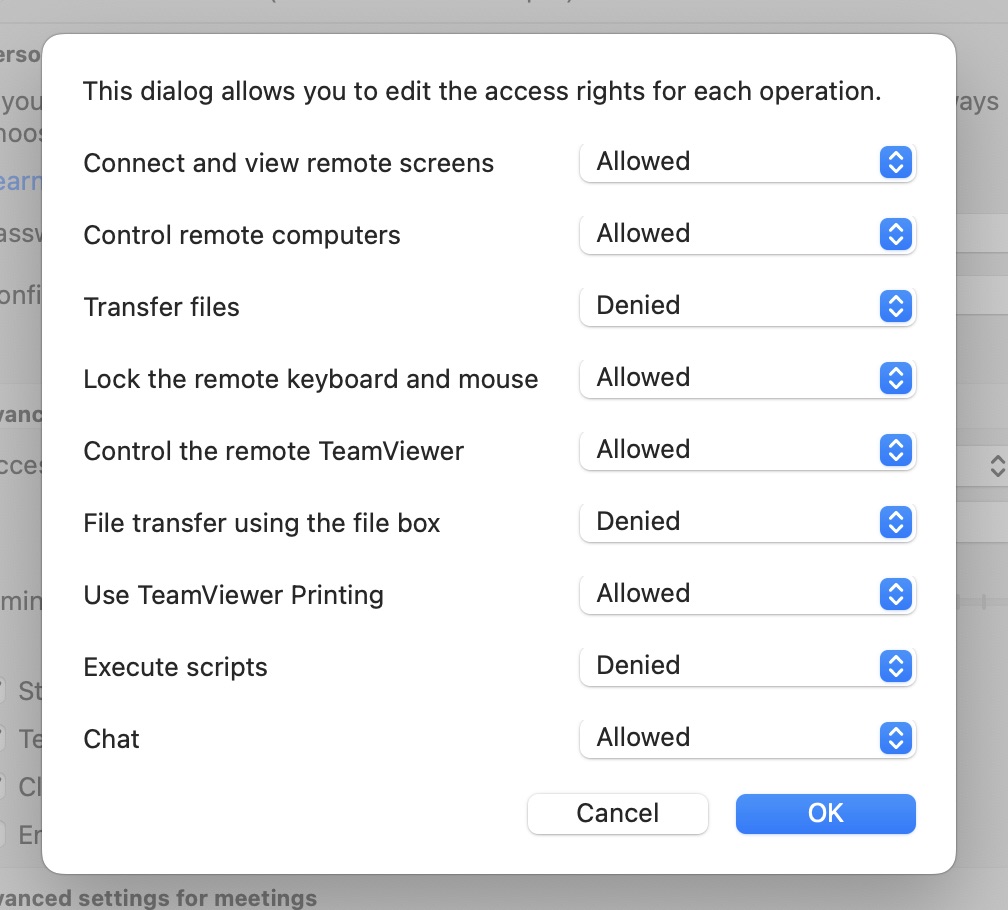
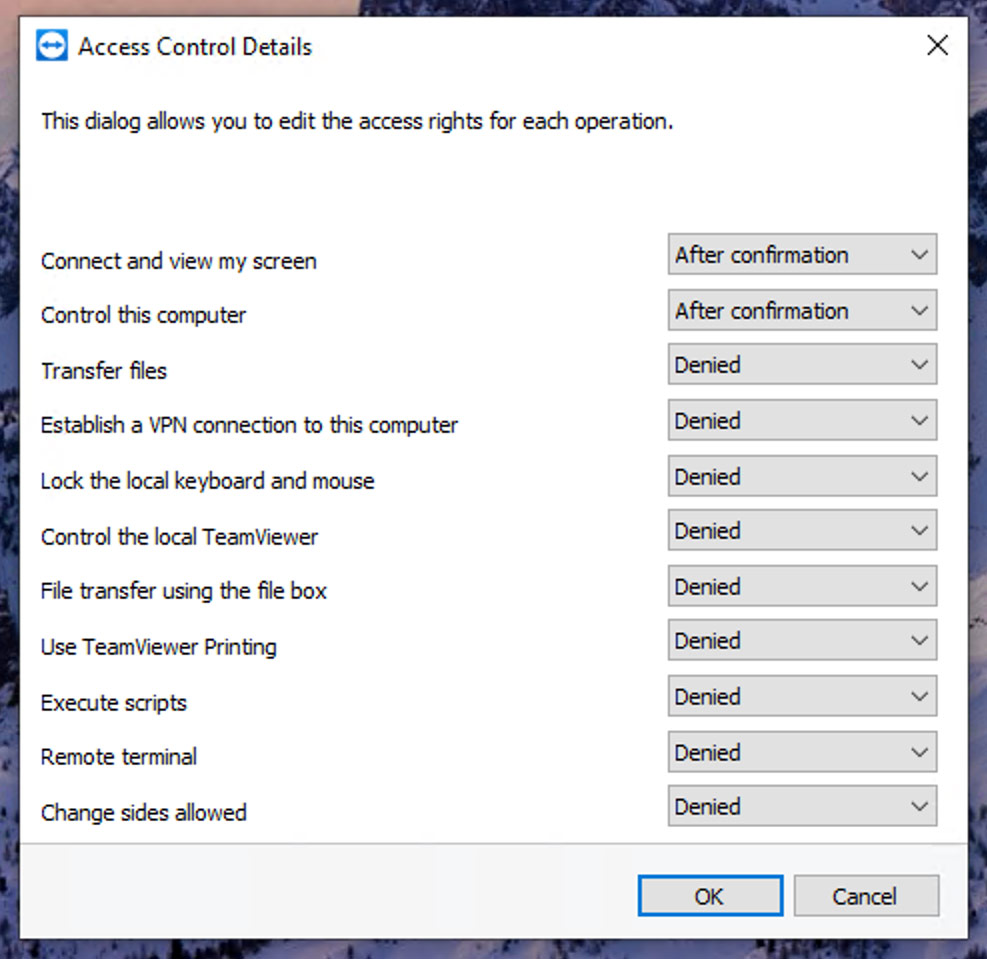
- Select Configure and make changes to your preference. Our recommended configuration can be seen in the images to follow
- Select Ok. This will close the Configure modal
- Select Apply
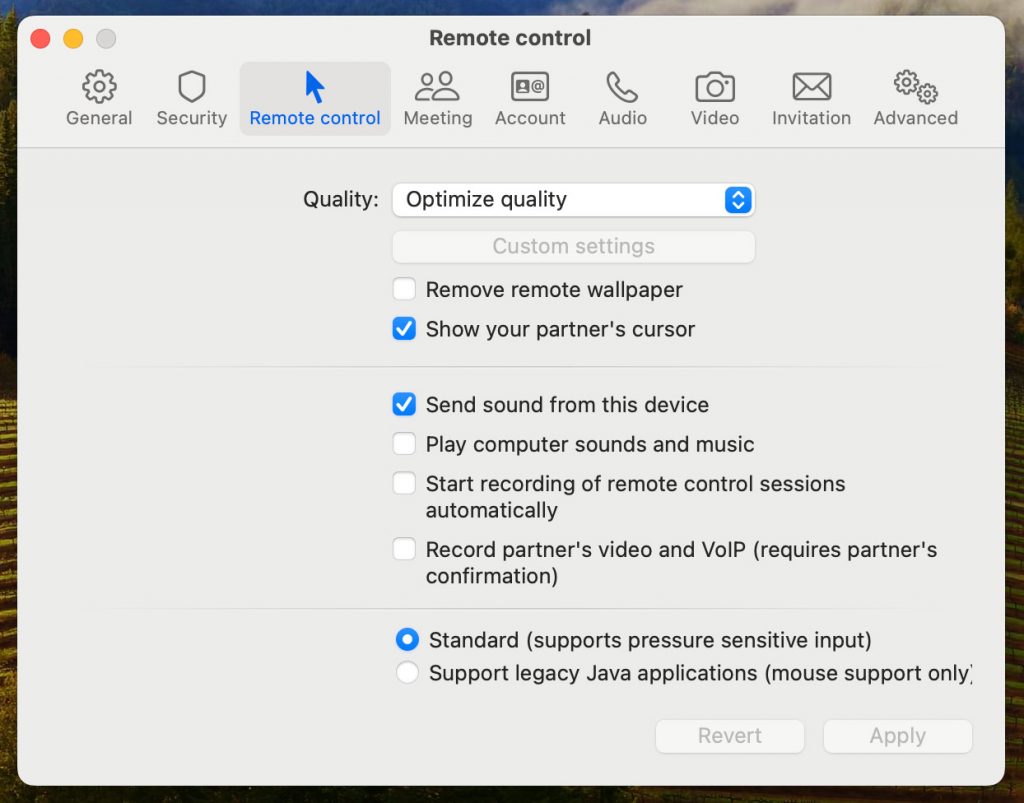
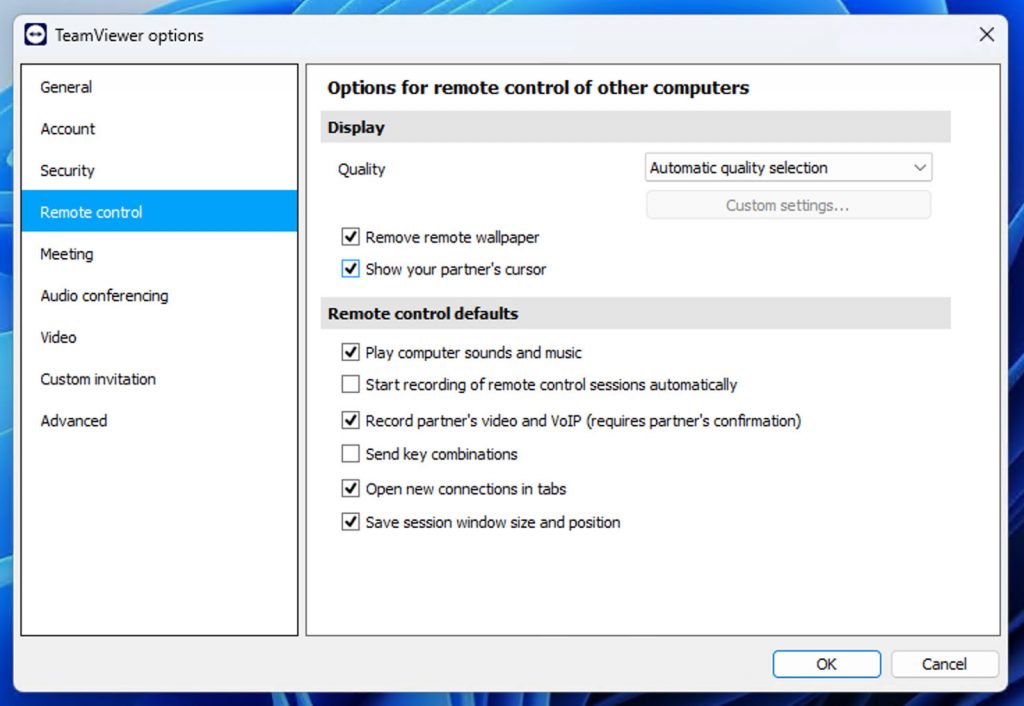
- Select the Remote Control Tab
- Select Show your partner’s cursor
- Select Apply
Ensure that you have updated to the latest version of TeamViewer if you are still experiencing access problems.
TeamViewer Windows Access Settings
The first step we recommend is to switch OFF the “New Interface” option, which is selected by default. We have found this new interface to be more complicated, so we have decided not to utilise or document this UI currently.
- Navigate to the Options
 > Advanced Tab
 - Select the Show Advanced Options button
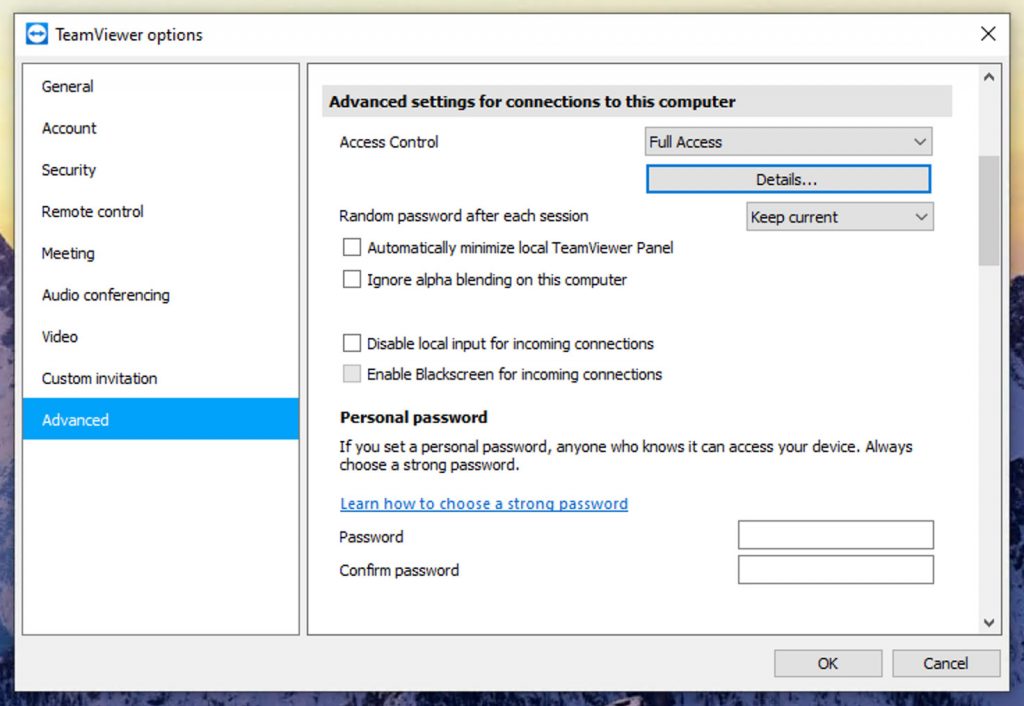
- Scroll to Advanced Settings For Connections To this Computer
- Select Custom Settings from the menu
- Select Configure and make changes to your preference. Our recommended configuration can be seen in the images to follow
- Select Ok. This will close the Configure modal
- Select OK
- Select the Remote Control Tab
- Select Show your partner’s cursor
- Select Apply
You can review our Blog and YouTube channel for additional information and resources on SapphireOne ERP, CRM and Business Accounting software.