This comprehensive guide is designed to assist administrators in setting up and managing email functionalities within SapphireOne, applicable across all operational modes. This guide ensures that users are well-equipped to handle email-related tasks within SapphireOne.
It should be emphasised that SapphireOne incorporates a built-in email client. Consequently, configuring the email client in SapphireOne is similar to the configuration process for any other email client application.
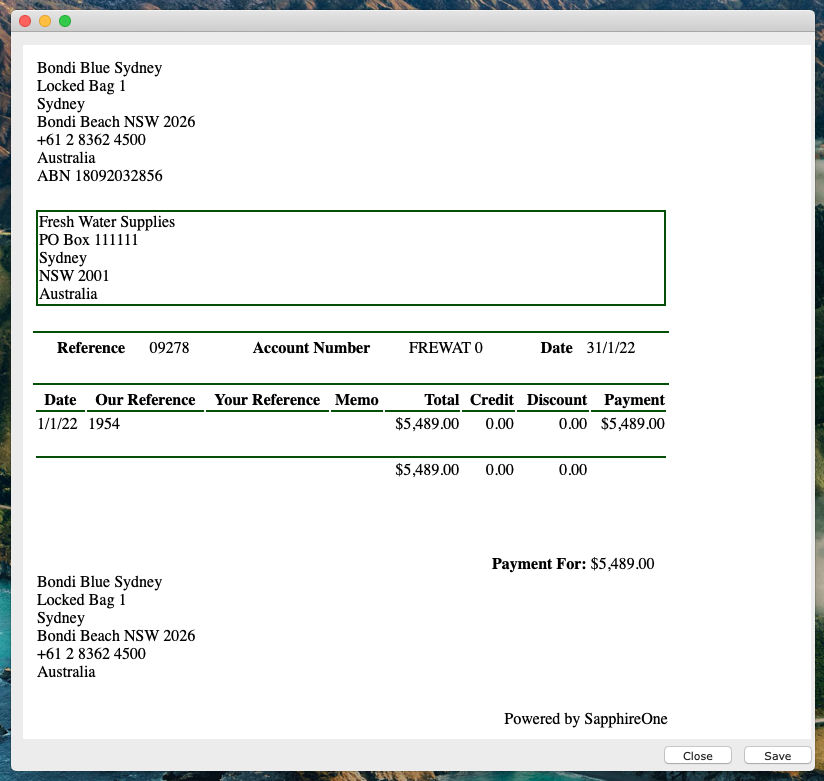
SapphireOne’s built in Email Client functionality enables users to dispatch emails directly from any transaction or inquiry screen, thereby optimising communication workflows. This Email Client feature permits the creation of bespoke email inquiry screens for Receivables or Payables in the Accounts mode, offering a variety of design output preferences. All reports are automatically attached within the body of the email in PDF format, guaranteeing uniformity in presentation and elevating the professionalism of your organisation’s email correspondence.
Additionally, SapphireOne provides the option to set a default for the automatic attachment of the generated PDF to the corresponding transaction within the Client’s master record in the Document Management System (DMS). This ensures a comprehensive record of all correspondence dispatched from SapphireOne, encompassing Clients, Vendors, Employees, Job Projects, and more.
The email log capability further augments communication management, affording users a meticulous record of all email transactions for straightforward tracking and referencing. These integrated features collectively facilitate seamless and precise communication, thereby boosting the productivity and operational efficiency of your organisation.
Email Functionality Overview
This guide provides instructions for configuring the Email Client functionality of SapphireOne on MacOS and Windows. Following these guidelines, users can activate and utilise the email features of SapphireOne, thereby enhancing communication efficiency. SapphireOne is compatible with a multitude of mail servers available for both MacOS and Windows platforms, offering users the flexibility to select and configure their preferred email host or server to align with their requirements.
To activate the integrated Email Client, administrators must input the necessary email settings to connect with their company’s email host or server within SapphireOne’s Utilities > Controls > System Controls. Once the email settings are established in System Controls, users can seamlessly access and engage with the email functionalities provided by SapphireOne.
SapphireOne’s email functionality is designed to ensure seamless communication by utilising the appropriate sender and recipient email addresses for correspondence with Clients, Vendors, Employees, and other stakeholders. The configuration of email settings within System Controls is a critical step to enable this feature effectively.
Email Address Precedence
When determining the sender email address for outgoing emails, SapphireOne adheres to a specific order of precedence. This ensures that emails originate from a recognised and authorised source within your organisation. The hierarchy for sourcing a sender email address is as follows:
- User Access Inquiry – The primary location where individual user email addresses are specified.
- Company Inquiry – A dedicated page allows for the specification of alternative sender email addresses for up to five distinct areas within SapphireOne.
- System Controls – This serves as the fallback for the sender email address in instances where the above options are not utilised.
For testing purposes, the Email address intended to receive the test email should initially be entered. Upon a successful test, you may proceed to update the sender email address for the company as necessary.
Recipient Email Addresses
The Recipient email addresses, which are used for deploying emails to Clients, Vendors, and Employees, are entered within their respective inquiries on the first page. This ensures that each email is directed to the correct recipient.
By prioritising the user’s email address, SapphireOne guarantees that all emails are dispatched from a valid and identifiable source. Should the user’s email address be unavailable, SapphireOne will cycle through the subsequent locations until a valid Email address is identified. This structured approach to Email management within SapphireOne enhances the efficiency of communication channels, contributing to the overall productivity and professionalism of your organisation’s operations.
To optimise the delivery of batch emails through SapphireOne and prevent them from being intercepted by spam filters, it is essential to configure the spam filter settings on the Email Host or server appropriately. Spam filters are designed to detect and block mass email transmissions that exhibit characteristics of unsolicited emails. When SapphireOne sends batch Emails, the rapid sending of multiple messages may inadvertently resemble such characteristics.
To mitigate this issue, the individual responsible for managing your email host or server should adjust the spam filter settings to recognise and permit the batch Email activity from SapphireOne. This involves whitelisting the email addresses or domains used by SapphireOne, or modifying the rate-limiting controls to accommodate the volume of emails sent during batch operations.
Blind Carbon Copy (BCC)
To enhance the tracking and auditing of Email correspondence sent through SapphireOne, it is recommended that users employ the BCC (blind carbon copy) feature when configuring their Email settings. This functionality is accessible across all modules within SapphireOne where Email capabilities are provided.
By utilising the BCC field, users can discretely direct a copy of each email to a predetermined Email address. This address may belong to a specific department within your organisation, an individual’s account, or a dedicated account established solely for archiving purposes. The inclusion of a BCC recipient ensures that a thorough record of all outbound Emails from SapphireOne is maintained, which can be invaluable for future reference, compliance verification, and audit trails.
It is important to note that the use of the BCC feature is a best practice for maintaining privacy and confidentiality, as it allows for discreet monitoring of Email communications without disclosing the recipients’ identities to each other. This practice not only aids in record-keeping but also upholds the integrity of your organisation’s communication processes.
Print and Email Defaults
It is recommended that administrators confirm the printing and Emailing settings in SapphireOne. To access these settings, go to Utilities > Controls > Master Defaults > Invoices Page.
From here, users can configure the printing and Emailing options for invoices in SapphireOne. By ensuring that the correct settings are selected, users can seamlessly print and Email invoices to their Clients, Vendors, and other stakeholders directly from SapphireOne.
Entering the Email Host or Server Details
It should be again emphasised that SapphireOne incorporates a built-in Email Client. Consequently, configuring the Email Client in SapphireOne is similar to the configuration process for any other Email Client application.
Email Server or Host credentials or details must be entered into Utilities > Controls > System Controls. They are not entered into a User Access Inquiry or a Company Inquiry.
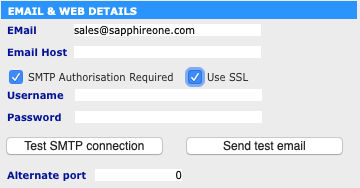
Before utilising the Email features within SapphireOne, users are required to configure their Email host or server. This initial setup is accessed through Utilities > Controls > System Controls within the SapphireOne platform. Completing this step is a prerequisite for executing any Email-related operations in the software.
During this configuration phase, users must input their return Email Address, Email Host, User Name, and Password into the designated fields to enable SapphireOne to connect to their Email host or server. Successful completion of this configuration allows users to leverage the full spectrum of email capabilities offered by SapphireOne, facilitating smooth communication via email with clients, vendors, employees, and other key contacts.
The following configuration settings encompass aspects such as Email Recipient, Host, and Security Settings, each requiring attention to detail to ensure proper functionality and secure email exchanges.
- Email – To test the email functionality in SapphireOne, users are advised to enter an email return address. This address is used to verify that the email functionality works correctly.
- After Testing – Remember that the return address can be modified if needed and used as a single return email address across all modes in SapphireOne, simplifying email communication and ensuring emails are sent from a consistent and recognisable source.
- Email Host – In addition to entering an Email return address, users must also enter an Email host in SapphireOne. The Email host address typically begins with mail or smtp.xxx.xxx.xx and represents the Email server that is used by the user’s organisation or Company. By entering the Email host address in SapphireOne, users grant SapphireOne access to their Email server. This enables the users to utilise SapphireOne’s Email Client functionality seamlessly.
- SMTP Authorisation Required – If the
 checkbox is selected in SapphireOne, the Email host or server will require the entry of a Username and Password for authentication purposes. This type of authentication is typically required by Email hosts or servers to ensure secure access to the relevant Email accounts. Once the checkbox is selected, data entry fields for the Username and Password will be displayed in SapphireOne. This allows users to enter their credentials and gain access to the mail functionality in SapphireOne. By enabling the checkbox and entering the appropriate credentials, users can securely send and receive Emails through SapphireOne’s software.
 - Use SSL – If SSL encryption is required by the Email host or server, users should select the
 checkbox in SapphireOne. By selecting this checkbox, SapphireOne will require that the connection is secured with Secure Socket Layer (SSL) encryption. This ensures that all Email communication between SapphireOne’ software and the Email host or server is encrypted and protected from un-authorised access. By selecting the checkbox, users can ensure that their Email communication is secure and compliant with the encryption requirements of their Email host or server.
- Errors – During testing, any error in sending will be displayed in a Company Inquiry on the Email Page. The most common errors are, UN: xxx, User Name error while PW:xxx is a Password error.
- Username – Enter the Email accounts Username.
- Password – Enter the Email accounts Password.
- Test SMTP Connection – Test the SMTP connection to the email host server.
- Send Test Email – Selecting this button will send a test Email to the Email address in the Email field.
- Success – If successful a message will be received in the email account as entered.
- Failure – If the test fails, an alert will be displayed to provide the user with some indication of the reason for the issue.
- Alternate Port – By default, SapphireOne uses the standard email port for email communication. However, users can specify an alternate port if necessary by entering the port number into the appropriate data entry field in SapphireOne. This feature allows users to configure the Client email functionality to work with the specific requirements of their email host or server. By entering an alternate port, users can ensure that their email communication is seamlessly integrated with SapphireOne and compatible with their email host or server.
When users request that SapphireOne send an invoice via email, SapphireOne automatically attempts to access the Email Host as specified in the System Controls’ Email and Web Details section. The return email address entered in this section will be used as the sender’s email address for the invoice email. By ensuring that the correct email host and return email address are entered in System Controls, users can streamline their email communication and effortlessly send invoices and documents to their clients, vendors, and other stakeholders.
Office 365 Settings
If users use Office 365 as their email service provider, they need to input the host email address designated by Office 365. It’s important to note that Microsoft may make changes to these details. Therefore, users should check the Microsoft webpage if the following details seem incorrect. Typically, the host email addresses for incoming and outgoing emails will resemble the following:
- Currently, for incoming emails it is: IMAP & POP outlook.office365.com
- Currently for outgoing emails: smtp.office365.com (this is the email host that should be entered in SapphireOne)
Furthermore, during the configuration of a User Access Inquiry in SapphireOne, users are required to enter their Office 365 email address. Adherence to these steps guarantees full integration of their Office 365 email with SapphireOne, enabling seamless operation.
SapphireOne Server HTTP Settings
If users plan to generate emails from the web, the HTTP server on the SapphireOne server must be enabled by selecting the Start HTTP Server button in the Server Admin Window > HTTP Server Tab on the main interface. Keep in mind that the SapphireOne server application must then be restarted to enable this feature once the button has been selected.
If a single email account is to be used across SapphireOne, the entry of the email details is required only in System Controls. SapphireOne would then refer back to the System Controls and use this single email address for all users and all areas.
Entering The Recipient Email Address
SapphireOne follows a precedence when selecting the sender email address for email communication. SapphireOne will search for a valid email address in the following order:
- User – Utilities > Controls > User Access Inquiry – Details Page (For Individual users).
- Company Inquiry – Utilities > Controls > Company Inquiry – (Emails Page has five options).
- System Controls – Utilities > Controls > System Controls. (Email & Web Details area).
Once a valid email address is found, SapphireOne will not advance to a subsequent level in the precedence order. This policy guarantees that emails sent from SapphireOne originate from a recognisable and valid address. By giving priority to the user’s email address, SapphireOne ensures that all outgoing emails are from a trusted source, increasing the likelihood of successful delivery.
Email Set Up User Access Inquiry
In SapphireOne, the ‘User Access Inquiry’ found at Utilities > Controls > User Access > Details Page, is the initial location checked for the return email address. When sending emails, SapphireOne prioritises this inquiry as the first location to search for a valid email address. This approach ensures that email communications are sent from a trusted and recognised source.
User Access – Email Area
If used this Email area must have the following data entry fields entered as follows:
- Email Address – If the SapphireOne Email Client is being used, the only item required to be entered into a user inquiry is a return email address. For the chosen user any emails sent from SapphireOne will specifically have this users return address.
- Use External Email Client – If the Use External Email Client
 checkbox is selected in SapphireOne, the following additional items will have to be entered in addition to the return email address entered above:
- Username – Enter the user name for the external email client.
- Password – Enter the password for the external email client.
- BCC option – If users plan to use the BCC function when sending emails from SapphireOne, an additional email address must be entered. This email address can be a company or personal email account, or an email account set up specifically for storing emails sent from SapphireOne. By entering this additional email address, users can ensure that all emails sent from SapphireOne are copied to the specified email account for record-keeping and backup purposes. This feature can help users stay organised and keep a permanent record of all emails sent from SapphireOne.
- Edit Signature – Add an automatic signature to the email. You can also set up a signature in the More Details page of a Company Inquiry.
- Test – After entering all of the required details for sending emails, you can use the Test button to check that the email settings are working correctly. This feature is very useful to ensure that your email settings are configured correctly before sending out any actual emails from SapphireOne.
It is important to remember that if users are using Office 365 as their email provider, both the Office 365 host and the Office 365 user email address must be entered into SapphireOne. The Office 365 host email address should be entered into System Controls, as discussed earlier in this article. Additionally, when setting up a User Access Inquiry, the Office 365 user’s email address must also be entered. By completing both of these steps, users can ensure that their Office 365 email is fully integrated with SapphireOne and can be used seamlessly.
Email Setup Company Inquiry
If a valid return Email address is not found in the User Access Inquiry, SapphireOne will then search within the Company Inquiry at Utilities > Controls > Company > Emails Page. Here, there are five distinct fields for entering email addresses corresponding to Receivables, Payables, Sales, Purchases, and Payroll. By populating these fields with the appropriate return Email addresses, users can streamline Email communications, directing messages to the correct departmental addresses. This customisation within the Company Inquiry ensures efficient distribution of information to all relevant parties.
Should the same email address be applicable for all five areas, it can be entered into each corresponding field. This centralisation of email addresses simplifies the management of email communications, maintaining consistency and ensuring that all necessary parties are kept informed.
Using External Email Client or Host
To configure SapphireOne for use with an external Email client, users must enable the relevant feature. This can be done by navigating to Utilities > Controls > Master Defaults > System Page within SapphireOne. In the Email section on this page, users have the option to modify settings. To proceed with using an external email client, select the option labeled ![]() .
.
Entering Email Details in a Company Inquiry
For each specified area from Receivables to Payroll enter the following details:
- Email Address – When using the built in SapphireOne Email Client, the only item required to be entered into a User Access Inquiry is a return address. Once a valid return address is entered into the User Access Inquiry, any emails sent from SapphireOne will include this user’s return address. This simplifies the email setup process and ensures that all email communication is sent from a recognisable and consistent source. By using the SapphireOne Email Client and entering a valid return address, users can streamline their email communication and ensure that all emails are sent from a trusted and recognised source.
- Username – Enter the user name for the external Email Client if one is used.
- Password – Enter the Password for the external Email Client if one is used.
- BCC Address – To leverage the BCC (Blind Carbon Copy) option while dispatching emails via SapphireOne, individuals must designate a specific email address for this feature. This could be a personal or corporate email, or often an email created solely for archiving SapphireOne sent correspondences. Employing the BCC element aids in documenting every email transmitted from SapphireOne, serving archival needs and adding a supplementary backup tier. Utilising the BCC feature allows users to tailor their email interactions, guaranteeing that all pertinent recipients are informed as necessary.
- Edit Signature – Add an automatic signature to the email. You can also set up a signature in the More Details page of a Company Inquiry.
- Test – After entering all of the required details for sending emails, you can use the Test button to check that the email settings are working correctly. This feature is very useful to ensure that your email settings are configured correctly before sending out any actual emails from SapphireOne.
Whenever an email is sent via SapphireOne, it automatically generates a log that tracks the email’s details, including the sender, recipient, date, time, and any attachments included. Administrators can access this log by navigating to Controls > Company”>Utilities > Controls > Company. It serves as a comprehensive record of all emails sent from SapphireOne. Reviewing the email log allows administrators to monitor user communication effectively and verify that all necessary emails are sent and received. The email log is a crucial feature of SapphireOne, providing essential oversight of email communications.
If no email address is entered during a User Inquiry, or in a Company Inquiry, SapphireOne will attempt to retrieve an email address from the System Controls as a last resort. By configuring the email settings in System Controls, users can ensure that SapphireOne has access to the necessary information to send emails and retrieve email addresses when needed.
Entering Email Recipient Addresses
To fully utilise the email functionality in SapphireOne, users may also enter the email addresses for each Client, Vendor or Employee in their respective Master records in the Address area as follows:
- Clients – Client Master records include options for saving three distinct email addresses as follows:
- Email – A primary email for general correspondence.
- E-Statements – An alternate email for targeted communications, such as dispatching statements.
- URL – A data entry field where the Clients URL may be entered.
- Vendors – Vendor Master records include options for saving two distinct email addresses as follows:
- Email – A primary email for general correspondence.
- URL – A data entry field where the Vendors URL may be entered.
- Employee – Employee Master Records include a provision for storing just the personal email address of employees.
Example from a Clients Master Record
The accompanying screenshot illustrates the placement of these Email fields in a Client Inquiry screen, and a similar arrangement is found on the initial page of both a Vendor and Employee Inquiry. By configuring these different email addresses, users can facilitate direct emailing to specific contacts in their database, enhancing communication and operational efficiency.
Within a Client’s or Vendors master record, any email addresses entered into the primary Email and the E-Statement fields will be automatically designated for sending routine communications and e-statements to that particular Client or Vendor. Such a setup in SapphireOne ensures a smooth process for distributing both general and statement-related emails to Clients and Vendors, contributing to a more streamlined and efficient communication workflow.
When sending emails to Clients and Vendors alike, users must select the ‘Include In Batch List’ ![]() checkbox for each contact. This feature allows the sending of multiple emails simultaneously, thereby saving time and effort in day-to-day operations. By streamlining the email-sending process, SapphireOne enhances efficiency and productivity for organizations of all sizes.
checkbox for each contact. This feature allows the sending of multiple emails simultaneously, thereby saving time and effort in day-to-day operations. By streamlining the email-sending process, SapphireOne enhances efficiency and productivity for organizations of all sizes.
Setting up Employee Recipient Email Addresses
After entering the recipients’ email addresses for employees in SapphireOne’s Employee Inquiry, the procedure for sending emails is the same as for Clients and Vendors, as documented above.
Accounts Mode Email Procedures
SapphireOne enables users to send emails from multiple locations or modes, as detailed below. While email has become the preferred method, the option to print and mail Statements, Payments, and Invoices via traditional postal services is also available from the same interface. This section offers a concise summary of the email procedures for quick reference. For a thorough understanding, readers are encouraged to review this entire article.
Emailing Client Statements
The procedure for processing Client Statements in SapphireOne involves selecting the appropriate report from the list in the Receivables menu. This can be found by navigating to: Accounts > Receivables
To access these options proceed as follows:
- Report Options – Select the Statement option from the list of reports.
- Print Dialog – Next the Print Dialog screen will be displayed.
- Print Destination – Select the Email option.
- Report Type – From the email options of a Single email or Batch Emails select as required.
- Printing – When data entry has been completed select the Print button.
- Email Report – An Email Report screen will be presented with all necessary data pre-filled. Users will have the option to modify these entries as needed. If any data is absent from the Clients Master record, users will need to manually input it.
Emailing Vendor Payments
The procedure for processing Vendor Payments in SapphireOne is slightly different as the user must access the email function from the Process options in the Payables drop down menu. This item may be found by going to: Accounts > Payables. After the user selects the Payments option from this drop down menu a Process Payments alert will be displayed. Next proceed as follows:
- Process Payments Alert – Select the Payments checkbox then select the OK button
- Bank Account – The Bank Accounts selection screen will be displayed next so select the appropriate bank Account and select the OK button.
- Transactions Reports – This is the print dialog screen where there are a number of options.
- Print Destination menu – By default the Email option is selected. You may have to re-select the email option to force the update of the print dialog screen to display the email options in the Report Type menu.
- Report Type menu – Select Cheque, Remittance or Remittance & Cheque.
- Report Method menu – Please note carefully, select Single Email or Batch Email. There are a number of other options in this menu that perform printing options.
- Printing – When data entry is complete select the Print button.
- Payment Selection – This screen will be displayed next so select the transactions that are to be paid in this Email run as required.
- Selecting Transactions – When processing payments in SapphireOne, users are presented with various options, from this Payment Selection Screen. Make your selection from the two columns at the right hand side of the screen.
- Continue.. Button – When all transactions have been selected sect the Continue button
- Confirmation – After completing the processing, SapphireOne may prompt users to confirm that the items have been printed or created correctly. This confirmation step helps ensure accuracy and completeness in the payment processing workflow.
- Email Report – An Email Report screen will be presented with all necessary data pre-filled. Users will have the option to modify these entries as needed. If any data is absent from the Vendors Master record, users will need to manually input it.
Sending a Single or Selected Emails
If you’re uncertain about the sequence number or other transaction details you wish to email while the print email dialog window is open, move the window to the left side of the screen. Then select the Account Transactions option from the Inquiries Palette. Next, read the necessary details from the list and enter them into the filter area of the window. Using sequence numbers is advisable if the range is limited.
Emailing from Transaction Inquiries in Accounts mode
In Accounts mode both Receivables and Payables have a Transaction Inquiry Emailing feature. From within a Transaction Inquiry, a single transaction can be opened on the screen and then either printed or Emailed.
Remember, open a single email. Do not select a group of transactions and then open them as a group for viewing or modification.
For both Receivables and Payables, the user can select and highlight a single item from the Transaction Inquiry list or use Command/Control click to select specific transactions.
- Printing – Directly select the
 Print button on the main tool bar and not the small arrow to its right. SapphireOne will display the Transaction Reports Print Dialog screen.
- Print Destination Menu – Select the Email option.
- Report Type menu – This menu provides options for sending either a Single Email or Batch Emails from the list of transactions so select the Single option.
- Report Sort Order menu – Not required as you are sending emails.
- Print Button – When data entry is complete select the Print button.
- Email Report Screen – Review the data entry on this screen and when all is correct select the Send Button
Inventory Mode Email procedures
It should be noted that only Batch emails may be sent using this functionality in SapphireOne. There are a number of procedures available for the user to process these emails.
Emailing Sales Invoices or Purchase Orders
For both Sales and Purchases the procedure is virtually identical once the user has made a selection from either menu. To send emails from either Sales or Purchases in SapphireOne. For both Sales and Purchases the required items are in the reports area of the Sales or Purchases area of the respective drop down menu as follows:
- Sales or Purchases – Select either the Sales or Purchases menus as follows.
- Sales Invoices – Go to: Inventory > Sales > Invoices, which is in Reports section of the Sales menu.
- Purchase Orders – Go to Inventory > Purchases > Purchase Orders, which is in the Reports section of the Purchases menu.
- Print Dialog – In both cases above, users are immediately presented with SapphireOne’s standard print dialog screen named Batch Email Invoices. The procedure remains consistent for both Sales and Purchases from this point onward.
- Print Destination – Select the Email option for both Sales and Purchase.
- Report Type – SapphireOne will automatically set this option as Batch email as it is the only option in this menu and enables users to send batch emails for both Sales and Purchases.
- Print – When this button is selected SapphireOne will present the user with the Batch Email Invoice selection screen which is documented below.
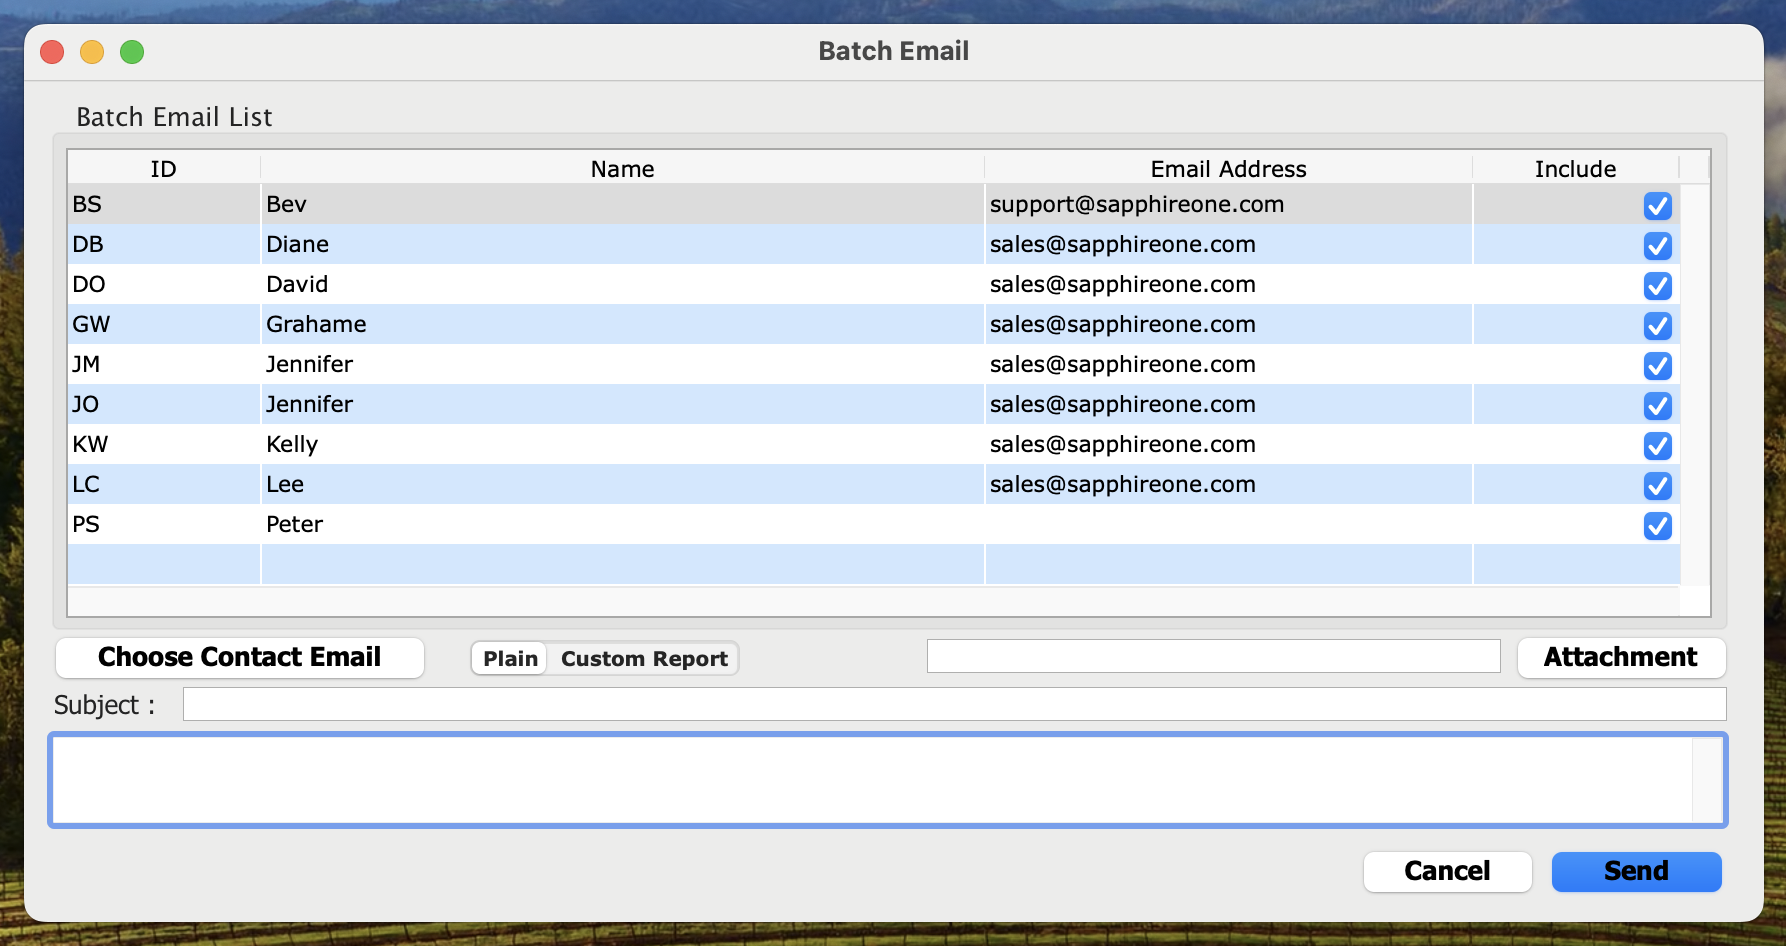
- Batch Email Invoices Screen – In this screen in SapphireOne, users can efficiently manage the sending of invoices for both Sales and Purchases. The screen layout remains consistent for both types of invoices. Here’s a breakdown of the key components:
- Invoice List: The main section of the screen displays all invoices that are ready to be sent. This includes invoices generated for Sales transactions or Purchase Transactions.
- Right-hand Column: Users will notice a column on the right-hand side of the screen populated with checkboxes. This column automatically ticks all invoices that are eligible to be emailed out in the current batch.
- Transaction Selection: To proceed with sending the emails, users need to review each invoice individually. They should carefully check each invoice and deselect any that are not meant to be emailed out in the current batch.
- Sending Email – Once all transactions have been reviewed select the Send button.
- Final Alert – When the user clicks the Send button, an alert may be displayed. It is important to select your option carefully.
- Yes – Choosing Yes will cause SapphireOne to mark the item as Printed/Emailed and it will no longer appear in any lists of items to be printed.
- No – Selecting No will it will still appear in any lists of items to be printed or Emailed.
By manually reviewing and deselecting invoices as needed, users can ensure that only the appropriate invoices are sent out via email. This process helps in maintaining accuracy and efficiency in communication with customers and suppliers.
Emailing a Single Transaction in Inventory mode
- Selecting Email Option – In both Sales and Purchases modules of SapphireOne, when a single transaction is open on screen, it can be printed or emailed by selecting the
 arrow next to the
  Print button on the main toolbar. This will display a drop-down menu with at present 14 options on it.
- Note Carefully – The email option will only be displayed in the drop-down menu after selecting the Down arrow next to the Print button on the main toolbar.
- Email Option – Select the third option Email
- Note Carefully – The email option will only be displayed in the drop-down menu after selecting the Down
- Email Report Screen – When sending a single email, the user will be directed straight to the Email Report screen. Similar to other email data entry screens.
- Data Entry – If all details are already in the Client or Vendor’s master record, SapphireOne will automatically input them.
- Missing Data – However, if these details are missing, the user will need to enter them manually.
- Sending the Email – Once all information is accurate, the user can select the Send button to send the email to the intended Client or Vendor.
Batch Emailing from a Transaction Inquiry in Inventory mode.
Emails for both Sales and Purchases are sent from Transaction Inquiries using the Batch Email option. This functionality is available from the Sapphire Tools menu on the main toolbar. This option can be used to send emails for any item that appears in these lists. It is important to note the following
- Transaction Selection – SapphireOne will only send emails for currently selected/highlighted items.
- Alert – If SapphireOne detects that no items have been selected, it will display an alert message warning the user.
- Filtering – To send emails for selected items, users must first selected/highlight all of the selected items in the resulting list. Once the transactions have been selected/highlighted proceed as follows
- Sapphire Tools – From the Sapphire Tools drop down menu select the Batch Email option. The Batch Email Invoices screen will be displayed next.
- Batch Email Invoices Screen – In this screen in SapphireOne, users can efficiently manage the sending of invoices for both Sales and Purchases. The screen layout remains consistent for both types of Invoices. Here’s a breakdown of the key components on the Batch Email Invoices screen:
- Invoice List: The main section of the screen displays all invoices that are ready to be sent. This includes invoices generated for Sales transactions or Purchase Transactions.
- Note Carefully – All transaction/s previously selected/highlighted will be selected for emailing.
- Right-hand Column: Users will notice a column on the right-hand side of the screen populated with checkboxes. This column automatically ticks all invoices that are eligible to be emailed out in the current batch.
- Manual Selection: To proceed with sending the emails, users need to review each invoice individually. They should carefully check each invoice and deselect any that are not meant to be emailed out in the current batch.
- Sending the Emails – Once all is correct select the Send Button.
- Emails – SapphireOne will immediately commence sending all transactions ticked in the Batch Email Invoice Screen.
Deployment Examples
Please refer to the screenshot below, where we have used command/Control-Click to select sales invoices.
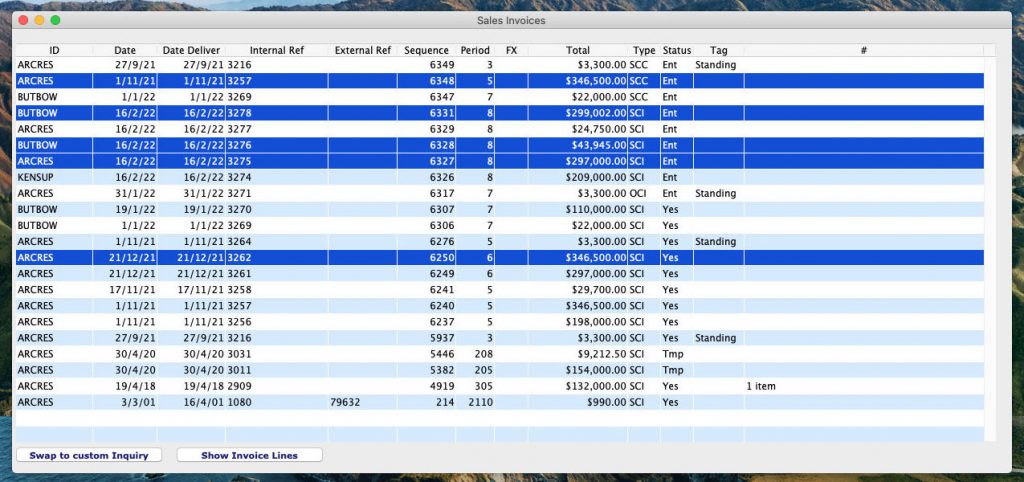
Once these items have been selected and the Batch Email option is chosen, SapphireOne will display the pop-up message shown below.
All of the selected items from the Sales list will populate the Batch Email Invoice list (as shown below). The user may then deselect any unwanted items from the Include Column checkboxes; these items will then not be included in the email. This gives the user two opportunities to select the transactions to be sent by email.
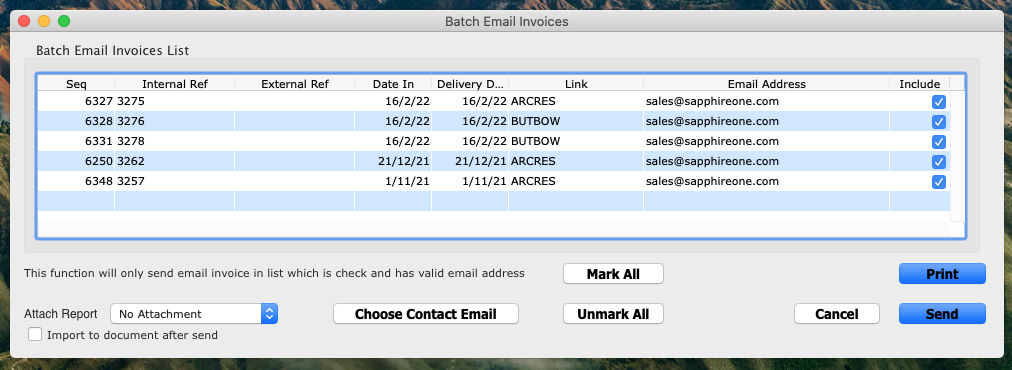
Attachments

The Attach Report menu provides the user with the option to attach almost any type of report to the email.
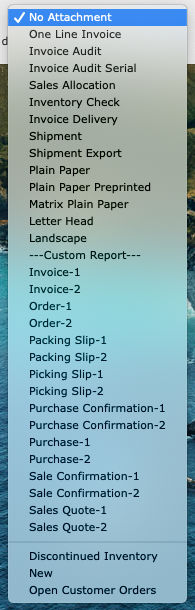
To do so, select the desired report from the drop-down menu (as shown on the left).
Please note that the normal body of the email as sent from SapphireOne will not be included. The attachment will be attached to the email and sent as a separate attachment.
Once the desired attachment has been selected, the Print ![]() button will be displayed. This enables the immediate printing of any attachments being sent out via email.
button will be displayed. This enables the immediate printing of any attachments being sent out via email.
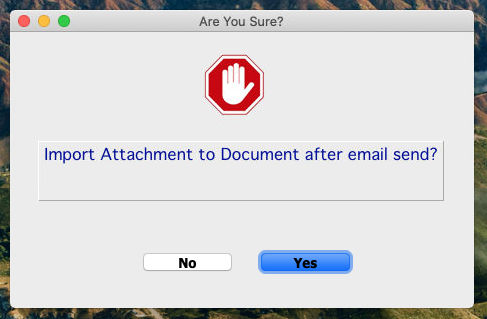
If the Import to Document After Send ![]() checkbox is selected, SapphireOne stores a copy of the PDF as part of the transaction in the Documents section of the relevant Client or Vendor master record.
checkbox is selected, SapphireOne stores a copy of the PDF as part of the transaction in the Documents section of the relevant Client or Vendor master record.
Once a copy of the PDF has been saved, the red paper clip on the first page of the Client or Vendor master record will turn green. Then the number of items it holds will be incremented by 1.
Choose Contact Email
For example, a single transaction in the Batch Email Invoices screen is selected and the Choose Contact Email ![]() button is selected. SapphireOne will then display a list of contacts for the selected Client or Vendor to whom the email can be sent. Assuming that email addresses have been correctly entered for the contacts, SapphireOne will send the email to the selected contact.
button is selected. SapphireOne will then display a list of contacts for the selected Client or Vendor to whom the email can be sent. Assuming that email addresses have been correctly entered for the contacts, SapphireOne will send the email to the selected contact.
What Will Be Sent
If the user sends an email directly from the Batch Email Invoices list without making any additional selections, one email will be sent to ARCRES. as seen below.
These emails are in HTML format and have been predefined in SapphireOne. If the ‘Import To Document After Send’ ![]() checkbox is selected, SapphireOne will store a copy of the sent PDF as part of the transaction in the Documents section of the corresponding Client or Vendor master file. When this function is used, the attachment button (represented by a paperclip icon) on the first page will change from red to green, and the count of items it displays will increase by one.
checkbox is selected, SapphireOne will store a copy of the sent PDF as part of the transaction in the Documents section of the corresponding Client or Vendor master file. When this function is used, the attachment button (represented by a paperclip icon) on the first page will change from red to green, and the count of items it displays will increase by one.
Email Procedures from Payroll/HR Mode
Batch Emailing Payslips from a Pay Run
Within the Pay Run process function, you have the option to send emails directly from within the function itself. When a Pay Run is being processed, this feature can be accessed from when the Set Up Reports screen, illustrated in the screenshot below is encountered during the processing of a Payrun.
As the user will notice, by default, Payslips, Email Batch Payslips, and ABA file for EFT options are selected.
When the Email Batch Payslips ![]() checkbox is selected, SapphireOne will endeavor to send an email to all employees in the current pay run, including their payslips as attachments.
checkbox is selected, SapphireOne will endeavor to send an email to all employees in the current pay run, including their payslips as attachments.
SapphireOne can also attach the sent payslip to the employee’s master record. To activate this functionality, simply select the  button.
Emailing Payslip after a pay Run
Exercise caution when emailing payslips, as SapphireOne defaults to sending emails to all employees from the Last pay run.
Historical payslips can be printed or emailed at a later time by following the procedure outlined below:
- Navigation – Go to: Payroll > Payroll.
- Payroll Menu – From this drop down menu from the reports area, select the Pay Slips option.
- Print Dialog Screen – It will be named Employee Payslips Reports.
- Print Destination – From this menu and select Email.
- Report Type – Once the email option is selected, both the Single Email and Batch Email options will appear in the Report Type menu. This enables users to send both Single and Batch emails using the Payslip report functionality in Payroll.
- Report Sort Order – Not used as emails are being sent.
- Report Selection – In the Report Selection dropdown menu, users should make a selection ranging from the Last Pay Number to All Records. (Refer to the KB notice above!)
- Queries – Below the report selection dropdown menu, SapphireOne offers provisions for two basic queries to be performed before initiating the email process.
- ID – In this query area, ID is listed as one of the options and directly refers to the Employee ID. It is commonly used as a filter when setting up these queries.
- Emailing – Once all is correct on the print dialog screen select the Print button.
- Email Report Screen – From this screen check the emails that are to be sent out for this email or emails then select the Send button.
- Emails – When the user selects the Send button, SapphireOne will immediately email the reports as requested without further interaction required.
- Batch Emails – If the Batch email option is chosen from the Report Type menu, additional alerts will be displayed to the user:
- Request Alert – The user will be prompted to select from a dropdown menu the type of report to be attached to each email. Options range from Laserwriter to Custom Payslip if one has been set up.
- Are You Sure alert – SapphireOne will inquire if the user wants to attach the sent payslip to the employee’s master record. To proceed with this functionality, they should select the Yes button.
- Final Alert – Confirmation of the successful sending of the emails will be displayed.
Batch Emailing Payslips Post Pay Run
Even if the Batch Email checkbox hasn’t been selected during a Pay run, the Payroll officer can still opt to email individual employees who require their payslips via email at a later time.
The process of sending payslips to employees via email is the same as sending emails in other modes. SapphireOne will send an email to the selected employees with an attached copy of their payslip for the latest pay run processed in SapphireOne.
To start the process proceed as follows.
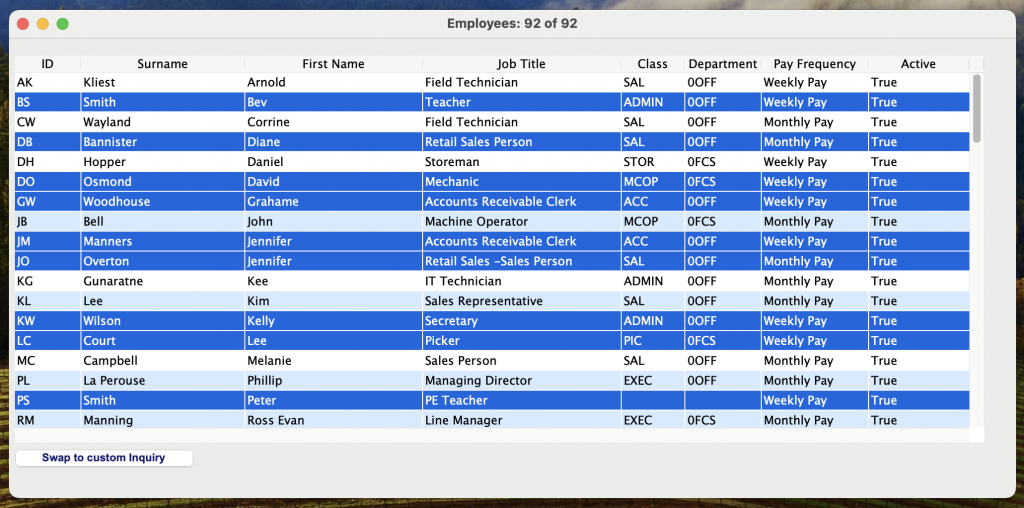
- Navigation – Go to Payroll/HR > Administration > Employee Inquiry to access a list of all employees in the data file.
- Selection – Utilise the Control/Command Click option or other available selection methods in SapphireOne to choose any employee or employees from the last completed pay run as seen in the screenshot below.
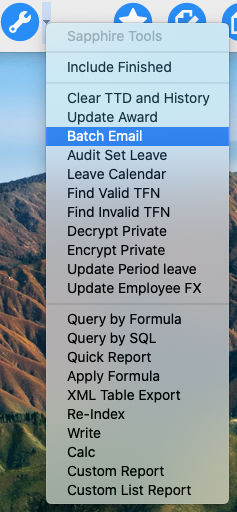
SapphireOne’s main toolbar includes a small arrow to the right of the Sapphire Tools button, which provides users with access to various selection options.
- Navigation – Go to Payroll/HR > Administration > Employee Inquiry to access a list of all employees in the data file.
- Selection – Utilise the Control/Command Click option or other available selection methods in SapphireOne to choose any employee or employees from the last completed pay run.
- Sapphire Tools – Once the desired employees are selected, choose the Batch Email option from the tools menu, as depicted here.
- Batch Email – The Batch Email screen will then be displayed, enabling the user to review and select the employees who are to be sent an email.
SapphireOne will now display all the selected/highlighted employees from the Employee Inquiry list, providing the user with a second opportunity to review who will receive an email containing their payslip.
If any employees in the list do not require an email, the user can uncheck the checkbox in the Include column on the right-hand side of the screen. Similar to Inventory mode, users can select the appropriate Attachment and Contact as needed. Once all the details are accurate, the user can click the Send button to initiate the process.
Employee Inquiry (Master Record)
After making the selection, SapphireOne will send an email to each employee with an attached copy of their payslip for the latest pay run processed in SapphireOne. If the user hasn’t set up an employee’s email address in the Employee Inquiry, SapphireOne cannot send the email. Therefore, it’s essential to ensure that all necessary information is accurately entered and up-to-date in the Employee Inquiry. This will guarantee the successful emailing of payslips.
Emailing Historical Payslips
Occasionally, there might be a need to email an employee’s historical payslip for various reasons. In SapphireOne’s Payroll module, there is a dedicated function available for this purpose in the Reports section. To access it, navigate to Payroll/HR > Payroll > Payslips which is in the reporting section of the drop down menu.
Once the Payslip option has been selected, the Print Dialog screen named Employee Pay Slips Reports will be displayed, allowing the user to drill down to a single employee in a specific pay run if necessary.
Note that the item listed as ID represents the employee’s ID, which is a critical component when searching for a specific employee’s payslip.
Email Report Screen Details
The user will note that extensive use of the words Email Report screen in the preceding sections of this article as well as the section starting immediately below is used.
In the Email Report Screen of SapphireOne, users can efficiently send reports via email, customising recipients, subject lines, and message content, and attaching reports in various formats. Information for Clients, Vendors, and Employees is typically pulled from their respective master records to populate these fields, reducing manual entry and potential errors. However, if any details are missing, users will need to enter them manually, which can be time-consuming and error-prone. Below, I’ll outline the purpose of each item on the Email Report Screen.
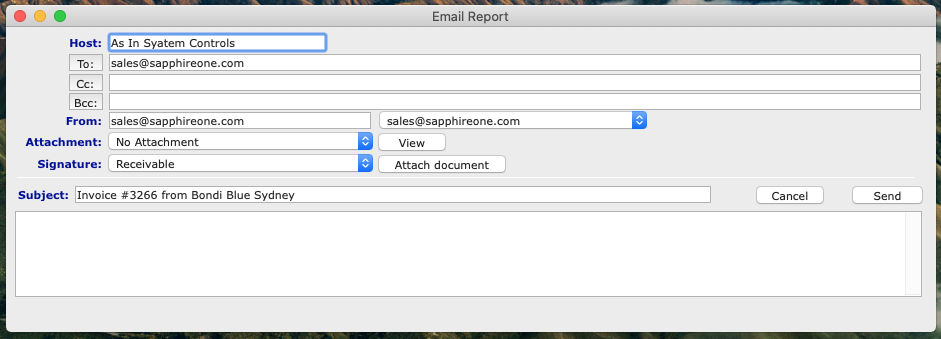
- Host – The details should be automatically populated from System Controls. If these details are not automatically populated, users may enter them as needed. However, manual entry of these details indicates that they have not been entered into System Controls correctly. This situation should be rectified immediately, as manually entering these details is time-consuming and prone to errors.
- To – Enter the email address of the recipient(s) here. (Should be entered by SapphireOne).
- BCC & CC –These fields will be automatically populated by SapphireOne from the email addresses listed in a Client, Vendor, or Employee Master Record. Users can manually enter email addresses for To, CC, and BCC if desired, but selecting any of the buttons will open an Address List window. This window allows for the selection of email addresses directly from a displayed list. window. This window allows for the selection of email addresses directly from a displayed list.
- From – Select the sender’s email address from the address book.
By default, the sender’s email address will first be sourced from the User Access Inquiry. If it is not available there, it will be obtained from the Company Inquiry. Should neither of these sources provide an email address, the address from System Controls will be utilised as a last resort.
It is also important to note that SapphireOne will only display Clients, Vendors, or Employees in the Address List who have an email address entered in their master files.
- Attachment – The drop-down menu in the Attachment data entry field will provide varying options depending on the users location within SapphireOne.
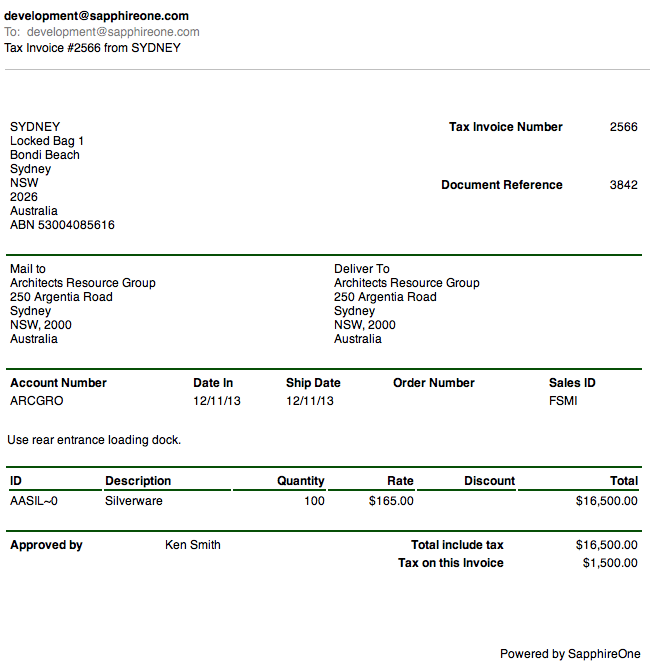
- View – Clicking on the
 button will prompt SapphireOne to display the email to be sent, as shown below.
- Signature – Includes a signature if required, usually drawn from the master file.
- Attach Document Button – Attach a computer file to the email.
- Subject – The subject line will be pre-populated to reflect the transaction and can be modified.
- Cancel Button – Cancels sending the email.
- Send Button – Sends the email/s immediately.
- Text field (No Heading) – The body of the email, where users can manually enter additional details.
You can review our Blog and YouTube channel for additional information and resources on SapphireOne ERP, CRM and Business Accounting software.