Data File – Backup, Restore, and Archive Overview
SapphireOne places high importance on data integrity and security, and as such, a strong backup strategy is critical. SapphireOne offers a layered backup process for added protection against data loss. Redundancy is key, and when coupled with incremental backup systems such as MacOS Time Machine and Windows File History, it provides a solid data protection strategy. Archiving is an important aspect of this strategy, allowing for the storage of historical data files to act as an additional data loss safeguard. SapphireOne simplifies archiving by enabling users to create compressed backups for storage in a specific folder.
Restoring data is just as important, and SapphireOne has an efficient process for this, requiring both the 4DD file and Settings folder to ensure complete data recovery up to the last transaction. Overall, SapphireOne’s backup and restoration capabilities are fundamental to a comprehensive data management strategy that ensures business continuity and protects critical information.
Backup Storage Recommendations
SapphireOne strongly recommends storing backups on a separate drive from the one containing your live data file. This is a critical step to protect your data against potential drive failures. By storing backup files on an independent drive, you ensure that they remain accessible even if the primary drive becomes compromised. We recommend that users give due consideration to the read and write performance of the drive, due to its impact on file management and recovery time.
In addition to on-site backups, it is prudent to maintain additional backups off-site. This strategy provides an extra layer of defence against localised events such as natural disasters or theft. SapphireOne facilitates this by providing all clients with 333GB of storage space on the SapphireOne File Station, included as part of the annual maintenance fees. Should your storage requirements exceed this allocation, additional space is available for purchase.
It is crucial to understand that the effectiveness of a backup strategy is significantly enhanced by redundancy. Multiple backups, stored in different locations, add layers of security and ensure that your organisation’s data is resilient against various types of data loss scenarios.
Incremental Backup Systems
SapphireOne recommends using incremental backups for an extra level of data protection. For Mac users, Time Machine automatically backs up everything, including system files, allowing for recovery if files are lost or damaged. Windows users should use File History, which saves file snapshots over time, enabling recovery from corruption or to retrieve earlier versions. Both Time Machine and File History enhance SapphireOne’s own backup features by offering multiple recovery points and are essential for recovering from accidental deletions or data corruption.
It is advisable to configure these incremental backup tools to save data to an external drive or network location, further enhancing the security of your backups. By doing so, you create an additional safeguard for your data, ensuring that it is not solely reliant on the integrity of your local system.
Incremental backups are a crucial supplementary element of data management and security for SapphireOne clients, regardless of whether they are operating on Apple/MacOS or Windows servers. For MacOS users, SapphireOne highly recommends leveraging Apple Time Machine for the creation of these backups. Time Machine’s integration with MacOS facilitates effortless rollbacks to previous data file states, enabling swift repair or restoration with minimal disruption. It supports various backup locations, including local and networked storage options. Similarly, for clients using Windows servers, SapphireOne strongly endorses the use of Windows 11 File History. This feature is built into Windows 11 and offers a user-friendly approach to backing up files and folders, simplifying the process of restoring earlier versions when necessary.
For both MacOS and Windows server environments, SapphireOne advises the use of an external SSD (Solid State Drive) connected directly to the server. Utilising an SSD enhances performance and provides rapid access to backups, ensuring that clients can quickly recover from data loss incidents. This strategy aligns with SapphireOne’s commitment to data integrity and resilience, providing clients with robust solutions for safeguarding their critical business information.
Both Windows File History and macOS Time Machine are designed to utilise the available space on the selected backup drive to store different versions of your files. As the drive approaches its full capacity, these systems will automatically delete the oldest backup versions to make room for new backups. This is a feature intended to ensure that the backup process can continue even when the drive is running out of space. To manage the storage space effectively and prevent these backup systems from using all available space on the drive, you can allocate a specific partition exclusively for backups. By doing so, you limit the amount of space that Time Machine and File History can use, which helps in avoiding the scenario where these services consume more space than desired.
Apple MacOS Time Machine
Activating Apple Time Machine with Multiple Backup Locations
- Connect your external drive to your Mac server.
- Click on the Apple menu and select “System Preferences.”
- Choose “Time Machine.”
- Click “Select Backup Disk” to choose your external SSD as the backup location.
- To add additional backup locations, repeat steps 2-4 for each new device or network location you wish to use.
- Ensure that “Back Up Automatically” is checked for continuous incremental backups.
- Select options
- Confirm your external drive is excluded from backups.
- Select the desired Backup frequency
Restoring the Specific Folder for SapphireOne Data and Log Files
- Open Time Machine by clicking on the Time Machine icon in the menu bar and selecting “Enter Time Machine.” If the icon is not present, access Time Machine through “System Preferences.”
- Navigate through the timeline on the edge of the screen to find the date of the backup you wish to restore from.
- Use the Finder window to locate the specific folder housing your SapphireOne data file and log files.
- Select the folder, then click “Restore” to recover the selected folder to its original location or a location of your choice.
By following these concise instructions, you can ensure that your SapphireOne data file and log files are securely backed up and can be restored efficiently when required. Remember to regularly check your backup devices for adequate storage capacity and to verify that backups are completed successfully.
Microsoft Windows 11 File History
Please note that File History in Windows 11 is designed to back up files in user libraries, desktop, favourites, and contacts by default. It will continue to back up data until the external drive runs out of space. At this point, the oldest versions of files will be deleted to make room for new backups. To manage space effectively, consider using a dedicated partition or drive for File History backups.
Activating Windows 11 File History with Multiple Backup Locations
- Connect your external SSD to your Windows server.
- Click on the Start button and go to ‘Settings’.
- In the Settings menu, select ‘Update & Security’.
- Choose ‘Backup’ from the sidebar.
- Under ‘Back up using File History’, click ‘Add a drive’ and select your external SSD as the backup location.
- After selecting the drive, click ‘More options’ to configure File History settings.
- Click ‘See advanced settings’ to open the File History control panel.
- In the control panel, you can add additional drives by clicking ‘Select drive’ on the left-hand side and repeating the process for each new drive or network location.
- Ensure ‘Automatically back up my files’ is switched on for continuous incremental backups.
- Under ‘Back up my files’, choose the frequency of backups as per your requirement.
- Click ‘Exclude these folders’ to ensure that your external drive is not included in the backup.
Restoring the Specific Folder for SapphireOne Data and Log Files
- Type ‘Restore your files with File History’ in the Start menu search bar and select it.
- Use the arrows to navigate through the backups and find the date of the backup you wish to restore from.
- Browse the folders in the File History window to locate the specific folder containing your SapphireOne data file and log files.
- Select the folder, and then click the green ‘Restore’ button to recover the selected folder to its original location or choose a new one.
By adhering to these detailed instructions, you can ensure that your SapphireOne data file and log files are consistently backed up and can be restored effectively when necessary. It is important to regularly monitor your backup devices to ensure they have sufficient storage capacity and to confirm that backups are being completed successfully.
Storing Data Overview
When operating Sapphire Single User or the SapphireOne server, efficient data management is crucial for optimal performance. The central folder to focus on is the folder named Live Data File, We recommend you avoid locating this file directly on your system desktop. It is strongly advised to establish a dedicated folder, preferably named SapphireOne Constants. However, users retain the flexibility to choose their preferred folder name. Once established, this folder should be positioned directly within the SapphireOne directory, thereby efficiently organising all SapphireOne related files.
SapphireOne Data File Directory Files and Folders
SapphireOne generates a series of specific files and folders for the management and maintenance of user data. Upon the creation of a new data file, these directories and files will be automatically generated as well. In regard to selecting a location for this root directory, SapphireOne recommends maintaining it alongside your SapphireOne Server application in a folder dedicated to your Sapphire Constants. Descriptions of the critical directories and files within the root parent directory follow.
- x.4DD – The main data file in the Live Data File folder is the 4DD file. This file is essential and contains the primary data. If necessary, all other files within the Live Data File folder can be regenerated solely from this main data file.
- x.4Dindx – One of the files mentioned above is the 4Dindx file. The purpose of the index file is to facilitate efficient data retrieval and searching operations within the main data file.
- x.journal – This serves as a 4D backup file that captures incremental changes since the last full 4D backup.
- x.Match – This files purpose and specific function depends on the context and configuration of SapphireOne.
- Logs folder – This folder serves as a repository for a text file that records the outcomes of 4D backups. This log file chronicles the backup activities and offers valuable insights into the backup process. Monitoring the Log folders contents aids in tracking the status and reliability of your backup operations.
- Temporary Files folder – Typically, this folder remains devoid of files during standard operations. This folder is utilised when the SapphireOne/4D application necessitates temporary storage for specific operations or processes.
Recommended Directory Structure
Regarding the location of the SapphireOne server, your data file, its associated parent directory, and supplementary files, it is advisable to adhere to the recommended structure detailed here and illustrated in the image to follow.
- Application or Program Files > SapphireOne > SapphireOne X Server > Server database
- Application or Program Files > SapphireOne > SapphireOne Constants > Your Subdirectories
Please note that the screenshot below has been updated to reflect the current build at the time of publication, which is 20.1.
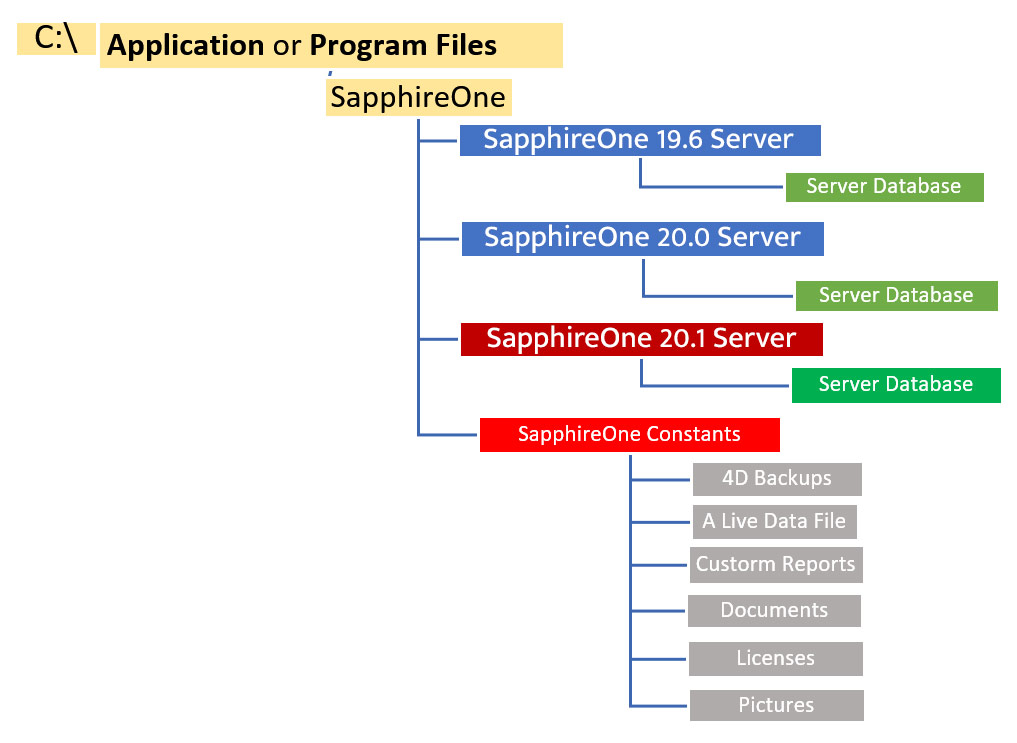
By adhering to this structure, the SapphireOne Constants folder will remain below the primary SapphireOne server folders in the directory tree, ensuring its isolation during upgrades.
Sub Folders in the SapphireOne Constants folder
Within the SapphireOne Constants directory, users have the permission to create new subdirectories based on their needs. The flowchart above displays several examples of these subdirectories, demonstrating their purpose and position within the overall folder hierarchy.
- The folder housing your data file should only contain the files and folders outlined in the SapphireOne Data File Directory Files section above.
- When performing a backup of solely the .4DD file, it is essential to consider that generating a new index file may consume a significant amount of time to restore, especially for large data files. The index file plays a pivotal role in facilitating efficient data retrieval and search operations within the primary data file.
Data File Backups Overview
Ensuring the safety and integrity of your data is paramount in any robust data management strategy. SapphireOne has developed a comprehensive backup solution that seamlessly integrates with the server data file function, providing both automated and manual backup options to protect your valuable data. Below, we delve into the details of how SapphireOne facilitates these critical backup processes, offering you the flexibility to customise your backup strategy to meet the unique needs of your organisation.
SapphireOne 4D Automated Backups Overview
SapphireOne now incorporates a backup solution directly within the server data file function, enhancing the speed, ease and reliability of your data protection efforts by offering real-time data mirroring. During the initial configuration of the SapphireOne/4D backup function, you will be guided to specify the backup location. This feature is designed to give you the flexibility to determine where your backups are stored, ensuring they are both secure and readily accessible when needed. Detailed instructions on setting up this integral function are provided to follow.
Manual Backups Overview
While automated backups are a key component of data security, SapphireOne also strongly recommends performing manual backups. This involves creating compressed backups of the data file, using zip or rar formats, particularly during system upgrades. This additional step is a crucial safeguard, providing an extra layer of protection to maintain the safety and integrity of your data throughout the upgrade process.
SapphireOne 4D Automatic Backup Procedure
When opening a new data file in SapphireOne, users may need to specify the location of the log file. By default, the log file, named companyname.journal (for example, BondiBlue.journal), is saved in the same directory as the 4DD files. If regular backups are not performed, the log file can grow significantly and complicate data management. To prevent the log file from growing, users can disable logging in the User Settings by unchecking the ‘Use Log’ option. Backups can be made through the server’s File menu and will be saved within the application, unless a different save location is specified. Note that executing a backup should reset the journal file size to zero.

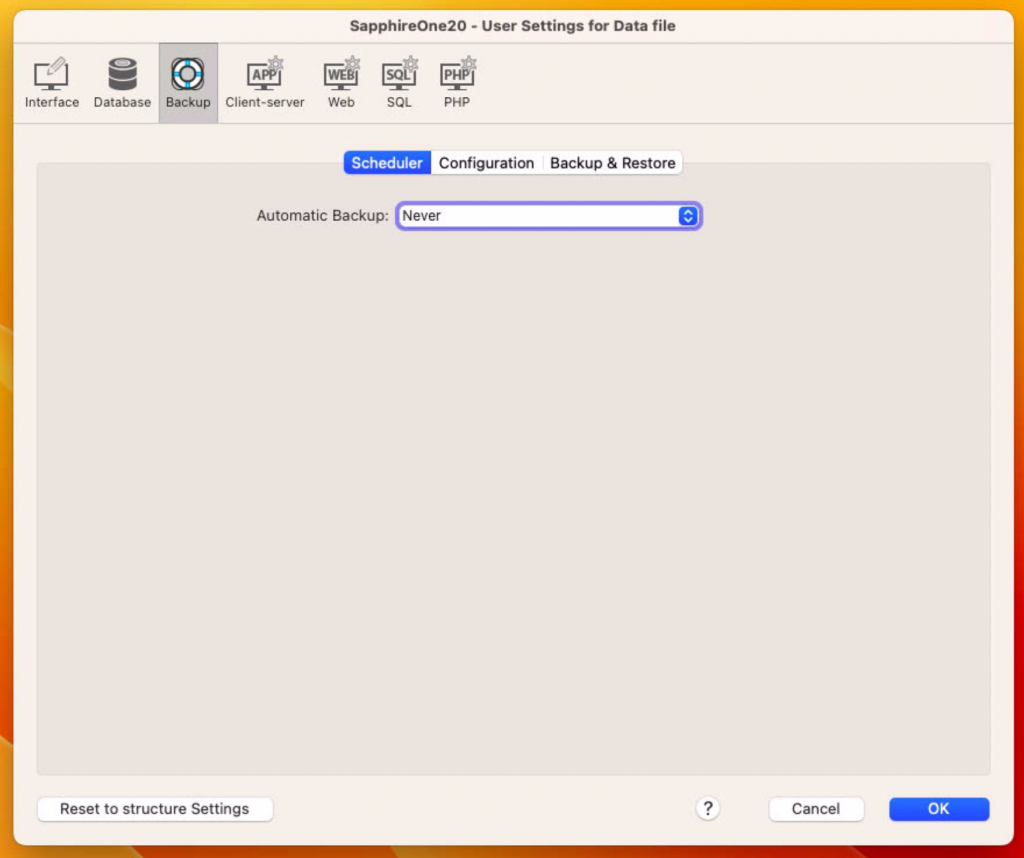
The Settings folder in SapphireOne is created when a backup configuration is established. This can be done by navigating to the Scheduler tab and modifying the Automatic Backup option from Never to another setting, then saving the changes. Upon saving, 4D will promptly generate the Settings folder, as depicted in the screenshot provided.
The Settings folder is located within a sub folder of the Data File folder. It’s crucial to maintain this folder in its designated location within the data file directory. By doing so, you ensure that the server can access the necessary backup information from the Settings folder.
Manual Backup Procedure
During manual backup processes, users do have the choice to select only the 4DD file. When this option is exercised and the restoration is executed, 4D will generate all the necessary files, excluding the Settings folder. To ensure complete data restoration, it is essential to include both the 4DD file and the Settings folder in the backup.
Maintaining the Settings Folder Post-Server Upgrade
The Settings folder in SapphireOne serves as a repository for essential information accessible and configurable through the administration window of the SapphireOne server. Inside this folder, you will find the following details:
- IP Address – If an IP address has been entered for the server, it is stored here.
- Port Number – The port number used by the server is also stored in the Settings folder. By default, it is set to 8080, but it can be modified if needed.
- Database Details – Various database-related details are stored, which help in configuring and managing the database effectively.
- Backup Procedure – If a backup procedure has been set up, it is documented within this folder.
Thus this Settings folder plays a pivotal role in preserving and managing vital server configuration information and backup procedures within SapphireOne.
When the server is initiated, the user is prompted to locate the necessary 4DD file. Subsequently, the server searches for the remaining required files. If these files are not present, the server will generate them. At this juncture, the server also checks for the existence of the Settings folder. If the folder is discovered, the server reads the contained details and applies them to the server as necessary.
Verifying Backup Location Post-Server Upgrade
Each time the server is upgraded, SapphireOne will attempt to revert to its default settings. Users will need to follow the procedure below to re-initiate the 4D backup process. For detailed instructions on updating the SapphireOne server, consult the accompanying documentation in the Administration Knowledge base sub-category.
When a Settings folder is present, the server should read the settings stored within it and then restart the backup process. However, it is advisable for users to verify that backups are being executed correctly, even when the Settings folder is present. If there is no Settings folder, the user has two backup options as follows:
- New Backup – Navigate to the Files dropdown menu and enter the backup settings for the first time, following the documented instructions provided below.
- Existing Backup – If backups have been previously configured but the Settings folder is missing, such as after restoring a data file, the user will need to re-enter the backup settings.
Establishing a 4D Backup
Both MacOS and Windows users can access the User’s Settings for Data File screen using two methods that offer the same functionality. After initially enabling the backup function on MacOS, users on both platforms can navigate to this feature via the Server Administration window or the File menu on the main toolbar.
When establishing a new backup for the first time on MacOS, users should follow these steps:
- Navigate to the File menu
- From the drop-down menu, select: Settings > User Settings for Data File.
- Change the Automatic Backup option from Never to any other desired frequency.
- Select from the following two choices:
- Manually enter all of the backup details directly from this screen
- Save the Scheduler screen data with the Automatic Backup option set to anything other than Never. Subsequently, access to the User Settings for Data File, screen is available directly from the Server Administration window.
For Windows-based platforms from version 19 onwards, there is no change in the process of establishing a new backup procedure or accessing an existing backup. Users can follow these steps:
- Access the Server Administration window.
- Choose the Maintenance tab.
- Then, select the Settings
 button. This action will reveal the User Settings for Data File screen, as shown below.
 - Select “Backup”.
Users attempting to set up any new backups directly from the Maintenance tab of the Server Administration window, will notice that the backup options From the Maintenance tab on the Server Administration window are not accessible (grey).
Scheduler Tab
The server may initially open on the Interface option. In this case, please proceed to select the Backup option as indicated below. Once you’re on the backup option screen, you will find three tabs. To access the Scheduler tab, select it.
Depending on the option you choose within the Scheduler tab, the screen will display various relevant options as follows in accordance with your selection.
- Every Hour – No additional options are provided or required for this selection.
- Every Day – To set this option, you only need to specify the time of day when the backup should occur.
- Every Week – When choosing this option, you’ll have two selections to make:
- Date – Select the day of the week from Sunday to Saturday.
- Time – Specify the time for the backup to be executed
- Every Month – When opting for monthly backups, you’ll have two choices:
- Date – Select either the First day of the month, the Last day of the month, or choose a specific day from 1 to 31.
- Time – Enter the preferred time for the backup.
- Personalised – Selecting this option will display a comprehensive list of choices, including all the above options, allowing you to customise the backup schedule according to your specific preferences.
When you select the OK ![]() or Save button from any of the three tabs within Scheduler, Configuration or Backup & Restore, the application will save the entered data and instantly create the Settings folder. This folder will now store the backup information that you have entered thus far.
or Save button from any of the three tabs within Scheduler, Configuration or Backup & Restore, the application will save the entered data and instantly create the Settings folder. This folder will now store the backup information that you have entered thus far.
Configuration Tab
The Configuration tab plays a vital role in defining how the server handles backups and their destinations in SapphireOne. It encompasses three distinct areas which are outlined to follow.
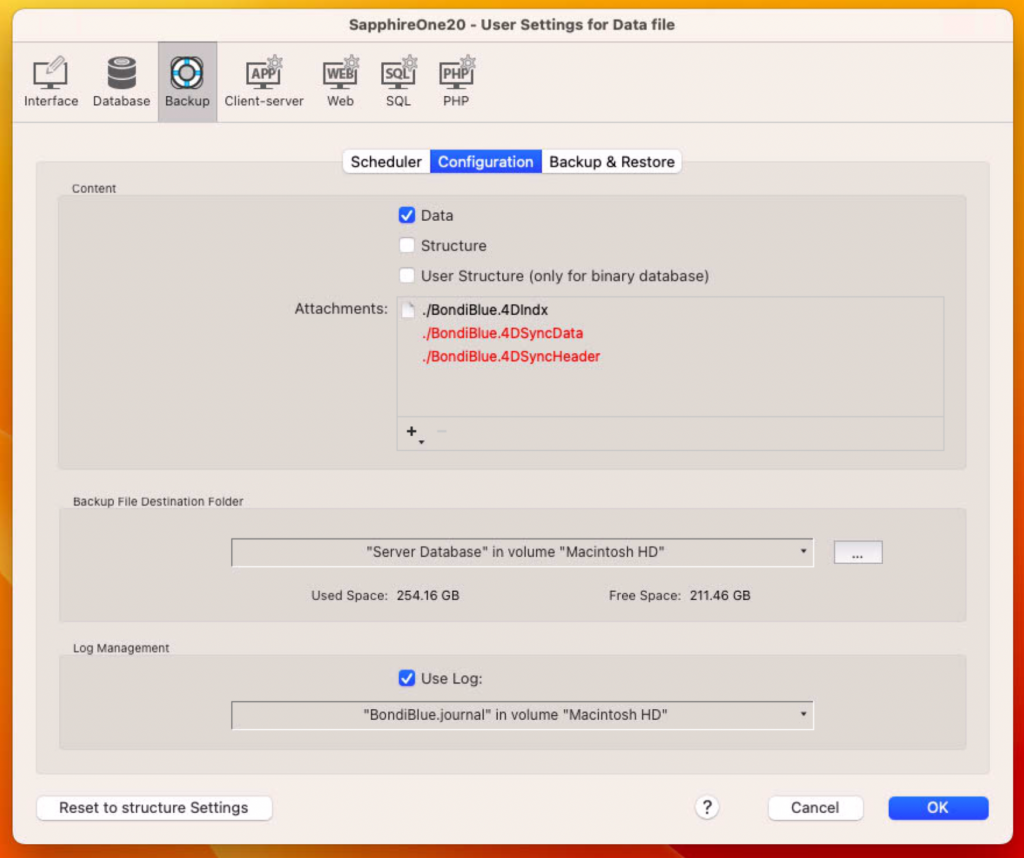
Configuration Tab – Content Area
In this area, the user specifies what data or content should be included in the backup process. SapphireOne operates as follows:
- Data check box – When performing 4D backups, make sure to select only the Data checkbox.
- Structure – The Structure file can be downloaded again from SapphireOne whenever necessary.
- User Structure (only for binary database) – It’s important to note that this checkbox should never be checked.
- Attachments – Prior to selecting the Attachments checkbox, it is advisable to consult with SapphireOne support staff for guidance.
Configuration Tab – Backup File Destination Folder Area
In this area, the user determine the location where the backup will be stored or backed up to. SapphireOne operates as follows:
It is highly recommended that before these backups are activated the user creates a specific folder to hold backups. A common name for this would be 4D backups and should be positioned within the SapphireOne constants folder.
When the user clicks the … (ellipsis) ![]() search button on both Windows and MacOS platforms, the standard search function will be activated, allowing the user to navigate to any folder on the hard drive. Furthermore, just below this area, you will find information about the currently used space on the hard drive and the available free space.
search button on both Windows and MacOS platforms, the standard search function will be activated, allowing the user to navigate to any folder on the hard drive. Furthermore, just below this area, you will find information about the currently used space on the hard drive and the available free space.
Configuration Tab – Log Management Area
In this area, the user defines the management and recording of backup-related logs and activities. SapphireOne operates as follows:
- Backup – At the scheduled time, as set up previously in the procedure, SapphireOne will archive the current 4DD file. This means that any transactions performed during the day will not be included in the backup.
- Log File – When the log file is activated, SapphireOne creates a journal file that records every single action taken in the data file for the day.
- Restoring – When the “Restore” function is activated, the user will be prompted to decide whether the log file should be incorporated.
- Incorporating Log File – If the log file is incorporated, SapphireOne’s restore function has the capability to bring the data file back to the state of the final transaction or action made in the data file for the day, ensuring a complete restoration.
Backup and Restore Tab
This tab has three areas, General Settings, Archive & Restore and Log Integration which will be documented below.
Backup and Restore Tab – General Settings Area
In the General Settings Area, you will find several straightforward options to configure:
- Number of Backups to Keep – Specify how many backup copies should be retained.
- Backup on No Modifications – (e.g., on a weekend). Decide whether backups should be performed even if no modifications have been made, such as on a weekend.
- Backup Failure Action: Define the course of action to take if a backup operation fails due to any unforeseen reasons.
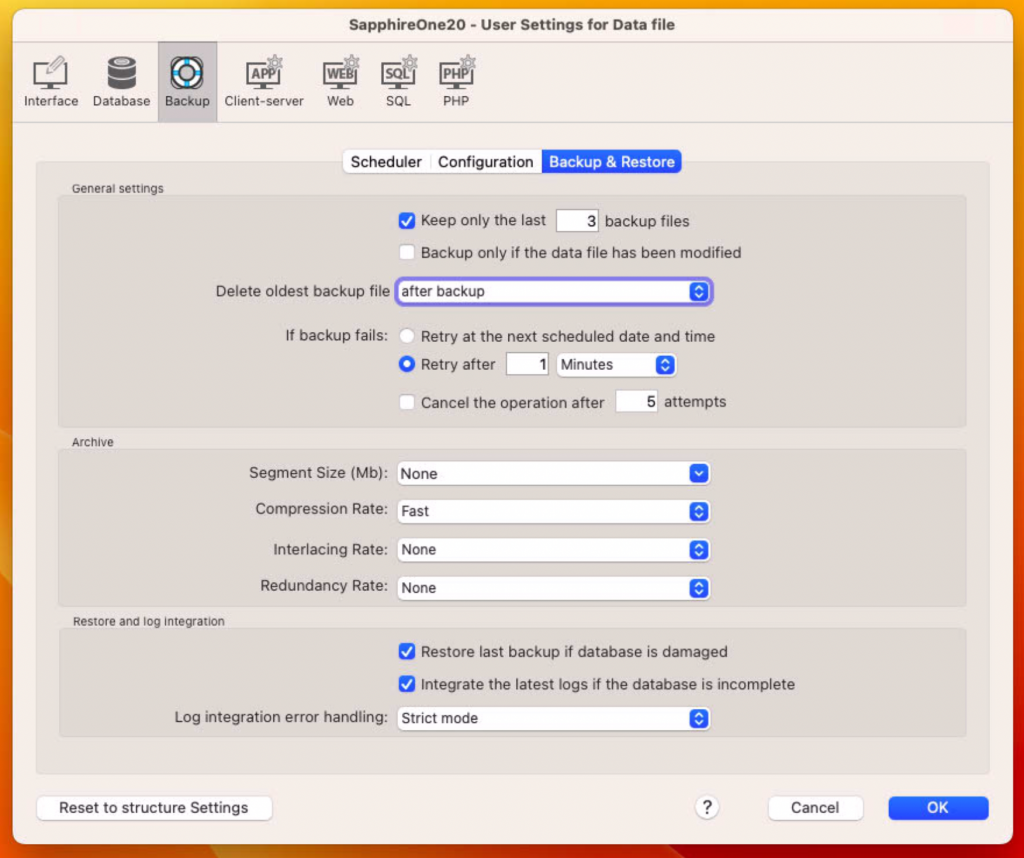
Backup and Restore Tab – Archive Area
In this area, it is advisable not to make any changes, as the default settings are typically suitable. The settings in this area pertain to how the archive is created, and this largely depends on personal preference.
If the data file archive is exceptionally large—typically several gigabytes (GB) in size—splitting the archive into segments could be considered. Generally, when the archive exceeds a few GB, it may be appropriate to consider this approach. Furthermore, the manageability of uploading files to remote storage, such as SapphireOne File Station, should be taken into account when deciding.
Backup and Restore Tab – Restore and Log Integration Area
In the Restore and Log Integration area, please note the following features:
- Restore Last Backup Checkbox – Ensure that this checkbox remains deselected. This prevents SapphireOne from automatically attempting a restore.
- Integrate the Latest Log Checkbox – When selected, SapphireOne will prompt you to decide whether to include the journal file (log file) in the restoration process.
- Log Integration Error Handling – It is recommended to leave this setting on Strict Mode and avoid making any changes.
Reset to structure headings Button
When you select the “Reset to Structure Headings” button in SapphireOne, SapphireOne will perform the following actions
- Delete all data entries made during the backup procedure.
- Revert to the settings found in a new structure file.
Upon selecting this button, a warning alert will be displayed to the user, informing them of the actions that will be taken.
You can review our Blog and YouTube channel for additional information and resources on SapphireOne ERP, CRM and Business Accounting software.