Custom Deductions Overview
The Custom Deductions report within the History menu of the SapphireOne Payroll/HR mode allows you to customise a layout to both a CSV file and direct to a printer, so that you can export and report on quantities and totals of Allowances.
When printing reports, the user should be aware that SapphireOne will assume that it is to print the selected report on all Custom Deductions that are currently active and in SapphireOne. This may be from just a few Custom Deductions but could extend to hundreds or even thousands of employee’s.
When the Custom Deductions report is selected from the History menu, SapphireOne will present a print dialog screen for the user to select and customise the criteria and data they would like included within the report.
The user should note that this report dialog screen is slightly different to other Print dialog screens in SapphireOne as follows. There are three buttons on the screen named Period, Weekly and Headings. A selection for these must be made first as these selections here set up the reports. The reports here will not work unless selections for these items are made first.
- Period Button – This button, lets you select a particular Period or group of Periods to report on. Usage is the same as in other areas of SapphireOne, select a single period or multiple periods as required.
- Weekly Button – This button lets you select a particular Pay run to report on. An alert will be displayed asking for the first and last days of the pay run that you want the report to include in the report.
- Headings – Selecting this button will cause SapphireOne to display an additional alert screen as seen below.
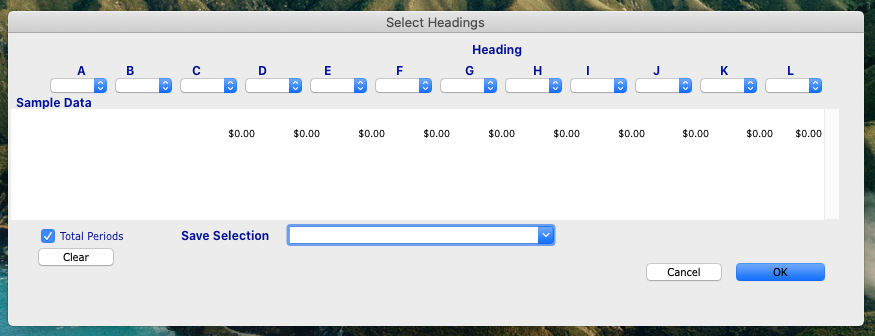
- Reports – For all 4 reports to both to a file and to the printer the twelve headings are not only the headings for the column, they are also the data for each column in the report.
- Re-Selection – Re-selecting the heading or periods, will clear the previous entry.
- Clear Button – Selecting this button will also clear all of the data.
- Columns – Any column from A through to L may be selected to display any data from the drop down list with each heading.
- Deduction – This lets you select an deduction as required for each column.
- Total Periods – When selected, the Total Periods check box, totals all periods into one line, otherwise each period is a separate line. The sample data is an example only, and may not reflect the exact values of the final report.
- Save Selection – Once the user has set up their headings, they may now save it by entering a name into the data entry field. If other configurations have been saved, they will be displayed as a list when the arrow at the right hand end of the data entry field is selected.
Report Type Menu
Selecting the Report Type menu option will enable the user to print different layout styles of the Details Report.
| Export Totals | This option export the totals for each employee of each allowance as a CSV file and will boot the default spreadsheet program in your local machine to display it. |
| Export Quantities | This option export the quantities for each employee of each allowance as a CSV file and will boot the default spreadsheet program in your local machine to display it. |
| Report Totals | This report totals the allowance for each employee and sends the report to the printer. |
| Report Quantities | This report totals the quantities for each employee and sends the report to the printer. |
Report Sort Order Menu
The Report Sort Order Menu allows the user to select from various sorting methods and criteria to organise data in different sequences while still maintaining the same fundamental report format. The user can sort data by:
| No Sort | This will display the Details Report in the order they are displayed. |
| By ID | This will sort the order of the data by employee ID. |
| By Surname | This will sort the order of the data by surname. |
| By Pay Frequency | This will sort the order of the data by pay frequency. |
| By Class | This will sort the order of the data by employee class. |
| By Department | This will sort the order of the data by employee department. |
Report Selection Options
| Last Pay No | This option will print a report for the Last Pay number only. |
| Last Pay | This option will print a report for the Last Pay only. |
| Working Transactions | This option print the current working Transactions In SapphireOne |
| Active Only | This option print a report for active or current employees. |
| All Records | This report will display all all Employees including inactive or finished Employees. |
Report Buttons
The user should not that this print dialog has three buttons that are not displayed on other Print dialog pop ups and have been documented earlier in this post.
| Print button | Select this button to Print the Report. |
| Cancel button | Select this button to Cancel the Report. |
| View Button | Selecting this button will display a list of employees that will be included in the report. The user may then us the find option to filter the list of employees as required. |
| Period Button | Select a particular Period or group of Periods to report on. |
| Weekly Button | Select a particular Pay run to report on. Enter the first and last days of the pay run that you want the report to include |
| Heading Button | Documented earlier in this post but must be selected and setup before any of the reports will work. |
You can review our Blog and YouTube channel for additional information and resources on SapphireOne ERP, CRM and Business Accounting software.