Employee Inquiry Overview
An employee refers to workers or managers who are employed by a company, organisation or community. These employees are commonly referred to as staff and are hired by a company, organisation or individual to do a particular job in exchange for payment. In each country employers are required by law to do abide by minimum wage laws, provide a safe workplace, and pay tax on behalf of the employees. As an example, the employers are required by law to pay superannuation, health insurance, annual leave entitlements, carer and personal leave (sick leave), long service leave entitlements, bereavement leave, domestic violence leave and other compulsory benefits. The relationship between employer and employee is different to that of an organisation and a Client.
The Employee Inquiry function within SapphireOne Payroll/HR is the Master File repository for all employee related data. The data entry screen allows the user to set up individual files for each employee to store all personnel and human resources data.
SapphireOne incorporates a built-in Contact Relationship Management (CRM) system that diligently monitors all interactions across Clients, Vendors, Job Projects, Assets, Payroll/HR, Employees, and Workbook. It maintains a comprehensive history of all contacts throughout the entire duration of your data file.
The CRM functionality in SapphireOne is specifically designed to efficiently track and manage interactions with various contacts, including Clients, Vendors, Job Projects, Assets, Payroll/HR, Employees, Workbooks, and all contacts. Users can easily record and log various communication activities, such as emails, phone calls, meetings, notes, and actions associated with each contact.
By leveraging SapphireOne CRM, your organisation gains a deeper understanding of past, present, and potential Clients, Vendors, Job Projects, Assets, Payroll/HR, Employees and Workbook leading to analysis of Client buying behavior improved relationship management and customer retention. For example, through analysis of Client buying behavior, an organisation may identify that its Vendor base has not recently supplied a particular SKU inventory.
SapphireOne’s CRM (Contact Relationship Management) is seamlessly integrated into every aspect of the SapphireOne application, providing users with a powerful tool to manage and organise contact details for Clients, Vendors, Job Projects, Assets, Payroll/HR, Employees, and Workbook data. The CRM module efficiently gathers data from various communication channels, including the company’s website and the inbuilt SapphireOne Softphone. It records all outgoing and incoming telephone calls associated with a contact, ensuring a comprehensive interaction history.
The CRM module also manages emails, and it can be integrated with external tools like Mailchimp for monitoring email campaigns to contacts. It tracks when emails are sent, opened, and how many times they are opened. Additionally, all interactions with contacts are automatically recorded, streamlining communication tracking and simplifying follow-up processes.
Users have the convenience of adding actions to contacts, which are automatically populated within the SapphireOne calendar. This feature ensures that important actions and follow-ups are never missed, enhancing productivity and time management.
SapphireOne CRM allows users to attach an unlimited number of documents and digital assets to each contact. Whether it’s contracts, proposals, or multimedia files, this capability ensures all relevant information is readily accessible and organised, making collaboration and decision-making more efficient.
Summarising the Benefits of SapphireOne CRM
SapphireOne CRM delivers enhanced daily support to both Clients and Vendors by providing real-time information, enabling timely decision-making. The core benefits of SapphireOne CRM encompass centralized data management, offering a comprehensive view of contacts, fostering improved customer relationships, facilitating data-driven decision-making, streamlining marketing efforts, and optimizing sales and purchasing processes. Below are the eight core benefits of SapphireOne CRM:
- Centralised Data Management – All contact information is consolidated in one place, ensuring easy access and efficient organisation.
- Comprehensive View of Contacts – Gain a holistic perspective of Clients and Vendors, facilitating a deeper understanding of their needs and preferences.
- Improved Customer Relationships – Build stronger and more meaningful relationships with Clients and Vendors, fostering loyalty and satisfaction.
- Data-Driven Decision-Making – Utilise data insights to make informed decisions, enhancing operational efficiency and business performance.
- Streamlined Marketing Efforts – Targeted marketing campaigns can be devised, ensuring more relevant messaging and increased engagement.
- Optimized Sales and Purchasing Processes – Efficient sales and purchasing workflows lead to improved productivity and revenue generation.
- Identification of Profitable Clients & Vendors – Analyse Client & Vendor data to identify the most profitable partnerships and opportunities for growth.
- Seamless Integration – The CRM is fully integrated across all company departments within a single data file, facilitating smooth collaboration and information sharing.
In summary, SapphireOne CRM empowers businesses by offering tailored services, responsive pricing, and personalized messaging. It creates a cohesive ecosystem where all products and services are linked through contacts for all functions within SapphireOne. This synergy leads to superior supply chain effectiveness and overall operational efficiency, resulting in improved business performance and customer satisfaction.
All inquiry screens in SapphireOne offer the option to customise the list of items displayed on the page. This feature, known as Custom Inquiry, allows you to select the data fields to be shown and the order in which the columns of data appear across the screen. Although a client list is used as an example below, any type of inquiry can be customised within SapphireOne.
The list below represents the standard inquiry list, displaying a basic set of data fields for each client record:
Swap to Custom Inquiry
When you select the ‘Swap to Custom Inquiry’ button in the lower left-hand corner of the screen, SapphireOne will display the default Custom Screen, as shown below. This Custom List screen provides the user with two main options for organising the data display:
- To add or remove the data field columns displayed on the screen, click the ‘Setup’ button in the bottom right corner of the screen. Within the Setup screen, you can right-click on the column lines and choose from Delete, Move Left, or Move Right. More information on the Setup screen is provided below.
- To change the order in which the data field columns are displayed, click the ‘Setup’ button in the bottom right corner of the screen. Within the Setup screen, you can right-click on the column lines and choose from Delete, Move Left, or Move Right. More information on the Setup screen is provided below.
Once you have customised the Custom Inquiry screen, the screen view will be unique to you, and each time you log in, you will see the same custom view. You also have the option to select and save an unlimited number of custom views. This can be done in the ‘Setup’ screen, as detailed below.
The Inquiry screen below is the initial Custom Inquiry screen, which can be modified by the user.
Custom Inquiry Screen ‘Setup’ Function
To begin setting up your Customised List screen, click the Setup button, as shown above. The Setup screen will appear, as displayed below.
From this screen, users can add and remove data columns as needed. Almost every field within the SapphireOne data tables can be included in the Custom List screen, provided the user has the necessary authorisation.
The screen features several menu items across the top, which include:
- Reset to Default – Clicking this button resets the display to the default settings determined by SapphireOne. When you add a new data field, SapphireOne will place it on the right-hand side of the data columns. You can then click on the field heading and drag it to your desired location on the screen.
- Show Related Record – This option allows you to add related fields from other tables. By ticking the Show Related checkbox
 at the top of the screen, you can select a related record, and a mini view of that related record for the chosen entry will be displayed for the currently selected record. You will need to select the fields to be displayed.
 - Favourite Set – Located at the top left of the screen, this option enables you to save a custom-created screen for future use. For instance, you can have a simple Inquiry screen for general use and a more complex screen view when auditing specific information.
Employee Inquiry Details Page
Employee Area
- ID – Enter an ID for the employee. The employee ID supports alpha numeric.
- Surname – Enter the employees surname or family name.
- First Name – Enter the employees first names.
- Area – This field may be used for grouping employees for reporting purposes. It is a menu where the user is able to add or delete items as they choose. It is a demographic that the user can use in whatever way they see fit. For example, a physical area, work classification area, work type classification, or level.
- Job Title – This menu is used for the entry of the employees job title. The user is able add or delete items as they choose. The list has been populated with some of the more common job titles as an example.
- Salutations – This menu is used for the entry of the employees salutation. It is a menu where the user is able to add or delete items from it as they choose.
- Risk – Select the level of risk from 1 (Green) through to 25 (Red).
- Blue Data Entry fields – All of the following fields have a blue background which means that they are wildcard ‘@’ or ‘?’ searchable.
- Company – SapphireOne will enter the company that the user is logged into and this may not be altered.
Department – Select a department for the employee. This assists with grouping and reporting on employees. - Class – Select a Class for the employee. This assists with grouping and reporting on employees.
- Award – If an employee is to be linked to a specific award, the award details should be entered in the system here.
- Pre existing- It’s important to establish all awards for employees prior to linking them to an existing award. This sequential process ensures the correct configuration of awards and simplifies the subsequent task of associating employees with specific awards.
- Modifying Existing Award – For comprehensive guidance on award entitlements and handling award modifications, please refer to the article titled Awards Entitlement.
- Company – SapphireOne will enter the company that the user is logged into and this may not be altered.
- Paperclip – In the top right hand corner of this area is a paperclip that will allow the user to attach documents to this employee record. Please click below for additional details.
Paperclip Management Saves Time with Easy File Attachment
The SapphireOne Document Management System (DMS) features a convenient Paper Clip button on all data entry and inquiry screens. This enables users to attach relevant documents or files to every transaction or record. The system also includes a dedicated page for managing documents related to a specific transaction or record, providing robust version control of the attached documents.
The color of the paper clip serves as a visual indicator of the status of the attached documents. A red paper clip indicates that there are no documents currently attached to the transaction or record, while a green paper clip indicates the presence of one or more attached documents. Additionally, the word “Items” is preceded by the number of attached documents, providing a clear and concise representation of the current status.
SapphireOne’s Document Management System is highly versatile and can accommodate a wide range of document types, including Adobe Acrobat, spreadsheets, word processing documents, photo files, JPEGs, CSV files, HEIFs, and MP4 files. With the ability to store an unlimited number of documents for an indefinite amount of time, the system provides users with a comprehensive and efficient solution for managing all their important files and documents.
Master Defaults
In SapphireOne, users have the flexibility to control the size of individual documents and determine where they are stored through the Master Defaults settings. These settings can be accessed by navigating to Utilities > Controls > Master Defaults > System Page.
Within the Documents area of the SapphireOne page, there is a Document Size Limit setting with a default size of 10 MB, which can be adjusted as needed. Additionally, users can choose to store the documents either as part of the data file or as separate files, by selecting the appropriate option from the two radio buttons provided.
To attach a document to a transaction, simply click on either the ![]() or
or ![]() Paperclip button. The Document List window as seen below will be displayed allowing the the user to select the desired file to attach.
Paperclip button. The Document List window as seen below will be displayed allowing the the user to select the desired file to attach.
How to Attach Documents Using SapphireOne Paperclip
SapphireOne also provides users with the convenient Drag & Drop functionality to attach documents. To use this feature, simply drag a document from your local computer into the Document List screen and it will be attached automatically. This streamlined process saves time and effort and makes it easier to manage your important files and documents within SapphireOne.
If SapphireOne detects that the document name already exists, a pop-up will be displayed alerting the user. Alternatively, the user can also select the
If SapphireOne detects that the document name already exists, a pop-up will be displayed alerting the user. Alternatively, the user can also select the Plus  button to select a document to upload from the local computer.
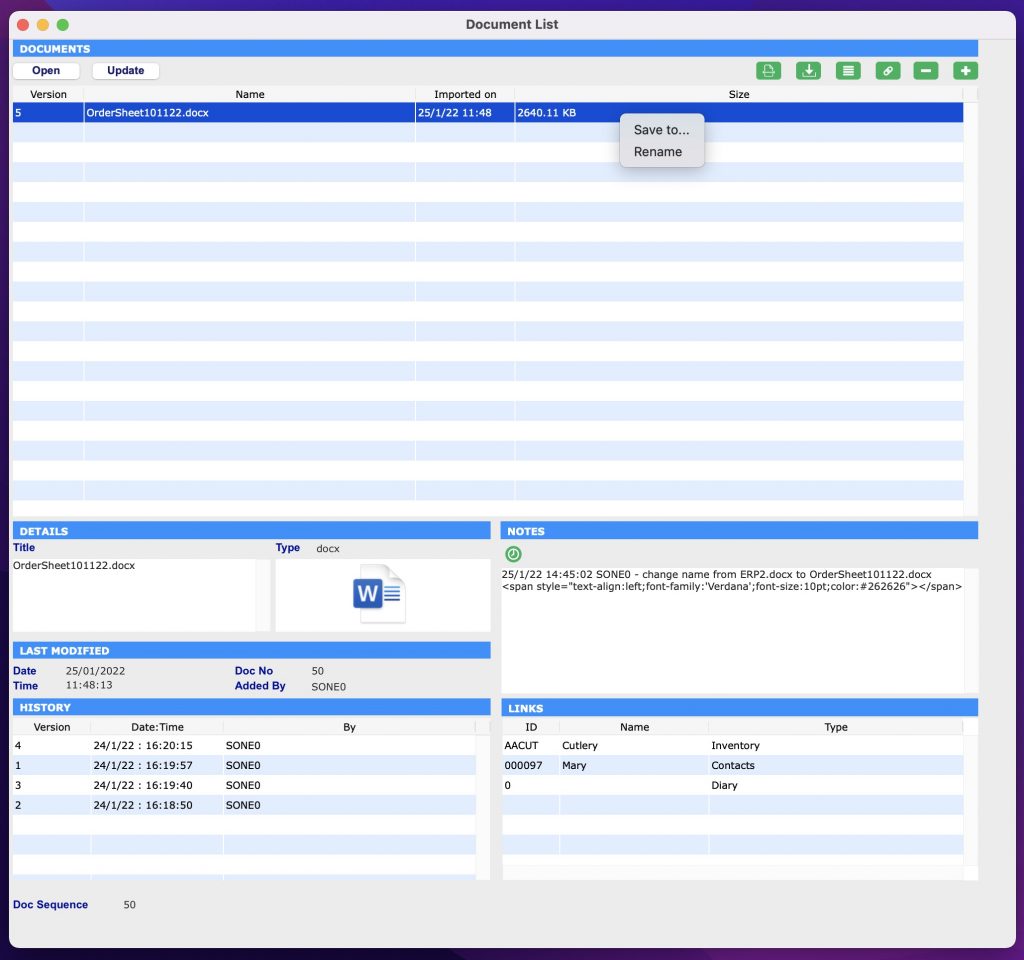
SapphireOne’s document management system provides users with the ability to easily manage their attached documents. After a document has been attached, the user has the option to rename it by right-clicking on the file and selecting Rename This feature is useful for maintaining consistency in document names across all records and helps to keep the system organised and efficient.
Documents Area within Document Management System (DMS)
- Open
 – By clicking on this button, the document will be opened for viewing, allowing users to review its contents without having to leave the SapphireOne system. This feature provides a convenient and streamlined way to access and review important documents within the context of the larger document management system.
 - Update
 – When this button is selected an alert is displayed allowing the user to import a new version of a highlighted document, enabling version tracking. After selecting a new version, the user enters a version number. The latest version becomes available, with previous versions accessible in the History area. The updated document remains linked to associated transactions.
 - Scan
 – This option in SapphireOne provides users with the ability to scan a document directly into the data file and link it to a transaction. This feature requires access to a local or network scanner, and the appropriate scanner and software must be installed on the local machine or network. By using the Scan option, users can quickly and efficiently digitise physical documents and associate them with the relevant transactions within SapphireOne.
 - Save
 – This button in SapphireOne allows users to save the currently highlighted document to disk. This feature provides a convenient way to export a copy of the document for backup or further use outside of the SapphireOne system. By clicking the Save button, users can easily access a digital copy of their important documents and ensure that they are properly preserved and accessible.
 - Link Documents
 – With SapphireOne, users have the ability to link a highlighted document to one or more transactions within the data file. To do this, the user simply clicks the “Link” button, which will bring up an alert allowing them to make their selection. This feature provides a convenient way to associate important documents with multiple transactions, ensuring that all relevant information is easily accessible from one central location. For more information about linked documents, refer to the Links Area documentation provided by SapphireOne.
 - Link Existing Documents
 – SapphireOne provides users with the ability to link existing documents in the data file to the current transaction or record. To do this, the user simply clicks the Link Existing button, which will bring up an Alert allowing them to choose from a list of available documents. This feature provides a convenient way to associate existing documents with additional transactions, ensuring that all relevant information is easily accessible from one central location. For more information about linked documents, refer to the Links Area documentation provided by SapphireOne.
 - Delete
 – This option in SapphireOne allows users to remove the currently highlighted document. By clicking the Delete button, the selected document will be removed from the system, providing users with a simple way to manage their attached documents and ensure that only relevant and up-to-date information is stored within the system.
 - Plus – SapphireOne includes a search function that makes it easy for users to select a document saved on their local computer. This feature provides a convenient way to quickly locate and attach the desired document, streamlining the process of adding and managing important files within the SapphireOne system.
Details Area within Document Management System (DMS)
The Details area within SapphireOne’s Document Management System (DMS) provides users with additional information about the selected document. When a document is selected in the Documents area, the Details area will automatically display the title of the document and the type of file. This information helps users to quickly identify and manage their important files and documents, providing a more efficient and organised system for document management.
Notes Area within Document Management System (DMS)
The Notes area is for entering any notes related to the document. The user can select the green clock button ![]() to create a time and date stamp for every note added.
to create a time and date stamp for every note added.
The Notes area will also keep an automatic user log when any changes are made to the document. For example, if the document is renamed or new links are created. SapphireOne will record the date, time and user that made the modifications.
Document Details Area within Document Management System (DMS)
The Document Details area within SapphireOne’s Document Management System (DMS) provides additional information about the selected document. This area automatically displays information such as the date and time the document was added, the document number, and the user who added the document. This information helps users to quickly understand the context of the selected document and provides a comprehensive history of the document’s status and interactions within the system. The Document Details area is a valuable resource for managing and tracking important documents within SapphireOne.
History Area within Document Management System (DMS)
The History area within SapphireOne’s Document Management System (DMS) provides a record of the complete version history of the selected document. SapphireOne tracks all version changes and automatically displays the document’s history in this area.
As new versions of the document are imported using the button, the History area will be automatically updated, ensuring that all previous versions of the document are recorded and available for viewing. This enables users to access the most recent version of the document, while still maintaining a complete history of all versions.
The History area provides a valuable resource for tracking the evolution of a document and understanding how it has changed over time. By having a complete record of the document’s history, users can easily review past versions and understand the context of the changes that have been made.
Links Area within Document Management System (DMS)
The Links area within SapphireOne’s Document Management System (DMS) is used to link documents to specific transactions or areas within SapphireOne. This area provides a comprehensive view of all linking information related to the document, including any functions used to import the document into SapphireOne.
By linking documents to transactions and areas within SapphireOne, users can easily associate important information and files with the relevant transactions, providing a more organised and efficient system for document management. The Links area is a valuable resource for understanding the relationships between documents and transactions within SapphireOne.
To add additional links to a document in SapphireOne, follow these steps:
- Select/highlight the document you wish to link.
- Click the
 Link Document button.
 - The Files pop-up window will be displayed.
- From the File drop-down menu, select the item you want to link the document to.
- In the Value data entry field, enter the necessary details (ID).
Note that the Value data entry field has a light blue background and is searchable by entering the wildcard symbols ‘?’ or ‘@’, making it easier to find the information you need. By linking documents to specific transactions and areas within SapphireOne, users can create a more organised and efficient system for document management.

Updating a Document within Document Management
The process for updating a document in SapphireOne is straightforward:
After clicking the “Update” button in SapphireOne, the user will be asked to confirm if they would like to import a new version of the document:
- Confirm that you wish to import a new version of the document by selecting Yes.
- The user will then be prompted to choose the updated document to open.
- After selecting the updated document, a secondary dialogue will appear, asking the user to enter an alphanumeric value for the new version.
- Enter the desired value for the new version and select OK
By following these steps, SapphireOne will replace the previous version of the document with the updated document. It will also maintain a complete record of all previous versions in the History area. This process ensures that the most up-to-date information is always readily accessible within the SapphireOne system.
Document Management using SapphireOne Documents Inquiry
In addition to SapphireOne’s Document Management Paperclip functionality, SapphireOne Documents Inquiry function in Workbook Mode provides users with a centralised repository of all documents and files stored within the SapphireOne data file. This function gives users the ability to add new documents, modify, view, or delete existing documents from within the Documents Inquiry screen.
Any revisions made to a document within the Documents Inquiry screen will be automatically updated across all areas where the document is linked within SapphireOne. Similarly, any modifications made to documents within the SapphireOne Paperclip Document List window will be reflected within the Documents Inquiry window.
For example, if a document is renamed within a transaction Paperclip Document List screen, the updated document name will be reflected when viewing the document in the Documents Inquiry screen.
You can learn more about SapphireOne Documents Inquiry functionality within the Documents Inquiry article.
Document Control within Document Management
In this example, we have an inventory item with documents attached, such as installation instructions and a packing checklist. The item is added to a sales order, manufactured, shipped, and the job is completed. SapphireOne’s Document Management Paperclip functionality allows for easy attachment and access to all relevant documents throughout the entire process, from sales order to completion. This improves efficiency and helps ensure all relevant information remains consistently available and up-to-date.
A year after the completion of the job, a revision of the inventory item is made, along with updates to its associated Documents (DMS). To keep the information organised and up-to-date, it is not necessary to create a new inventory item for the revision. Instead, the documents and files can be easily updated using SapphireOne’s DMS file that are attached.
By using the Update button within the DMS, users can import a new version of the document and SapphireOne will automatically keep track of all version changes, ensuring that the most recent information is readily available. This process saves time and effort by allowing users to simply update the documents and files, rather than creating a new inventory item for each revision.
In SapphireOne, when referring back to the original completed sales client invoice or job projects client invoice, the associated documents and files will be displayed in their original state or as they have been updated. The user has the option to view the documents and files as they were at the time of completion or as they currently are, providing a comprehensive and accurate record of all relevant information.
In the screen shot above, both the current and historical documents are attached to the inventory item. As a SapphireOne user, you have the ability to edit the list and choose to delete the historical document by simply selecting the Minus button.
Additionally, you also have the ability to modify the existing document, keeping a log file of each and every time the document has been revised. This ensures that a complete and accurate record of all revisions to the document is maintained, allowing you to easily reference the most recent version or any previous versions as needed.
The ability to manage both current and historical documents, as well as the option to modify and delete them, provides users with a flexible and efficient solution for document management within SapphireOne.
Employee Grouping Area
This area containing three tags which enable additional sorting and reporting of employees. The drop-down menus for all three tags may be created by the user. Enter in a new item and SapphireOne will ask if you want to add it to the existing list. Select an existing item by using the arrow then command click on the same arrow and it will ask if you want to remove it from the list.
In addition, the headings of Tag1, Tag2, and Tag3 may also be altered by the user as required. To make the changes the user can navigate to Utilities > Controls > Master Defaults > Payroll/HR Page.
Dictation and Speech to Text Overview
SapphireOne’s implementation of both Dictation (MacOS) and Speech to Text (Windows) is a game changer for data entry. Any data entry field you can type into using a keyboard can use this feature.
You can also use this functionality on all inquiry screens within SapphireOne. For example, the user is in a Contact within a Client. They may have made a phone call to that particular client using the Softphone technology. Consequently, this will automatically date and time stamp both the contact and the phone number you called.
As soon as the call is completed, the user has the ability to use Speech to Text (Windows) or Dictation (MacOS). They can dictate into the memo field of the CRM contact, adding as much description as they require.
Dictation and Speech to Text Procedure
This functionality applies across every single Data Entry screen. For example, the SapphireOne user is entering a Vendor Invoice (VI). Additionally, you may want to add a memo within the Vendor Invoice (VI). The user can utilise the tool and simply dictate the memo.
Another example is if the user wants to add additional lines to the General Ledger account, within each General Ledger account. When the user is completing data entry using a General Ledger, there’s always a unique memo field for each GL account line.
The user can then utilise this feature to quickly add the information they need to add. Alternatively, you may have an interview with an employee. After the interview process is completed, the user can then make notes about the employee.
Speech to Text or Dictation is an extremely powerful tool. It is something that we at SapphireOne, as well as our clients, utilise daily. It is a massive time saver.
Employee Personal Details Area
There are two Address areas for the entry of the employees address, and both of these address areas are identical. One is for the recording of the employees Residential Address, while the second is for the recording of the employees Postal address if it is different to the residential address.
- Residential Address – Enter the Employees address.
- Postal Address – If the Postal Address is the same as the Residential Address the
 arrow may be used to directly copy the address details over.
 - Phone – Phone numbers may be entered here. If the SpliceCom phone system has been installed clicking on the
 icon will cause SapphireOne to ring the telephone number as entered beside it.
 - Mobile – Mobile Phone numbers may be entered here. If the SpliceCom phone system has been installed clicking on the icon will cause SapphireOne to ring the telephone number as entered beside it.
- Email – Enter the employees email address. The heading is underlined so clicking on the Email heading will create an email within your nominated email application.
- Date of Birth – Enter the employees Date of Birth. SapphireOne will then use the date as entered and calculate the employees age as of today’s date. The Date of Birth heading is underlined so clicking on the heading will display a calendar style date picker enabling easy entry of the employees date of birth.
- Next of Kin – Enter the employees next of kin. One default next of kin can be entered into this field. If more are required go down to the Additional Next of Kin area and select the icon to add additional kin.
- Relationship – This selection menu may have items added to it or removed from it as required by the user. Common items would be, Husband, Wife, Partner, Sister, Brother, Mother, Father, Son, Daughter.
- Phone – The telephone number of Next of Kin can be entered here.
- Gender – Select the appropriate radio button from Male, Female or Not Given.
Employee OHS Notes Area
This data entry field is a specific area to keep notes related to an employees specific OHS requirements. For example, allergies, disabilities and health requirements. Full WHS records of all incidences can be found on the WHS Inquiry screen.
Employee Dates Area
This area stores a number of dates. All of these dates may be altered by the user although this is not recommended as all of the dates are entered by SapphireOne when other items are processed. I.e. a Pay run which will alter the Last Paid date. All of the headings here are underlined so a date picking calendar is available for the entry of dates if required.
- Start – This will be the date that the employee commenced employment.
- Finish – This date will always be set as 00/00/00. A date will only be entered by SapphireOne when the employees has completed employment.
- Review – This is a date that could be entered by the Payroll/HR officer as it indicates when a review is due for the employee.
- Paid to – Entered by SapphireOne based on the last pay run that was executed.
- Last Paid – Entered by SapphireOne based on the last pay run that was executed
- Terminate – This is a date that could be entered by the Payroll/HR office to indicate the date of termination.
Additional Next of Kin
An unlimited number of next of kin or related parties may be recorded here for each employee. This may include additional contacts such as medical contacts, physiotherapists, therapists and external support staff.
To add another next of kin select the ![]() add icon, to delete an item select the
add icon, to delete an item select the ![]() delete icon. To search for an existing contact in the data file select the
delete icon. To search for an existing contact in the data file select the ![]() link icon.
link icon.
Employee More Details Page
Employee Rostered Days Off Area
A Rostered Day Off (RDO) is a day within a payroll period that an employee has not worked. This time can be paid or unpaid dependant on an employees registered agreement or awards are recorded. An example of when an RDO is paid may be due to an employee working extra hours that add up over a period of time and that will be taken as an RDO.
There are 4 radio buttons or option that are selected one at a time. Depending on which radio button or option that the user selects, this area will alter to display only the data entry fields that require data entry.
- Use Trigger – When this option is selected the following fields must have data entry.
- Trigger Hours – Enter the number of hour for the trigger to occur.
- Automatic RDOs below trigger checkbox – Select if RDO’s are to occur below the number of hours above.
- Use Percentage – Enter the RDO percentage into the data entry field.
- Use Hours Accrued – Enter the Trigger Hours and the Accrued Hours.
- Manual Control – All options are removed. Rostered days of are set manually.
- Maximum RDO Owed – Enter the maximum number of RDO’s before an alert is raised.
- Owed Days – SapphireOne will calculate and display the current number of RDO’s currently owed to the employee.
Saved Hours
This area may be used to manually enter an employees’ saved hours as a reminder for the Payroll Officer.
Employee Default Settings Area
- Payment Summery Deduction Name – Enter the deduction name here. This name will appear in reports.
- Change Pay Down to Next – This option menu is for the rounding of individual employees pay.
- National Student Number – This field is for the entry of a national Student Number.
- Passport Number – A Passport number may be entered here. The number will be encrypted.
- Expiry Date – The passport expiry date is entered in this field.
- Leave Loading in First Year Checkbox – When this check box is selected SapphireOne calculates leave loading from when the employee first starts instead of after the first year.
- Apprentice Checkbox – The selection of this checkbox allows for specific Payroll/HR setup for Apprentices.
- Quick Pay Checkbox – The check box is directly linked to Payroll/HR > Payroll Working Transactions Wizard Only. Employees that have this check box selected will only then appear in the list of employees when the wizard is run.
Employee Drivers License Area
This area has been created for the storing of the employee’s drivers license details. Provision has been made for the storing of all details required with the actual license number being encrypted.
- License Number – Enter the employees license. Once entered SapphireOne will encrypt.
- Card No – Enter the license card number.
- License Class – Enter the class of the license. For example, C, LR, HR, HC or MC.
- License State – Enter the State that the license was issued in.
- Expiry Date – Enter the expiry date of the license.
- License Conditions – Enter any conditions for the license. For example, eyesight requirements.
- License Country – Select the country that the license was issued in.
Employee Labor Hire Area
When an employer hires labor, it is now a requirement that more details are kept by management than before. For this reason, SapphireOne has now included this area where these additional details may be stored.
- Vendor – Enter the Vendor details here. It is not linked to any other functionality in SapphireOne.
- Nationality – The nationality of the employee may be recorded here.
- Weight – The weight of the employee may be recorded here.
- Height – The employees Height may recorded here.
- NESB Checkbox – The Non English Speaking Background checkbox my be selected if required.
- Police Check – If a Police check has been conducted and received back it can be entered here.
- Conviction Checkbox – If a Police check has been conducted and it shows that a conviction has been recorded this checkbox should be selected.
- Disabilities – If the employee has disabilities they may be entered here.
- NESB Checkbox – Select this checkbox if the employee is from a Non English Speaking Background.
- Smoker Check box – Select this checkbox if the employee is a smoker.
Employee Medical Area
There is becoming a larger requirement for businesses to store some basic medical details about the employee if they agree to supply the information. All of the data entry fields in this will accept any characters so that the user has maximum flexibly when recording these details. All below details can be added in the Employees Next of Kin contact details.
- Medical Conditions Text Field- Record any medical conditions that the employee has.
- Medication Text field – Record any medications that the employee is taking.
- Doctors Name – Record the Employees doctors name.
- Phone – Enter the employees doctors phone number.
Employee Log Area
This a text data entry field that can be used for any purpose the user requires.
Employee Custom Page
Custom Page Overview
SapphireOne’s Custom page features text fields designed for versatile, user-defined purposes. Each field is assigned a variable by SapphireOne, which is displayed as the default field heading label. Users can take note of the desired field or heading variable for customisation and modify it by navigating to Utilities > Controls > Change Names. Detailed instructions on this process will be provided below.
The Custom page is organised into the following sections:
- Alpha – Allows letters and numbers, but cannot be used for arithmetic functions
- Real – Allows numbers only, and can be used for arithmetic functions
- Date / Time – Date fields store date values and can be used for date functions, while Time fields store time values and can be used for time functions
- No Heading Defined – Features eight alphanumeric fields that cannot be used for arithmetic functions
- Text – Accepts letters, numbers, and special characters, but cannot be used for arithmetic functions
The data entry fields in these Custom Pages can also be employed in Sapphire Custom Reports, Quick Reports, Custom Inquiries, 4D View Pro, and 4D Write Pro Reports, just like any other data entry fields within SapphireOne.
The example Custom Page below is from an Asset Inquiry; however, the process for customising this page remains the same, irrespective of the function in which the Custom Page is located.
Default Variable Values
In the default variable values defined by SapphireOne, the first number signifies the position of the field within the group, while the second number denotes the maximum number of characters for the data entry field.
For instance, ASAlpha_1_20 indicates that it is the first data entry field in the group and can hold up to 20 characters. Similarly, ASAlpha_8_80 shows that it is the eighth data entry field in the group, with a capacity for a maximum of 80 characters.
To modify the headings on a Custom Page:
- Write down the exact names of the headings you wish to modify.
- Navigate to Utilities > Controls > Change Names. Keep in mind that when performing this procedure, you will be warned that only one user should be logged into the data file.
- Upon accessing the Change Names function, a dialogue box will appear. Then, refer to your list of names and scroll down the list to find the headings you want to modify.
- For each heading:
- Highlight the name.
- Enter your new name in the lower data entry field.
- Click the Update button to save the changes in SapphireOne.
Employee Banking Page
The Employees Banking details are recorded on this Banking page. When multiple Bank Accounts are entered for the employee, SapphireOne will read from the BOTTOM up when allocating payments to the Employees Bank accounts. As an example, if the employee nominates a fixed amount or a fixed percentage to a particular bank account, the distribution of the pay will work from the bottom up. The bank account that is sitting at the top will be where the remaining balance of the pay will go to.
When SapphireOne is checking for a GL account to be used for this employee this is where SapphireOne will first look. If an FX GL account is entered in the Paid From field, the employee will be paid using the entered GL account type. If it is an FX GL account, SapphireOne will also display the currency Type in the Currency Column. Additional documentation for FX pays has been entered further on in this section.
Please make note of the way that the bank accounts are calculated and the order that they are in. For example, the LAST bank account in the list has a percentage of 50% entered and this means that 50% of the employee’s TOTAL pay will be paid into this bank account. The second account in the list has 60% set and this means that 60% of the REMAINDER of the employees pay will be paid into that account. The first account in the list MUST always have 100% set so that SapphireOne will pay all of the remainder of the employees pay into the first bank account. Example is included below.
| Account Payment Order & Name | Percentage for the Account | Paid into the Account | Balance of Pay Remaining |
|---|---|---|---|
| 1st Account read | 50% of $1000.00 | = $500.00 | $500.00 |
| 2nd Account read | 60% of $500.00 | = $300.00 | $200.00 |
| 3rd Account read | 100% of $200.00 | = $200.00 | $0.00 |
Banking Area Data Entry
- Salary Payments – Almost all payments of salary are now completed by electronic funds transfer (EFT). However, if all or part of their salary is not to be paid in this manner the user has the below two options:
- Cheque – When paying by cheque enter the value of the cheque here.
- Cash – If cash is to paid enter the amount given as cash here.
- Order – Enter the order that multiple bank accounts are to be displayed in.
- Swif/Bic – If supplied enter the Swift or Bank Identification code.
- BSB – Enter the BSB of the bank account.
- Account No. – Enter the employees bank account number.
- Reference – Enter a reference number id required.
- % – For a single bank account it is critical that the user enters 100%. For multiple Bank Accounts see above.
- Maximum – You may also set a Maximum amount in dollars that is to be paid into any of the accounts and this will override the percentage amount for that Bank account if it is less. SapphireOne will still look at the balance of pay remaining when calculating the amount to be dispersed into the next sequential bank account.
When using this function, the first bank account in the list should always have the full 100% set and no dollar amount set in the Maximum column. If the first bank account is to have a dollar amount set it should be moved to the bottom of the list.
- Salary Sacrifice – After the compulsory superannuation has been taken the Employee may elect to make an additional Salary Sacrifice. This data entry field has a light blue background so the user has a pick list to select from. Entering the ‘@’ or ‘?’ symbol for a full search will display a list of all the Allowances currently in SapphireOne.
- Paid From – This data entry field is not normally used, but it must be used when there is a requirement that an employee is to be paid in a non-local currency i.e. FX Currency. SapphireOne will first check that there is a valid Bank G.L account entered into the Paid From data entry field here in the Banking Page of an Employee Inquiry as seen above.
If it finds none then it will proceed to: Utilities > Controls> Company Inquiry > Control Accounts Page > Payroll Tab and select the Bank G.L data entry field as entered. From now on the selection precedence is Employee Inquiry first then the Control Accounts.
Paying Employees in FX currency
The FX G.L. accounts must be set up first. To do this go to: Accounts > General Ledger > General Ledger and select the button to create your new FX General Ledger. Remember to select both the checkbox and the FX currency using the button in the Bank Details area. Once an FX type of Bank account has been entered into the Paid From field, SapphireOne will display the FX ID immediately to the right of the Paid From field.
Proceed as normal, however there are 2 additional items that will need your attention. On the Banking Page of the Employee Inquiry enter in the new FX G.L. bank account into the Paid From data entry field. A point to note is that when you do set up an FX bank account, save it and then immediately re-open it and double check all of the details. In particular check that the button has been altered to your selected FX type in this case .
Then on the Salary Page of an Employee Inquiry select from the drop down list the same FX Currency that the employee is to be paid in as seen below. This Salary Page in an Employee Inquiry is documented later in the section.
Custom Page Overview
SapphireOne’s Custom page features text fields designed for versatile, user-defined purposes. Each field is assigned a variable by SapphireOne, which is displayed as the default field heading label. Users can take note of the desired field or heading variable for customisation and modify it by navigating to Utilities > Controls > Change Names. Detailed instructions on this process will be provided below.
The Custom page is organised into the following sections:
- Alpha – Allows letters and numbers, but cannot be used for arithmetic functions
- Real – Allows numbers only, and can be used for arithmetic functions
- Date / Time – Date fields store date values and can be used for date functions, while Time fields store time values and can be used for time functions
- No Heading Defined – Features eight alphanumeric fields that cannot be used for arithmetic functions
- Text – Accepts letters, numbers, and special characters, but cannot be used for arithmetic functions
The data entry fields in these Custom Pages can also be employed in Sapphire Custom Reports, Quick Reports, Custom Inquiries, 4D View Pro, and 4D Write Pro Reports, just like any other data entry fields within SapphireOne.
The example Custom Page below is from an Asset Inquiry; however, the process for customising this page remains the same, irrespective of the function in which the Custom Page is located.
Default Variable Values
In the default variable values defined by SapphireOne, the first number signifies the position of the field within the group, while the second number denotes the maximum number of characters for the data entry field.
For instance, ASAlpha_1_20 indicates that it is the first data entry field in the group and can hold up to 20 characters. Similarly, ASAlpha_8_80 shows that it is the eighth data entry field in the group, with a capacity for a maximum of 80 characters.
To modify the headings on a Custom Page:
- Write down the exact names of the headings you wish to modify.
- Navigate to Utilities > Controls > Change Names. Keep in mind that when performing this procedure, you will be warned that only one user should be logged into the data file.
- Upon accessing the Change Names function, a dialogue box will appear. Then, refer to your list of names and scroll down the list to find the headings you want to modify.
- For each heading:
- Highlight the name.
- Enter your new name in the lower data entry field.
- Click the Update button to save the changes in SapphireOne.
Employee Controls Page
Please note that there is also an Allowances Page in a Company Inquiry which must be set up first when creating a new data file. Then when a new employee is created SapphireOne will read from the allowances set up in the Company Inquiry and duplicate them here. When SapphireOne determines that a new employee is being setup, it will copy the existing allowances in a Company Inquiry into the new employee’s record.
This means that each employee may have their own customised allowances set up here after the employee file has been created e.g. commissions could be set up as commission A,B ,C and D with different settings. Then from the employees master file link to each one as required.
When SapphireOne requires information from an allowance it will look in the employee record first for the details. If it is unable to find the allowance here it will fall back to the allowances set up in the company inquiry and use those. To find this page go to Payroll > Administration > Employee Inquiry > Controls Page.
Employee Allowances Area
These are all listed in the left hand column and most of them are entered as setup in a Company Inquiry. As noted previously, the user can roll their own allowance and substitute a custom allowance for any allowance in the list if required on an employee by employee basis. This allows for the maximum amount of flexibility when setting up a new employee.
Employee Tax Details Area
Introduction to Tax File Numbers
The first item to enter in this area is the employees Tax File Number or TFN. Tax file numbers are stored in an Employee Inquiry in the Controls Page. To prevent accidental damage to the tax file number details and follow privacy law guidelines, SapphireOn recommends that the tax file number should be encrypted.
In SapphireOne, for the Australian tax system the TFN No data entry field is used to store and then encrypt the Tax File Number. For the New Zealand tax system, it may also be used to store the IRD number. The same principals applies for multiple tax jurisdictions including UK, USA, etc.
How encryption Operates
Encryption ensures that Tax File Numbers are kept private. However, when Tax File Numbers are decrypted, or are imported and left un-encrypted, the true Tax File Number details may be lost when selecting the tax file number field in the Controls Screen in Employee Inquiry and overriding the tax file number with the wrong details or “********” and saving the result.This may be intentional – by changing an Employee’s Tax File Number details e.g. with new employees – or may be unintentional. By simply tabbing into the TFN field, SapphireOne will encrypt the TFN details. This means that when the user reports on the TFN_ field, instead of seeing decrypted Tax File Numbers, they will find encrypted Tax File Numbers.
If the user enters an invalid Tax File Number, and it is saved, SapphireOne will warn that the Tax File Number is invalid. Should this message come up, the user can correct the TFN entered by going back into Controls in Employee Inquiry as seen in the screen shot above. To correct the TFN No field, simply click on the Data Entry field. Even if the Tax File Number is encrypted, clicking on the field will show the incorrectly entered Tax File Number.
How to tell is a TFN is Encrypted
To find out which Tax File Numbers are not encrypted, go to the Employee Inquiry Screen, under Administration. Select the employees you wish to query and do a Detailed Query for IRDEncrypt is equal to False. If any TFN’s that are not encrypted appear, you can encrypt the TFN’s through SapphireOne Options. Instructions on doing this are explained in the following section.
Encrypting Tax File Numbers
To Encrypt the Tax File Numbers, you will need to be in the Employee Inquiry Screen. To do this in Payroll//HR, select Administration from the Main Menu, and then select Employee Inquiry. Once the Employee Inquiry list is displayed, go to Sapphire Tools icon and then from the drop down menu select Encrypt TFN’s.
You can check if Tax File Numbers have been Encrypted by doing a Quick Report from Employee Inquiry, selecting the IRD_No field, or by doing the query mentioned above.
Actual Tax Scale
There are two columns of radio buttons and each column is independent of the other. By default these will have Australian Resident and Full Time buttons selected. A selection must be made from each of the the two columns. Depending on the users selection made for the two radio buttons, the checkboxes below then will alter and display the items that the user is required to consider. As the option are selected SapphireOne will alter the Suggested Tax Scale.
SapphireOne also supports New Zealand and other Tax Jurisdictions. Once the Country Code is nominated in the Master Company Setup, it will default to the particular requirements for tax scales for that tax jurisdiction.
When a new employee is created SapphireOne will set checkboxes at common default settings and then suggest a tax scale of 4 (for Australia as an example). The user must then always then select the Actual Tax Scale from the drop down menu provided. You have the ability to support different tax scales for various tax jurisdictions.
A common alteration to an employee’s file would be if they have a second job and do not want to claim the tax-free threshold for this job so the Claims Tax free threshold checkbox would have to be un-ticked. SapphireOne would then alter the Suggested Tax Scale. If the user is not familiar with the tax scales in SapphireOne they would have to look at the tax scales in SapphireOne and select the appropriate scale.
To check these go to Payroll > Administration > Tax Scale Inquiry. The user would then have to return to this Employee Inquiry and manually select the correct Actual Tax Scale from the drop down list. These may be updated every year.
TFN Declaration Area
Once the employees master record has been completed to this point, SapphireOne has enough information to create and send the Tax office a TFN declaration. Enter in a date in the field provided and the select the Send To ATO button.
Job Keeper Area
This was created when Job Keeper was introduced in 2020. At present it is now redundant until the Alpha Bravo Charlie Delta Echo Variant arrives 🙂
Child Support Area
This area is for the entry of any Child support payments that the employee may have to make. They may be entered as a dollar amount or as a percentage of their salary.
Other Area
- IPO Checkbox – This refers to International Progress Organisation. Select the IPO checkbox for employees that falls under a United Nations tax jurisdiction.
- Leave Loading checkbox – If leave loading is to be applied to any leave for this employee select this check box.
- Leave Loading Rate – Enter the rate as a percentage in this field.
- Set Tax Rate % – SapphireOne initially checks this data field entry field for a valid entry for the direct calculation of tax to be applied to this employee.
- % Entered – When there is an entry in the data entry field, SapphireOne uses the percentage as entered to calculate the Employees tax and proceeds no further. These percentages must be entered as follows: for 33% tax .33 must be entered. For 25%, .25 must be entered and so on.
- % Not Entered – If SapphireOne finds nothing in this field, SapphireOne then proceeds to the Controls Page of an Employee Inquiry to calculate the tax to be applied as is normal.
Salary Page
The details entered into the package area below do NOT calculate the pays for an employee. The information entered here is used when SapphireOne automatically sets up a blank Standing Transaction record when the new employee record is saved. The user then has to modify/add to this Standing Transaction to establish the dollar amount that an Employee is to be paid.
Package Area
This Package area is linked back to the first Page for this employee, the Details Page. In the Classification area there is provision for entering an Award. If this employee is linked to an Award that has a salary specified, the salary specified in that Award will be entered here automatically and may not be changed in this screen. Salary changes will have to be made to the Award and not here. However, if the Award has a zero salary set in the linked Award, you will be permitted to alter the Salary paid in the Package area. If this employee was not linked to an Award you may enter in either an Annual salary or a Period salary (as set by the Pay Frequency menu). The last field entered by the user will force SapphireOne to recalculate the other.
For employees that have constantly changing hours, enter zero in the Standard Hours per Week field. This will mean that unless the Working Transaction is altered for this Employee for every Payrun they will be paid 0 * $25 = $0.
This then gives you the option of inserting the hours that have been worked for each period in the Working Transaction for that employee. They would then get paid based upon the hours entered into the Working Transaction multiplied by the Hourly Pay Rate in the Employee file. When the employee is also set up as a resource the Staff member checkbox in the Resource record.
Annual Based Salary
- Pay Frequency menu – First select the Pay Frequency from the menu. There are seven options available and the most common ones are weekly, fortnightly and monthly pays.
- Frequency of Pay – The Data field heading immediately below will alter to display the item selected from the Pay Frequency menu. From the items above Weekly Pay, Fortnightly Pay and Monthly Pay will be displayed as the heading for the data field. Do not enter a figure into this field as SapphireOne will enter it for you after the next step.
- Annual Salary – Next enter in the Annual Salary figure. Once you enter the annual salary figure SapphireOne will calculate the period based salary figure for you based on the Frequency of Pay you have selected.
- Day & Weeks – SapphireOne will assume 8 hours per day, and 40 hours per Week and 5 days a week. As these daily and weekly figures are altered by the user SapphireOne will recalculate the other figures automatically.
Period Based Salary
Alternatively, again start by entering the Pay Frequency. There are seven options available and the most common ones are, weekly, Fortnightly and monthly pays.
- Pay Frequency Menu – The Data field heading immediately below, will alter to display the item selected from the Pay Frequency menu. From above Weekly Pay, Fortnightly Pay and Monthly Pay headings will be displayed.
- Frequency of Pay – You must enter a dollar figure into this field based on the Pay Frequency option selected. Just enter the total Pay for the selected period. As a Bonus SapphireOne will calculate and display the Annual Salary in the field for you in the next step.
- Day & Weeks – SapphireOne will assume 8 hours per day, and 40 hours per Week and 5 days a week. As these daily and weekly figures are altered by the user SapphireOne will recalculate the other figures automatically.
For both methods above the hourly pay rate will then be calculated from the Standard Hours per week data entry field as entered by the user.
Daily Pays
If Daily Pays are to be entered for an employee some additional items will have to be considered. This option for pay periods is set up in much the same way that other pay period options are set up.
- No Award – Ensure that the employee is not linked to an award on the Details Page as this will automatically populate the Annual Salary data entry field and it cannot be altered.
- Allowance – An allowance will have to be specifically set up for this option to work correctly.
- To do this go to Payroll/HR > Administration > Allowance and set up the allowance. This is then entered by the user into the Standing Transactions function which is then automatically transferred to a Working Transaction for adjustments when a Payrun is executed.
- Enter Daily Pay Rate – When a daily pay is set up all of the data entry fields from Annual Salary through to Standard Days per week should be left blank and the actual Daily Pay Rate amount is the only data entry required.
Hourly Pays
- No Award – Ensure that the employee is not linked to an award on the Details Page as this will populate the Annual Salary data entry field automatically by SapphireOne and it cannot be altered.
- Hours per Day – Enter in the Standard Hours per Day.
- You have the option of entering in the Standard Hours per Week that the employee works. This means that unless alterations are made to this employees Working Transactions file, for each and every Payrun they will be paid 38 hours * $25 = $950 when the Hourly Pay Rate is entered as below.
- Enter in the Standard Days per week.
- Enter in the Pay Frequency as before.
- Do not enter in any amounts into either the Annual Salary or Monthly Pay fields.
- Enter in the Hourly Pay Rate.
Employee’s Paid in FX
When a selection is made from the Currency drop down menu the employee will be paid in the selected FX currency as selected from one of the FX options. When this option is left as not selected, the employee’s salary currency is determined by the master or default currency of the company they are assigned to, which is normally the local currency.
The Currency data entry field provides the Payroll/HR Officer with the option to pay the employee’s base salary in any FX currency set up in the data file. To allow a salary to be calculated in an alternative currency, the user will have to make a selection from the Currency menu. Once an FX currency has been selected, the employee salary details are locked to that FX currency.
On the More Details Page of the employee’s master record there is provision for the selection of a G/L bank account for them to be paid from and this G/L bank account may be in local or FX currencies.
Update Employee FX Sapphire Tool
From the Sapphire Tools menu there is an Update Employee FX update option which may be accessed from an Employee Inquiry when the list of employees in on screen. This allows for the FX rate to be updated on the currently selected employee or employee’s from the list.
Multi-Currency Pay Slip Reports
This report has been added to the list of Payslip reports as another option in the print section. This will be documented in the reports section. This is a pay slip that displays the employee currency rates, pay sheet working currencies and payment bank account currencies on a single report for an employee.
FX Table
A specific table has been created for storing the FX conversion rates along with the pay run records for historical reporting purposes. Historical payslips will print in the currency and rate appropriate to the time of the payrun.
Package Notes
This text area is used to keep any notes that are written about the salary package that the employee has been set up.
Commissions Area
The Rep ID is directly linked to the Sales Person as entered here in a Sales Person Inquiry. This inquiry may be accessed by going to Inventory > Sales > Sales People Inquiry .
- New Item – Select the icon to add a new commission record.
- Rep ID – Enter the Rep ID that this commission record is for.
- Margin – Enter a margin above which a commission is to be paid.
- Commission – Enter the actual commission that is to be paid for sales above that margin.
Commission Reports
Once a user selects a Sales person for viewing or modifying they may select the icon on the main toolbar and either view or print a report. SapphireOne uses the details entered here to calculate the value of the commissions in the report.
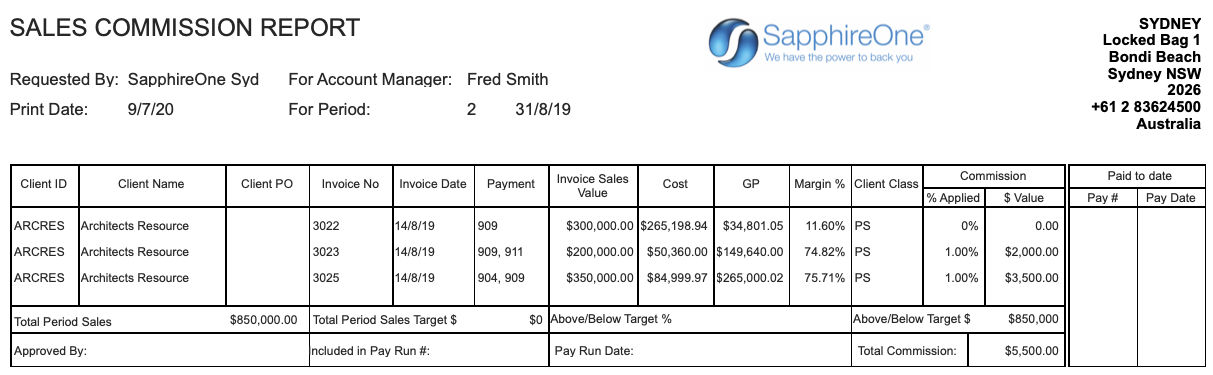
In the report above all of the sales were in excess of the 25% mark-up, so 1% commission was applied to each transaction based on the Invoice Sales Value. It should be pointed out that no financial details are altered in any way, this report is solely to display any commissions on sales that may be owing to employees.
Costing Split Area
This area would be used if there was a requirement to split employees pay across 2 or more Employee Departments.
Select the ![]() icon to add in an Employee Department or select the
icon to add in an Employee Department or select the ![]() icon to remove an Employee Department.
icon to remove an Employee Department.
Superannuation Page
This Superannuation Page displays all Superannuation details for this employee. Please check your local Taxation and Superannuation rules for your particular tax jurisdiction. One common factor is that Superannuation rules in all tax jurisdctions are a very complex matter and are usually subject to change on a regular basis.
How is a Superannuation Percentage Applied
There is a precedent for where SapphireOne checks for the Superannuation rate that is to be applied for an employee.
It will use the following precedence as follows.
- When the employee is employed under an Award the rate as entered into the award superannuation rate will be used.
- If the employee is not linked to an award SapphireOne will then look here in the Employee’s Master Record for the rate as entered on the Superannuation page.
Additional Notes on the Award
- If they are to be paid any item that is different to what has been entered into an award, they must be immediately removed from the award.
- New employees linked to an award will have the award rate of superannuation entered into their Superannuation Page automatically.
- If any employee linked to an award has the award rate of superannuation altered it will update all employees linked to it including the employee with a superannuation rated that was different to the award rate.
- When the superannuation rate in the award is altered the user will then be presented with an alert. If yes is selected the SapphireOne will then proceed to re-write all employee’s superannuation rates as if it has just been entered in the award.
Superannuation Allowance Setup
When setting up allowances in a new data file the following 4 steps will be useful to the user.
- Company Inquiry – Allowances in a Company Inquiry are automatically linked to the Allowances in an Allowance Inquiry when the data file is first setup. These should be checked before going live.
- Allowances Inquiry – All types of allowances are set up using an Allowance Inquiry. This is located by going to Payroll/HR > Administration > Allowance Inquiry. Any variations in allowances for individual employees are first created and set up here.
- Employee Inquiry – When a new employee is commenced, the allowances in a company inquiry are used to automatically populate the Allowance area in the Controls page of the new employee.
- Over Riding – If required the Payroll/HR officer can create a new unique Allowance using an Allowance Inquiry. They can then use the Controls page here in an Employee Inquiry to over ride the standard allowance. The new allowance with the new ID can then be searched for and selected instead of the standard allowance.
Compulsory or Not Compulsory Superannuation
- Compulsory Checkbox Selected – SapphireOne will look directly at the allowance in your data named SUPER in the Controls Page of the employee, and perform the calculations contained there. This is a two step process as outlined below.
- SapphireOne will use the details entered into the allowance field. The setting of the SUPER award is very flexible allowing the correct handling of superannuation for all countries. For Australia it is important this field is filled in as it is used for Single Touch PayRoll (STP) Phase 2 reporting.
- Once the compulsory SUPER allowance has been processed, SapphireOne will then use the Vendor details in the Superannuation page to create a superannuation VI for the employee. It will use the G/L account set up in the allowance, so ensure that is the correct G/L account.
- Compulsory Checkbox Not Selected – SapphireOne will take this to mean that it is not compulsory Superannuation and is another type of allowance. This Salary Sacrifice may or may not be superannuation related and are normally set up as an after tax deduction. This Superannuation allowance setup procedure is documented just above under the Superannuation Allowance set up heading.
If it is for Salary Sacrifice Superannuation, the Use this Allowance When Calculating must have the Super Contribution ticked in the allowance itself.
Entering Superannuation Vendors
In SapphireOne Superannuation is paid to a Vendor for each employee. These Vendors must be set up before any Payruns are attempted. This must be done so that payments made to Vendors identified within SapphireOne as Superannuation Vendors. But first a new Class for Vendors of SUPER must be created.
There are two methods to enter in the Vendor details for paying superannuation.
1. Preferred method – Set up a Vendor Class and add superannuation Vendors to the Vendor Class ready for Payroll. The Vendor Class should contain the word SUPER as this will tell SapphireOne to treat all Vendors that have a class of SUPER as superannuation Vendors.
2. Second Method – Enter in the details listed above from the Superannuation page itself. When entering the Superannuation fund details the user will enter in the Fund ID first and then tab to the Vendor ID data entry field.
If a new Vendor ID is entered an alert will ask if the user wants to create a new vendor record. This is not the normal Vendor data entry page but an abbreviated one. SapphireOne has made the assumption that the Vendor Class is SUPER, Superannuation Fund is selected from the drop down menu and the checkbox selected and the employee entered in the linking data entry field. Once the employee master record is saved the user is strongly advised to got to: Accounts > Payable’s > Vendor Inquiry. Select the new Vendor from the list and check the record so that any corrections or additions may be made.
If any Pay runs are made without the appropriate Vendors entered the VI’s may be created manually at a later date and SapphireOne will recognise these VI’s as superannuation amounts providing the Vendor has been correctly created so that SapphireOne recognises the Vendor as a Superannuation Vendor in the first place.
Please read the following pages carefully as specific details on how to set these Vendors up are provided.
Parent/Child Vendors
For complete documentation on setting up Vendors please read Vendor Inquiry.
When you have a number of Employees who have the same superannuation Fund. The user may set the Superannuation Fund Vendor as a Parent. Then each individual Employee can be established as a Child of the Parent rather than a Super vendor.
First set up a Vendor that will act as a Parent. Then to set up a Vendor as a child of the parent, simply enter in the required Parent ID into the parent data entry field. The Vendor will then be considered as a Child. A single payment may then be made to the Parent Vendor for all the Superannuation Children Vendors.
Creating a Superannuation Class for Vendors
To create a new Vendor Class go to: Accounts > Payables > Class Inquiry. The ID for the new Vendor Class has to be SUPER.
Enter data into the Superannuation Page
Superannuation Setup Details Area
A mix of superannuation funds and amounts is allowed. While the minimum superannuation payable in Australia is 10% this may be paid to one or more funds. I.e. 5% to one fund and 5% to a second fund totalling the required 10% for Australia. For each Tax jurisdiction each different rules/laws will apply.
- From the top right-hand corner of the line entry, select the icon or select (Command /) to add a Superannuation fund. To remove a Superannuation fund from the list, select the icon.
- ID – Enter in a unique system ID to identify this Superannuation fund.
- Vendor – Vendors in SapphireOne have a Superannuation flag to identify those Vendors that are Superannuation Vendors. The Vendor data entry field may be searched by using the @ symbol. You may then select from the list of Vendors displayed. If an existing Vendor is selected, they will have their Superannuation flag set to active if it has not already been set. If a NEW Vendor ID is entered, you will be asked if you want to create a New Vendor. If you proceed and a new Vendor is created from here, the superannuation flag for the new Vendor will also be set active.
- Allowance – If a specific allowance is to be used for this employee only enter it here otherwise leave it blank.
- G/L – If a specific G/L account id to auctioned for this employee enter it here otherwise leave it blank.
- Job Project – If the employee is to be linked to a Job/Project enter it here otherwise leave it blank.
- Compulsory – If this checkbox is selected it will indicate to SapphireOne that the amount payable to the Superannuation fund is all, or part of a Compulsory Superannuation entitlement. (If it is not checked that means that it is some other type of salary sacrifice which may or may not be superannuation related).
- Fund Acc.# – Enter in the Superannuation funds ID.
- Fund Name: Enter in the Superannuation Funds Name. SapphireOne will attempt to auto fill the name in from previous entries. This is to prevent, for example, AMP Superannuation and AMP superannuation becoming two funds. Note the alteration in capitalisation.
- USI – All Superannuation funds in Australia must now have a unique identifier so enter the USI here.
- Percentage – Enter an amount set as a percentage to be paid into this employees Superannuation fund. Any amount as a percentage may be entered here.
- Fixed – Enter an amount set as a fixed dollar amount to be paid into this employees Superannuation fund.
- Add Fixed + % – Selecting this checkbox tells SapphireOne to add the % amount and the Fixed amount together, and pay both into the Employees Superannuation fund.
- Active Checkbox – When this checkbox is selected, this tells SapphireOne to create the superannuation Vendor Invoices(VI) when a Payrun is conducted. If it is not selected, the VI will not be created at the time the Payrun is executed.
To Date Areas
These two areas display both Compulsory and Voluntary superannuation paid for the current year, (YTD or Year To Date) and paid as (TTD or Total to Date), since the employee commenced or since the data file was established.
Transactions Area
This area displays all transactions that have been posted for this employee. This will include all Vendor Invoices for each Superannuation fund and Vendor payments to the Superannuation fund.
Roster Page
This Roster page in an employee Inquiry and is used to populate the Roster page in the Sapphire Web Pack. The Payroll/HR officer with information provided by the employee, enters details of where and when the employee is available for work. The employee is then able to access the Sapphire Web Pack online and choose or bid for rosters or shifts that they are available for or want to work.
To go directly to this page go to Payroll > Administration > Employee Inquiry > Roster Page
Availability area
- Adding Removing – Use the icon to add a new weekly roster. Use the icon to remove a weekly roster.
- Location – Enter the Location that the employee wishes to work at. SapphireOne will then display the locations name.
- Max Hrs / Day – Enter the maximum number of hours to be worked each day for the week.
- Max Hrs / Week – Enter the maximum number of hours per week that can be worked.
- Max Day / Week – Enter the maximum number of days for each consecutive week.
- Day Checkboxes – There is a checkbox for each day of the week including weekends. Select the days that the employee wishes to work.
Activity / Role Area
Multiple activities with different allowances or rates of pay may be set up for each individual employee.
- Activity – Enter the activity. Activities must be set up beforehand so that the wild card characters “@” or “?” may be used to search for the Activity. Once the Activity ID has been entered SapphireOne will display the activities name.
- Allowance – Enter the Allowance using the wild card characters “@” or “?”, that will be used for this employees rostered work. Allowances must be set beforehand and this may be accomplished by going to Payroll/HR > Administration > Allowance Inquiry.
- Rating – The user can enter any number from 1. The higher the number the higher the priority that can be given in relation to roster selection.
Leave Page
All Leave is consolidated on to this single Leave page in SapphireOne.
To go directly to this page go to Payroll > Administration > Employee Inquiry > Leave Page.
The user will note that many of these values are editable. The principal reason for this is that when a new data file for a company has been started, or you create a new company within your data file, and you then move existing employees from Company A to Company B, you will need the ability to resign their entitlements to the new company.
If Pro Rata Leave is enabled in master defaults Utilities > Controls > Master Defaults > Payroll/HR then this is also displayed in this Leave Page in an employee Inquiry.
Paid Parental Leave
The leave setting for Daily or Hourly Leave is used by SapphireOne when calculating Paid Parental Leave. For Employees on hourly leave the user will select the current PPL hourly rate of 22 as the multiplier. ($22 being the current hourly rate for PPL Leave). However, for employees on daily leave the user will have to use the number of hours the employee works in 1 day and multiply that figure by 22 to find the multiplier. These figures are available on the Salary page in this Employee Inquiry.
Leave Area
- This area has four columns that display data as follows.
- Daily Pay – This first column displays the employees pay on a daily basis. This is calculated from values entered elsewhere in an employee Inquiry. This value may be altered if required but it is not recommended that a change in the daily rate of pay is entered into this leave page.
- Carer/Personal – Enter the Carer or Personal Leave rate per day.
- Long Service – Enter the Long Service Leave rate per day.
- Public Holiday – Enter the Public Holiday Leave rate per day
- Annual Entitlement – This line displays SapphireOne’s calculation Leave that is currently owed and may not be altered by the user.
- % Entitlement – The annual entitlement expressed as a percentage of total time worked. As an example some awards will not say you get 4 weeks annual leave, they will express it as a percentage so the example will be that you get 7.69%.
- Current – Displays the current leave that is owing for the employee. When a new data file is established these values will have to be entered by the user.
- Pro Rata – If set up in master defaults the Pro Rata leave will be displayed in this line as calculated by SapphireOne and it is not accessible to the user for any alterations.
Leave Basis Area
- Leave Basis – This Leave Basis drop down menu has four options as follows.
- Standard Hours – This uses the accumulators and does pro rata leave. Its unchanged.
- Period Dollars – This uses the accumulators and support pro rata leave on the tab in working transactions for yearly.
- Period Hours – This uses the accumulators and supports pro rata leave on the tab in working transactions for yearly.
- Old Standard Hours – This is the same as if you used standard hours and did not have proportional leave ticked. Pro rata leave is not supported. It does not use the accumulator. It appreciates week by week as a percentage of Salary/hours accrued.
- Daily or Hourly Leave – Select if leave is to be based on Hourly or Daily basis.
- Casual Worker for Annual Leave – When this checkbox is selected SapphireOne will not apply any annual leave because the casual rate will already include it.
Award Modifications
When an award undergoes modifications in SapphireOne, it’s crucial to review and verify the settings in this Leave Basis area. Examine this section carefully to ensure that all changes in the award area have been updated correctly. Confirm that the new settings in the award area have seamlessly flowed through to this Leave Basis area.
For comprehensive guidance on award entitlements and handling award modifications, please refer to the article titled Award Entitlements.
History By Use Area
This area displays any leave taken by the employee. The list displays the basic details of the leave taken and the dates.
Future Leave Calculation Area
Employees will require advice on their leave entitlements from a certain date. A Leave calculator has been provided here for the payroll/HR office. The leave has been split in to the three types, Annual Leave, Carer Leave and Long Service Leave.
For each type of leave SapphireOne will enter today’s date. For the three types of leave the date heading is underlined to indicate a date picker calendar is available for the entry of a future date. As a future date is entered SapphireOne will calculate the leave for the selected type of leave.
History by Month Area
This area display a list of Carer/Personal, Annual Leave and Long Service Leave taken by the employee on a month by month basis. For each type of leave the essential details are displayed. This area is for display purposes only and is not modifiable by the user.
Employee Leave Requests
Since leave requests will normally be made by employees without access to Payroll/HR this function has also been placed in the Pallet menu. It is the last item on the Data Entry drop down menu. Since it is in the Pallet menu it will be documented in the Pallet Functions and will be the last item documented in the section on Data Entry. it is also on the Sapphire Web Pack on the Data Entry menu.
The employee must know their Employee ID so that SapphireOne can establish a link to their employee record. Once the employee selects the final button in the Leave Request Function SapphireOne will immediately transfer the Leave Request Employee’s Record. Employees are advised to check with their Payroll/HR Office.
Leave Updates
How to process NZ Payroll/HR with the additional functionality of Average Daily Pay (ADP)/ Relevant Daily Pay (RDP):
Leave Rate Basis
In line with the terminology used by the IRD, the Leave Rate calculation basis can be selected for Annual/Holiday Leave, and all other types of leave:
- a) Holiday:
- Average Weekly Earnings (AWE) or Ordinary Weekly Pay (OWP), whichever is greater.
- AWE = 52 weeks of all gross as at the end of the last pay period
- OWP = 28 days of average earnings as at the day before the annual holiday
- Standard Daily Rate (set on the Salary page or Leave page)
- Average Weekly Earnings (AWE) or Ordinary Weekly Pay (OWP), whichever is greater.
- b) All other leave types, including Sick, Alternative, Bereavement, etc:
- RDP = 52 weeks of average earnings (identical to AWE for annual leave)
- ADP = 52 weeks of all gross
- Standard Daily Rate (set on the Salary page or Leave page)
Accumulators Page
When a new data file or a new company within the data file, is being set up or when leave amounts have to be altered, this is the page that the entries are made. This information may be drawn from the SapphireOne legacy program that has been used to store this payroll data historically.
In addition, corrections to leave may be made for one reason to the accumulated values for the employee so these corrections are made in this Accumulators page in the Accumulate From area.To go directly to this page go to Payroll > Administration > Employee Inquiry > Accumulators Page.
This page displays the accumulated values for all items processed through SapphireOne Payroll/HR to the General Ledger for the employee to date. The first two areas have identical fields. The Total to date for and employee means the total from the date they were first employed to today. Year to Date is from the first date of the new Financial year. For example from the 1st of July to today.
- Total to Date Area – Totals from start of employment.
- Year to Date Area – Totals for this Financial year.
- Accumulate From Area– This area is used for setting the Leave as at a certain point. SapphireOne will accrue the leave from this date forward. When a new data file or new company within the data file is commenced the detail/totals in these areas will have to be entered by the Payroll/HR office. This must be migrated from your legacy system.
Allowance Totals Page
This Allowance Totals page display all running totals for all allowances that have been used for processing payruns.
Allowance ID, Description or Name, Period total, MTD or Month to Date Total and a YTD Year To Date total for each item is displayed. The page is for viewing only and does not provide any editable fields.
This page can be accessed directly by going to Payroll > Administration > Employee Inquiry > Allowance Totals Page.
This page displays the totals of all Income Types applicable for this Employee.
Standing Transactions Page
Once a new employee has data entered and saved using ![]() tick icon, SapphireOne will automatically create a new Standing Transaction record for the new employee.
tick icon, SapphireOne will automatically create a new Standing Transaction record for the new employee.
To directly access this Standing Transactions page in an employee record go to Payroll > Administration > Employee Inquiry > Standing Transactions Page.
Once the new employee has been saved, the Payroll/HR office will now go to the employees new standing record and verify that the employee has been created correctly. They will then have to enter in all additional allowances/deductions that will go to make up the details that are processed when a Payrun is executed. If the Standing Record for the employee is not correctly setup, the employee pay will not process accurately.
If there are no standing transactions listed for an employee the employee will not appear in any Payrun’s. When a New employee is started the Payroll/HR office has to open the employees Standing Transaction file and enter in some standing transactions. The first standing transaction to be entered would be as seen above Salaries or a Wage of some type.
This page displays all Standing Transactions that are applicable to this Employee. I.e. they are in their Standing Transactions record.
Journal Lines Page
This page displays all General Ledger accounts that have been used to process pays for this employee.
This page may be accessed directly by going to Payroll > Administration > Employee Inquiry > Journal Lines Page.
Log Page
This Log page displays event data on a period basis. The most recent period or payrun will be displayed at the top of the list. SapphireOne then lists any procedures and events in the log file that occurred during the current month.
To access this page directly go to Payroll > Administration > Employee Inquiry > Log Page.
Remuneration Page
These two pages display all historical modifications to the Employee, including details not related to actual salary or wages.
The page can be accessed at Payroll > Administration > Employee Inquiry > Remuneration Page.
Selecting the Net Summary button will display the payrun number the payrun date, the period, the gross value of the pay, the tax on the payrun and the net on the payrun.
The Net Summary button toggles with the Remuneration button in the screen shown above enabling you to swap between the two views.
Work Health and Safety Page
This page is directly linked to the WHS function on the Administration menu in the Payroll/HR function. Any WHS records created are recorded using the WHS function. The function also has provision for the linking of employees to the record in the employee data entry field. To go to that page go to Payroll > Administration > WHS.
When an employee in that WHS function is linked to it, the summary details will also be displayed in a list here on an employee by employee basis. This enables the Payroll/HR office a summary of each of the employees records that are lit red to a particular employee.
To directly access this page go to Payroll > Administration > Employee Inquiry > Work Health and Safety (WHS) Page.
Keywords and Notes
Keywords & Notes Overview
The Keywords and Notes page is a standard feature found on all inquiry pages in SapphireOne, providing a central location to add and manage keywords and notes for each record.
Keywords Area
The Keywords and Notes page is consistent across all inquiry pages in SapphireOne. Users can add customisable keywords to the list and reuse them. Additionally, keywords can be added that apply specifically to the current record. To remove keywords from the list, users can hold down the Command key on a Mac or the Ctrl key on Windows.
Notes Area
The notes area serves as a diary, allowing users to enter notes and include a date and time stamp by clicking on the green clock button. Users can also customise the font, style, colour, and background colour of the text in the Notes area by highlighting it and right-clicking.
Notes Area
You can add to a list of keywords or commonly used phrases. The clock works similarly to elsewhere in SapphireOne and simply adds a date/time stamp. From and to allow you to highlight a text box between the relevant date ranges.
Actions Page
Action Page Overview
The Action Page is a versatile tool that can be added to major records and transaction tables. It includes various actionable items such as Calendar Reminders, Meeting Invites, Alarms, Emails, To-Do Lists, General Notes, Private Notes, Meeting Notes with Date and Time, Start and Finish stamps, as well as All Day Notifications. This provides users with a centralised location to manage and organise their tasks, meetings, and notes, improving efficiency and productivity.
The Action Page allows users to use the add ![]() or delete
or delete ![]() buttons to add or delete actions as required. Simply select the relevant button to add or delete an action.
buttons to add or delete actions as required. Simply select the relevant button to add or delete an action.
Diary Area
The Diary Area in SapphireOne provides users with a comprehensive range of options to customise their actions. It includes a sequence number, title, type, action, user, privacy settings, status, tag, and link fields.
- Sequence – SapphireOne automatically generates a unique sequence number for each action.
- Title – Enter a title for the action.
- Type – Choose from the customisable drop-down menu to input a type. This will subsequently become a permanent type within the drop-down.
- Action – Utilise the user-customisable drop-down menu to input an Action. This will then become a permanent action within the drop-down.
- User – SapphireOne automatically inputs the user creating this action, though it can be modified if necessary.
- Private – If this checkbox is selected, SapphireOne will only permit the specified user to view or modify this action.
- Status – The user has three options: Open, Hold, and Completed.
- Open – Action is open and active.
- Hold – Action is active, but no alarms will be active.
- Completed – Action is now Inactive and won’t be displayed in any list of actions.
- Tag – Users may attach a tag to an action, which will create a permanent tag within the drop-down. To add a new tag, type the name of the new tag into the tag box and press the tab key. Select “Yes” from the pop-up window to confirm. To remove a tag from the list, click on the tag name while holding down the Command (MacOS) or Control (Windows) key. Select “Yes” from the pop-up window to confirm the deletion.
- Link – When created within a transaction or record, SapphireOne automatically generates a link to the transaction or record. When created from the Options Menu, Palette, or Workbook, users must select an item or function from the drop-down menu to link the action. There are 12 items on this list, ranging from Clients to Manager.
Check List Area
SapphireOne offers a user-friendly checklist tool to create and track actions, allowing users to check off completed items as they progress.
Dates and Times Area
- Start/Finish – Set a Start and Finish time for the action, or select the checkbox for an all-day option.
- Completed – Entering a completion date for an action deactivates it, and it will no longer appear in action lists.
Alarm Area
Never forget a task again – set up alarms to send reminders via email at specific dates and times. Users can also receive email notifications with the provided email address.
Recurring Area
If necessary, the alarm can be set to recur at intervals selected from the Type drop-down menu. Additionally, the recurring period can be defined by date.
Notes Area
Click the green clock button to add time and date stamps to your notes. You can also customise the font, style, color, and background color of the text in the Notes area by highlighting it and right-clicking.
Invite Attendees Area
In the event module, you can invite multiple attendees to your event and track their acceptance or rejection of the invitation. You can also send them an email notification if their email addresses are provided. Additionally, you can manage and track attendees’ RSVP status in real-time.
Documents Page
Documents Page Overview
The Documents Page centralises document and information storage for transactions and master tables, streamlining organisation and management for easy access and improved efficiency.
Documents Area
The Documents Page simplifies file management by allowing various document types to be attached via drag and drop, including PDFs, spreadsheets, photos, and more. It provides a centralised location for document and information storage for transactions and master tables, streamlining organisation and management for easy access and improved efficiency.
Documents can only be attached once the corresponding record has an assigned ID.
Documents List Screen Options
There are eight buttons on the Document List screen, as follows:
- Open – Allows viewing of the currently selected document.
- Update – Prompts the user to import a new version of the selected document while maintaining links to any associated transactions.
- Scan – Accesses a scanner for scanning documents directly into the data file and linking them to the current transaction (requires a compatible scanner with software).
- Save – Saves the currently selected document.
- Link Document: Enables linking of the selected document to other transactions in the data file, presenting a popup for user selection.
- Link Document – Allows linking of an existing document in the data file to the current transaction or record, displaying a popup with a list of documents to choose from.
- Link Existing Document – Allows linking of an existing document in the data file to the current transaction or record, displaying a popup with a list of documents to choose from.
- Delete – Deletes the currently selected transaction or record.
- Add – Displays a search function for selecting a document from the local computer or device.
Details Area
The Details area allows users to add a custom name, description, and tags to each document, enabling easy search and location of specific documents. These details can be customised to meet the specific needs of the user or organisation, further improving the efficiency and organisation of the Documents Page.
Last Modified Area
The Last Modified section displays the date and time when the document was last modified, as well as the user who made the changes. This feature helps maintain accountability and enables efficient tracking of document modifications.
History Area
The History area records changes made to the document, including the date, time, and user who made the changes. This provides a valuable tool for tracking and managing document revisions.
Links Area
The Links area allows users to record links to other places where the document has been attached. Links can be added or removed using the (+) and (-) buttons, providing an efficient way to manage and organise related documents.
Notes Area
The Notes area allows users to add any relevant notes related to the document. Clicking the green clock button will add a date/time stamp, further improving document tracking and management.
Digital Assets Page
The Digital Assets Page enables users to attach an unlimited number of media files to almost any record in SapphireOne. Only the digital assets that have been entered by users for the selected record will be listed from the page menu in the selected record.
It should be noted that there is a Digital Asset item in Workbook mode on the General drop-down menu as well. This Digital Asset item lists all digital assets within the data file as a complete list. While very limited modifications are allowed from this list, it is very handy for getting an overall view of the digital assets in the data file. SapphireOne has provided the search function, enabling the user to search for a specific digital asset.
The key to successful image optimisation for performance is finding the perfect balance between the lowest file size and acceptable image quality. There are three things that play a huge role in image optimisation:
Image File Format
For most website owners, the three image file formats that matter the most are JPEG, PNG, and GIF. Choosing the right file type is crucial in image optimisation. To simplify things, JPEGs are ideal for photos or images with lots of colors, PNGs are recommended for simple images or transparent images, and GIFs are suitable for animated images only. PNG images are uncompressed, making them higher-quality, but also much larger in file size. JPEGs are a compressed file format that slightly reduces image quality to provide a significantly smaller file size. GIFs only use 256 colors along with lossless compression, making them the best choice for animated images.
Compression
Image compression plays a significant role in image optimisation. Various types and levels of image compression are available, and the settings for each will depend on the image compression tool you use. Most image editing tools such as Adobe Photoshop, ON1 Photo, GIMP, Affinity Photo, among others, have built-in image compression features. You can also save images normally and use web tools such as TinyPNG or JPEGmini to compress images before uploading them to SapphireOne. Although they require some manual effort, these two methods allow you to compress images efficiently.
Image Dimensions
When you import a photo from your phone or a digital camera, it usually has a high resolution and large file dimensions (height and width). These photos typically have a resolution of 300 DPI and dimensions starting from 2000 pixels or more. Although high-quality photos are perfect for print or desktop publishing, their dimensions can still be optimised. Reducing the image dimensions can significantly decrease image file size. You can resize images easily using image editing software on your computer.
To illustrate the impact of image optimization, let’s consider an example. We optimized a photo with a resolution of 300 DPI and image dimensions of 4900 x 3200 pixels. The original file size was 1.8 MB. We selected the JPEG format for higher compression and adjusted the dimensions to 1200 x 795 pixels. The resulting file size was reduced to just 103 KB. That’s a remarkable 94% reduction in file size from the original.
Choosing the Digital Assets option from the Page menu in a record displays a list of digital assets currently stored in the data file for the selected record.
This screen, as well as any subsequent screens, will overlay the existing screen displayed in your major table. This feature facilitates the attachment of digital assets to your Master Record, providing an efficient way to manage and organise media files associated with your data.
- To add a picture, simply click the Add button.
- To delete a picture, select the Delete button.
Considerations for Adding Digital Assets
Adding digital assets can impact your data file size and system performance. It is important to consider the following:
- Storage capacity: Assess your storage capacity to ensure it can accommodate an increase in file size.
- System performance: Adding a large number of media files can potentially slow down your system. Evaluate the impact on system performance before attaching a significant number of digital assets.