SapphireOne Document Management System (DMS) includes a Paper Clip ![]() icon on all data entry and inquiry screens and allows users to attach relevant documents or files to every transaction or record. Additionally, every data entry and inquiry screen within SapphireOne also contains a separate Page specifically for managing documents related to the transaction i.e. version control.
icon on all data entry and inquiry screens and allows users to attach relevant documents or files to every transaction or record. Additionally, every data entry and inquiry screen within SapphireOne also contains a separate Page specifically for managing documents related to the transaction i.e. version control.
The red colour of the paper clip indicates that there are currently no documents attached to this transaction. When a document has been attached, the paperclip will turn green ![]() and the word Items will be prefixed by the number of documents currently attached to this transaction or record.
and the word Items will be prefixed by the number of documents currently attached to this transaction or record.
SapphireOne Document Management functionality can store any type of file or document, and an infinite number of documents may be stored for an unlimited amount of time. Examples of types of documents include Adobe Acrobat, Spreadsheet Documents, Word Processor Documents, Photo Files, JPEG, CSV, HEIF, MP4 files.
Within SapphireOne Master Defaults, there are settings available for the user to restrict the size of each individual document, and also to select where the documents are to be stored – within the data file itself or in a seperate folder. These options may be altered by going to Utilities > Controls > Master Defaults > System Page. Within the Documents area in the right hand corner of SapphireOne Page, there is a provision for the user to set the ‘Document Size Limit’ (the default size is 10Mb). There are also two radio buttons where the user can select ‘Store with Data File’ as part of the data file, and ‘Store as Files’ seperate to the data file.
To attach a document to a transaction, select either the  or
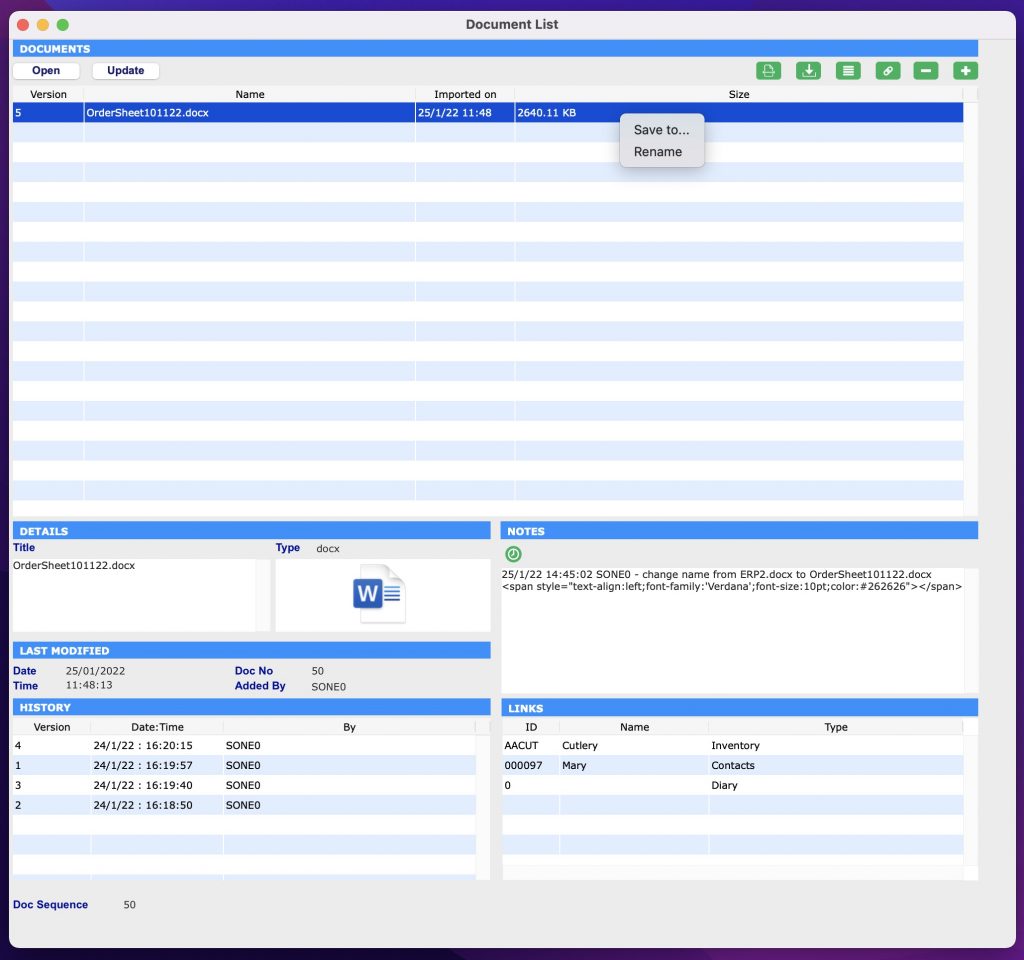
or  Paperclip icon and the following Document List window will be displayed.
How to Attach Documents Using SapphireOne Paperclip
Documents can be attached using SapphireOne Drag & Drop functionality. To use this functionality, simply drag a document from the local computer into the Document List screen and it will append automatically. If SapphireOne detects that the document name already exists, a pop-up will be displayed alerting the user. Alternatively, the user can also select the Plus ![]() icon to select a document to upload from the local computer.
icon to select a document to upload from the local computer.
Once a document has been attached, the user has the ability to rename any document by right clicking on the file and selecting Rename as seen above. Renaming documents will ensure that document names remain consistent across all records.
Documents Area within Document Management System (DMS)
- Open – When the
 button is selected, SapphireOne will open the currently selected document for viewing.
 - Update – When the
 button is selected, SapphireOne will display a pop-up which asks the user if they want to Import a New Version of the currently highlighted document. This functionality allows users to update and keep records of different versions of the same document. When the new version has been selected, the user will be asked to enter in a new version number. The new version will now be the document available, and all previous versions will be recorded and available within the History area of Document List screen. The new version of the document will still be linked to any transactions that the old version was.
 - Scan – When the Scan
 button is selected, SapphireOne will access a local or network scanner, and following the usual prompts allows the user to scan a document directly into the data file and link it to the transaction. The appropriate scanner with software must be installed on the local machine or network.
 - Save – The Save
 button allows the user to save the currently highlighted document to the disk.
 - Link Documents – The Link Document
 button allows the user to link the currently highlighted document to another transaction or multiple transactions in the data file. A pop-up will be displayed allowing the user to make their selection. You can learn more about Linked Documents in the Links Area documented below.
 - Link Existing Documents – The Link Existing Documents
 button allows the user to link an existing document in the data file to this transaction or record. A pop-up will be displayed allowing the user to make their selection from a list of documents. You can learn more about Linked Documents in the Links Area documented below.
 - Delete – The Delete
 button when selected will delete the currently highlighted document.
 - Plus – When the Plus
 button is selected SapphireOne will display a search function allowing the user to select a document that is currently on the local computer.
Details Area within Document Management System (DMS)
When a document is selected within the Documents area, the Details area will automatically populate to display additional information about the document, including the Title of the document and the Type of file.
Notes Area within Document Management System (DMS)
The Notes area is for entering any notes related to the document. The user can select the green clock icon ![]() to create a time and date stamp for every note added.
to create a time and date stamp for every note added.
The Notes area will also keep an automatic user log when any changes are made to the document. For example, if the document is renamed or new links are created. SapphireOne will record the date, time and user that made the modifications.
Document Details Area within Document Management System (DMS)
The Document Details area contains additional information relating to the selected document, and will automatically populate when a document is selected from the list. This includes the date and time the document was appended, the document number and the user who added the document.
History Area within Document Management System (DMS)
The History area displays a record of the complete version history of the selected document. SapphireOne keeps track of all version changes and will automatically display the documents history within this area.
The History area will automatically update as new versions of the document are imported when selecting the Update button ![]() . When a new document version is imported, all previous versions of the document will be recorded and available to view within the History area. This enables the user to always view the most recently updated version of the document, however still keep a complete record of the document history.
. When a new document version is imported, all previous versions of the document will be recorded and available to view within the History area. This enables the user to always view the most recently updated version of the document, however still keep a complete record of the document history.
Links Area within Document Management System (DMS)
The Links area is used to link documents to particular areas or transactions within SapphireOne. The links area can also be used to view all linking information related to the document. For example, if the document was imported using a function with SapphireOne, the links area will have a line containing this linking information.
To add in additional links to a document, select the document and then select the Link Document ![]() icon. The Files pop up window will be displayed. From the File drop down menu, select what you want to link this document to. Then within the Value data entry field, enter in the details (ID). As this data entry field has a blue background, it is user searchable by entering the wildcard ‘?’ or ‘@’ symbols.
icon. The Files pop up window will be displayed. From the File drop down menu, select what you want to link this document to. Then within the Value data entry field, enter in the details (ID). As this data entry field has a blue background, it is user searchable by entering the wildcard ‘?’ or ‘@’ symbols.

Updating a Document within Document Management
The procedure for updating a document is as follows.
- When the update button is selected the user will be asked to confirm they would like to import a new version.
- Upon confirmation the user will then be asked to choose the updated document to open.
- Upon selection a secondary dialogue will prompt the user for the entry of an alphanumeric value for the new version.
- Select OK.
Document Management using SapphireOne Documents Inquiry
As well as SapphireOne Document Management Paperclip functionality, SapphireOne Documents Inquiry function within SapphireOne Workbook Mode gives users the ability to view a repository of all documents and files stored within the SapphireOne data file. Users have the ability to add New documents, Modify, View or Delete existing documents from within the Documents Inquiry screen.
Any revisions made to a document within the Documents Inquiry screen will be updated across all areas that the document is linked to across SapphireOne, and similarly any modifications made to documents within the SapphireOne Paperclip Document List window will be reflected within the Documents Inquiry window. For example, if a document is renamed within a transaction Paperclip Document List screen, the document name will also be reflected when viewing the document in the Document Inquiry screen.
You can learn more about SapphireOne Documents Inquiry functionality within the Documents Inquiry article.
Document Control within Document Management
As an example, we have an inventory item with documents attached (installation instructions and a packing checklist amongst others). We add this inventory item to a sales order, manufacture, ship, completely finish the job. One year later we might have a revision of this inventory item along with all the Documents (DMS). Understandably, we don’t want to have to make a whole new inventory item for the revision, just update the DMS that are attached. We update the inventory item with all the new documents, ready for the next sale. When we refer back to the original completed Sales Client Invoice or Job Projects Client Invoice, we will we see the documentation as it was when the Job Project, Sales Client Invoice or Job Projects Client Invoice was completed, or the documents as they are now. In the example above where we have elected to produce an Order Client Invoice (OCI) with the current installation instructions and packing checklist. This will automatically flow into the finished Sales Client Invoice once the OCI has been delivered.
In the example above we have both the current and historical documents attached. As a SapphireOne user has the ability to edit the list and if they choose not to store the historical document and simply select the Minus button and they can delete the historical document. We also have the ability to modify the existing dociument keeping a log file of each and every time the document has been revised.
You can review our Blog and YouTube channel for additional information and resources on SapphireOne ERP, CRM and Business Accounting software.