Point of Sale Overview
Sapphire Web Pack Point of Sale (POS) is when a retail transaction is created quickly in a retail environment. You will have a computer, this may be an iMac, for example, where you will have either a dedicated salesperson, commonly referred to as a Point of Sale Operator, or the second scenario, you may have a Point of Sale System where there are multiple staff on the floor, whom log on to the same computer and login with a unique login ID and password to create a Client Sale (POS). In larger type organisations, typically, you will have a dedicated Point of Sale (POS) operator. The second scenario is more common, in boutique or bespoke retail environments where you may only have, at any one time, less than five clients in a store and you may have two or three sales people in this environment. Typically, this will be larger type ticketed priced items.
When using Sapphire Web Pack Point of Sale, most customers will have barcodes on each of their inventory items and the price will form part of the barcode. By simply scanning the barcode, this will automatically indicate on the Point of Sale to the operator the transaction value. When the client is in a position to proceed to paying for the items that have been entered into the Point of Sale typically a client will present a credit card or cash where the Sapphire Web Pack Point of Sale person will enter either the tended amount or the receipted amount for the purchase. The point-of-sale will display the invoiced amount as well as the receipted amount.
The invoice and receipt are combined into one document and the Sapphire Web Pack Point of Sale (POS) user may ask the customer client if they would like to have the invoice and receipt emailed to them. From Sapphire Web Pack Point of Sale you can select the email option and elect to email it directly to the client. More traditionally these have been printed on a thermal roll printer. Point of Sales are moving towards emailing and being able to record the clients email address for adding to things like Mailchimp and marketing campaigns. When your client is making payment, typically that may be done through a terminal and the terminal will scan or swipe the card or phone presented. In the case of an iPhone, it would be something like Apple Pay and then that scenario it would automatically update Sapphire Web Pack Point of Sale and once again would produce the completed invoice and receipt. The Point of Sale system can include other devices such as barcode scanners, scales, etc. to form part of the Point of Sale device.
The big game changer with having Point of Sale as an integral part of your Sapphire Web Pack solution is that it brings all the business operations into the one application. For example, Client Relationship Management (CRM) marketing campaigns to those customers either by follow-up phone calls or emails, inventory management, warehousing, logistics, distribution, etc.
In conclusion, the summary of an inbuilt Point of Sale within your Sapphire Web Pack is the ability to record in real time, transactions with your clients, date and time and the goods and services purchased by the client.
The Sapphire Web Pack Point of Sale (POS) screen is the first item in the Sapphire Web Pack Point of Sale Mode menu. The Sapphire Web Pack Point of Sale (POS) allows users to search and select inventory as well as view images and data descriptions related to the inventory item and tabulates the inventory selected. The user can select an invoice type from a transaction type such as Sale, LayBy, Return and Account Invoice.
The Sapphire Web Pack Point of Sale (POS) also allows the user to enter a Rep ID and a Till Persons ID. The user has the ability to queue current transaction and reload a queued transaction. Once a Sapphire Web Pack Point of Sale (POS) is posted it is converted to a Client Invoice (CI) and a Client Receipt (CR) and the inventory stock levels are automatically updated.
Point of Sale Overview.
The Point of Sale function in the web pack is used to bring all of your Point of Sale functionality into a single function. Point Of Sale, Lay by’s and Returns may all be conducted from this single function in SapphireOne.
The data entry procedure is the same for all three types of transactions and they all use the same screen so as to make the learning of the POS procedure as simple as possible. The only difference for the user will be when they select the ![]() start payment icon to complete the POS transaction as follows.
start payment icon to complete the POS transaction as follows.
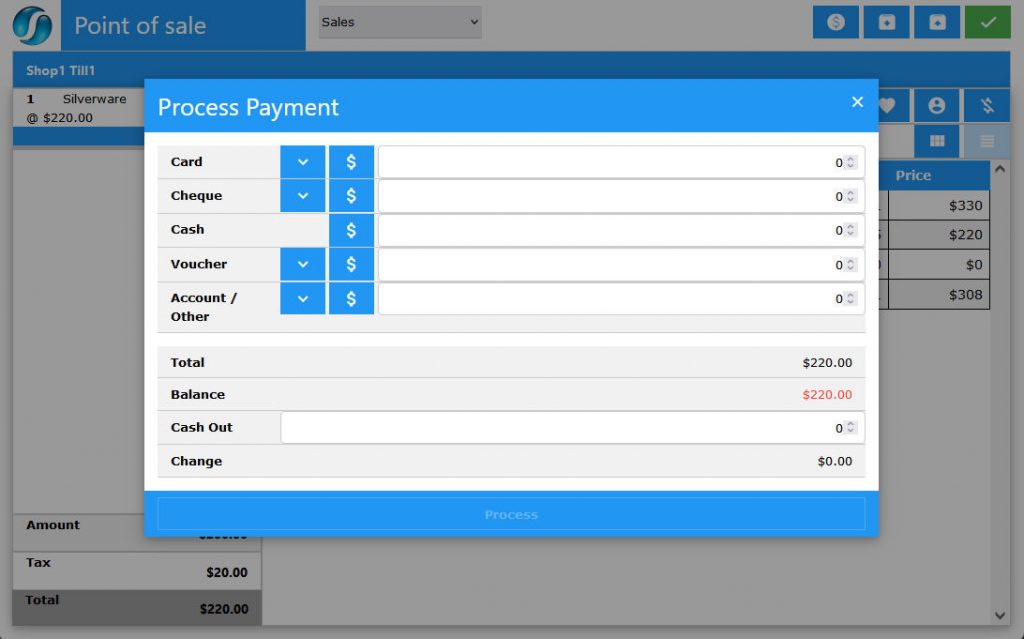
- Sales – The Process Payment screen must balance with nothing outstanding before the Process Payment button at the bottom of the Process Payment alert becomes active.
- LayBy – The Process Payment screen is not required to have the full balance entered as it recognizes the layby payment procedure. SapphireOne will activate the Process Payment button immediately the Process Payment alert is displayed. If an attempt is made to process the layby transaction with a zero payment, the user will receive a warning that the transaction currently has a zero balance.
- Returns – If an item is returned the user will have to select the return option and then scan the barcode or enter the ID of the item being returned. For an initial cash sale of the item the user can go to the
 Start Payment function immediately. This function has been reversed by the selection of the Return function, so that the customer receives money instead of paying it.
So that users in the office are easily able to identify web based POS transactions in SapphireOne, they will be given additional three letter transaction type codes as listed below.
- TCI – Sales This is a standard Point Of Sale Transaction generated when using the POS function in the Web Pack. It is a normal sales transaction the same as an SCI in Inventory mode but specific to POS. Once this transaction is posted, it is converted to a normal CI and it at this point when inventory stock levels are updated.
- TCC –Return This is a Point of Sale Return when an item has been returned. It is same as a return in Inventory mode which generates an SCC. This allows for the processing of goods sold through the POS function to be returned.
- HCI –Hire This type of transaction is created by the system when an inventory item is Hired rather than sold. Hiring is performed only from the POS function.
- Inventory Hire items – When inventory items are to be hired they are not treated as normal inventory items when they are purchased. Additional details may be found in the article on an Inventory Inquiry.
- Hiring & Selling – This becomes very important when you are both hiring and selling the same inventory item, as you will have to have two independent ID’s for the same item.
- HCC –Return This type of transaction is created by the system when a Hire Item is Returned.
- Note that the original hire HCI must be posted first.
- LCI – Lay by This transaction is the same as a sales TCI but the SapphireOne allows the transaction to be saved even though full payment has not been made. The transaction may then be posted which will convert it to a CI and it is at this point inventory stock levels are updated.
Dictation and Speech to Text Overview
SapphireOne’s implementation of both Dictation (MacOS) and Speech to Text (Windows) is a game changer for data entry. Any data entry field you can type into using a keyboard can use this feature.
You can also use this functionality on all inquiry screens within SapphireOne. For example, the user is in a Contact within a Client. They may have made a phone call to that particular client using the Softphone technology. Consequently, this will automatically date and time stamp both the contact and the phone number you called.
As soon as the call is completed, the user has the ability to use Speech to Text (Windows) or Dictation (MacOS). They can dictate into the memo field of the CRM contact, adding as much description as they require.
Dictation and Speech to Text Procedure
This functionality applies across every single Data Entry screen. For example, the SapphireOne user is entering a Vendor Invoice (VI). Additionally, you may want to add a memo within the Vendor Invoice (VI). The user can utilise the tool and simply dictate the memo.
Another example is if the user wants to add additional lines to the General Ledger account, within each General Ledger account. When the user is completing data entry using a General Ledger, there’s always a unique memo field for each GL account line.
The user can then utilise this feature to quickly add the information they need to add. Alternatively, you may have an interview with an employee. After the interview process is completed, the user can then make notes about the employee.
Speech to Text or Dictation is an extremely powerful tool. It is something that we at SapphireOne, as well as our clients, utilise daily. It is a massive time saver.
Master Defaults
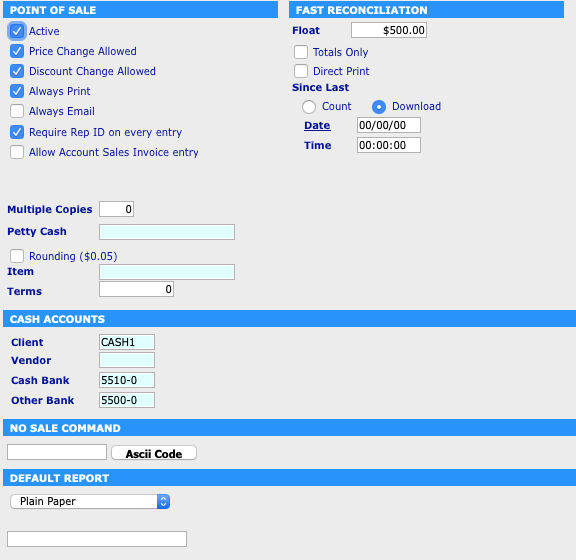
Before POS is used for the first time the user should go to master defaults and check on the settings in the Point Of Sale page. In client Server mode go to Utilities > Controls > Master defaults > POS page.
The screenshot below displays a portion of the POS Master default page and these details should be checked first as there are a number of checkboxes that should be set up correctly before any POS transactions from the web pack are processed.
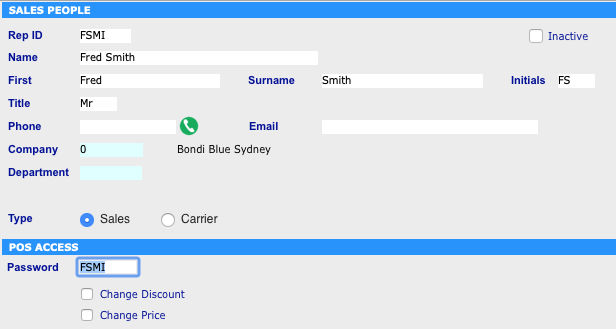
If the Require Rep ID on Every Entry checkbox is selected every user who attempts to access the POS function will be asked to log in as seen below.
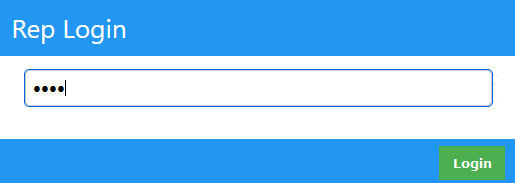
This log in ID asked for is the ID that is entered when a Sales Person master record is create using a Sales People Inquiry as seen below in Client Server mode.
We will go through all details on the POS screen first, then there will be a numbered list at the end of this article on how to process a POS transaction that will fit on a printed page.
POS Transaction icons
Once a Sales person ID is entered if required, the system will display the POS screen as seen below.

SapphireOne by defaults to a cash sale. The user will notice that there is not much required in the way of data entry on the initial POS screen for a cash sale. There is also one drop down menu defaulted to Sales and currently nine icons or buttons.
When eight of these icons are selected, SapphireOne will display an alert to the user requiring some data entry. The last icon or button on the third alter row, alters the display of the selected inventory item from a grid to a line display. If there is a picture of the inventory item attached to its master file it, will be displayed when the Grid option is selected.
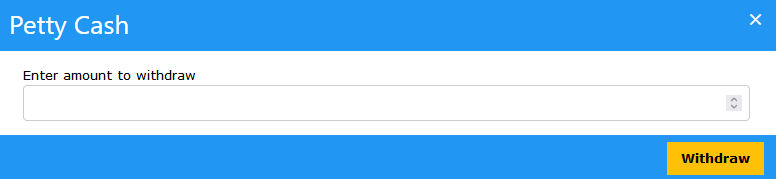
- Petty Cash – When the
 Petty Cash icon is selected, SapphireOne will display the alert as seen below allowing the user to withdraw petty cash from a petty cash General Ledger account which will allow these cash withdrawals to be tracked. Once the amount has been entered select the
  button.
- Queuing Transactions – The
 Add and Retrieve buttons have been supplied to that incomplete transactions may be stored and then retrieved or loaded back at a later time.
- Add Transaction – While the transaction is on screen in the left hand column, select the icon. If the transaction has been stored correctly a red alert will be displayed stating that the operation was successful.
- Retrieving Transactions – When the Retrieve icon is selected SapphireOne will display a list of transactions that have been stored. Select the transaction that you want to retrieve, so that you may complete processing it. Any number of transactions may be stored although identification of the transaction required may become difficult if there are too many in the list.
- Add Transaction – While the transaction is on screen in the left hand column, select the
- Start Payment – The
 start payment icon is the last icon to be selected so that the payment and processing of the POS transaction may be completed. For this reason it will be documented last in this section
 - Notes – When the
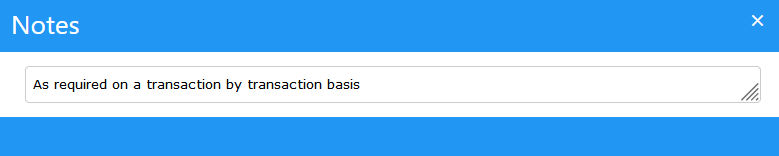
 Notes icon is selected SapphireOne will display the following alert. These notes are entered on a transaction by transaction basis. To save your note select the x in the top right hand corner of the alert.
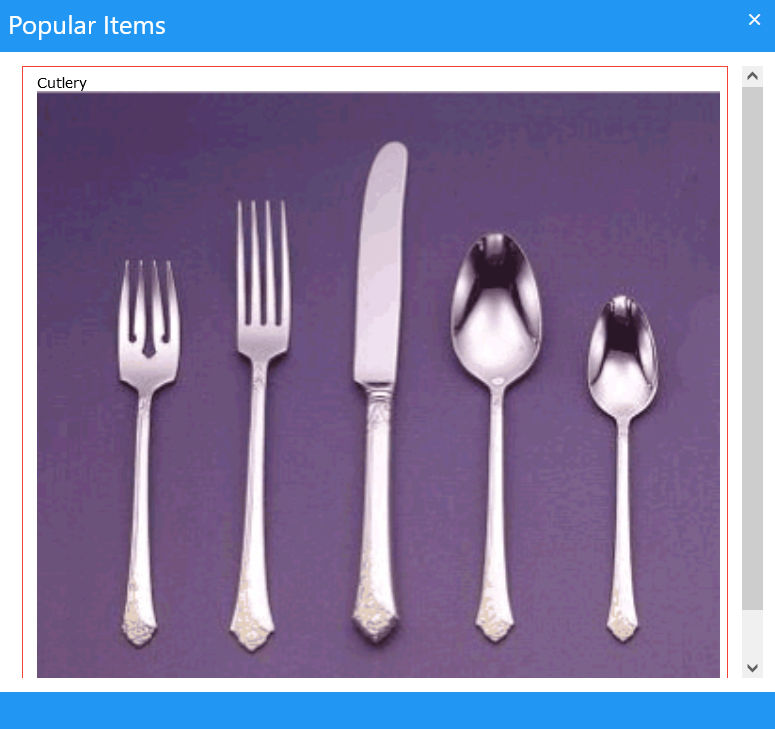
- Popular Items – When the
 Popular items icon is selected SapphireOne will display in Box view the most popular items.
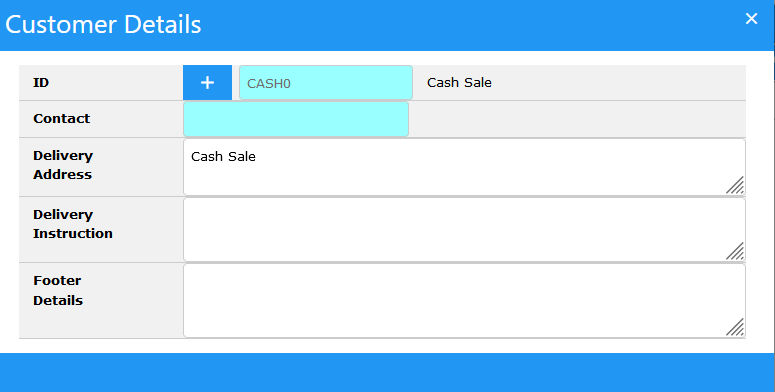
- Customer Details – The selection of the
 Customer Details icon is critical when the POS transaction is not for cash. It is only here where the selection of an existing Client or the addition of a new client may be performed. SapphireOne will initially display the alert as seen below defaulting to the Cash customer.
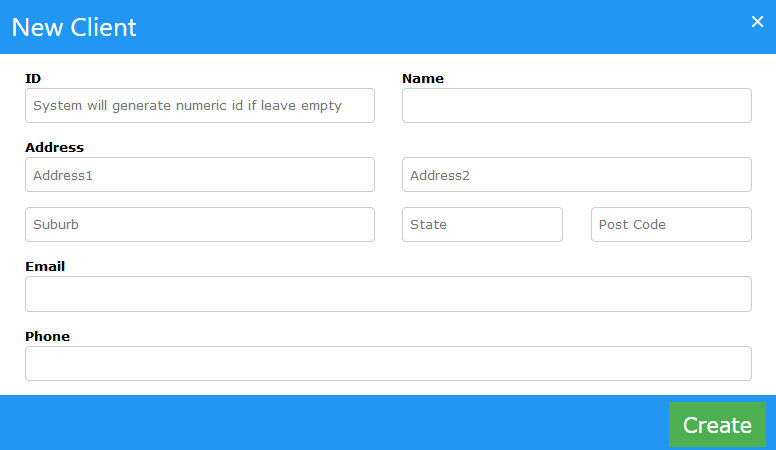
- New Customer Or Client – Select the
 icon to enter a new customer into SapphireOne. Only the basic details are required for POS style transactions. If additional details are required they may be added when a Client Server connection is established to the data file at a later time.
- ID – If the ID data entry field left bank SapphireOne will automatically generate a numerical ID. If required the user may enter in an ID as required.
- Name – Enter the customers name.
- Contact Details – Enter Address, Email and Phone details as required.
- Saving – Select the
 button to save the new customer record
If Delivery Addresses, Instructions or Footer details are to be entered for the new Client, the user will have to re-open the new customer record and enter these as required. This procedure is documented below when an existing customer or client is selected for a POS transaction.
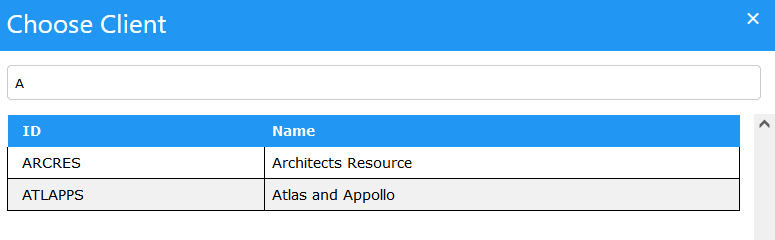
- Existing Client or Customer – When the user clicks into the Client ID data entry field the Choose Client alert will be displayed. Scroll through the default complete list of Clients, or enter in a keyword as we have done in the screenshot below to get a shorter list by entering A into the keyword area.
Once a Customer has been entered Contact, Delivery addresses and Deliver Instructions will be automatically populated in to the Customer Details alert as seen below. By re-opening a new customer the user is able to enter these details as required.
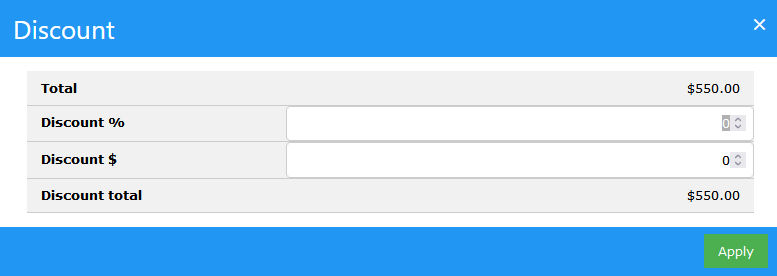
- Discount – When the
 discount icon is selected SapphireOne will display an alert allowing a discount to be applied.
Please take careful note, the discount will be applied to entire POS transaction!
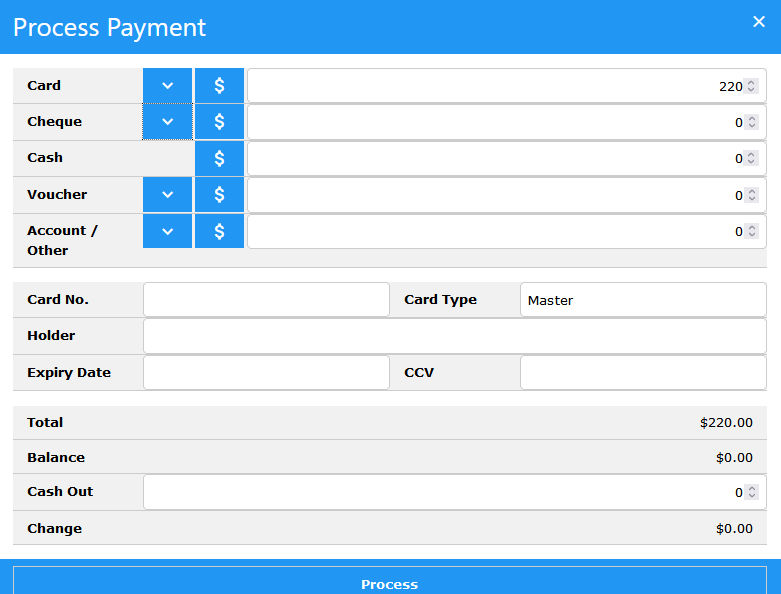
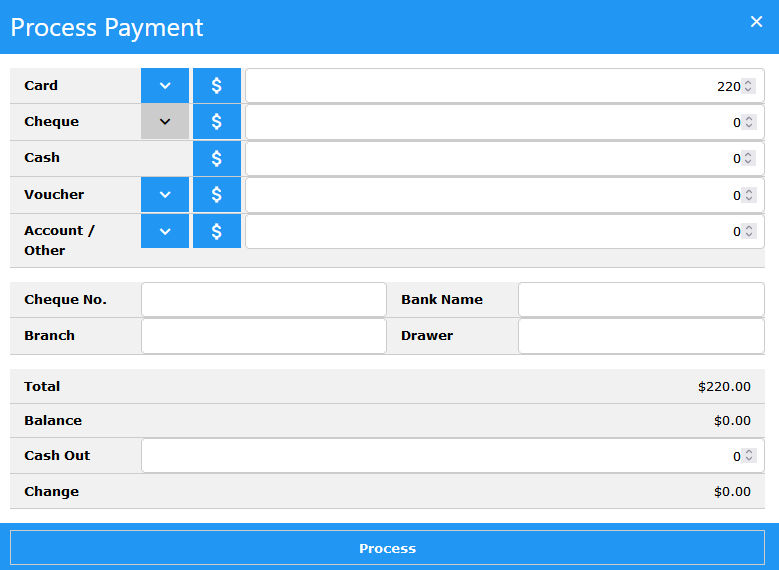
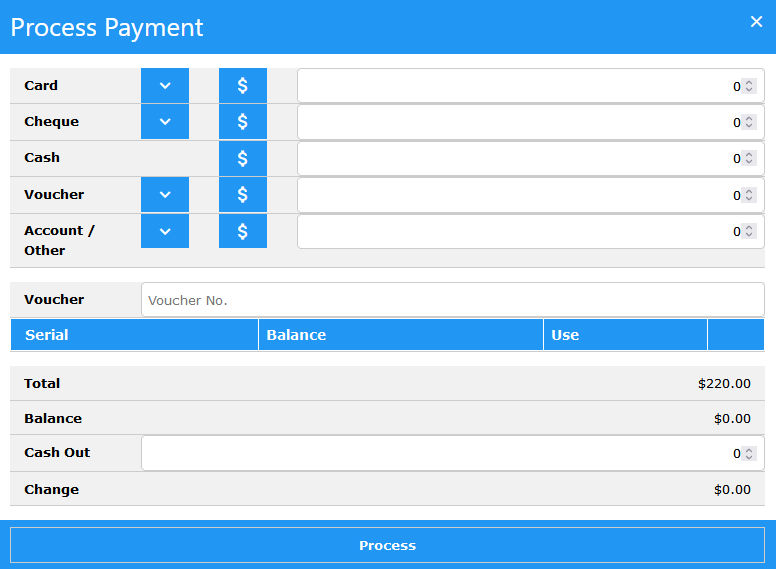
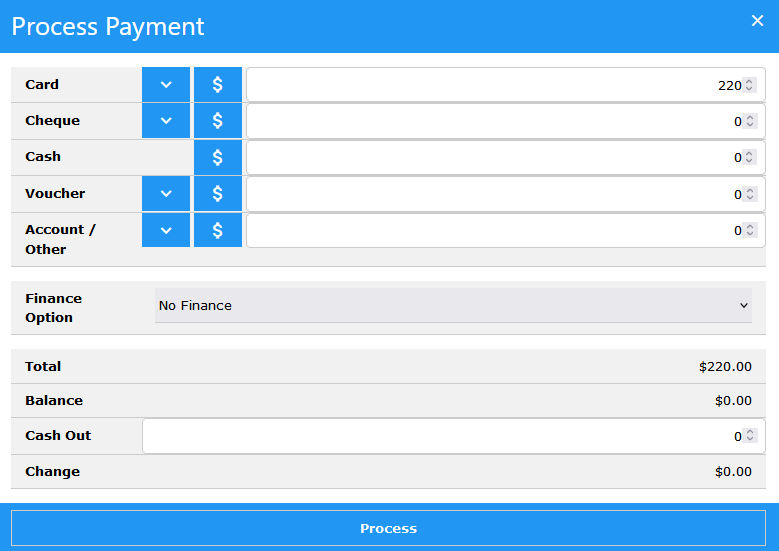
- Start Payment – When the Start Payment icon is selected SapphireOne will display the Process Payment alert. SapphireOne then opens with the Cash payment option. Select the option that is required, SapphireOne will then display the required data entry fields for the payment option that is selected.
Credit Card
Cheque
Voucher
Account
POS data Entry (TCI):
- Transaction Selection – Select with the drop-down menu, what this POS transaction will be. Sales, LayBy or Return. SapphireOne will default to Sales as seen below but check it each time).
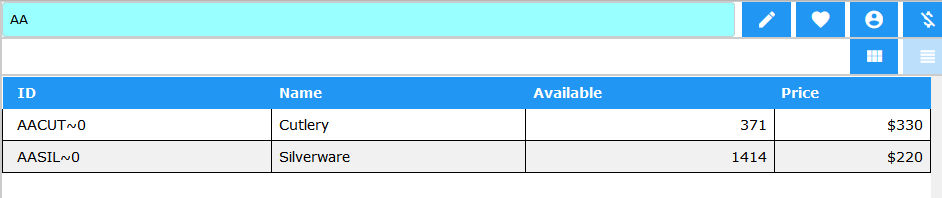
- Inventory Selection – Scan or enter in the Inventory Item or Items into the SKU or Barcode data entry field.
- Filtering – We have entered AA and then used a carriage return. Entering the @ symbol will tell SapphireOne to display a complete list of inventory item available for a POS sale.
- Filtered Inventory Items – The results of the search criteria will be displayed in a list immediately below the Inventory SKU or barcode data entry field.
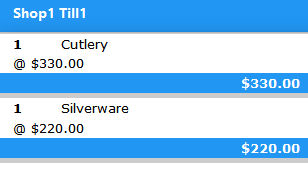
- Adding Inventory to Transaction – Click once on an inventory item in the list. The item will now be displayed in the left-hand column with a quantity of one. To add more click again and the quantity will increment 1 for each mouse click. We have clicked once on each item above.
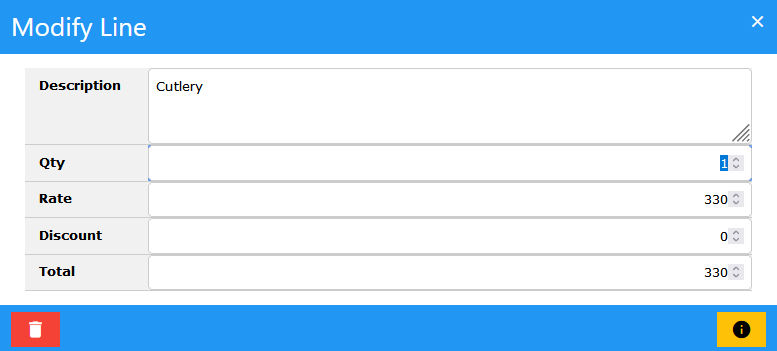
- Modifying Inventory – When the mouse is used to click on an Inventory item in the left hand column an alert is displayed allowing the user to perform the following functions.
- Qty – The only item a user should have to do is to enter in a Quantity. This quantity may be directly entered if required.
- Rate & Discount – On a line by line basis these may also be altered, but these two items are not normally the responsibility of the operator.
- Deleting – Selecting the
 trash can icon will delete this item from the current POS transaction.
 - Information – Selecting the
 information icon will tell the system to display more information about this inventory item.
POS Cheat sheet:
- Transaction Type – First check the drop-down menu, is it a Sales, LayBy or a Return.
- Enter Inventory Items – Scan or enter the inventory items for the POS transaction.
- Selecting Items for POS transaction- Click on the required inventory items that are displayed below the SKU data entry field.
- Quantities – Go to the left-hand column of inventory items and click on each one in turn.
- Quantities, Discounts – Check the Quantities and any Discounts for each inventory item. (Remember both of these are on a line by line basis). Transaction discounts are applied at item 7 in this list
- Trashcan – Selecting the Trashcan button will delete the selected inventory item from the current POS transaction!
- Information – Selecting the Information button will tell the system to display more information about the selected inventory item.
- Customer – If this is for a customer, select the Customer Details icon on the main POS screen and select a Client. (Note that this is the only location were a Client or customer is entered)
- Favorites – Selecting the Favorites icon will display a list of the most common items that a Client Orders. This list has to be built up by the system when it looks at historical transactions for each client or customer.
- Discount – The Discount icon on the main POS screen is usually not required. The user is warned that if selected, and value entered and applied, the Discount will be applied to all lines in the the whole transaction. (Item by item discounts are applied at item 4 in this list)
- Notes – Select the Notes icon If any notes are to be entered select the notes button and enter them.
- Payment – Finally select the Start Payment function and enter the payment details as required.
- Processing the POS – Once you have the payment details entered select the
 button at the bottom of the Process Payments alert. Once this has been don SapphireOne will then process the POS transaction through to the data file.
Standard POS transactions will be displayed as TCI’s.
Any LayBy transactions will be displayed as LCI’s.
Any Credits/Returns money handed out, will be displayed as TCC’s.
You can review our Blog and YouTube channel for additional information and resources on SapphireOne ERP, CRM and Business Accounting software.