Manifest Overview
In logistics, a Manifest lists goods for delivery or shipment, including cargo descriptions, quantities, origins, and destinations. SapphireOne’s Manifest Inquiry screen consolidates delivery dockets, invoices, picking and packing slips, and electronic files for EDI. Users can record various details, such as delivery lists, carriers, dispatch dates and locations, vehicles, transport APIs, time-slots, temperatures, items, cartons, boxes, weights, con notes, and picker employees. The feature also allows unlimited date and time-stamped notes and generating seven predefined custom reports for electronic sharing and printing.
The user can adjust the order of the columns by clicking consistent with other List screens in SapphireOne, the user can re-organise the information displayed by highlighting and using sorting and Finding functions from the Options Menu.
From this list the user can Look ![]() at all Manifest Lines. The user may also Modify
at all Manifest Lines. The user may also Modify ![]() the Manifest Lines. This can also be done using the correct keyboard shortcut. Double clicking on the line will also bring up the Manifest Inquiry screen.
the Manifest Lines. This can also be done using the correct keyboard shortcut. Double clicking on the line will also bring up the Manifest Inquiry screen.
Select the New ![]() button to create a new Manifest file.
button to create a new Manifest file.
All inquiry screens in SapphireOne offer the option to customise the list of items displayed on the page. This feature, known as Custom Inquiry, allows you to select the data fields to be shown and the order in which the columns of data appear across the screen. Although a client list is used as an example below, any type of inquiry can be customised within SapphireOne.
The list below represents the standard inquiry list, displaying a basic set of data fields for each client record:
Swap to Custom Inquiry
When you select the ‘Swap to Custom Inquiry’ button in the lower left-hand corner of the screen, SapphireOne will display the default Custom Screen, as shown below. This Custom List screen provides the user with two main options for organising the data display:
- To add or remove the data field columns displayed on the screen, click the ‘Setup’ button in the bottom right corner of the screen. Within the Setup screen, you can right-click on the column lines and choose from Delete, Move Left, or Move Right. More information on the Setup screen is provided below.
- To change the order in which the data field columns are displayed, click the ‘Setup’ button in the bottom right corner of the screen. Within the Setup screen, you can right-click on the column lines and choose from Delete, Move Left, or Move Right. More information on the Setup screen is provided below.
Once you have customised the Custom Inquiry screen, the screen view will be unique to you, and each time you log in, you will see the same custom view. You also have the option to select and save an unlimited number of custom views. This can be done in the ‘Setup’ screen, as detailed below.
The Inquiry screen below is the initial Custom Inquiry screen, which can be modified by the user.
Custom Inquiry Screen ‘Setup’ Function
To begin setting up your Customised List screen, click the Setup button, as shown above. The Setup screen will appear, as displayed below.
From this screen, users can add and remove data columns as needed. Almost every field within the SapphireOne data tables can be included in the Custom List screen, provided the user has the necessary authorisation.
The screen features several menu items across the top, which include:
- Reset to Default – Clicking this button resets the display to the default settings determined by SapphireOne. When you add a new data field, SapphireOne will place it on the right-hand side of the data columns. You can then click on the field heading and drag it to your desired location on the screen.
- Show Related Record – This option allows you to add related fields from other tables. By ticking the Show Related checkbox
 at the top of the screen, you can select a related record, and a mini view of that related record for the chosen entry will be displayed for the currently selected record. You will need to select the fields to be displayed.
 - Favourite Set – Located at the top left of the screen, this option enables you to save a custom-created screen for future use. For instance, you can have a simple Inquiry screen for general use and a more complex screen view when auditing specific information.
Manifest Inquiry Details Page
The Details Page is the first page to open when a New ![]() Manifest record is created or when a Manifest line is Modified
Manifest record is created or when a Manifest line is Modified ![]() . Once a Manifest record has been created it may be modified at any time. Transactions may be added to it or removed from it.
. Once a Manifest record has been created it may be modified at any time. Transactions may be added to it or removed from it.
Manifest Details Area
Create and manage carriers, set dispatch dates, and track vehicle details, dispatch locations, and delivery instructions using the Carrier Manifest feature, with options for Transport API integration, delivery list reloading, user tracking, and document attachments.
- Carrier – Input Carrier/Run Name details and effortlessly add unlimited carriers by typing a new name and pressing Enter or Tab; newly added carriers are saved in a drop-down menu for future use.
- Dispatch Date – Enter the Dispatch Date by clicking the underlined heading, which opens the SapphireOne calendar, allowing you to select the desired date.
- Vehicle – Input a Vehicle ID if required. Using ‘@’ or ‘?’ triggers SapphireOne to display a Manifest Vehicle Inquiry list, directly linked to the field. After selecting the desired vehicle, click the underlined Vehicle text to utilise the Sapphire Mapping System, available for SapphireOne customers with the Sapphire Custom Web Pack. This feature generates a link to the vehicle, displaying its real-time location, date, and time within the Sapphire Custom Web Pack Mapping System.
- From – Enter the dispatch location that the goods will be departing from.
- Notes – Enter any information that the carrier is required to see. i.e. Delivery Instructions. The green clock is available to the left of the memo area to insert today’s date and the time.
- Transport API Button – The API integration with 3rd party transport and logistics providers is exclusively available to SapphireOne users who have purchased the Sapphire Custom Web Pack.
- Reload Delivery List Button – Users can reload the delivery list in response to a change of date, such as when goods are not dispatched on the designated day and must be reloaded for the following day, providing flexibility in the delivery process.
- Entered – The ‘Entered’ field is automatically populated with the name of the SapphireOne user who created the Manifest, along with the date and time it was created.
- Modified – The ‘Modified’ field is automatically populated with the name of the SapphireOne user who most recently modified the Manifest, in addition to the date and time it was modified.
- Status – The status is pre-set as ‘Active’ and cannot be directly modified by the user; it will be automatically made inactive 30 days after the Period End, based on the creation period of the Manifest item.
- Internal Ref – Add an Invoice to the Manifest by entering the corresponding Internal Reference number and selecting the plus
 button. To remove a Manifest, select the line and use the minus
  button. Alternatively, scan the barcode of the Invoice to add it directly to the selected Manifest.
 - Document Paperclip – To attach any relevant documentation for the Manifest, select the paperclip button. More information on Document Management in SapphireOne can be found below.
Paperclip Management Saves Time with Easy File Attachment
The SapphireOne Document Management System (DMS) features a convenient Paper Clip button on all data entry and inquiry screens. This enables users to attach relevant documents or files to every transaction or record. The system also includes a dedicated page for managing documents related to a specific transaction or record, providing robust version control of the attached documents.
The color of the paper clip serves as a visual indicator of the status of the attached documents. A red paper clip indicates that there are no documents currently attached to the transaction or record, while a green paper clip indicates the presence of one or more attached documents. Additionally, the word “Items” is preceded by the number of attached documents, providing a clear and concise representation of the current status.
SapphireOne’s Document Management System is highly versatile and can accommodate a wide range of document types, including Adobe Acrobat, spreadsheets, word processing documents, photo files, JPEGs, CSV files, HEIFs, and MP4 files. With the ability to store an unlimited number of documents for an indefinite amount of time, the system provides users with a comprehensive and efficient solution for managing all their important files and documents.
Master Defaults
In SapphireOne, users have the flexibility to control the size of individual documents and determine where they are stored through the Master Defaults settings. These settings can be accessed by navigating to Utilities > Controls > Master Defaults > System Page.
Within the Documents area of the SapphireOne page, there is a Document Size Limit setting with a default size of 10 MB, which can be adjusted as needed. Additionally, users can choose to store the documents either as part of the data file or as separate files, by selecting the appropriate option from the two radio buttons provided.
To attach a document to a transaction, simply click on either the ![]() or
or ![]() Paperclip button. The Document List window as seen below will be displayed allowing the the user to select the desired file to attach.
Paperclip button. The Document List window as seen below will be displayed allowing the the user to select the desired file to attach.
How to Attach Documents Using SapphireOne Paperclip
SapphireOne also provides users with the convenient Drag & Drop functionality to attach documents. To use this feature, simply drag a document from your local computer into the Document List screen and it will be attached automatically. This streamlined process saves time and effort and makes it easier to manage your important files and documents within SapphireOne.
If SapphireOne detects that the document name already exists, a pop-up will be displayed alerting the user. Alternatively, the user can also select the
If SapphireOne detects that the document name already exists, a pop-up will be displayed alerting the user. Alternatively, the user can also select the Plus button to select a document to upload from the local computer.
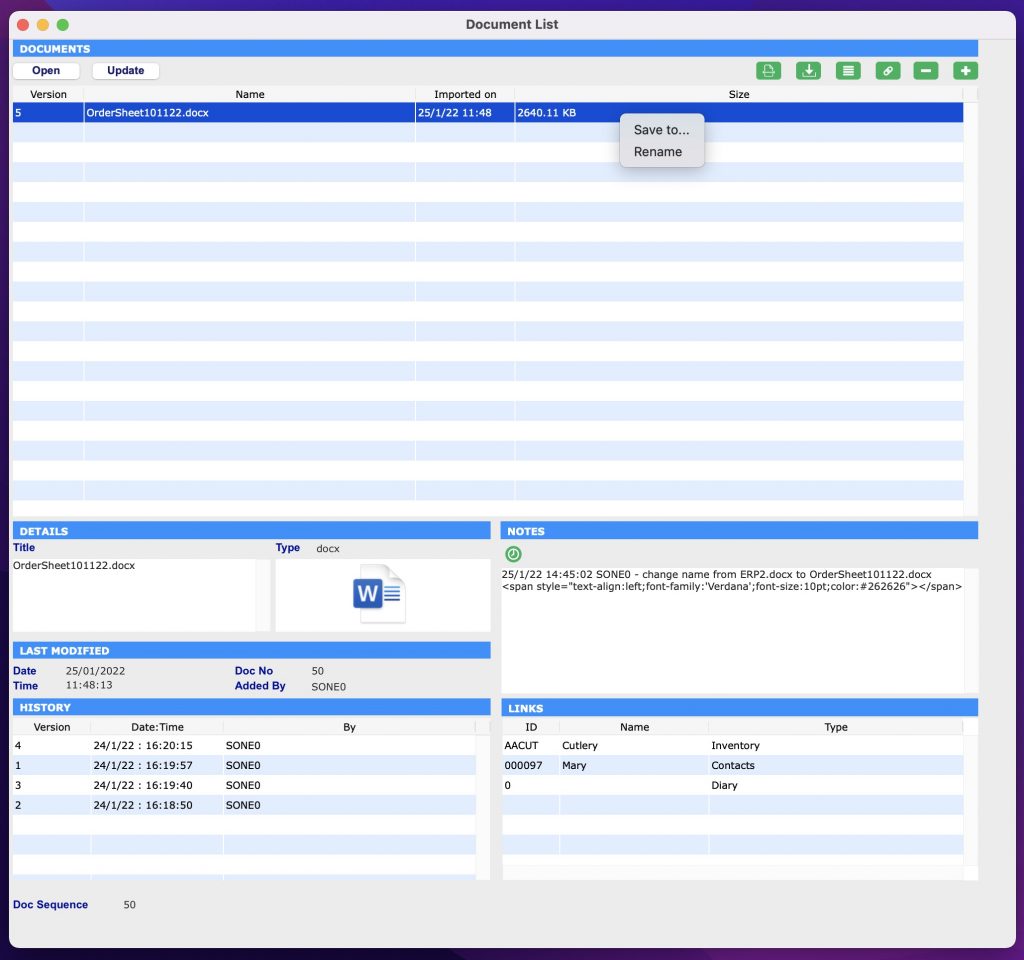
SapphireOne’s document management system provides users with the ability to easily manage their attached documents. After a document has been attached, the user has the option to rename it by right-clicking on the file and selecting Rename This feature is useful for maintaining consistency in document names across all records and helps to keep the system organised and efficient.
Documents Area within Document Management System (DMS)
- Open
 – By clicking on this button, the document will be opened for viewing, allowing users to review its contents without having to leave the SapphireOne system. This feature provides a convenient and streamlined way to access and review important documents within the context of the larger document management system.
 - Update
 – When this button is selected an alert is displayed allowing the user to import a new version of a highlighted document, enabling version tracking. After selecting a new version, the user enters a version number. The latest version becomes available, with previous versions accessible in the History area. The updated document remains linked to associated transactions.
 - Scan
 – This option in SapphireOne provides users with the ability to scan a document directly into the data file and link it to a transaction. This feature requires access to a local or network scanner, and the appropriate scanner and software must be installed on the local machine or network. By using the Scan option, users can quickly and efficiently digitise physical documents and associate them with the relevant transactions within SapphireOne.
 - Save
 – This button in SapphireOne allows users to save the currently highlighted document to disk. This feature provides a convenient way to export a copy of the document for backup or further use outside of the SapphireOne system. By clicking the Save button, users can easily access a digital copy of their important documents and ensure that they are properly preserved and accessible.
 - Link Documents
 – With SapphireOne, users have the ability to link a highlighted document to one or more transactions within the data file. To do this, the user simply clicks the “Link” button, which will bring up an alert allowing them to make their selection. This feature provides a convenient way to associate important documents with multiple transactions, ensuring that all relevant information is easily accessible from one central location. For more information about linked documents, refer to the Links Area documentation provided by SapphireOne.
 - Link Existing Documents
 – SapphireOne provides users with the ability to link existing documents in the data file to the current transaction or record. To do this, the user simply clicks the Link Existing button, which will bring up an Alert allowing them to choose from a list of available documents. This feature provides a convenient way to associate existing documents with additional transactions, ensuring that all relevant information is easily accessible from one central location. For more information about linked documents, refer to the Links Area documentation provided by SapphireOne.
 - Delete – This option in SapphireOne allows users to remove the currently highlighted document. By clicking the Delete button, the selected document will be removed from the system, providing users with a simple way to manage their attached documents and ensure that only relevant and up-to-date information is stored within the system.
- Plus – SapphireOne includes a search function that makes it easy for users to select a document saved on their local computer. This feature provides a convenient way to quickly locate and attach the desired document, streamlining the process of adding and managing important files within the SapphireOne system.
Details Area within Document Management System (DMS)
The Details area within SapphireOne’s Document Management System (DMS) provides users with additional information about the selected document. When a document is selected in the Documents area, the Details area will automatically display the title of the document and the type of file. This information helps users to quickly identify and manage their important files and documents, providing a more efficient and organised system for document management.
Notes Area within Document Management System (DMS)
The Notes area is for entering any notes related to the document. The user can select the green clock button ![]() to create a time and date stamp for every note added.
to create a time and date stamp for every note added.
The Notes area will also keep an automatic user log when any changes are made to the document. For example, if the document is renamed or new links are created. SapphireOne will record the date, time and user that made the modifications.
Document Details Area within Document Management System (DMS)
The Document Details area within SapphireOne’s Document Management System (DMS) provides additional information about the selected document. This area automatically displays information such as the date and time the document was added, the document number, and the user who added the document. This information helps users to quickly understand the context of the selected document and provides a comprehensive history of the document’s status and interactions within the system. The Document Details area is a valuable resource for managing and tracking important documents within SapphireOne.
History Area within Document Management System (DMS)
The History area within SapphireOne’s Document Management System (DMS) provides a record of the complete version history of the selected document. SapphireOne tracks all version changes and automatically displays the document’s history in this area.
As new versions of the document are imported using the button, the History area will be automatically updated, ensuring that all previous versions of the document are recorded and available for viewing. This enables users to access the most recent version of the document, while still maintaining a complete history of all versions.
The History area provides a valuable resource for tracking the evolution of a document and understanding how it has changed over time. By having a complete record of the document’s history, users can easily review past versions and understand the context of the changes that have been made.
Links Area within Document Management System (DMS)
The Links area within SapphireOne’s Document Management System (DMS) is used to link documents to specific transactions or areas within SapphireOne. This area provides a comprehensive view of all linking information related to the document, including any functions used to import the document into SapphireOne.
By linking documents to transactions and areas within SapphireOne, users can easily associate important information and files with the relevant transactions, providing a more organised and efficient system for document management. The Links area is a valuable resource for understanding the relationships between documents and transactions within SapphireOne.
To add additional links to a document in SapphireOne, follow these steps:
- Select/highlight the document you wish to link.
- Click the
 Link Document button.
 - The Files pop-up window will be displayed.
- From the File drop-down menu, select the item you want to link the document to.
- In the Value data entry field, enter the necessary details (ID).
Note that the Value data entry field has a light blue background and is searchable by entering the wildcard symbols ‘?’ or ‘@’, making it easier to find the information you need. By linking documents to specific transactions and areas within SapphireOne, users can create a more organised and efficient system for document management.

Updating a Document within Document Management
The process for updating a document in SapphireOne is straightforward:
After clicking the “Update” button in SapphireOne, the user will be asked to confirm if they would like to import a new version of the document:
- Confirm that you wish to import a new version of the document by selecting Yes.
- The user will then be prompted to choose the updated document to open.
- After selecting the updated document, a secondary dialogue will appear, asking the user to enter an alphanumeric value for the new version.
- Enter the desired value for the new version and select OK
By following these steps, SapphireOne will replace the previous version of the document with the updated document. It will also maintain a complete record of all previous versions in the History area. This process ensures that the most up-to-date information is always readily accessible within the SapphireOne system.
Document Management using SapphireOne Documents Inquiry
In addition to SapphireOne’s Document Management Paperclip functionality, SapphireOne Documents Inquiry function in Workbook Mode provides users with a centralised repository of all documents and files stored within the SapphireOne data file. This function gives users the ability to add new documents, modify, view, or delete existing documents from within the Documents Inquiry screen.
Any revisions made to a document within the Documents Inquiry screen will be automatically updated across all areas where the document is linked within SapphireOne. Similarly, any modifications made to documents within the SapphireOne Paperclip Document List window will be reflected within the Documents Inquiry window.
For example, if a document is renamed within a transaction Paperclip Document List screen, the updated document name will be reflected when viewing the document in the Documents Inquiry screen.
You can learn more about SapphireOne Documents Inquiry functionality within the Documents Inquiry article.
Document Control within Document Management
In this example, we have an inventory item with documents attached, such as installation instructions and a packing checklist. The item is added to a sales order, manufactured, shipped, and the job is completed. SapphireOne’s Document Management Paperclip functionality allows for easy attachment and access to all relevant documents throughout the entire process, from sales order to completion. This improves efficiency and helps ensure all relevant information remains consistently available and up-to-date.
A year after the completion of the job, a revision of the inventory item is made, along with updates to its associated Documents (DMS). To keep the information organised and up-to-date, it is not necessary to create a new inventory item for the revision. Instead, the documents and files can be easily updated using SapphireOne’s DMS file that are attached.
By using the Update button within the DMS, users can import a new version of the document and SapphireOne will automatically keep track of all version changes, ensuring that the most recent information is readily available. This process saves time and effort by allowing users to simply update the documents and files, rather than creating a new inventory item for each revision.
In SapphireOne, when referring back to the original completed sales client invoice or job projects client invoice, the associated documents and files will be displayed in their original state or as they have been updated. The user has the option to view the documents and files as they were at the time of completion or as they currently are, providing a comprehensive and accurate record of all relevant information.
In the screen shot above, both the current and historical documents are attached to the inventory item. As a SapphireOne user, you have the ability to edit the list and choose to delete the historical document by simply selecting the Minus button.
Additionally, you also have the ability to modify the existing document, keeping a log file of each and every time the document has been revised. This ensures that a complete and accurate record of all revisions to the document is maintained, allowing you to easily reference the most recent version or any previous versions as needed.
The ability to manage both current and historical documents, as well as the option to modify and delete them, provides users with a flexible and efficient solution for document management within SapphireOne.
Manifest Invoice Lines Area
Each Invoice added to the Manifest will appear in the Manifest Invoice Lines area.
To add invoices to the Manifest Invoice Lines section, input their Internal/Invoice Reference Numbers and use the plus button. Remove invoices by selecting the minus button after highlighting them. Users can view ![]() or modify
or modify ![]() invoices added to the Manifest Lines. Note that certain items must be correctly entered in both the Inventory Item and Sales Invoice, as the manifest function cannot automatically input data that hasn’t been previously entered.
invoices added to the Manifest Lines. Note that certain items must be correctly entered in both the Inventory Item and Sales Invoice, as the manifest function cannot automatically input data that hasn’t been previously entered.
- Int Ref – This field is automatically populated with the Internal Reference number entered by the user. The Int Ref number is the number that is automatically generated by SapphireOne when a user creates an Order or an Invoice.
- Del Date – This field is automatically populated with the delivery date specified by the customer on the invoice.
- Client ID – This field is automatically populated with the Client ID on the invoice.
- Client Name – This field is automatically populated with the Client Name on the invoice.
- Suburb – This field is automatically populated with the Clients Suburb on the invoice.
- State – This field is automatically populated with the Clients State on the invoice.
- Timeslot – Enter the predefined time chosen by the customer that the items must be delivered in.
- Items – This field is automatically populated with the number of Items on the Invoice.
- Cartons – This field is automatically populated with the number of Cartons on the Invoice.
- Four User Definable Fields – There are four user definable Custom fields that the user has the ability to name according to their requirements. Further information on how to customise the headings is detailed below.
- Temperature – If required, specify the temperate that the items are required to be shipped in.
- Boxes – The number of boxes listed on the Invoice. Each Box Label has the ability to be printed in sequential order e.g Box 1/10, 2/10, 3/10.
- Weight – The total weight of the particular invoice.
- Con Note – If the user is using a 2rd party logistics party to deliver the goods, the con note provided by the 3rd part logistics company can be entered here.
- Picked By – The name of the employee who picked the goods on the invoice.
- Tag – The Tag dropdown menu in the footer of the Manifest Inquiry screen is customisable by the user and displays commonly entered additional information. Hold down the command key on Mac or the Control key on PC to remove a word.
Footer Area
The Footer area located at the bottom of the screen displays important information about the Manifest record along with additional Manifest functionalities. These include:
- Sequence – This is an automated SapphireOne sequence number assigned to the Manifest.
- Total Invoices – This field shows the total number of invoices that are associated with the current Manifest.
- Tag – The Tag dropdown list is customisable by the user. It serves as a quick way to view commonly entered information. If the user wishes to remove a word from the list, they can do so by holding down the Mac/command key or the Windows/Control key.
- Pick Button – Clicking on this button changes the status of invoices that have a Tag of ‘Ready’ to ‘Picking’. This indicates that the items are ready to be picked in the warehouse. Once the items have been picked, the user can manually change the Tag of the items to ‘Picked’ on the invoice. Alternatively, users can utilise the Sapphire Custom Web Pack to automatically mark all Picked items as ‘Picked’.
- Delivered Button – This button changes the Tag of the Invoice to ‘Delivered’, indicating that all items have been successfully delivered to their intended destination.
Whenever an Invoice is added to the Manifest Inquiry screen, it is automatically logged in the Shipping page of each corresponding Invoice. This enables easy tracking of shipping details for each individual Invoice, allowing users to efficiently manage and monitor the delivery process.
How to Customise The Manifest Lines Field Headings
Customising the Manifest Lines Field Headings is a simple process that allows users to tailor the four user-definable fields in the line entry area of the Manifest Inquiry screen according to their specific needs. To get started, navigate to Utilities > Controls > Master Defaults > Invoice Page. From here, you can find the Manifest section and label each of the four columns (No 1 through to No 4) with your preferred headings. It’s worth noting that until you make an entry in Master Defaults, the column headings in Manifest will remain blank, so it’s important to complete this step to ensure the fields are properly labeled.
Print Buttons and Custom Reports
The Manifest Inquiry screen contains seven Print ![]() Buttons, which are each linked to a user-created Custom Report for easy report generation and printing. To name these Print Buttons, navigate to Master Defaults in Utilities > Controls > Invoice Page, and select Reports 1 through to Report 7 to create a custom name for each report. Once you’ve created a name for a report, you can then create a custom report of the exact same name to link to the corresponding Print Button. It’s worth noting that until an entry is made in Master Defaults, the Print button names will remain blank.
Buttons, which are each linked to a user-created Custom Report for easy report generation and printing. To name these Print Buttons, navigate to Master Defaults in Utilities > Controls > Invoice Page, and select Reports 1 through to Report 7 to create a custom name for each report. Once you’ve created a name for a report, you can then create a custom report of the exact same name to link to the corresponding Print Button. It’s worth noting that until an entry is made in Master Defaults, the Print button names will remain blank.
To create a custom report, open the Manifest Inquiry List window, select the Tools ![]() button in the main toolbar, and then click on ‘Custom Report’. This will create a brand new Custom Report and present the user with a blank report canvas to work with. It’s important to ensure that the Custom Reports have the exact same name as the corresponding Print buttons to be properly linked.
button in the main toolbar, and then click on ‘Custom Report’. This will create a brand new Custom Report and present the user with a blank report canvas to work with. It’s important to ensure that the Custom Reports have the exact same name as the corresponding Print buttons to be properly linked.
Action Page
Action Page Overview
The Action Page is a versatile tool that can be added to major records and transaction tables. It includes various actionable items such as Calendar Reminders, Meeting Invites, Alarms, Emails, To-Do Lists, General Notes, Private Notes, Meeting Notes with Date and Time, Start and Finish stamps, as well as All Day Notifications. This provides users with a centralised location to manage and organise their tasks, meetings, and notes, improving efficiency and productivity.
The Action Page allows users to use the add ![]() or delete
or delete ![]() buttons to add or delete actions as required. Simply select the relevant button to add or delete an action.
buttons to add or delete actions as required. Simply select the relevant button to add or delete an action.
Diary Area
The Diary Area in SapphireOne provides users with a comprehensive range of options to customise their actions. It includes a sequence number, title, type, action, user, privacy settings, status, tag, and link fields.
- Sequence – SapphireOne automatically generates a unique sequence number for each action.
- Title – Enter a title for the action.
- Type – Choose from the customisable drop-down menu to input a type. This will subsequently become a permanent type within the drop-down.
- Action – Utilise the user-customisable drop-down menu to input an Action. This will then become a permanent action within the drop-down.
- User – SapphireOne automatically inputs the user creating this action, though it can be modified if necessary.
- Private – If this checkbox is selected, SapphireOne will only permit the specified user to view or modify this action.
- Status – The user has three options: Open, Hold, and Completed.
- Open – Action is open and active.
- Hold – Action is active, but no alarms will be active.
- Completed – Action is now Inactive and won’t be displayed in any list of actions.
- Tag – Users may attach a tag to an action, which will create a permanent tag within the drop-down. To add a new tag, type the name of the new tag into the tag box and press the tab key. Select “Yes” from the pop-up window to confirm. To remove a tag from the list, click on the tag name while holding down the Command (MacOS) or Control (Windows) key. Select “Yes” from the pop-up window to confirm the deletion.
- Link – When created within a transaction or record, SapphireOne automatically generates a link to the transaction or record. When created from the Options Menu, Palette, or Workbook, users must select an item or function from the drop-down menu to link the action. There are 12 items on this list, ranging from Clients to Manager.
Check List Area
SapphireOne offers a user-friendly checklist tool to create and track actions, allowing users to check off completed items as they progress.
Dates and Times Area
- Start/Finish – Set a Start and Finish time for the action, or select the checkbox for an all-day option.
- Completed – Entering a completion date for an action deactivates it, and it will no longer appear in action lists.
Alarm Area
Never forget a task again – set up alarms to send reminders via email at specific dates and times. Users can also receive email notifications with the provided email address.
Recurring Area
If necessary, the alarm can be set to recur at intervals selected from the Type drop-down menu. Additionally, the recurring period can be defined by date.
Notes Area
Click the green clock button to add time and date stamps to your notes. You can also customise the font, style, color, and background color of the text in the Notes area by highlighting it and right-clicking.
Invite Attendees Area
In the event module, you can invite multiple attendees to your event and track their acceptance or rejection of the invitation. You can also send them an email notification if their email addresses are provided. Additionally, you can manage and track attendees’ RSVP status in real-time.
Documents Page
The Documents Page is used to store and record documents and information relating to data entry, transactions and master tables.
Documents Area
Any type of document can be attached to the Documents area. Examples of types of documents include Adobe Acrobat, Spreadsheet Documents, Word Processor Documents, Photo Files, JPEG, CSV, HEIF, MP4 files and more.
Documents can be attached using Drag & Drop functionality. To use this functionality, simply drag a document or file from the local computer into the Document List screen and it will append automatically.
Please note that when creating a new record in SapphireOne, you are unable to attach a document until the record has an entered ID.
There are eight buttons on the Document List screen. These are as follows:
- When the button is selected SapphireOne will open the currently highlighted document for viewing. (The appropriate software must be installed on the local computer or device).
- When the button is selected SapphireOne displays a popup which asks the user if they want to Import a New Version of the currently highlighted document. (The new version will still be linked to any transactions as was the old version).
- When the Scan button is selected SapphireOne will access a scanner, and following the usual prompts allows the user to Scan a Document Directly into the data file and link it to this transaction. (The appropriate scanner with software must be installed on the local computer, device or network).
- The Save button allows the user to save the currently highlighted document.
- The Link Document button allows the user to link the currently highlighted document to other transaction or transactions in the data file. A popup will be displayed allowing the user to make their selection.
- The Link Existing document button allows the user to link an existing document in the data file to this transaction or record. A popup will be displayed allowing the user to make their selection from a list of documents.
- The Delete button when selected will delete the currently highlighted transaction or record.
- When the Add button is selected SapphireOne will display a search function allowing the user to select a document that is currently on the local computer or device.
Details Area
The Title and Type of the document are displayed in the Details Area.
Last Modified Area
The documents area keeps a record of the Time and Date of when the document was last modified in addition to who initially added it.
Links Area
The links area allows you to record links to other places this document has been attached to. You can add and remove Links using (+) and (-) .
History Area
The history area records changes made to the document.
Notes Area
Any relevant notes which relate to the document may be recorded here. Clicking the green clock button will add a date/time stamp.
You can review our Blog and YouTube channel for additional information and resources on SapphireOne ERP, CRM and Business Accounting software.