The Sapphire Web Pack Market Manger displays the current orders that are sitting in the data file, waiting to be finalised or settled. The finalisation will have the same colour coding as sales screen. The persons or manager, that is responsible for checking and finalising all market sales will be able to go into each pending transaction displayed. The user has the ability to display these transactions either as a list or a grid style view. By clicking on the particular transaction, the user then will be able to go in, verify, modify if required and confirm the finalised quantity and also confirm the finalised price.
In the market environment, the price of goods is highly dynamic and throughout the day the price may vary considerably. The manager has the ability, on a transaction by transaction basis, to adjust the final sale price if they so desire. For example, if you have a valued client who is your largest carrot purchaser and the price of carrots has increased throughout the day, you may keep the original price for that Client’s sale. When a Manager enters into a transaction they also have the ability to select the picker a particular location or warehouse. Typically, the picker will be working in a separate location from the market stand. There may be additional warehouses or locations where the picker will be notified on their iPhone or iPad or any device that supports HTML5 or greater, and they will be able to go and pick those goods and then deliver it to the truck or van that is parked in the dedicated market stand parking allocation. The manager at this point can nominate to the picker and how many pallets will be used for the order going onto the back of the vehicle.

Setting Up Manager
User or employee access
The best description of this manager function in the web pack is a Picker Manager although they can also be set up as a picker as well. This employee or picker manager, would then allocate Pickers against Transactions. This function also displays transactions that have any issues as each transaction is colour coded, before, during and after they are allocated to pickers.
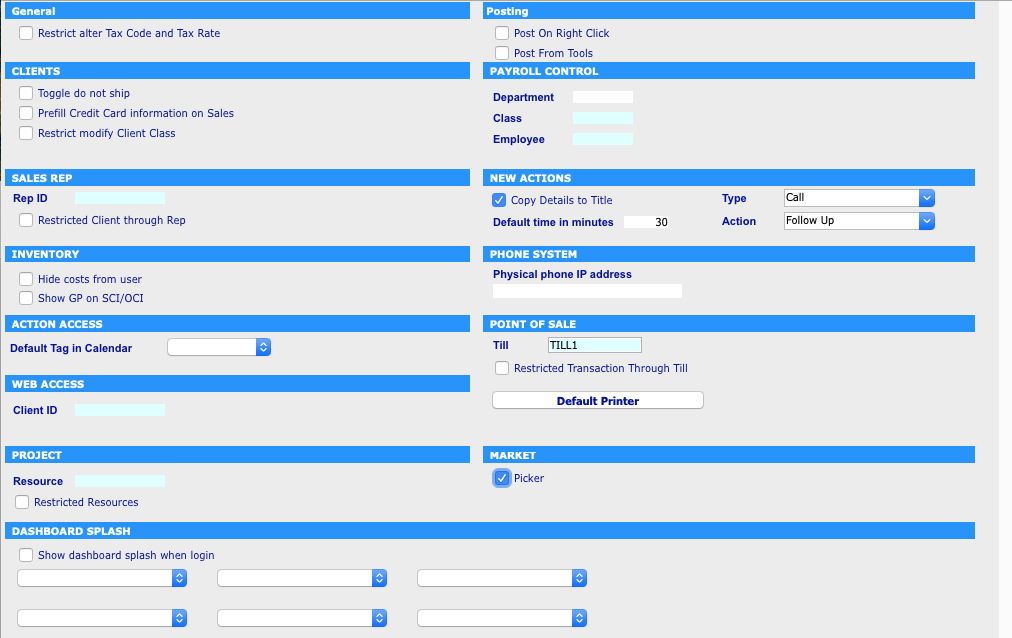
Before this Manager function is used the user will have to use Client Server mode and go to
Utilities \ Controls \ User Access
The user should note that this Manager function will only allow the manager to select those employees who are setup as pickers in their User access record, and are CURRENTLY logged in to the data file.
To access the Manager screen, the user will need to go to the Web Pack, select Market and then Manager from the drop-down menu. Market \ Manager

Picking Process
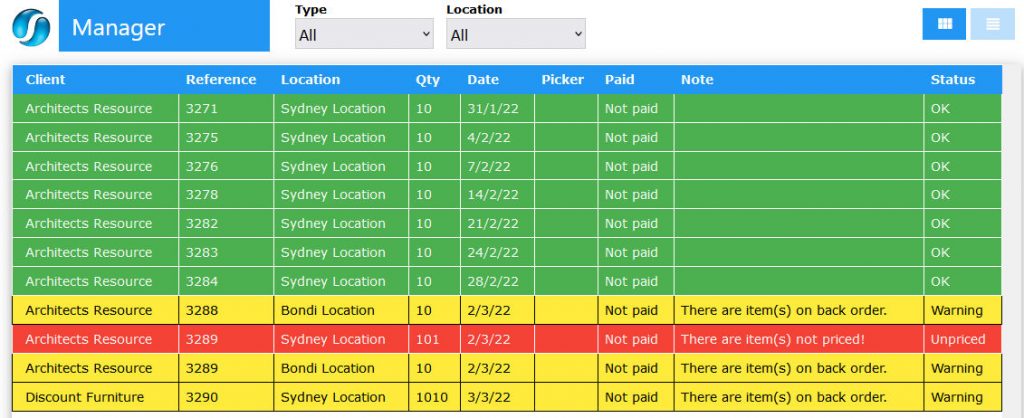
- Opening Screen – This will open the Manager screen, which will default to a grid view of all the Client Orders in the system. The transactions are split if picking is required at different locations. They are currently sorted by Delivery Date and then alphabetically.
- Transaction Colours – The transactions will be colour coded depending on their status.
- Green – Status of OK and is ready for picking.
- Grey – A Picker has been allocated but the item has not been picked yet.
- Red – The order has an error some type or has not been priced yet.
- Yellow – Usually a cash sale that requires a payment immediately on picking.
- Transaction Details – The transactions show the, Client Name, Reference Number, Total Qty, Delivery Date, Payment Status, Location, linked Pallet Type, Error Info and Manager Transaction Status.
- View Formats – Users can also change to a line view of the transactions by clicking on the
 Line icon. It can be changed back to the grid view by clicking on the
  Grid icon.
 - Types of Transactions – If the picker manager wants to view only a certain Type of Order Status, they can go to the Type drop down and select from the list as follows.
- All – All orders the default setting so all colours will be displayed.
- Wait –
 Picker has been selected but the order has not been picked yet!
 - OK –
 Green and ready to be be picked.
 - Warning –
 Can be an alert for a client but is used for a number of types of warnings.
 - Payment Required –
 Usually cash sales where payment is required on delivery or items on backorder.
 - Error – Red transaction has an error.
- Unpriced – Transaction has not had a price entered.
- Locations – The Picker Manager can also subset the list on a Location by location by selecting an option from the Location drop down menu as follows for Bondi Blue.
- All – All Locations the default setting.
- Other locations as setup in the data file.
- Picking Commencement – If the record is marked Green it will have a status of OK which means that it is ready to be picked. To commence the picking process, click on the record and an alert will be displayed showing additional details for the selected transaction as seen below

- Picking Options – The manager has the following options from this alert as follows.
- Modification – Select the
 modify icon if the Picking Manager needs to update/modify the transaction before they proceed to the selection of a picker, Sapphire Web Pack Manager displays the Sales Data entry screen, to allow the user to modify the transaction.
- Be aware that this will be opened in a new tab on your browser. If no alterations are to be made use the browser and close the tab directly.
- Pallet Selection – Select the
 Pallet icon if the pickers need to know what type of pallet to load goods onto.
- Usage – This will display an alert that allows the manager to choose the preferred Pallet type if it hasn’t already been allocated (set-up at client level or by Salesman) or needs to be updated.
- Pallets – These have to be set up as Inventory items first before using the web pack.
- Picker Options – Select the
 Picker icon to select the required picker.
- Picker Selection – A picker can be allocated by clicking . This will then bring up a Choose Picker alert displaying list of all pickers that are currently logged into the system.
- Picker Location – It will default the sort by pickers located at the required location.
- Picker Jobs – This list will also show the number of transactions that the picker currently has allocated against them, allowing the manager to spread the workload more evenly.
- Picking in Process – Once the picker has been selected the record will update to a Grey colour in the Manager screen with a status of Wait, waiting to be picked.
- Modification – Select the
- Locking Orders – Once the order has a Picker allocated it will be locked. If the manager re-opens the order they will note that the picker icon is now red.
- Changing Picker – Select the now red
 Picker icon if a change of picker or modification of the order is required and the picker has not yet set the order as picked. The manager may re-select the Picking icon and un-pick the order. Care will have to be exercised when using this functionality as it can lead to confusion.
- Changing Picker – Select the now red
Dictation and Speech to Text Overview
SapphireOne’s implementation of both Dictation (MacOS) and Speech to Text (Windows) is a game changer for data entry. Any data entry field you can type into using a keyboard can use this feature.
You can also use this functionality on all inquiry screens within SapphireOne. For example, the user is in a Contact within a Client. They may have made a phone call to that particular client using the Softphone technology. Consequently, this will automatically date and time stamp both the contact and the phone number you called.
As soon as the call is completed, the user has the ability to use Speech to Text (Windows) or Dictation (MacOS). They can dictate into the memo field of the CRM contact, adding as much description as they require.
Dictation and Speech to Text Procedure
This functionality applies across every single Data Entry screen. For example, the SapphireOne user is entering a Vendor Invoice (VI). Additionally, you may want to add a memo within the Vendor Invoice (VI). The user can utilise the tool and simply dictate the memo.
Another example is if the user wants to add additional lines to the General Ledger account, within each General Ledger account. When the user is completing data entry using a General Ledger, there’s always a unique memo field for each GL account line.
The user can then utilise this feature to quickly add the information they need to add. Alternatively, you may have an interview with an employee. After the interview process is completed, the user can then make notes about the employee.
Speech to Text or Dictation is an extremely powerful tool. It is something that we at SapphireOne, as well as our clients, utilise daily. It is a massive time saver.
Back Ordered lines in an Order
Sapphire Web Pack Manager will automatically split orders that have a line with a backorder component as follows. Sapphire Web Pack Manager will automatically split these orders into separate orders. This is so that the arrived component of the order may be picked and sent out to the customer. The backorder component will then be displayed in yellow and will indicate as follows, “There are item(s) on back order”
Errors in Lines
The error could be for several reasons, the most common would be that a line in the transaction is un-priced. Once the transaction is clicked into an alert will be displayed allowing the user to modify the order as required. If un-priced the focus will be placed on the Rate data entry field allowing the user to enter a rate or simply close the transaction using the ![]() in the top right hand corner of the screen.
in the top right hand corner of the screen.
Batch Splitting
This ![]() Split icon is only displayed when a batch item arrives that is incomplete.
Split icon is only displayed when a batch item arrives that is incomplete.
There may be times when certain lines containing a Batch item within an order will not have the complete batch as ordered. When this occurs, the picker manager has been given the ability to split the order so that available items can be picked and invoiced while the unavailable stock is split to a separate order that will remain on back-order. An example of when this may happen is when a batch that has not yet arrived has been allocated to an order. In this case the transaction in the manager screen will show a Total B/O amount along with info regarding the Batch in error due to it not yet being arrived into the system. Note the last item in the list below for Discount Furniture.
If the Picker Manager finds that there is a batch item that is incomplete when he is checking the back orders they will find that there is an additional ![]() Split icon at the bottom of the alert screen. They may then split the batch part of the order by clicking on the line that has the error message, “Qty in B/O”.
Split icon at the bottom of the alert screen. They may then split the batch part of the order by clicking on the line that has the error message, “Qty in B/O”.
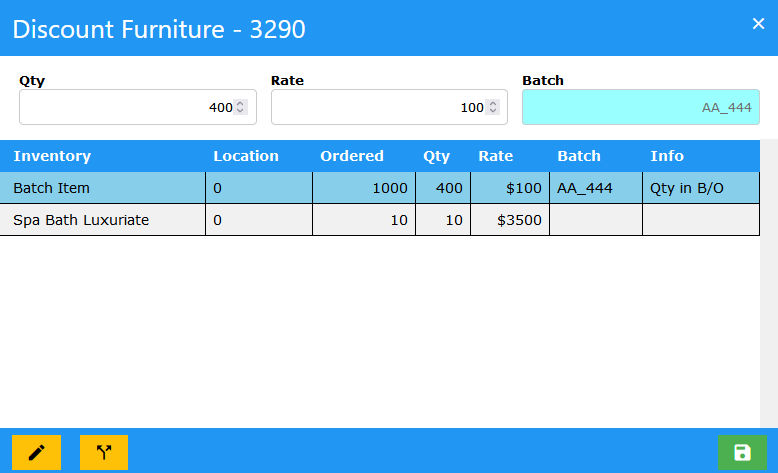
- Splitting Icon – Doing this will display an alert which will display the
 Split icon. This confirms that splitting the line in the transaction transaction is allowed.
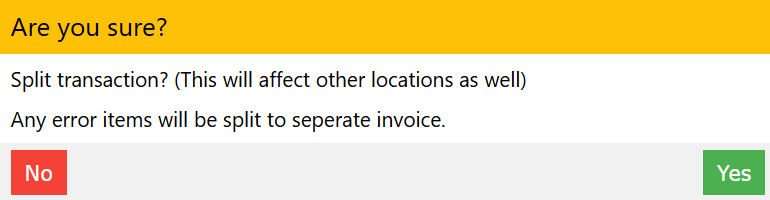
- If the user clicks Yes, the transaction will be split and show in the Manager screen as 2 separate transactions. The item on back order will still be in error and will have an updated Reference number appended with an S representing the split. The deliverable items will now be in a status of OK (green) so a picker can be allocated.
You can review our Blog and YouTube channel for additional information and resources on SapphireOne ERP, CRM and Business Accounting software.