Inventory Management Overview
Inventory, also known as stock or Stock-Keeping Unit (SKU), encompasses the goods and materials that an organisation holds for the primary purpose of reselling, production, and manufacturing. Effective inventory supply chain management focuses on organising and maintaining inventory across various departments, locations, facilities, and third-party logistics centers (3PL). This includes managing handling, ordering, shipping, and associated costs.
SapphireOne Inventory Management is designed to balance and maintain a business’s physical inventory, assisting with quality management, price forecasting, inventory valuation, replenishment lead times, future inventory pricing, Material Requirements Planning (MRP), handling returns, and managing defective goods. By addressing these aspects, SapphireOne Inventory Management helps maintain optimal inventory levels within the organisation.
SapphireOne’s Inventory mode offers functionality that enables users to store and record all inventory items, stock, goods, equipment, and materials intended for resale by a business or organisation.
SapphireOne classifies inventory according to various stock types, including Non-Diminishing, Normal, Serial, Batch, Item, Activity, Hire, Asset, Voucher and General Ledger. Each control type has its own unique functionality, and several price controls can be maintained, such as average, item, and fixed pricing. SapphireOne categorises inventory into ten different types, as follows:
- Non-Diminishing – Non-diminishing inventory items refer to services that are billed based on the time spent by an individual, such as professional services. In these cases, the time expended does not decrease, and the service is essentially metered. One prime example of a non-diminishing inventory item is a six-minute time block. Another instance can be seen in freight charges, where you may bill your client for shipping costs or receive invoices for freight expenses from your Vendors. In this context, the setup is considered non-diminishing.
- Normal – A Normal inventory item is a basic stock type where you purchase a certain quantity from a vendor, sell a portion of it, and keep the rest in stock. The sold items are recognised as revenue in the Profit & Loss (P&L), while the remaining stock is recorded as a current asset in the balance sheet. For instance, you can manufacture ten Normal Diminishing inventory items, sell five of them, which will appear on the P&L as income. The remaining five items will have a manufacturing cost, also listed in the P&L, and will be presented as an asset valuation on the balance sheet.
- Serial –Serialised inventory is similar to Normal inventory, with the main difference being that each manufactured or purchased item has a unique serial number, such as an iPhone’s serial number. When creating a serialised inventory item, additional defaults are automatically generated for both purchasing and sales. Users will be prompted to select or create unique serial numbers for each item during purchase or manufacturing. When selling serialised inventory, users will be asked to pick the specific serial number or scan it, and the serial numbers will appear on the Sales Client Invoice (SCI). Each serial number is stored for the life of the SapphireOne datafile.
- Batch – Batch inventory is similar to Normal and Serial inventory, but it has a unique Batch ID for a large volume of identical items, such as a batch of yogurt. When creating a batch inventory item, the system generates default values for both purchase and sale. Users can select existing batch numbers or create new ones for each batch-based inventory item. During the selling process, they must specify the particular batch number or scan its barcode, which includes information such as an expiry date or best before date. We keep a record of the batch numbers for the entire lifespan of the SapphireOne data file.
- Item – Item inventory refers to products that are typically sold in bulk or large quantities and are measured by weight or a unique number, such as nails or washers. Due to their large volume, it is impractical to count them individually, and they are usually managed and tracked by weight or quantity. Item-based inventory is commonly used in construction, manufacturing, and similar industries where bulk materials are used.
- Activity – Once an inventory item is set up as an Activity in SapphireOne, it can be allocated to a resource in SapphireOne Job Projects. Multiple resources can be set up, each with an unlimited number of activities. The primary purpose of establishing an Activity is to track activities within the inventory system. When purchasing activities or creating Sales Client Invoices for activities, the information flows to SapphireOne’s Job Projects, providing a complete view of job costs and revenue.
- Hire – Hire Inventory in SapphireOne allows users to designate a specific item as a hire item, which enables the inbuilt hire functionality in the Point of Sale drop-down menu. When an inventory item has a Hire type code, it can work within the hire functionality of SapphireOne. This functionality enables users to track when the hire inventory was invoiced to a client and when the client returns the hired inventory items. The invoicing can occur on a daily, weekly, or other specific time period, and it will accumulate in a similar fashion to Non-Diminishing inventory items. This feature streamlines the hire process, making it easier to manage and track inventory items that are being hired out.
- Asset – Asset inventory allows SapphireOne users to purchase items that become part of the SapphireOne asset register. This feature is specifically designed for the purchasing of company or organisation assets that are held by the company, and facilitates the disposal of those assets by enabling users to complete a Sales Client Invoice for their disposal. By tracking assets within the system, users can easily monitor asset depreciation, maintenance, and other related costs. This functionality helps businesses to efficiently manage their asset portfolio and ensure compliance with accounting standards.
- Voucher –SapphireOne’s Voucher Inventory allows users to create vouchers for clients in Australia. There are two types of vouchers available. The first type is a prepaid voucher, also known as a gift card, which can be purchased and redeemed by the recipient against goods or services. The second type is a reward program or incentive program where vouchers are issued based on points per dollar spent. This type of voucher is commonly used by businesses to incentivise customer loyalty or as part of a promotional campaign. With SapphireOne’s Voucher Inventory, users can easily manage and track the issuance, redemption, and balance of both types of vouchers.
- General Ledger – SapphireOne’s General Ledger inventory feature enables users to directly code purchase or sales transactions to a General Ledger account without the need to create an inventory item. This offers users enhanced flexibility and control over their accounting processes by allowing direct transaction coding to their General Ledger. With SapphireOne, users can choose any General Ledger account and efficiently manage specific expenses, such as office stationery or staff amenities. This is particularly useful when a vendor requires an Order Vendor Invoice for basic supplies or amenities.
SapphireOne’s Inventory Price Book is a versatile tool featuring multiple Rule Types, such as Rate Rule, Quantity Rule, and Discount Rule. These rules can be applied to inventory items using several pricing structures, including Fixed Quantity, Quantity Break, Standard Markup, Standard Margin, Cumulative Markup, Cumulative Margin, Standard Rate, Cumulative Rate, Price Code, and Price Code Cumulative. The Inventory Price Book enables users to create and manage bespoke price lists for their inventory items, allowing them to effortlessly modify prices based on factors such as quantity, markup, and discount. This ensures accurate pricing and enhances profitability.
With SapphireOne’s Price Book, users can generate an unlimited number of unique prices per client, vendor, client class, vendor class, inventory class, job project, job project class, location, tag, and company .
Inventory Inquiry
SapphireOne’s Inventory Inquiry screen functions as a repository for all essential inventory information. It offers users a complete overview of inventory data, encompassing stock levels, product descriptions, and pricing. Moreover, the Inventory Inquiry screen grants seamless access to a range of pages and screens associated with inventory management, including stock adjustments, purchase orders, sales orders, as well as vendor and client details. By utilising the Inventory Inquiry screen, users can rapidly access critical information and manage their inventory with ease.
To obtain full details for the Inventory you can Look ![]() by selecting a single inventory or a group and then selecting Look
by selecting a single inventory or a group and then selecting Look ![]() . To Modify
. To Modify ![]() an Inventory item you can double click on the Inventory item or you can click on the Inventory once and select the Modify
an Inventory item you can double click on the Inventory item or you can click on the Inventory once and select the Modify ![]() button or use the keyboard shortcut. Both screens look the same but only by selecting Modify can you amend the data. To create a new Inventory item, click on the New
button or use the keyboard shortcut. Both screens look the same but only by selecting Modify can you amend the data. To create a new Inventory item, click on the New ![]() button or use the keyboard shortcut.
button or use the keyboard shortcut.
SapphireOne Inventory Management maintains strict audit control and, as a result, does not allow for the deletion of inventory items. However, SapphireOne provides the ability to mark inventory items as inactive, provided certain criteria are met. This ensures that all inventory data is preserved and easily accessible for future reference or reporting purposes. With this feature, users can maintain accurate and reliable inventory records while keeping their data organised and easily searchable.
Dictation and Speech to Text Overview
SapphireOne’s implementation of both Dictation (MacOS) and Speech to Text (Windows) is a game changer for data entry. Any data entry field you can type into using a keyboard can use this feature.
You can also use this functionality on all inquiry screens within SapphireOne. For example, the user is in a Contact within a Client. They may have made a phone call to that particular client using the Softphone technology. Consequently, this will automatically date and time stamp both the contact and the phone number you called.
As soon as the call is completed, the user has the ability to use Speech to Text (Windows) or Dictation (MacOS). They can dictate into the memo field of the CRM contact, adding as much description as they require.
Dictation and Speech to Text Procedure
This functionality applies across every single Data Entry screen. For example, the SapphireOne user is entering a Vendor Invoice (VI). Additionally, you may want to add a memo within the Vendor Invoice (VI). The user can utilise the tool and simply dictate the memo.
Another example is if the user wants to add additional lines to the General Ledger account, within each General Ledger account. When the user is completing data entry using a General Ledger, there’s always a unique memo field for each GL account line.
The user can then utilise this feature to quickly add the information they need to add. Alternatively, you may have an interview with an employee. After the interview process is completed, the user can then make notes about the employee.
Speech to Text or Dictation is an extremely powerful tool. It is something that we at SapphireOne, as well as our clients, utilise daily. It is a massive time saver.
- When entering data in other areas of SapphireOne, changes made to inventory details created by the default setting will not become permanent parts of the inventory record. However, any alterations made to inventory details in the Inventory Management Software will be permanent and will appear in any subsequent screens with inventory information.
- If a transaction is created for an inactive inventory item, SapphireOne will automatically reactivate it. By default, inactive inventory items will not be displayed, but users can choose to include them by selecting “Include Inactive” in a query under the Tools
 menu.
menu.
Choosing between a Standard Inquiry and a Custom Inquiry Screen
All inquiry screens in SapphireOne offer the option to customise the list of items displayed on the page. This feature, known as Custom Inquiry, allows you to select the data fields to be shown and the order in which the columns of data appear across the screen. Although a client list is used as an example below, any type of inquiry can be customised within SapphireOne.
The list below represents the standard inquiry list, displaying a basic set of data fields for each client record:
Swap to Custom Inquiry
When you select the ‘Swap to Custom Inquiry’ button in the lower left-hand corner of the screen, SapphireOne will display the default Custom Screen, as shown below. This Custom List screen provides the user with two main options for organising the data display:
- To add or remove the data field columns displayed on the screen, click the ‘Setup’ button in the bottom right corner of the screen. Within the Setup screen, you can right-click on the column lines and choose from Delete, Move Left, or Move Right. More information on the Setup screen is provided below.
- To change the order in which the data field columns are displayed, click the ‘Setup’ button in the bottom right corner of the screen. Within the Setup screen, you can right-click on the column lines and choose from Delete, Move Left, or Move Right. More information on the Setup screen is provided below.
Once you have customised the Custom Inquiry screen, the screen view will be unique to you, and each time you log in, you will see the same custom view. You also have the option to select and save an unlimited number of custom views. This can be done in the ‘Setup’ screen, as detailed below.
The Inquiry screen below is the initial Custom Inquiry screen, which can be modified by the user.
Custom Inquiry Screen ‘Setup’ Function
To begin setting up your Customised List screen, click the Setup button, as shown above. The Setup screen will appear, as displayed below.
From this screen, users can add and remove data columns as needed. Almost every field within the SapphireOne data tables can be included in the Custom List screen, provided the user has the necessary authorisation.
The screen features several menu items across the top, which include:
- Reset to Default – Clicking this button resets the display to the default settings determined by SapphireOne. When you add a new data field, SapphireOne will place it on the right-hand side of the data columns. You can then click on the field heading and drag it to your desired location on the screen.
- Show Related Record – This option allows you to add related fields from other tables. By ticking the Show Related checkbox
 at the top of the screen, you can select a related record, and a mini view of that related record for the chosen entry will be displayed for the currently selected record. You will need to select the fields to be displayed.
 - Favourite Set – Located at the top left of the screen, this option enables you to save a custom-created screen for future use. For instance, you can have a simple Inquiry screen for general use and a more complex screen view when auditing specific information.
Inventory Inquiry Details Page
The Inventory Inquiry screen in SapphireOne presents the Details page as the initial view when Looking ![]() or Modifying
or Modifying ![]() an inventory item. However, users can easily navigate to other pages by accessing the Page drop-down menu on the (default) left-hand side of the SapphireOne Toolbar.
an inventory item. However, users can easily navigate to other pages by accessing the Page drop-down menu on the (default) left-hand side of the SapphireOne Toolbar.
In addition, the Inventory Inquiry list screen displays a list of current active inventory items, making it easy to select individual records for additional viewing and modification. Users can select a single record or a group of records and either Look to view or Modify to edit. This feature is commonly referred to as a Base Inventory Inquiry.
Paperclip Management Saves Time with Easy File Attachment
The SapphireOne Document Management System (DMS) features a convenient Paper Clip button on all data entry and inquiry screens. This enables users to attach relevant documents or files to every transaction or record. The system also includes a dedicated page for managing documents related to a specific transaction or record, providing robust version control of the attached documents.
The color of the paper clip serves as a visual indicator of the status of the attached documents. A red paper clip indicates that there are no documents currently attached to the transaction or record, while a green paper clip indicates the presence of one or more attached documents. Additionally, the word “Items” is preceded by the number of attached documents, providing a clear and concise representation of the current status.
SapphireOne’s Document Management System is highly versatile and can accommodate a wide range of document types, including Adobe Acrobat, spreadsheets, word processing documents, photo files, JPEGs, CSV files, HEIFs, and MP4 files. With the ability to store an unlimited number of documents for an indefinite amount of time, the system provides users with a comprehensive and efficient solution for managing all their important files and documents.
Master Defaults
In SapphireOne, users have the flexibility to control the size of individual documents and determine where they are stored through the Master Defaults settings. These settings can be accessed by navigating to Utilities > Controls > Master Defaults > System Page.
Within the Documents area of the SapphireOne page, there is a Document Size Limit setting with a default size of 10 MB, which can be adjusted as needed. Additionally, users can choose to store the documents either as part of the data file or as separate files, by selecting the appropriate option from the two radio buttons provided.
To attach a document to a transaction, simply click on either the ![]() or
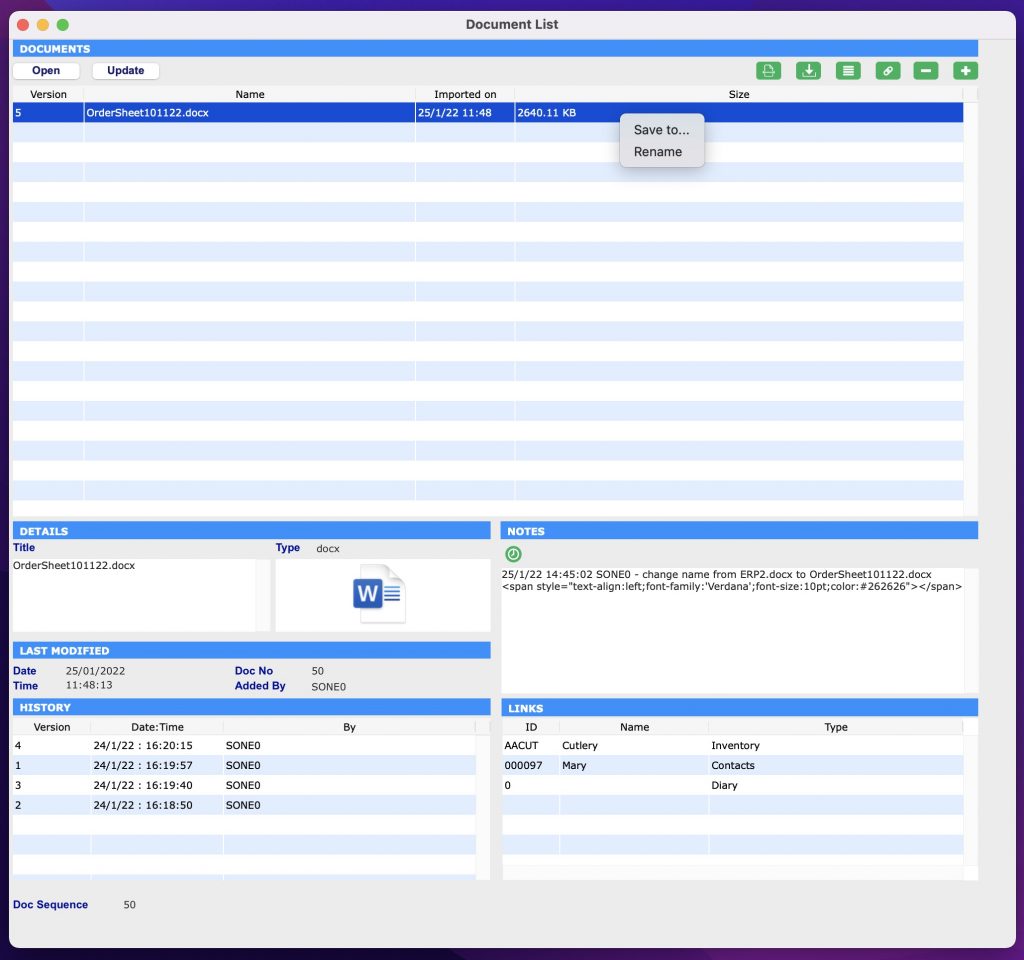
or ![]() Paperclip button. The Document List window as seen below will be displayed allowing the the user to select the desired file to attach.
Paperclip button. The Document List window as seen below will be displayed allowing the the user to select the desired file to attach.
How to Attach Documents Using SapphireOne Paperclip
SapphireOne also provides users with the convenient Drag & Drop functionality to attach documents. To use this feature, simply drag a document from your local computer into the Document List screen and it will be attached automatically. This streamlined process saves time and effort and makes it easier to manage your important files and documents within SapphireOne.
If SapphireOne detects that the document name already exists, a pop-up will be displayed alerting the user. Alternatively, the user can also select the
If SapphireOne detects that the document name already exists, a pop-up will be displayed alerting the user. Alternatively, the user can also select the Plus  button to select a document to upload from the local computer.
SapphireOne’s document management system provides users with the ability to easily manage their attached documents. After a document has been attached, the user has the option to rename it by right-clicking on the file and selecting Rename This feature is useful for maintaining consistency in document names across all records and helps to keep the system organised and efficient.
Documents Area within Document Management System (DMS)
- Open
 – By clicking on this button, the document will be opened for viewing, allowing users to review its contents without having to leave the SapphireOne system. This feature provides a convenient and streamlined way to access and review important documents within the context of the larger document management system.
 - Update
 – When this button is selected an alert is displayed allowing the user to import a new version of a highlighted document, enabling version tracking. After selecting a new version, the user enters a version number. The latest version becomes available, with previous versions accessible in the History area. The updated document remains linked to associated transactions.
 - Scan
 – This option in SapphireOne provides users with the ability to scan a document directly into the data file and link it to a transaction. This feature requires access to a local or network scanner, and the appropriate scanner and software must be installed on the local machine or network. By using the Scan option, users can quickly and efficiently digitise physical documents and associate them with the relevant transactions within SapphireOne.
 - Save
 – This button in SapphireOne allows users to save the currently highlighted document to disk. This feature provides a convenient way to export a copy of the document for backup or further use outside of the SapphireOne system. By clicking the Save button, users can easily access a digital copy of their important documents and ensure that they are properly preserved and accessible.
 - Link Documents
 – With SapphireOne, users have the ability to link a highlighted document to one or more transactions within the data file. To do this, the user simply clicks the “Link” button, which will bring up an alert allowing them to make their selection. This feature provides a convenient way to associate important documents with multiple transactions, ensuring that all relevant information is easily accessible from one central location. For more information about linked documents, refer to the Links Area documentation provided by SapphireOne.
 - Link Existing Documents
 – SapphireOne provides users with the ability to link existing documents in the data file to the current transaction or record. To do this, the user simply clicks the Link Existing button, which will bring up an Alert allowing them to choose from a list of available documents. This feature provides a convenient way to associate existing documents with additional transactions, ensuring that all relevant information is easily accessible from one central location. For more information about linked documents, refer to the Links Area documentation provided by SapphireOne.
 - Delete
 – This option in SapphireOne allows users to remove the currently highlighted document. By clicking the Delete button, the selected document will be removed from the system, providing users with a simple way to manage their attached documents and ensure that only relevant and up-to-date information is stored within the system.
 - Plus – SapphireOne includes a search function that makes it easy for users to select a document saved on their local computer. This feature provides a convenient way to quickly locate and attach the desired document, streamlining the process of adding and managing important files within the SapphireOne system.
Details Area within Document Management System (DMS)
The Details area within SapphireOne’s Document Management System (DMS) provides users with additional information about the selected document. When a document is selected in the Documents area, the Details area will automatically display the title of the document and the type of file. This information helps users to quickly identify and manage their important files and documents, providing a more efficient and organised system for document management.
Notes Area within Document Management System (DMS)
The Notes area is for entering any notes related to the document. The user can select the green clock button ![]() to create a time and date stamp for every note added.
to create a time and date stamp for every note added.
The Notes area will also keep an automatic user log when any changes are made to the document. For example, if the document is renamed or new links are created. SapphireOne will record the date, time and user that made the modifications.
Document Details Area within Document Management System (DMS)
The Document Details area within SapphireOne’s Document Management System (DMS) provides additional information about the selected document. This area automatically displays information such as the date and time the document was added, the document number, and the user who added the document. This information helps users to quickly understand the context of the selected document and provides a comprehensive history of the document’s status and interactions within the system. The Document Details area is a valuable resource for managing and tracking important documents within SapphireOne.
History Area within Document Management System (DMS)
The History area within SapphireOne’s Document Management System (DMS) provides a record of the complete version history of the selected document. SapphireOne tracks all version changes and automatically displays the document’s history in this area.
As new versions of the document are imported using the button, the History area will be automatically updated, ensuring that all previous versions of the document are recorded and available for viewing. This enables users to access the most recent version of the document, while still maintaining a complete history of all versions.
The History area provides a valuable resource for tracking the evolution of a document and understanding how it has changed over time. By having a complete record of the document’s history, users can easily review past versions and understand the context of the changes that have been made.
Links Area within Document Management System (DMS)
The Links area within SapphireOne’s Document Management System (DMS) is used to link documents to specific transactions or areas within SapphireOne. This area provides a comprehensive view of all linking information related to the document, including any functions used to import the document into SapphireOne.
By linking documents to transactions and areas within SapphireOne, users can easily associate important information and files with the relevant transactions, providing a more organised and efficient system for document management. The Links area is a valuable resource for understanding the relationships between documents and transactions within SapphireOne.
To add additional links to a document in SapphireOne, follow these steps:
- Select/highlight the document you wish to link.
- Click the
 Link Document button.
 - The Files pop-up window will be displayed.
- From the File drop-down menu, select the item you want to link the document to.
- In the Value data entry field, enter the necessary details (ID).
Note that the Value data entry field has a light blue background and is searchable by entering the wildcard symbols ‘?’ or ‘@’, making it easier to find the information you need. By linking documents to specific transactions and areas within SapphireOne, users can create a more organised and efficient system for document management.

Updating a Document within Document Management
The process for updating a document in SapphireOne is straightforward:
After clicking the “Update” button in SapphireOne, the user will be asked to confirm if they would like to import a new version of the document:
- Confirm that you wish to import a new version of the document by selecting Yes.
- The user will then be prompted to choose the updated document to open.
- After selecting the updated document, a secondary dialogue will appear, asking the user to enter an alphanumeric value for the new version.
- Enter the desired value for the new version and select OK
By following these steps, SapphireOne will replace the previous version of the document with the updated document. It will also maintain a complete record of all previous versions in the History area. This process ensures that the most up-to-date information is always readily accessible within the SapphireOne system.
Document Management using SapphireOne Documents Inquiry
In addition to SapphireOne’s Document Management Paperclip functionality, SapphireOne Documents Inquiry function in Workbook Mode provides users with a centralised repository of all documents and files stored within the SapphireOne data file. This function gives users the ability to add new documents, modify, view, or delete existing documents from within the Documents Inquiry screen.
Any revisions made to a document within the Documents Inquiry screen will be automatically updated across all areas where the document is linked within SapphireOne. Similarly, any modifications made to documents within the SapphireOne Paperclip Document List window will be reflected within the Documents Inquiry window.
For example, if a document is renamed within a transaction Paperclip Document List screen, the updated document name will be reflected when viewing the document in the Documents Inquiry screen.
You can learn more about SapphireOne Documents Inquiry functionality within the Documents Inquiry article.
Document Control within Document Management
In this example, we have an inventory item with documents attached, such as installation instructions and a packing checklist. The item is added to a sales order, manufactured, shipped, and the job is completed. SapphireOne’s Document Management Paperclip functionality allows for easy attachment and access to all relevant documents throughout the entire process, from sales order to completion. This improves efficiency and helps ensure all relevant information remains consistently available and up-to-date.
A year after the completion of the job, a revision of the inventory item is made, along with updates to its associated Documents (DMS). To keep the information organised and up-to-date, it is not necessary to create a new inventory item for the revision. Instead, the documents and files can be easily updated using SapphireOne’s DMS file that are attached.
By using the Update button within the DMS, users can import a new version of the document and SapphireOne will automatically keep track of all version changes, ensuring that the most recent information is readily available. This process saves time and effort by allowing users to simply update the documents and files, rather than creating a new inventory item for each revision.
In SapphireOne, when referring back to the original completed sales client invoice or job projects client invoice, the associated documents and files will be displayed in their original state or as they have been updated. The user has the option to view the documents and files as they were at the time of completion or as they currently are, providing a comprehensive and accurate record of all relevant information.
In the screen shot above, both the current and historical documents are attached to the inventory item. As a SapphireOne user, you have the ability to edit the list and choose to delete the historical document by simply selecting the Minus button.
Additionally, you also have the ability to modify the existing document, keeping a log file of each and every time the document has been revised. This ensures that a complete and accurate record of all revisions to the document is maintained, allowing you to easily reference the most recent version or any previous versions as needed.
The ability to manage both current and historical documents, as well as the option to modify and delete them, provides users with a flexible and efficient solution for document management within SapphireOne.
Inventory Area
The Inventory area in SapphireOne allows users to create and manage inventory items by entering an Inventory ID, name, class, project settings, type, and other optional details such as department, URL, and General Ledger department. The active checkbox enables or disables an inventory item.
- ID – The Inventory ID is the very first item to be created in the Inventory Details screen. SapphireOne recommends establishing a criteria before entering any ID’s, as once saved these ID’s may not be deleted and so re-used. We recommend using your vendor ID as your Inventory ID), i.e. Apple iPhone ID can be entered as an Inventory ID NQA92ZP/A (Identify your iPhone model). Once the ID has been created it will become the default Inventory ID for the Inventory Item. Under normal circumstances the Inventory ID will not be changed or modified, however it can be amended by going to Utilities > Utilities > Sapphire Tools > Change ID. Only an authorised user can modify an Inventory ID. Sapphire One’s Inventory ID currently supports 80 alphanumeric characters.
- Name – The name of the Inventory item will be entered here. The Inventory Name can be modified at any time.
- Class – All inventory items may be assigned to an Inventory Class this enables additional Sorting, Searching, Reporting and Pricing for inventory items in the assigned Inventory class. For example, you can organise your Inventory Items into different classes such as iPhone, Desktop, and iPad to distinguish and group them. Inventory Classes must be set up first and the Inventory item assigned to an existing Class. Inventory Classes may be created by using an Inventory Class Inquiry. SapphireOne Inventory class supports up to six alphanumeric characters.
- Job Project Settings – This drop-down menu allows you to select from Expense, Stock, Disbursement, Time, Direct, Other, Income and Non Tracking. This is to categorise the Inventory item in regards to a Job Project. SapphireOne Job Project ID supports up to 12 alphanumeric characters.
- Type – The Type drop-down menu provides a range of options to select from, such as Non-Diminishing, Normal, Serial, Batch, Item, Activity, Hire, Asset, Voucher, and General Ledger. These options determine the specific functionality associated with each Inventory item. By default, SapphireOne assigns the Type of inventory item based on a setting in Master Defaults. To change this setting, navigate to Utilities > Controls > Master Defaults > Inventory Page. The default setting in Master Defaults is Normal, but users can modify it to any inventory type available in the Type drop-down menu.
- If you select the Serial or Batch option in the Type drop-down, SapphireOne will automatically activate tracking for either Serial or Batch numbers. When an item is designated as Serial or Batch, a dialog box will appear during purchase or sale transactions, prompting users to enter Serial or Batch numbers.
- On the other hand, if you choose the Activity or Hire option, SapphireOne will display additional data entry fields related to the item. It is essential to complete these fields accurately to ensure the proper processing of these Inventory items throughout SapphireOne.
- Discontinued, On Hold, Web and Indent Checkboxes – These allow you to flag the Inventory item for various states.
- Discontinued Checkbox – When selected, the Discontinued checkbox enables the Inventory item to continue functioning as normal, but prevents re-purchasing of the item. This ensures that you do not inadvertently repurchase stock that you no longer wish to retain in your inventory list. In addition, the Discontinued checkbox also provides a notification that the item has been discontinued. This allows users to manage inventory more effectively and make informed decisions about future purchases.
- Hold Checkbox – When an item is marked as ‘On Hold,’ it prevents the sale of that particular item. The user may also provide a reason for putting the item on hold, which can be displayed in the system. For instance, an on-hold inventory item can be an Apple reseller with a new product that has been embargoed until the release date. In this case, they would mark the item as ‘On Hold’ until the release date arrives, at which point they can remove the hold and commence sales. This feature ensures that inventory management is precise and efficient, preventing sales of items that are temporarily unavailable or embargoed.
- Web Checkbox – Tells SapphireOne to display this inventory item in the Web Store when it is used. Only inventory items that will be displayed in the SapphireOne Web Store will be those items that have the checkbox selected.
- Indent Checkbox – Tells SapphireOne to mark the item as indent.
- Job Project – The Inventory item may be linked to a Job Project if a Job Project ID is entered into the data entry field. Job Projects are set up in the Job Project Inquiry screen. This is an optional field.
- Department – The entry of a department is optional depending on a number of factors. One factor would be if reports are to be generated at the department level. This is an optional field.
- Rep – The user has the option to input a Rep ID as necessary. A Rep ID serves various functions, including commission payments. Therefore, it holds significance to ensure accurate entry of the correct Rep ID. This ensures precise tracking and processing, particularly when it comes to commission-related matters.
- For additional documentation on representatives and commissions please read the article entitled Sales Rep and Carrier
- URL – You can associate the Inventory item with a URL. The URL itself will be recorded as an active hyperlink.
- Company – SapphireOne by default will enter the Company that the user is logged into and this may not be altered by a user logged into a specific company.
- Department – You may link the Inventory item to a General Ledger department.
- Active Check Box – The active checkbox is responsible for enabling and disabling an Inventory Item. The active checkbox will default to true when a new Inventory item is created. Un-checking this will mark this item as inactive, provided the stock level is zero.
Inventory Types within SapphireOne Inventory Management Software
| Non-Diminishing | This type (also referred to as Never-Diminishing) is selected when the tracking of stock levels is not required. Instead, SapphireOne will display the actual units sold for that item. For example these may consist of Services, Freight, or other Non-Stocked Items. |
| Normal | For all inventory items where the normal tracking of stock levels is required. This is the SapphireOne default when a new item is being created. The default setting in Master defaults is Normal but this may be altered to any item in the drop-down. |
| Serial | Tracking of stock levels as for normal inventory items but serial functions are turned on in the inventory details. Each and every inventory item must have individual serial numbers when purchased and sold. This is enforced by SapphireOne. |
| Batch | Tracking of stock levels as for normal inventory items but batch functions are turned on in the inventory details. This allows batches of the same inventory item to be assigned a serial number which then becomes a batch number. These items are also tracked by SapphireOne when they are purchased and sold as batches and this is enforced by SapphireOne. The stock levels in each batch are tracked individually. |
| Item | Normally used to distinguish an item that is tallied using weights of measure. For example 1kg of nails. |
| Activity | This Inventory item can be linked to a Timesheet or a Resource and is classified as non-diminishing. It is typically used for professional services, labor, equipment or any time allocation for individuals, and other similar activities. This Inventory type allows users to accurately track time-based costs. In the Description area, two additional data entry fields are displayed. It is essential to complete these fields accurately for SapphireOne to process Activity items correctly. These fields are the Unit of Hire, which denotes the unit of measure for the Inventory item, and the Allowance or Rate, which specifies the hourly rate or allowance for the activity or equipment. Using this Inventory type, users can effectively manage time-based costs and optimise resource allocation in their organisation. |
| Hire | The type Hire is selected when the organisation has products that they hire to their clients. Hire Items may only be used through the POS Hire feature. It will not be displayed in any of the Sales or Purchases lists. A further change is in the Prices area where a data entry field Bond will be displayed as occasionally hire items require the payment of a Bond, or Deposit of some type. Since this is not required for all Hired items SapphireOne does not enforce the entry of a value here. |
| Asset | Is used when the inventory item is purchased with the intent or desire of use as a fixed asset for purchase and sale. |
| Voucher | The item is tracked as a voucher. Each voucher is individually tracked and can be sold and redeemed at a later date. |
| General Ledger | Is used when the inventory item is purchased with the intent or desire of use as a General Ledger account. |
Grouping Area in Inventory
Inventory items in SapphireOne can be tagged with up to six tags for additional searching and classification purposes. These tag headings can be customised by the user under Utilities > Controls > Master Defaults > Inventory Page. To add a description to the tag, simply type it in the field and press Tab to add it to the standard description list. These tags appear as the last three columns on the right-hand side of the list in a standard inventory inquiry, and can be used for filtering when using the Web Pack to display inventory items.
The drop-down menus can be updated by entering an item not on the list, and SapphireOne will prompt the user to add it to the list. Items can be removed by selecting them with command/control and confirming the removal prompt.
In addition to the six data entry fields for tags, there are three additional fields for season, area, and indent, which are used when a customer order is selected from a browser using the Sapphire Web Pack. These fields are linked to the SapphireOne web area in Master Defaults on the Inventory and can be used for pre-ordering inventory items. For example, if customers use the Pre-Order function in the Sapphire Web Pack to enter anticipated future orders for inventory items, sales staff can see the quantity and timing of stock purchases needed to fulfill those orders.
When the Customer Order function is selected, the user will see a dialog asking for the selection of Current Stock (Normal) or Pre-Order. If the required Master Default has not been set up, a dialog will appear to prompt the user. Once the Pre-Order for a specific season has been selected, the Inventory List in the Sapphire Web Pack will display only those items with that season entered in the Season data entry field. All other items will be filtered out.
Description Area in Inventory
SapphireOne’s inventory management includes features for units of measurement, pallets, weight, and product dimensions to aid in shipping and calculations, including useful packaging and freighting information. The options are as follows:
- Primary Units – This term refers to the unit of measurement used to describe an item, such as Each, Set, Box, Pack, or Carton. The primary unit should accurately represent the item in question.
- Secondary Units – This term is used to indicate the number of items within the primary unit. For example, if an item is sold individually, the primary unit would be “Each,” and the secondary units would be set to 1. If a carton contains 12 items, the primary unit would be “Carton,” and the secondary units would be set to 12. When invoicing these packs, users would input a quantity (e.g., 60). SapphireOne then divides the quantity by the secondary units (12) and enters the result (5) into the secondary units data entry field in the transaction. This information guides those responsible for picking and packing the order, indicating that five cartons are needed to fulfil the order.
- Pallet – This field allows you to enter the number of inventory items shipped on a pallet. When creating a sales or purchase order, SapphireOne displays the number of pallets needed for this inventory item. If shipping is charged per pallet, adjustments to the order quantity may be necessary based on the number of pallets required.
- Weight – SapphireOne displays the total weight of items in a purchase or sale on a per-line basis and the overall order weight at the bottom of any inventory data entry screen. This information is useful for calculating shipping weights, which can impact shipping fees.
- Inner Height, Width, and Depth – These dimensions represent the product size without packaging, useful for determining packaging requirements.
- Outer Height, Width, and Depth – These dimensions include product packaging and are useful for calculating shipping costs based on volume. This information is relevant when shipping fees are determined by volume rather than weight.
Standard Prices Area in Inventory

The Standard Prices section in SapphireOne enables users to enter pricing details for their inventory items. Standard pricing options range from A through to H and Ex, which is tax-exempt. The user can manually enter any of these prices but should be aware that doing so will overwrite pricing in all locations. To include tax in displayed prices, the user can select the ‘Include Tax’ checkbox.
The margin type dropdown allows users to select a number from 1 to 10, which tells SapphireOne what line to read from the Price Margins area found in Utilities > Controls > Master Defaults > Inventory 2 Page. When the Update Prices by Margins tool is used and set at 1, it will read the first line.
Bulk updating of pricing can be done through an Inventory Location Inquiry, where two functions in the Tools menu allow for importing or creating prices. If pricing based on a markup or margin is required, the user will have to do this on a location-by-location basis. Since alterations to prices made in a Base Inventory Inquiry will rewrite prices in all locations, users are advised to exercise caution.
Selling price restrictions can be set up under Utilities > Controls Master Defaults > Inventory Page. These restrictions control the prices at which inventory items can be sold, for example, setting a floor price or prohibiting sales below the average or last cost. The Selling Price Restrictions now also check the Price Book for discounts before allowing a sale. If a price book entry discounts the sale to below the minimum selling price, the sale may be stopped.
FX Prices Area
The FX Prices section displays foreign currency prices for the Inventory item, showing the buy and sell prices in those currencies. The update button can be used to manually update the latest FX prices for this item. This section will only be visible if Foreign Currency has been activated in SapphireOne.
Stock Levels Area
This area displays the stock levels for this particular Inventory item. It illustrates the status and settings for the current stock for all locations (Inventory Location Inquiry for each Location).
- Minimum Stock – This is the minimum threshold of stock at all times.
- Maximum Stock – This is the maximum threshold of stock at all times.
- Current – The present quantity of stock. All posted transactions.
- Unposted – The present quantity of stock including un-posted.
- Carton Quantity – The number of items in a carton. If the inventory item is Purchased or Sold by the Carton, enter in the number of Inventory Items in a Carton. Then when a transaction is raised SapphireOne will display the number of Cartons in the transaction. This will help prevent the Purchasing or Selling of split Cartons.
- Carton Volume – This is the cubic volume of the carton.
- Back-Order (OCI) – The total number of Inventory lines in all Order Client Invoices (OCI).
- Orders (OVI) – The total number of Inventory lines in all Order Vendor Invoices (OVI).
- FOQ – Fixed Order Quantity this is the number that the Inventory item has to be ordered in multiples of.
- Indent Date – This is the indent date.
- Vendor Stock – You may obtain an automated feed for the vendor stock levels.
- Allocated – Stock that has been ordered and assigned to a client’s order.
Inventory Inquiry More Details Page
This Page displays additional internal data controlling the Inventory item. It also displays the creation modification and last up-date details.
Costs Area in Inventory
Typically, when costs are manually updated in a Base Inventory Inquiry, it’s important for the user to be aware that the updated costs will immediately be applied to all locations for the Inventory item.
However, it’s crucial to note that if these costs are updated using Gateway III, they will not automatically propagate to any of the locations for the inventory item.
This area displays various costing types, stocktake information, invoice header item, and vendors for the inventory item.
- Costing Type – The four costing types available are as follows:
- Average – Average costing will apply the cost divided by the stock available (Note this is the SapphireOne default).
- Standard – Allows a Standard Price to be applied to an item. This requires that a general ledger account be set up to hold any variances.
- Item – Allows the cost of the original order to be applied to the item.
- Fixed – This option changes the way SapphireOne manages Last Cost within SapphireOne. If the Inventory Costing Type is set as Fixed an additional field will be displayed as documented later in this article.
- Stocktake – The last date this item was included in a stocktake.
- Current – The calculated cost based off the Costing Type.
- Average – The average of the paid costs. When a new Inventory Item is created, SapphireOne will use Average as the Costing Type.
- Last – The cost of the last purchase. If you modify the Last cost a reason is requested and logged.
- Floor Price – Allows you to set and use a minimum cost that is slightly higher than your actual cost. This is Set up from Utilities > Controls > Master Defaults > Inventory.
- Invoice Header Item – On printing an invoice only the name is printed not the ID. When the Invoice header item checkbox is selected SapphireOne will forcibly default the Inventory Item Type on the first page to Non-Diminishing as it will assume that this Inventory item is to be only used as a header and stock level tracking will not be required. Any standard reports will then only print the Inventory description for the item and will not print any Quantities or ID’s for the Inventory items with the checkbox selected. This inventory item will then be used as a header in invoices for the insertion of additional details. Note that Quick Reports and specifically created Custom Reports will not be affected by the selection of this checkbox.
- Use Zero rate on PO – Your purchase Orders always default to zero for this inventory item, forcing the user to do manual data entry.
- Log – Every change to the last cost generates a log entry, This area is not editable by the user and and documents the reason to change last cost.
Additional Barcode Details
For each Inventory item in SapphireOne there is the functionality for users to create and store an unlimited number of barcodes for the same item. These are in addition to the UPC/Barcodes above. For example, you may require a unique barcode for the individual product, the carton, cartons in a box, pallet and other various sized containers.
ID Area
- Second ID – Allows you to store a secondary ID as an alternative.
- UPC/Bar Code – Is for the storing of a UPC / Bar Code for the Inventory item. This code may be entered at the time of invoicing with the use of bar code scanner. If the ID doesn’t exist for the entered code SapphireOne will then look for the entered code and replace the code with the correct Inventory ID.
Serial/Batch Defaults Area
Auto Serialise Area (Dynamically Displayed)
This area is by default empty and is active only for items where Serial/Batch is selected as the Type in the More Details screen and Auto Serialise is enabled in Utilities > Controls > Master Defaults > Inventory.
If the inventory item is Serial/Batch and is activated and Auto Serialise is enabled in Master Defaults a check box with the label ‘Auto Serialise’ will be displayed in this area. The user then has two options:
- The first option is to leave the check box unselected. This allows the user to assign specific serial numbers at the time of purchase and allocate those numbers to each transaction as items are sold. Alternately the user can assign any serial number you prefer to individual units at the time of purchase. The user also have the option to specify an expiry date for perishable items. The user can also use this expiry field to set the number of days an inventory item will expire after purchase or production.
- The second option is to select the check box which will then display additional data entry fields. But note, this will disable the ability to manually enter serial numbers when purchasing inventory items. Use this option only if the serial numbers will be in consecutive order. The fields are as follows:
- Prefix – You have the ability to choose a prefix for the serial number.
- Format – The Format entry field allows the user to choose a starting number for the serial numbers.
- Example – The Example field will show the user how the serial number will appear and the first number to be used.
- Expiry – Set an expiry date for the batch.
If the checkbox is selected and nothing is entered SapphireOne will by default commence the serial numbers at 1.
Tracking Area
The Tracking Area displays essential information about each inventory item, including its creation date, last update time, and the person responsible for the most recent modification.
Importer Area
The Importer Area streamlines the import and export aspects of your business. It contains your Tariff ID information and an option to add any duties configured in the Manager function. To use this feature, ensure that all items being imported or exported are set up as Normal items, including Non-Diminishing Tariff items. The Tariff Manager function must be configured before using this feature.
Tax Details Area
This section manages the tax applicable to each inventory item, which depends on your organisation’s country of operation. The tax code specified in the Client or Vendor record will take precedence over this setting at the transaction entry point.
User-Defined Fields Area
The User-Defined Fields Area provides four customisable fields, allowing users to assign unique names to each field. To set up these fields, navigate to Utilities > Controls > Master Defaults.
Custom Page in Inventory
Custom Page Overview
SapphireOne’s Custom page features text fields designed for versatile, user-defined purposes. Each field is assigned a variable by SapphireOne, which is displayed as the default field heading label. Users can take note of the desired field or heading variable for customisation and modify it by navigating to Utilities > Controls > Change Names. Detailed instructions on this process will be provided below.
The Custom page is organised into the following sections:
- Alpha – Allows letters and numbers, but cannot be used for arithmetic functions
- Real – Allows numbers only, and can be used for arithmetic functions
- Date / Time – Date fields store date values and can be used for date functions, while Time fields store time values and can be used for time functions
- No Heading Defined – Features eight alphanumeric fields that cannot be used for arithmetic functions
- Text – Accepts letters, numbers, and special characters, but cannot be used for arithmetic functions
The data entry fields in these Custom Pages can also be employed in Sapphire Custom Reports, Quick Reports, Custom Inquiries, 4D View Pro, and 4D Write Pro Reports, just like any other data entry fields within SapphireOne.
The example Custom Page below is from an Asset Inquiry; however, the process for customising this page remains the same, irrespective of the function in which the Custom Page is located.
Default Variable Values
In the default variable values defined by SapphireOne, the first number signifies the position of the field within the group, while the second number denotes the maximum number of characters for the data entry field.
For instance, ASAlpha_1_20 indicates that it is the first data entry field in the group and can hold up to 20 characters. Similarly, ASAlpha_8_80 shows that it is the eighth data entry field in the group, with a capacity for a maximum of 80 characters.
To modify the headings on a Custom Page:
- Write down the exact names of the headings you wish to modify.
- Navigate to Utilities > Controls > Change Names. Keep in mind that when performing this procedure, you will be warned that only one user should be logged into the data file.
- Upon accessing the Change Names function, a dialogue box will appear. Then, refer to your list of names and scroll down the list to find the headings you want to modify.
- For each heading:
- Highlight the name.
- Enter your new name in the lower data entry field.
- Click the Update button to save the changes in SapphireOne.
Analysis Page in Inventory
The Sales Analysis page records the total of the movements for this line item for the month and total to date. The Sales Analysis area records the movement for each period showing a basic analysis of the sales performance for the Inventory item. This is shown as Month To Date (MTD) and also Total To Date (TTD).
The total number of un-posted units is also included. A Period Analysis is not available here in an Inventory Inquiry as it is done on a location by location basis. If you require a Period Analysis, perform an Inventory Locations Inquiry, select the item and the location to View ![]() or Modify
or Modify ![]() and select this Analysis screen from the Page menu.
and select this Analysis screen from the Page menu.
Controls Page in Inventory
Controls Area
- On Cost Factor – Allows you to manually enter an On Cost Factor which works with the Order Vendor Invoice. An On Cost Factor of 1.1 will increase your cost by 10%, an On Cost Factor of 0.5 will reduce your cost by 50%.
- Wet % – If you produce or import wine into Australia, or sell it by wholesale, you will have to account for Wine Equalisation Tax (WET).
- Decimal Places – Entry of a number in these two data entry points tells SapphireOne how many numbers to display after a decimal point. For quantity, it is a simple fraction of a unit. For Price normally 2 places down to a cent but SapphireOne will allow more if required. For example, as a commodities Trader, you may wish to use 9 decimal places which will display a price as 00.123456789.
- No Discount Checkbox – When selected will prevent any discounts being used with this inventory item.
- No Print Checkbox – When selected the item will prevent the line detail for the Inventory item from printing. This is used when you are presenting an Invoice for services.
- Random Qty Product – adds additional functionality to delivery run
- Random Weight Product – allows you to make up weights from similar products ie fish or meat.
- Random Pallet Product – Your qty is calculated from your pallet multiplied by pallet quantity.
Accounts Area
The General Ledger Accounts show the default GL account links that are updated when the Inventory transactions are posted. These four accounts include Sales, Cost of Goods, Assets and Variance. You will be required to enter your General Ledger accounts for each of the four.
Project Area
When the Project Breakdown button is selected the screen below is displayed.
If you require an Inventory item to be allocated to a project, or across a number of projects, this distribution may be pre-set in the Inventory item itself. This will then automate the creation of a line in the transaction for each project as set in the Inventory items Project Breakdown function.
To enter a project that is to receive a quantity as a percentage, select the Project Breakdown button, select the project and then a percentage. Remember that for all of the projects that are entered they must add up to 100%. You must then select the button and then also the on the main tool bar to save the changes in the Project Breakdown pop up in the selected Inventory item.
In the example below when a quantity of 10 is entered into a Client Invoice, SapphireOne Inventory Management Software will again display a very similar pop up to the pop up as seen above, allowing the user to accept what is calculated by SapphireOne by selecting the button immediately, or to modify the quantities and then select the button.
It will then split the quantity as specified in the Project Breakdown function in the item itself and create a line in the transaction for each project as entered in the Items project breakdown area as seen above using the percentages to set the quantities.
The user still has the opportunity to change these lines as normal in any transaction.
Message Area
The user can input a message here for a Client, Vendor, and/or Picking. The messages for Clients and Vendors will be visible in your Client and Vendor transactions respectively. The message for Picking will be displayed as an alert in Web Pack when an inventory item is added by a user.
Full Description Area
This allows the creation of a long description for the Inventory item. You may also choose to have this description appear on Invoices and other documentation. The description area is infinite and allows for as much text as required.
Formula Pricing Area
This allows a calculation to be linked with an inventory item. For example, when you purchase an item in a box of 100 but sell the item as 100 individual items. You are provided with the ability to Add, Subtract, Multiply and Divide.
Transaction Line Page
This Page by default initially lists all the transactions for the selected Inventory item for the current period only. Double clicking on a line item will tell SapphireOne Inventory Management Software to display the historical record for the selected transaction line.
- Open In Inquiry – This button will open a standard transaction inquiry screen.
- Quick Report – This will display a dialog box enabling the user to create quick reports that may be saved for future use.
- Invoice Detail – This button will display the original invoice that the highlighted transaction originates from. All lines within the transaction are also displayed.
- Recent History Checkbox – Selecting the Recent History checkbox will load all transactions for the selected Inventory item for the current year.
- Complete History Checkbox – Selecting the Complete History checkbox will load all transactions for the selected Inventory item as a complete history.
Keywords & Notes Page
Keywords & Notes Overview
The Keywords and Notes page is a standard feature found on all inquiry pages in SapphireOne, providing a central location to add and manage keywords and notes for each record.
Keywords Area
The Keywords and Notes page is consistent across all inquiry pages in SapphireOne. Users can add customisable keywords to the list and reuse them. Additionally, keywords can be added that apply specifically to the current record. To remove keywords from the list, users can hold down the Command key on a Mac or the Ctrl key on Windows.
Notes Area
The notes area serves as a diary, allowing users to enter notes and include a date and time stamp by clicking on the green clock button. Users can also customise the font, style, colour, and background colour of the text in the Notes area by highlighting it and right-clicking.
Build Lines Page
The Build Lines Page is used to create a Bill of Materials (BOM) for Inventory.
Bill of Materials (BOM) Overview
When building any new Bill of Materials item from your Inventory, you must use a Base Inventory Inquiry to create the Inventory item that you want to build. The inventory items that are listed on the screen will make up the Bill of Materials.
A Bill of Materials Inventory can be made up of the various SapphireOne Inventory types – being normal, non-diminishing, serial, batch, item or activity, etc. For example, a Bill of Materials for a bicycle would consist of the real Inventory items used for its assembly (such as the frame, wheels, pedals) and labour. The bicycle itself would be the complete Bill of Materials.
Once you have the required Inventory entered using the ![]() button, you may then green tick to complete the Bill of Materials. This enables the Inventory to be compiled and shows the Inventory which forms the completed Bill of Materials.
button, you may then green tick to complete the Bill of Materials. This enables the Inventory to be compiled and shows the Inventory which forms the completed Bill of Materials.
Costing is obtained from each of the lines in the build and not from the Bill of Materials itself. While Inventory Items are selected for this Bill of Materials here, there is normally no change in Inventory stock levels until the Bill of Materials is completed and posted. There is an exception to this rule, which is when the user elects to select the Manufacture Only button, as described in more detail below.
Build Lines Area
The Build Lines area is used to select the Inventory components that make up the Bill of Materials.
- Makeup Quantity – Refers to the number of items produced at a minimum by the build.
- Manufacture Lead Time – Refers to the time it will take to produce the complete makeup quantity.
- Cost Per Unit (Average Cost) – Refers to the average cost of each unit i.e. the makeup quantity.
- Cost Per Unit (Last Cost) – Refers to the cost of each unit when it was last built.
- Price Per Unit (Standard Price) – Refers to the price of each unit.
- Manufacture From Invoices – Permits the user to build the inventory at the time of creating the Sales Invoice. Please see below for further information.
- Manufacture Only – Selecting this button will limit the user to only build inventory through the Build Journal function in Inventory > Inventory > Build Journal. Please see below for further information.
- Manufacture from Invoices (KIT) – Permits the user to build and modify the build at the time of creating the Sales Invoice. Please see below for further information.
- Copy Line Items to Invoice – Will copy build lines as individual inventory items onto the finished Client Invoice. Please see below for further information.
Manufacture From Invoices
SapphireOne Inventory Management Software will require zero Inventory to manufacture from invoices. Inventory quantities for your Build Lines will only be adjusted when the invoice is saved as SapphireOne will create a posted BGJ at this point.
Manufacture from Invoices permits you to build the inventory at the time of creating the Sales Invoice. The Bill of Materials that go to make up the build are selected automatically by SapphireOne based on the inventory items as entered into the Build Lines Page. SapphireOne will also check that there are sufficient quantities of all inventory items required. On saving the Client Invoice transaction, a BGJ transaction will be created which will automatically be posted by SapphireOne.
Should you modify the Client Invoice, increasing or decreasing the quantity sold, SapphireOne will automatically reverse the BGJ and re-do the BGJ reflecting the correct cost component. If you modify the build at the time of invoicing a ‘/k’ will be appended at the end of the Inventory ID e.g. KITPACK/K.
When selecting Manufacture from Invoices, you will be presented with the following additional options:
- Use Component – Selecting this option will list the components used to make up the build on the Invoice and Bill of Materials BOM.
- Enter Serial on Sale – Any serial numbers associated with the components can be entered at the time of sale.
- Use Master Price Formula – You can use formula pricing to set the price of the inventory item or build in the invoice.
- None of the Above – You can deselect Use Component, Enter Serial on Sale or Use Master Price Formula if these are not desired/required.
Manufacture Only
SapphireOne Inventory Management, must have stock created by using the Build Entry function. At this time a BGJ will be created and inventory stock levels will be adjusted as well. The user needs to enter a quantity for the Bill of Materials BOM as for a normal inventory item. The user will only see the Master Inventory ID and not any of the Inventory lines that go to make up the master. Since the user will only see the Bill of Materials BOM ID no alterations are possible.
When selecting Manufacture Only, you will be presented with the following additional options:
- Use Component – Selecting this option will list the components used to make up the build on the Invoice and Bill of Materials BOM.
- Enter Serial on Build – Any serial numbers associated with the components can be entered at the time of build.
- Use Master Price Formula – You can use formula pricing to set the price of the inventory item or build in the invoice.
- None of the Above – You can deselect Use Component, Enter Serial on Build or Use Master Price Formula if these are not desired/required.
Copy Line Items to Invoice
Copy Lines to Invoice will copy build lines as individual inventory items onto the finished Client Invoice. When selecting Copy Line Items to Invoice, you will be presented with the following additional options:
- Price Set from Master – The price of the Master item is pulled directly from the Inventory item.
- Print Lines – All the component lines copied will be marked to print as part of the invoice. By default, the lines will not be printed unless this option is selected.
- Show Price on Lines – The price of components are shown on the invoice.
- Don’t Show Master – Only the component lines are shown on the invoice.
- Use Master Price Formula – You can use formula pricing to set the price of the inventory item or build in the invoice.
- None of the Above – You can deselect Use Component, Enter Serial on Build or Use Master Price Formula if these are not desired/required.
With the exception of Manufacture from Invoices, any attempt to sell a Bill of Materials that has zero stock is not permitted. If this advice is not adhered to SapphireOne will display available stock in the negative.
Adding a Line Item
When you select the ![]() button to add a new line item the below dialog box is presented. You have to fill in the Inventory ID and the quantity to be added to this build.
button to add a new line item the below dialog box is presented. You have to fill in the Inventory ID and the quantity to be added to this build.
To delete a line item, highlight the line and select the Delete ![]() button.
button.
Modifying a Line Item
Double clicking on a line item will present the above dialog with fields for the Inventory ID, Quantity, the 2nd Unit, Weight and Notes to be adjusted.
Any modifications to the Inventory Bill of Materials will be reflected in all locations.
- If an Inventory item is waiting to be built and the item is allocated to a sale, SapphireOne will ask if the Inventory is to be built now or later.
- If Non-Diminishing items are used, the cost that has been filled in will be used when the item is being built. This will take the items from the Cost of Sales account and move them into the specified Assets account.
- The Fixed button becomes available by modifying an item within a Bill of Materials. Selecting the the Fixed button allows you to set a fixed quantity to be used regardless of how many units are to be sold. If it’s not fixed the quantity will automatically split over.
- When transferring Bill of Materials between locations, the individual Bill of Materials inventory quantities will be adjusted in both locations as normal. However, the Inventory quantities for the individual components that go to make up the Bill of Materials will also be transferred. They will be reduced in the from location and increased in the to location.
- Any sales of these individual components in the to location will then be allowed and tracked. However the Inventory quantities of the Bill of Materials will be adjusted downwards accordingly.
When selling a Bill of Materials, if a Bill of Materials has any negative inventory SapphireOne will flag an error on the relevant Build Journal within the transaction.
MRP Page
Material Requirements Planning (MRP) is a forecasting tool used for production planning, and scheduling of Inventory for procurement teams to analyse historical purchasing. SapphireOne Material Requirements Planning tool generates time-based data ranges up to 4 years historically and 30 periods projected into the future.
The main purpose of MRP software is to have the right materials at the right place and time.
In any inventory management software, regardless of the level of sophisticated technology used, the Saw Tooth pattern is followed. In this pattern, there is a certain amount of inventory that you start with, then you consume it, Inventory levels drop, you reorder the Inventory, you receive this Inventory and the cycle starts again.
In MRP there are four distinct steps:
- Demand / Consumption – You have an amount of Inventory that you are consuming or you are expecting to consume.
- Re-Order Point – Once your Inventory drops down to a certain level then you will need to re-order (this threshold can also be set in your details page).
- Demand During Lead Time – After re-ordering you continue to use Inventory while the re-order is on its way.
- Replenishment – New Inventory arrives before your inventory has run out of stock completely.
Material Requirements Planning software balances supply and demand. It monitors what you have now and what you have used in the past from historical records. It then informs you when it is time to re-order using lead times as entered into the stock items master record.
Material Requirements Planning takes into account 3 key points:
- What you need – The total amount of material required to be on hand to support the gross demands of the business.
- What you have – The supply you actually have in your stockrooms, retail shelves, warehouse, other locations, and what is already on order but has not yet been received.
- What you require to reorder and when – The net planned quantities and dates required to support the demands of your business, based on the Supply you already have, and have on order.
Reorder Location – This data entry field is directly linked to the re-order tool that is used from SapphireOne Inventory Inquiry. It has a light blue background so wild card / question mark searching is provided so that inventory location may be searched for. When you open the Reorder page from Inventory Inquiry it will show all inventory location items for re-order using the locations that have been set-up as default in the MRP page displayed above.
Example of SapphireOne Material Requirements Planning (MRP)
SapphireOne Material Requirements Planning MRP function forecasts can be calculated or entered manually. These forecasts can be dependent and controlled by sales orders and purchase orders. In SapphireOne Inventory Management software there is also provision for it to be independent as the user may adjust estimations manually if required.
So, let’s consider as an example – SapphireOne Material Requirements Planning MRP Forecasts for May, June, July.
May
Based on the previous 2 years sales (Usage History Graph), SapphireOne has calculated that the Stock requirements in May will be 1251 items. SapphireOne also has the capability to calculate this requirement based on up to 4 years of historical sales.
Since there are already 1699 items on hand (from April) plus an additional 500 inventory items will be required for orders in May. That’s why at the end of May SapphireOne has indicated that approximately 948 inventory items will remain on hand.
June
The forecast for June is for inventory stock levels to be 745. As there should currently 948 items on hand from the previous month, SapphireOne has estimated stock on hand in June to be 203 items.
July
Projected stock requirements for July is estimated to be 1050 items. It has now calculated that the previous month’s stock on hand of 203 items, is unable to fulfil stock requirements. Since SapphireOne knows there is 21 days lead time, the artificial intelligence (AI) that is part of the SapphireOne Material Requirements Planning MRP system will indicate 21 days before that month that an additional 847 items is required to be ordered.
SapphireOne is normally set up in a way that your inventory should never run out of stock and there will always be the minimum inventory items as entered on hand. Thus, to fulfil July requirements which is 1050 stock, the calculation is as follows:
Stock on hand after estimated orders filled: 203 items (from month June). Actual stock required for July: 1050 items. So, net required will be: 1050 less 203 = 847. But say for example the minimum stock on hand set for every month is 100 items. Hence, SapphireOne will calculate the Planned Order Release / Planned order arrival is: 847+100 = 947.
Price Book Page
Price Book allows you to set up a variety of conditions of which various prices are used. This screen allows you to view any Price Book entries that are linked to this Inventory item in all locations.
Any Price book entries that SapphireOne displays here will affect either the Price or Last Cost depending on the way the Price book entry has been set up. To Create New, Modify or View Price Book entries, please go to: Inventory > Inventory > Price Book Inquiry.
The Price Book checkbox must be selected otherwise Price Book will not activate in Data Entry Screens.
Price Book must also be established or turned on in two other locations. In SapphireOne, Price Book & Price Book2 defaults must also be turned on in Master Defaults. To do this please go to: Utilities > Controls > Master Default > Inventory.
Specific Pricebook entries are turned on or off in a Pricebook Inquiry by selection of the check box. To do this, please go to: Inventory > Inventory > Price Book Inquiry.
Addition / Deduction Page
Additions and Deductions allow you to schedule additional lines to Inventory transactions based on the Inventory items already added. For example you may add a levy deduction, and then based off the products contained in the levy deduction SapphireOne will automatically add a line to your transaction for a levy.
MSDS Page
Materials Safety Data Sheet (MSDS) is a document that lists information relating to occupational safety and health for the use of various substances and products. This allows you to record the information relating to a particular inventory.
The user should take note of two things. The Materials Safety Data Sheet page is only displayed in a Base Inventory Inquiry. It is not displayed on an Inventory Locations Inquiry. The name of the Page is MSDS, however all of the data field headings may be altered by the user so this page can be used for the storing of almost any type of data. The basic layout and functionality of this MSDS page is the same as the Custom Page in this drop-down menu in a Base Inventory inquiry. There is however one major exception as described below.
The user should note that this MSDS Page has Transaction lines, however these may be best described as subpages. When the initial MSDS page is selected, SapphireOne will display a list of transaction lines or subpages as seen below. Once a subpage has been selected each subpage is exactly the same as the Custom Page further up the Base Inventory Inquiries drop-down menu.
The user may add an additional transaction Line or subpage of MSDS data by selecting the ![]() Button. They may remove a subpage by selecting the
Button. They may remove a subpage by selecting the ![]() button. Double clicking on a line will allow the user to modify the selected page of MSDS data. An additional button provides additional functionality to print out details from this MSDS page by allowing easy access to the Quick Report function. This will allow the production of customised reports to be produced as required for any MSDS data.
button. Double clicking on a line will allow the user to modify the selected page of MSDS data. An additional button provides additional functionality to print out details from this MSDS page by allowing easy access to the Quick Report function. This will allow the production of customised reports to be produced as required for any MSDS data.
All of the Data Field Headings may be altered by going to: Utilities > Controls > Change Names .The user will find these Data Field Headings as the very last items in the list of Data Field Heading. Please refer to Custom Page described above for more information.
MSDS Area
- SapphireOne will enter in a system generated unique Sequence number and the Inventory ID.
- For each subpage, the user must enter in a Name or Title.
- If there are multiple pages for this MSDS entry the Order in which they are displayed in the list may be entered here.
- If a tag for each subpage is required, the tag name may be entered. Remember this tag list is user customisable.
Alpha Data Field Area
There are 30 Data entry fields in this area in which the headings may be renamed. They will display on screen over 30 characters, however SapphireOne will accept more than 30. Please refer to Custom Page above for further information on how to change data entry field names.
Real Area
This area has an additional 10 data entry fields which will display onscreen over 10 characters. Please refer to Custom Page above for further information on how to change data entry field names.
Date Area
This area is limited to the data entry of dates in the format as seen above. As the MSDSDate fields are underlined, the pick calendar is available for the convenient entry of a date in these data entry fields. Please refer to Custom Page above for further information on how to change data entry field names.
Reseller Page
The purpose of the Reseller Page is to establish a list of all clients who have stocked this inventory item previously.
The Reseller Page in SapphireOne Inventory Management will be populated with data if the client is marked as a reseller via a checkbox. This is done in the details page of a Client Inquiry. The reseller page is populated with all Clients that have been marked as a reseller. If a client has multiple addresses the list will display all of these on a line by line basis. Each line will include the City, State and Postcode for each reseller that is listed. The Last column shows the last date that they purchased this stock item.
The Open In Inquiry button will open the selected line in a client inquiry.
This Reseller Page is only available here from a Base Inventory Inquiry. It is not displayed when an Inventory Location Inquiry is used.
Hire Page
The Hire Page is used to manage Inventory items classified with the type Hire. The List displayed under Hire enables you to keep track of any Inventory currently being hired.
Each line displays sufficient details to identify the item and details of its current hire.
Transaction History Area
This area displays all hire transactions for the selected inventory item.
The hiring of all inventory items is processed from the Hire function in the POS drop-down menu in Inventory mode.
How to add hire items to Inventory
- Purchase the Hire item as a normal inventory item. You will have a purchase price and a selling price set up as you will probably be selling these items as well.
- For each item to be hired, create a second inventory item with its type set as hire.
- Next do a transfer journal (Inventory > Inventory > Transfer Journal) from the normal inventory item to its counterpart set as hire.
- The price in the hire item now becomes its hire price. Alter the hire pricing in the hire item to reflect its hiring price.
Table Matrix Page
This Page shows you the matrix associated with a particular Inventory item, also sometimes referred to as Size Colour Style. This is used when there are variations of that inventory item (like the size or colour of a shoe).
When a new matrix item is created, it will not have the activate table checkbox selected. The user will not be able to do any data entry unless that check box is ticked. Once checked, SapphireOne will display the buttons enabling the user to create or modify an existing table.
Unless the Inventory Type on the first page is set as Non-diminishing SapphireOne will not display the checkbox. If you have your new inventory item set as normal, you may still return immediately to the Details Page, change it to non-diminishing, save the item and then proceed to create the table on the Table Matrix Page.
Using Table Setup will open the Table Setup screen as shown below.
Table Setup
Selecting the Table Setup button will open the Table Setup screen. This screen comprises of four example tables. The tables to the left show the Rows and Columns which can be selected to display in your table matrix shown on the right two tables. Lines can be selected and moved from the left and right tables using the ‘>’ and ‘<‘ buttons. Alternatively, buttons ‘>>’ and ‘<<‘ will move everything to its respective table. The tag button allows you to insert a tag to associate with that row/column. The Load Grouping button allows you to share similar table matrices across inventory items. Clicking Ok will open the Inventory Table Creation.
Inventory Table Creation
The dialog above allows you to view the table you have created. The Process button will build the matrix creating the inventory items as defined. The user may now enter in a quantity at each point where the names intersect and tab forward to the next one. Once all is complete select the Process button again and SapphireOne will create a transaction with all lines that do not have a value of zero.
Automatic Naming Convention
After selecting Process button, Items generated through the Matrix feature in SapphireOne will adhere to a predefined naming structure, which is composed as follows: Table_ID–Row–Column. These items will be seamlessly associated with the corresponding table.
Should there be existing inventory items that share the same Table_ID in their identification, SapphireOne will automatically incorporate them into the table.
Example Matrix
SapphireOne displays the ID’s and the Names in the matrix as seen above. Stock levels are listed where the row and column of the matrix intersect. For the matrix above the Colours in the rows are the same for both the ID and the Name. The sizes for the columns however have a different ID and Name.
This is to demonstrate what happens when the ID and Name are the same for the Colours and Different for the Sizes. The user has the opportunity to have the ID different to the name, however for the sake of simplicity ID’s and Names being the same is the best way to proceed.
These Table Items must be set up in a base Inventory Inquiry. While the Inventory Master Table item must be set by the user as a Non-diminishing inventory type. When SapphireOne creates the actual Table Items it will automatically set the inventory Type as Normal.
Serial / Batch Page
The Serial/Batch Page in allows you to keep track of the serial numbers associated with a serial numbered item or batch numbers associated with a batch numbered item. These are set by setting the type of Inventory item on the details page.
The lines listed are across all locations in Inventory. These Inventory Items all have a Type of either Batch or Serial. By default, when this Page is accessed it only lists items with a status of Available. When the All button is selected, SapphireOne displays all Serial-Batch numbers in the list.
The status of a Serial/Batch item can be listed as Available, Completed and Removed. The numbers across the footer of the screen give totals which can be used as a control for checking Serial items.
Inventory Locations Page
This screen is a simplified display of Inventory items split according to their location.
From here you can see an overall picture of what inventory items you have, where they are located and their current status. The viewing of location data is restricted to the company that the user is logged into.
The Average Cost of each Inventory item for each location is displayed and may be the same or different for each location. The Standard Price is displayed for each Inventory item and this may also be the same or different for each location. If there are 10 locations and there is an ID for all 10 locations the list here will have 10 lines.
When you create a new Inventory Item it will appear in the Default Location selected in Master defaults: Utilities > Controls > Master Defaults > Inventory. It will NOT appear in any other location listings until you do a stock Transfer Entry, or create a Purchase Order for that particular location.
Clients Page
Clients Area
The Clients area in Inventory contains the default client and all orders processed against the inventory item, with options to record the preferred supplier, lead-time, Client Product ID, and Client Description.
You may store an unlimited number of Clients for an Inventory Item. The two buttons allow you to “Add” ![]() and “Delete”
and “Delete” ![]() a client.
a client.
To add a new client for the inventory item, click the “Add” ![]() button, and a dialog box will appear where you can enter the new client’s details, including the client’s lead time, product ID, name, and current price.
button, and a dialog box will appear where you can enter the new client’s details, including the client’s lead time, product ID, name, and current price.
Vendors Page
Vendors Area
The Vendors area in Inventory contains the default vendor and all orders processed against the inventory item, with options to record the preferred supplier, lead-time, Vendor Product ID, and Vendor Description.
You may store an unlimited number of Vendors for an Inventory Item. The two buttons allow you to “Add” ![]() and “Delete”
and “Delete” ![]() a Vendor.
a Vendor.
To add a new vendor for the inventory item, click the “Add” ![]() button, and a dialog box will appear where you can enter the new vendor’s details, including the vendor’s lead time, product ID, name, and current price.
button, and a dialog box will appear where you can enter the new vendor’s details, including the vendor’s lead time, product ID, name, and current price.
Action Page
Action Page Overview
The Action Page is a versatile tool that can be added to major records and transaction tables. It includes various actionable items such as Calendar Reminders, Meeting Invites, Alarms, Emails, To-Do Lists, General Notes, Private Notes, Meeting Notes with Date and Time, Start and Finish stamps, as well as All Day Notifications. This provides users with a centralised location to manage and organise their tasks, meetings, and notes, improving efficiency and productivity.
The Action Page allows users to use the add ![]() or delete
or delete ![]() buttons to add or delete actions as required. Simply select the relevant button to add or delete an action.
buttons to add or delete actions as required. Simply select the relevant button to add or delete an action.
Diary Area
The Diary Area in SapphireOne provides users with a comprehensive range of options to customise their actions. It includes a sequence number, title, type, action, user, privacy settings, status, tag, and link fields.
- Sequence – SapphireOne automatically generates a unique sequence number for each action.
- Title – Enter a title for the action.
- Type – Choose from the customisable drop-down menu to input a type. This will subsequently become a permanent type within the drop-down.
- Action – Utilise the user-customisable drop-down menu to input an Action. This will then become a permanent action within the drop-down.
- User – SapphireOne automatically inputs the user creating this action, though it can be modified if necessary.
- Private – If this checkbox is selected, SapphireOne will only permit the specified user to view or modify this action.
- Status – The user has three options: Open, Hold, and Completed.
- Open – Action is open and active.
- Hold – Action is active, but no alarms will be active.
- Completed – Action is now Inactive and won’t be displayed in any list of actions.
- Tag – Users may attach a tag to an action, which will create a permanent tag within the drop-down. To add a new tag, type the name of the new tag into the tag box and press the tab key. Select “Yes” from the pop-up window to confirm. To remove a tag from the list, click on the tag name while holding down the Command (MacOS) or Control (Windows) key. Select “Yes” from the pop-up window to confirm the deletion.
- Link – When created within a transaction or record, SapphireOne automatically generates a link to the transaction or record. When created from the Options Menu, Palette, or Workbook, users must select an item or function from the drop-down menu to link the action. There are 12 items on this list, ranging from Clients to Manager.
Check List Area
SapphireOne offers a user-friendly checklist tool to create and track actions, allowing users to check off completed items as they progress.
Dates and Times Area
- Start/Finish – Set a Start and Finish time for the action, or select the checkbox for an all-day option.
- Completed – Entering a completion date for an action deactivates it, and it will no longer appear in action lists.
Alarm Area
Never forget a task again – set up alarms to send reminders via email at specific dates and times. Users can also receive email notifications with the provided email address.
Recurring Area
If necessary, the alarm can be set to recur at intervals selected from the Type drop-down menu. Additionally, the recurring period can be defined by date.
Notes Area
Click the green clock button to add time and date stamps to your notes. You can also customise the font, style, color, and background color of the text in the Notes area by highlighting it and right-clicking.
Invite Attendees Area
In the event module, you can invite multiple attendees to your event and track their acceptance or rejection of the invitation. You can also send them an email notification if their email addresses are provided. Additionally, you can manage and track attendees’ RSVP status in real-time.
Documents Page
Documents Page Overview
The Documents Page centralises document and information storage for transactions and master tables, streamlining organisation and management for easy access and improved efficiency.
Documents Area
The Documents Page simplifies file management by allowing various document types to be attached via drag and drop, including PDFs, spreadsheets, photos, and more. It provides a centralised location for document and information storage for transactions and master tables, streamlining organisation and management for easy access and improved efficiency.
Documents can only be attached once the corresponding record has an assigned ID.
Documents List Screen Options
There are eight buttons on the Document List screen, as follows:
- Open – Allows viewing of the currently selected document.
- Update – Prompts the user to import a new version of the selected document while maintaining links to any associated transactions.
- Scan – Accesses a scanner for scanning documents directly into the data file and linking them to the current transaction (requires a compatible scanner with software).
- Save – Saves the currently selected document.
- Link Document: Enables linking of the selected document to other transactions in the data file, presenting a popup for user selection.
- Link Document – Allows linking of an existing document in the data file to the current transaction or record, displaying a popup with a list of documents to choose from.
- Link Existing Document – Allows linking of an existing document in the data file to the current transaction or record, displaying a popup with a list of documents to choose from.
- Delete – Deletes the currently selected transaction or record.
- Add – Displays a search function for selecting a document from the local computer or device.
Details Area
The Details area allows users to add a custom name, description, and tags to each document, enabling easy search and location of specific documents. These details can be customised to meet the specific needs of the user or organisation, further improving the efficiency and organisation of the Documents Page.
Last Modified Area
The Last Modified section displays the date and time when the document was last modified, as well as the user who made the changes. This feature helps maintain accountability and enables efficient tracking of document modifications.
History Area
The History area records changes made to the document, including the date, time, and user who made the changes. This provides a valuable tool for tracking and managing document revisions.
Links Area
The Links area allows users to record links to other places where the document has been attached. Links can be added or removed using the (+) and (-) buttons, providing an efficient way to manage and organise related documents.
Notes Area
The Notes area allows users to add any relevant notes related to the document. Clicking the green clock button will add a date/time stamp, further improving document tracking and management.
Notes Area
Any relevant notes which relate to the document may be recorded here. Clicking the green clock button will add a date/time stamp.
Digital Assets Page
The Digital Assets Page enables users to attach an unlimited number of media files to almost any record in SapphireOne. Only the digital assets that have been entered by users for the selected record will be listed from the page menu in the selected record.
It should be noted that there is a Digital Asset item in Workbook mode on the General drop-down menu as well. This Digital Asset item lists all digital assets within the data file as a complete list. While very limited modifications are allowed from this list, it is very handy for getting an overall view of the digital assets in the data file. SapphireOne has provided the search function, enabling the user to search for a specific digital asset.
The key to successful image optimisation for performance is finding the perfect balance between the lowest file size and acceptable image quality. There are three things that play a huge role in image optimisation:
Image File Format
For most website owners, the three image file formats that matter the most are JPEG, PNG, and GIF. Choosing the right file type is crucial in image optimisation. To simplify things, JPEGs are ideal for photos or images with lots of colors, PNGs are recommended for simple images or transparent images, and GIFs are suitable for animated images only. PNG images are uncompressed, making them higher-quality, but also much larger in file size. JPEGs are a compressed file format that slightly reduces image quality to provide a significantly smaller file size. GIFs only use 256 colors along with lossless compression, making them the best choice for animated images.
Compression
Image compression plays a significant role in image optimisation. Various types and levels of image compression are available, and the settings for each will depend on the image compression tool you use. Most image editing tools such as Adobe Photoshop, ON1 Photo, GIMP, Affinity Photo, among others, have built-in image compression features. You can also save images normally and use web tools such as TinyPNG or JPEGmini to compress images before uploading them to SapphireOne. Although they require some manual effort, these two methods allow you to compress images efficiently.
Image Dimensions
When you import a photo from your phone or a digital camera, it usually has a high resolution and large file dimensions (height and width). These photos typically have a resolution of 300 DPI and dimensions starting from 2000 pixels or more. Although high-quality photos are perfect for print or desktop publishing, their dimensions can still be optimised. Reducing the image dimensions can significantly decrease image file size. You can resize images easily using image editing software on your computer.
To illustrate the impact of image optimization, let’s consider an example. We optimized a photo with a resolution of 300 DPI and image dimensions of 4900 x 3200 pixels. The original file size was 1.8 MB. We selected the JPEG format for higher compression and adjusted the dimensions to 1200 x 795 pixels. The resulting file size was reduced to just 103 KB. That’s a remarkable 94% reduction in file size from the original.
Choosing the Digital Assets option from the Page menu in a record displays a list of digital assets currently stored in the data file for the selected record.
This screen, as well as any subsequent screens, will overlay the existing screen displayed in your major table. This feature facilitates the attachment of digital assets to your Master Record, providing an efficient way to manage and organise media files associated with your data.
- To add a picture, simply click the Add button.
- To delete a picture, select the Delete button.
Considerations for Adding Digital Assets
Adding digital assets can impact your data file size and system performance. It is important to consider the following:
- Storage capacity: Assess your storage capacity to ensure it can accommodate an increase in file size.
- System performance: Adding a large number of media files can potentially slow down your system. Evaluate the impact on system performance before attaching a significant number of digital assets.
You can review our Blog and YouTube channel for additional information and resources on SapphireOne ERP, CRM and Business Accounting software.