Inventory Class Overview
The SapphireOne Inventory Class Inquiry screen allows for the grouping of inventory items into Classes for the purpose of creating inventory reports and queries by Class.
The screen below is displayed when you select Look ![]() or Modify
or Modify ![]() a line selected from the Inventory Class Inquiry.
a line selected from the Inventory Class Inquiry.
Inventory Classes are NOT company specific. When a new Inventory Item is created and the General Ledger accounts have been entered in the linked Inventory Class, SapphireOne will offer to clone the General Ledger accounts as entered. If multiple companies are running in the data file it is NOT recommended that the General Ledger accounts be entered here in the Inventory Class as the General Ledger accounts may be from the other companies.
Inventory Class Area
- ID – Enter an ID for your Class (Please note this will be displayed in all Companies in your data file).
- Name – Enter in a Name for this Inventory Class.
- Company ID – SapphireOne will assume the Company that the user is currently logged into.
- Project Settings – This Project setting in an Inventory Class is set here when running Project Costings.
- Inventory Settings – The selection made in this Inventory Settings drop down menu is crucial when the Importer/Tariff function is used.
- Tariff – If a tariff is to be applied enter it here. Tariffs have to be setup first so that an existing tariff may be linked to here.
- Duty – This is the Duty percentage as set up in the Tariff.
- Margin Type – Select the Margin type.
Dictation and Speech to Text Overview
SapphireOne’s implementation of both Dictation (MacOS) and Speech to Text (Windows) is a game changer for data entry. Any data entry field you can type into using a keyboard can use this feature.
You can also use this functionality on all inquiry screens within SapphireOne. For example, the user is in a Contact within a Client. They may have made a phone call to that particular client using the Softphone technology. Consequently, this will automatically date and time stamp both the contact and the phone number you called.
As soon as the call is completed, the user has the ability to use Speech to Text (Windows) or Dictation (MacOS). They can dictate into the memo field of the CRM contact, adding as much description as they require.
Dictation and Speech to Text Procedure
This functionality applies across every single Data Entry screen. For example, the SapphireOne user is entering a Vendor Invoice (VI). Additionally, you may want to add a memo within the Vendor Invoice (VI). The user can utilise the tool and simply dictate the memo.
Another example is if the user wants to add additional lines to the General Ledger account, within each General Ledger account. When the user is completing data entry using a General Ledger, there’s always a unique memo field for each GL account line.
The user can then utilise this feature to quickly add the information they need to add. Alternatively, you may have an interview with an employee. After the interview process is completed, the user can then make notes about the employee.
Speech to Text or Dictation is an extremely powerful tool. It is something that we at SapphireOne, as well as our clients, utilise daily. It is a massive time saver.
Grouping Area (Tags)
There are six available tags in an Inventory Class screen. All tag headings can be customised by the user.
When data has been entered into the Tags of an Inventory Class, only the data within the Tags in this Class will flow through for selection from the Tags in an Inventory Item that has been linked to this class. If a user needs to create new data for a Tag from within the Inventory Item, the new data will update the relevant Class Tags that the inventory item has been linked to.
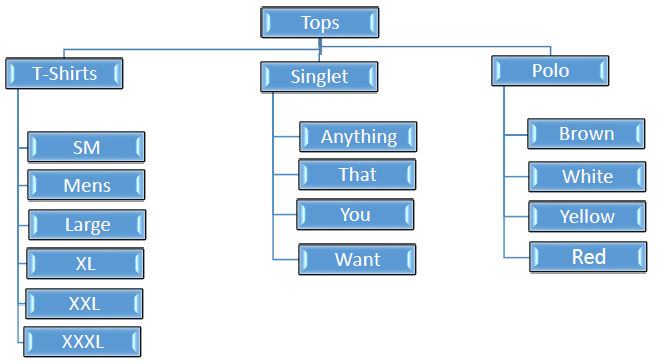
Each tag as created at the first level has a second level creatable sub list. Similarly, each tag at the second level has a third level sub list. For example, in the chart below we have a single first tag as Tops. But the user may create as many tags at any level as they want. Once Tops is selected we will see the second tag grouping the user has set up of T-Shirts, Singlet and Polo to select from.If we select T- Shirts we see the third tag grouping set up by the user of SM through to XXXL.
Please note that selecting the Tag Grouping check box is crucial to the correct operation of tags within the SapphireOne Inventory Class.
Linking to Base Inventory Inquiry
The user will note that there are three tags that are exactly the same as in an Inventory Inquiry. When data is entered into these Inventory tags it is normally displayed for all inventory items irrespective of Class. It is the same three tags for the entire Inventory.
When the check box is selected here in an Inventory Class inquiry, the Tags in an Inventory Inquiry are directly linked for this class only (On a Class by Class Basis).
Once the tag field has been selected, the user may enter Tag list data into either the Inventory item itself or into the Inventory Class. The tag lists from both functions will operate in parallel, so the user will only need to enter any Tag data into one of the fields.
Accounts Area
The General Ledger Accounts show the default GL account links that are updated when the Inventory transactions are posted. These four accounts include Sales, Cost of Goods, Assets and Variance. You will be required to enter your General Ledger accounts for each of the four.
If any General Ledger accounts are entered here, they will be only used as the third option by SapphireOne when it looks for General Ledger accounts when an Inventory item is processed. It must be understood that it is not a requirement that a Location is linked to a Department. However, a Department must be linked to Company. All Inventory Items must have a location selected and by default SapphireOne will force this. The following three conditions are used by SapphireOne when looking for G/L accounts.
- Provided that the Inventory item is linked to a location, and that Location is linked to a Department, then SapphireOne will use the control accounts for the Department. Using this option will mean that all G/L accounts for inventory use the Company’s departmental based G/L accounts so that they will all be the same.
- If the first option is not present, the next option is to use the G/L accounts as in the Control page of the Inventory item itself. Using option two will mean that the G/L accounts used by SapphireOne will have to be on an Inventory item by Inventory item.
- The third option is to use the G/L accounts as entered here in the Class. Using option three will mean that the G/L accounts entered will be setup on an Inventory Class basis.
Custom Header Area
The Custom Header area contains a series of fields that can be customised to the users particular requirements. Please read below for further information on how to customise Custom pages within SapphireOne.
Custom Page Overview
SapphireOne’s Custom page features text fields designed for versatile, user-defined purposes. Each field is assigned a variable by SapphireOne, which is displayed as the default field heading label. Users can take note of the desired field or heading variable for customisation and modify it by navigating to Utilities > Controls > Change Names. Detailed instructions on this process will be provided below.
The Custom page is organised into the following sections:
- Alpha – Allows letters and numbers, but cannot be used for arithmetic functions
- Real – Allows numbers only, and can be used for arithmetic functions
- Date / Time – Date fields store date values and can be used for date functions, while Time fields store time values and can be used for time functions
- No Heading Defined – Features eight alphanumeric fields that cannot be used for arithmetic functions
- Text – Accepts letters, numbers, and special characters, but cannot be used for arithmetic functions
The data entry fields in these Custom Pages can also be employed in Sapphire Custom Reports, Quick Reports, Custom Inquiries, 4D View Pro, and 4D Write Pro Reports, just like any other data entry fields within SapphireOne.
The example Custom Page below is from an Asset Inquiry; however, the process for customising this page remains the same, irrespective of the function in which the Custom Page is located.
Default Variable Values
In the default variable values defined by SapphireOne, the first number signifies the position of the field within the group, while the second number denotes the maximum number of characters for the data entry field.
For instance, ASAlpha_1_20 indicates that it is the first data entry field in the group and can hold up to 20 characters. Similarly, ASAlpha_8_80 shows that it is the eighth data entry field in the group, with a capacity for a maximum of 80 characters.
To modify the headings on a Custom Page:
- Write down the exact names of the headings you wish to modify.
- Navigate to Utilities > Controls > Change Names. Keep in mind that when performing this procedure, you will be warned that only one user should be logged into the data file.
- Upon accessing the Change Names function, a dialogue box will appear. Then, refer to your list of names and scroll down the list to find the headings you want to modify.
- For each heading:
- Highlight the name.
- Enter your new name in the lower data entry field.
- Click the Update button to save the changes in SapphireOne.
You can review our Blog and YouTube channel for additional information and resources on SapphireOne ERP, CRM and Business Accounting software.