SapphireOne Server Update Overview
Please note that the version numbers provided in this reference article may become outdated over time as new versions are released by both 4D and SapphireOne. However, the version numbers mentioned in this article are still relevant and should be applied to the current version available at the time of reading. The update procedure still remains the same.
The SapphireOne Server Update Reference Guide is a comprehensive resource created for SapphireOne users. It offers a step-by-step guide for upgrading either the 4D application or SapphireOne’s Server Database. The guide covers both 4D and SapphireOne version numbers, with the information extracted from version 18.4.0.1 and onwards. It serves as a valuable reference for users undergoing server updates, ensuring a smooth and successful upgrade process.
- 4D Version numbers – These the the first two numbers. 18.4
- SapphireOne Version Numbers – The last two numbers. 0.1
In this article, we will provide separate reference guides for the two upgrade options available: 4D and SapphireOne. Each guide will outline the necessary steps to follow when performing the respective upgrades.
When referring to version numbers, you will notice that they are composed of four groups of numbers separated by three dots. For example, 19.4.0.1 represents a version number.
- 4D Full Version – When the 4D version changes from 17 > 18 >19 > 20 > 21.
- 4D Incremental – When when the 4D version changes from 18.1 > 18.2 > 18.3 > 18.4 >.
- SapphireOne – When the build number changes from 18.4.0.1 > 18.4.0.2 > 18.4.0.3 >
To perform 4D upgrades, the user needs to download a data package of approximately 450 to 500Mb from the SapphireOne File Station. Once downloaded, they should extract the contents of the zip file and copy the entire folder, along with its contents, into the SapphireOne directory. This directory should be located under the yellow SapphireOne folder in the tree structure, where the Blue folder is displayed..

Downloading Files SapphireOne File Station.
Please note that we have closed our ftp server and replaced it with a SapphireOne File Station.
To download files from SapphireOne, you can now utilize a web browser. Detailed documentation on this procedure can be found on the SapphireOne website. Visit the article specifically dedicated to the new SapphireOne File Station for comprehensive instructions and information on how to utilise this feature effectively.
Each client is provided with their own dedicated Client folder, ensuring exclusive access for them to upload or download backup copies of their data files. Additionally, there is a shared common area where files can be downloaded by all users, but uploading is not permitted. The files referenced in this article are stored in the SapphireOne File Station within this common area. This setup allows for efficient and secure management of client-specific data files and facilitates easy access to shared resources.
To ensure convenience, the 4D Server Application, 4D Client application, and SapphireOne builds are stored in separate folders. You can select and download the necessary files from these folders before proceeding with the upgrade procedure detailed in this article. By acquiring the required files beforehand, you can streamline the upgrade process and ensure a smooth transition to the updated versions of the applications.
Before You Start for all Upgrades!
All 4d and SapphireOne build upgrades.
The process of upgrading both the 4D Application and SapphireOne’s current build has become more streamlined and similar. It involves downloading a file from the SapphireOne File Station and then adding it to or replacing specific folders on the SapphireOne server. In this documentation, we will focus on upgrading the 4D application/structure file specifically from currently version 18.3 to 18.4. This upgrade process ensures that both the 4D Application and SapphireOne are updated to their latest versions, enabling users to benefit from enhanced features and improvements.
Before proceeding with any 4D or SapphireOne build upgrades, it is crucial to complete the tasks listed below. Each item on this list should be carefully considered and completed while still running the previous version:
Checking and Backing Up of the Data File.
- 4D Application & Live Data Files – If you are unsure of the location of these files, their location may be found by going to the server window and selecting the Applications Server tab.
- Application & Data File – The location for both of these folders and your Live data file are located together in the Configuration area. Select the small down arrow to display their full location.
- Data File Location – If uncertain look at the Time Stamps on the data file and see when it was last modified.
- Recording – If necessary, write the locations down or take a screen shot.
- Checking the Live data file – The Live Data File should also be checked for errors from the Maintenance tab while the server is still running and before any upgrades are performed.
- Maintenance Tab – From this tab at a minimum, the Verify the Records and Indexes option should be selected and executed.
- Naming Conventions – The naming for the 4D Application folder on your hard drive is as follows.
- MacOSX – The 4D Application folder is named SapphireOne xx.x Server.app
- Windows – The 4D Application folder is named SapphireOne xx.x Server
- SapphireOne’s Build – The 4D Application folder will contain a folder named Server Database which contains SapphireOne’s current build or upgrade.
- Server Database – The name and path of this folder must not be altered!
- Access Server Locally – Access the server directly from the keyboard or use Remote Desktop/Team Viewer.
- Data File Checking – Again, while still using the old server version, perform the usual checks that are available from the server administration function. Verify Indexes and Records is the most important one. These are both available from the Maintenance Tab from the server menu.
- Data File Backup – If no errors are found , shut the Server down, back up your data file and then restart SapphireOne.
- Errors – If any errors are found in any of the steps above, please make a support booking with SapphireOne Support. Please email through screenshots to Support and detail what step you have encountered the error. SapphireOne Support will have this list and will be able to better help with the error.
- Manual Backup – Once any errors have been fixed, shut the server down and make an additional BACKUP of your live data file, especially if any errors were found and corrected in any of the procedures above. Remember that it is very easy to recover by using a backup.
4D Application Update Reference Guide.
While this specific procedure outlines an incremental upgrade from 4D version 18.3 to 18.4, it is important to note that the process would be identical if performing a full version upgrade, such as transitioning from version 18 to version 19. The steps and considerations mentioned in this article remain applicable regardless of the specific version being upgraded.
Whether it is an incremental upgrade or a major version update, it is crucial to follow the documented procedures, review the release notes, and ensure system compatibility to ensure a successful and smooth upgrade process. The underlying principles and steps involved in the upgrade process generally remain consistent, with adjustments made as necessary for each specific version or release.
Preparation for the 4D Update.
Downloading & Unzipping Required files
Download one of these 4D files from the SapphireOne File Station.
- 4D Updates – These are found in the SapphireOne File Station folder named, 2 Upgrade 4D Server. These files are platform dependent so select the file that is appropriate for your operating platform.
- MacOSX File Name – 4DVersionNumberMacServer.zip. (Currently about 650 Mb in size).
- Windows File Name – 4DVersionNumberWinServer.zip. (Currently about 350 Mb in size).
- Local File Storage – This file should be downloaded to a specific folder set up on your server for the express purpose of unpacking or unzipping of downloaded files.
- Unpacking File – Unzip the file inside the folder as documented above.
Checking Current 4D Version
- Checking the Data File – You have used the Initial Checking of the Data File procedure documented earlier in this article to check that all is well with your data file?
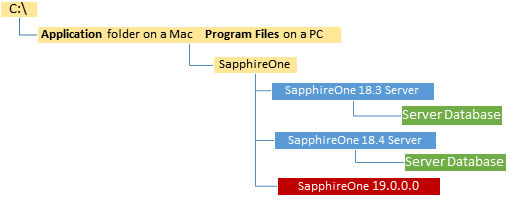
- Folder layout – Using the chart as seen below, find the location of the folder that you will be placing the new 4D version into.
- Look carefully at how you operating platform is displaying these folders to you. In this chart the 4D application folders are in blue background while the SapphireOne builds or compiles are in green in a sub folder of the 4D application.
- Mac users remember to right click and select the Show Contents option!
- Verifying Current Version – Access the server using a Client machine and record the complete version number that is currently running on the server which was 18.3.0.11
- Version Details – This would be, 4D application file version 18.3 and SapphireOne’s build 0.11
- Checking Folder Locations – These may be checked by going to the Application Server tab on your server. Both the 4D Application and the Live data File locations will be displayed in the configuration area on this screen.
Commencing the 4D Upgrade.
- Accessing the SapphireOne Server – Access the server directly from the keyboard or use Remote Desktop/Team Viewer.
- Shut Down- Shut down the old SapphireOne server.
- Backup – Make a manual backup of your live data file. This is essential as each new 4D version will make alterations to your data file.
- Installation Files – If you have not done so already download and unpack the files required from SapphireOne’s SapphireOne File Station into a folder on the hard drive.
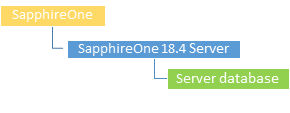
- Mac Zip File Name – 18.4.0.0MacServer.zip.
- Mac Actual File Name – SapphireOne 18.4 Server.app
- Windows Zip File Name – 18.4.0.0WinServer.zip.
- Windows Actual File Name – SapphireOne 18.4 Server.
- Finder & File Manager – Both Mac OSX and Windows have file managers. For both platforms you can open multiple instances of them.
- Single Instance – Use the drag and drop function or copy and paste function to move the unpacked folder to the location as indicated above.
- Multiple Instances – Open the first window and resize it to the left of your screen and leave it displaying the latest unzipped 4D version folder ready for copying.
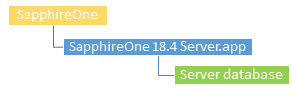
- Second Instance – Re-size it and then position it on the right-hand side of your screen. Next proceed to drill into your folders until you have the yellow SapphireOne folder displayed. You should also be able to see the current 4D application folder hanging just below it.
- Transferring Folder – Now select and copy the SapphireOne 18.4 Server folder on your left window and copy it directly into the SapphireOne folder in your right-hand window.
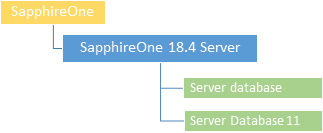
- Checking Folder Location – The SapphireOne 8.4 Server folder should sit immediately below the SapphireOne 18.3 Server folder as seen below.
- The Server Database folders have been included as well in the screenshot and these will be documented next in this article
- Creating Shortcuts- Once the SapphireOne 18.4 Server folder has been installed in the correct location the user will have to create shortcuts for each Operating Platform as follows.
- Mac OSX – Select the SapphireOne 18.4 Server app folder, right click and select the Make Alias option.
- Windows – in the SapphireOne 18.2 Server folder,drill in and find the .exe executable. Then right mouse click and select a create shortcut option from the mouse context menu.
On a Windows it is critical that the shortcut is always executed as Administrator. It is recommended that the short cut properties are modified by right clicking on the shortcut, selecting properties, then selecting the Advanced tab. While the advanced tab is open select the Run as Administrator checkbox.
- Remove Old Shortcuts – Immediately delete any shortcuts to the old 4D application.
- Dock or Toolbar – Also, check if the old shortcut is pinned to the dock of a Mac and, if so, remove it.
- Warning – Running up an older version of the 4D application is not recommended as you could trash the data file.
- Cleaning Up – Remember to delete old upgrade files and folders. All the files that you download are available from the SapphireOne SapphireOne File Station server again if necessary.
- Live Data File – That is with the exception of your Live data file.
Restarting the Server
- New Server Restart – On restart SapphireOne will immediately do one of two things.
- Log File – If the log file is missing it will ask the user for instructions. Select Create and follow the default options. If it finds a log file it will proceed immediately to ask for the location of the data file.
- Data File – On restart with either a new 4D Application or Server Database, SapphireOne will ask for the location of your live data file.
- Navigating – Use the operating platforms search function to tell it where the Live Data File is.
- Additional Verification – Once the Live data file has been accessed Immediately perform the following checks.
- Version Numbers – Once the server is running log into it with a Client and check the 4D version number and SapphireOne’s version number. When a new 4D release is installed, SapphireOne’s will also include the current build or compile as a part of the 4D release. This will be 0.0 or 0.1
- Upgrading SapphireOne- SapphireOne,s builds may have moved on since the 4D release was compiled and an immediate replacement of SapphireOne’s Server Database folder may be required. If this is required please read on as documentation for this procedure starts immediately below!
- User Access – Users may now be allowed to access the server.
Commencing SapphireOne Upgrade Process (Server Database).
These next pages of the documentation will compromise a basic step by step procedure to update SapphireOne’s build or compiles. All we will be doing is replacing a single folder named Server Database.
This file is a fraction of the 4D Application file at currently just under 45Mb in size.
Download this file beforehand from the SapphireOne File Station into the folder on your server that files are placed in from SapphireOne.
Preparation for the SapphireOne Upgrade
Checking the Active Data file
- Verifying SapphireOne’s Version – Access the server using a Client machine and record the complete version number that is currently running on the server for example 18.4.0.11. SapphireOne’s build number would then be 0.11 or build 11.
- Checking Folder Locations – If necessary these may be checked by going to the Application Server tab on your server. Both the 4D Application and the Live data File locations will be displayed in the configuration area on this screen.
Downloading and Installing Files
- SapphireOne Builds or Compiles – These are in the SapphireOne File Station This file is not platform dependent so there should only be the single file for MacOSX and Windows.
SapphireOne File Station Folder name is: 1 Upgrade Server Database
The file is named VersionNumberServer.zip 18.4.0.0Server.zip, 18.4.0.100Server.zip and is currently about approaching 100 Mb in size Mb in size. - Local File Storage – This file should be downloaded to a specific folder set up on your server for the express purpose of unpacking or unzipping of downloaded files.
- Unpacking File – Unzip the file inside the folder as documented above.
- Server Database Folder – Since this folder is always named Server Database it is very easy to loose it when it has been unzipped.
- Renaming the Folder – For this reason immediately rename it by adding the SapphireOne build number at the end of the name. For example, Server Database01, Server Database10 and so on. This will also make it simple for the swap procedure later in this article.
- Checking the Data File – You have used the Initial Checking of your Live Data File procedure documented earlier in this article to check that all is well with your Live Data file?
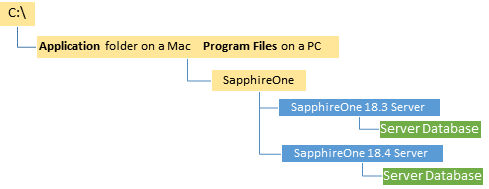
- Folder layout – Using the flow chart as seen below, find the location of the folder that you will be replacing with the new SapphireOne build version.
- Installing the Server Database Folder – Copy or move the new renamed Server Database folder into the required location. It will be allowed as it now has a different name.
- Checking – The two Server Database folders should now be one above the other together.
- Errors – If you have the new Server Database folder in the wrong location the new one will not be with the Server Database folder currently in use. (See the next item in this article)
Commencing the Upgrade Procedure (Server Database).
- Accessing the Server – Access the server directly from the keyboard or use Remote Desktop/Team Viewer.
- Shut Server Down- This is crucial, Shut down the SapphireOne server.
- Backup – Make a manual backup of your live data file. This is also essential as each new SapphireOne upgrade will make alterations to your data file.
- Installation Files – These should already be downloaded and in place. If not please please refer to the previous sections in this article entitled Downloading and Installing Files.
- Viewing the Server Database folder – The result will be as in the screenshot below. The user now knows the Server Database folder is in the correct location as it will be directly above or below the old Server Database folder.
- Delete the old folder Server Database folder – This can be deleted as required but the server must not be running.
- Rename the new folder – The new folder should be renamed to Server Database. It is crucial to rename the folder to Server Database because the 4D application specifically searches for a folder with this name. Furthermore, the application expects the Server Database folder to be located in a precise location relative to the application. Renaming the folder correctly ensures that the 4D application can locate and access the database files without any issues.
- Viewing the Server Database folder – The result will be as in the screenshot below. The user now knows the Server Database folder is in the correct location as it will be directly above or below the old Server Database folder.
- Cleaning Up – Remember to delete old upgrade files and folders. All the files that you downloaded are available from the SapphireOne File Station again if necessary.
- Live Data File – That is with the exception of your Live data file and your documents folder if used.
- New Server Restart – On restart SapphireOne will immediately do one of two things.
- Log File – If the log file is missing it will ask the user for instructions. Select Create and follow the default options. If it finds a log file it will proceed immediately to ask for the location of the data file.
- Data File Location – On restart with either a new 4D Application or Server Database, SapphireOne will ask for the location of your live data file.
- Navigating – Use the operating platforms search function to tell it where either the log file or the Live Data File is as required.
- Additional Verification – Once the Live data file has been accessed Immediately perform the following checks.
- Version Numbers – Once the server is running log into it with a Client and check the 4D version number and SapphireOne’s version number.
- User Access – Users may now be allowed to access the server
You can review our Blog and YouTube channel for additional information and resources on SapphireOne ERP, CRM and Business Accounting software.