Supporting The New Apple Silicon
A SapphireOne Guide to Deploying Across Platforms. For many years Apple has used Intel X86/X64 architecture processors and supporting chipsets in its desktops/workstations. As a result, for SapphireOne this simplified the process of facilitating the operation on both Microsoft Windows and Apple MacOs based platforms concurrently as they shared this common architecture.
In 2020, Apple released the first of a new line of hardware they refer to as Apple Silicon that has commenced with the Apple M1. Apple Silicon is a systems-on-a-chip (SoCs) based on the more efficient Arm architecture commonly used in mobile devices.
The 4D software utilised in the SapphireOne codebase has been significantly revised to support Apple Silicon natively and the complex migration of SapphireOne to support 4D Software V19 in kind, is now mature with the release of SapphireOne V19.5.
The revisions to 4D Software have been documented by 4D and included in this article. In all cases changes will have been made at the code or programming level by SapphireOne. In addition, for the end user, minor considerations will have to be made when mixing Windows and MacOS based platforms on the same Client/Server network.
Abstract for Deploying Across Platforms
Firstly, deploying merged applications across multiple clients can be an involved process when considering that clients can be on different operating systems and/or hardware. Also, one notable feature in 4D is automatic updates for merged clients, which may be applicable depending on the situation which will be covered later. The main purpose of this tech note is to cover different ways to deploy on clients utilising the same platform, cross platform, and differing hardware.
Introduction
Consequently, some variables to consider for deployment. As an example, whether server and client machines are running on different platforms, whether Apple workstations are running on Intel or Apple Silicon processors, whether 4D databases are in binary or project type, and whether automatic updates for merged clients are applicable. The different scenarios are covered below.
- 1: Both client and server on Windows
- 2: Both client and server on Mac
- 3: Mac 4D Server deploying to Windows clients
- 4: Windows 4D Server deploying to Mac clients
- 5: Mac or Windows 4D Server deploying to mixed Windows or Mac clients
Important Rules for Deploying Across Platforms
Before diving into the details, there are few important rules to follow.
Client-Server apps must be built on its targeted platform at least initially
For example, if the plan is to deploy a built 4D Server executable on Windows and a built client app on MacOS, the server must be built on Windows and the client app must be built on MacOS accordingly. Inversely, if the plan is to deploy a built 4D Server app on Mac and a client executable on Windows, the server app must be built on Mac and the client executable must be built on Windows.
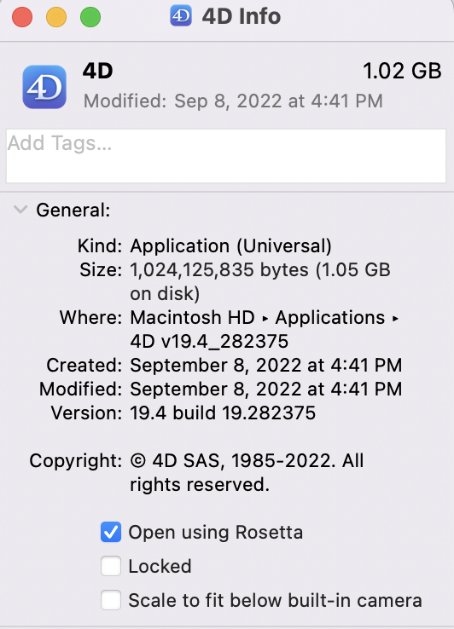
Apple Silicon based Macs must run 4D in Rosetta for apps compiled for Intel when Deploying Across Platforms
Specifically, this rule mainly applies when an Apple Silicon based Mac tries to open a compiled app built for Intel. Typically, when trying to open apps made for Intel on Apple Silicon, MacOS will alert the user that the app isn’t compatible. In particular, to resolve this issue, Rosetta can be enabled when right clicking on an app > Get info and enabling the Open using Rosetta checkbox.
Project mode on MacOS can compile for both Intel and Apple Silicon platforms. Subsequently, if an app has already been converted to project mode and has the compilation target set to All processors (Intel/AMD and Apple Silicon), then the Mac machine can compile for both platforms. However, if the project mode app is running on Windows, Windows can only build for Intel platforms. In this case, an Apple Silicon based client app trying to connect a Windows sever executable will have to be run with Rosetta.
Scenario 1: Both server and client on Windows
Therefore, in this scenario, binary and project databases will work the same and follow the same steps.
Initial Deploying Across Platforms
- Build a client-server executable on server machine.
- Transfer the client executables to the Windows clients.
- Start the server executable on the server machine.
- Start the client executable on the client machine. Confirm that the connection has successfully been made.
Handling Structure File Changes
Therefore, any code changes must be made after the client-server executable has already been built, there is no need to rebuild the client executable or use the automatic client update feature. Instead, only the server executable needs to be rebuilt and the existing client executables will still connect, including the updates and changes.
Handling Automatic Updates
Assuming the client and server executables have already been built at least once, and the server needs to be updated to a newer build of 4D. Therefore, this scenario would be ideal for automatic updates. For example, both built server and client are currently on 19.4, but the server needs to be updated to 19.5. The steps would be as follows:
- Download 19.5 on the server machine.
- Open the desired database in 19.5.
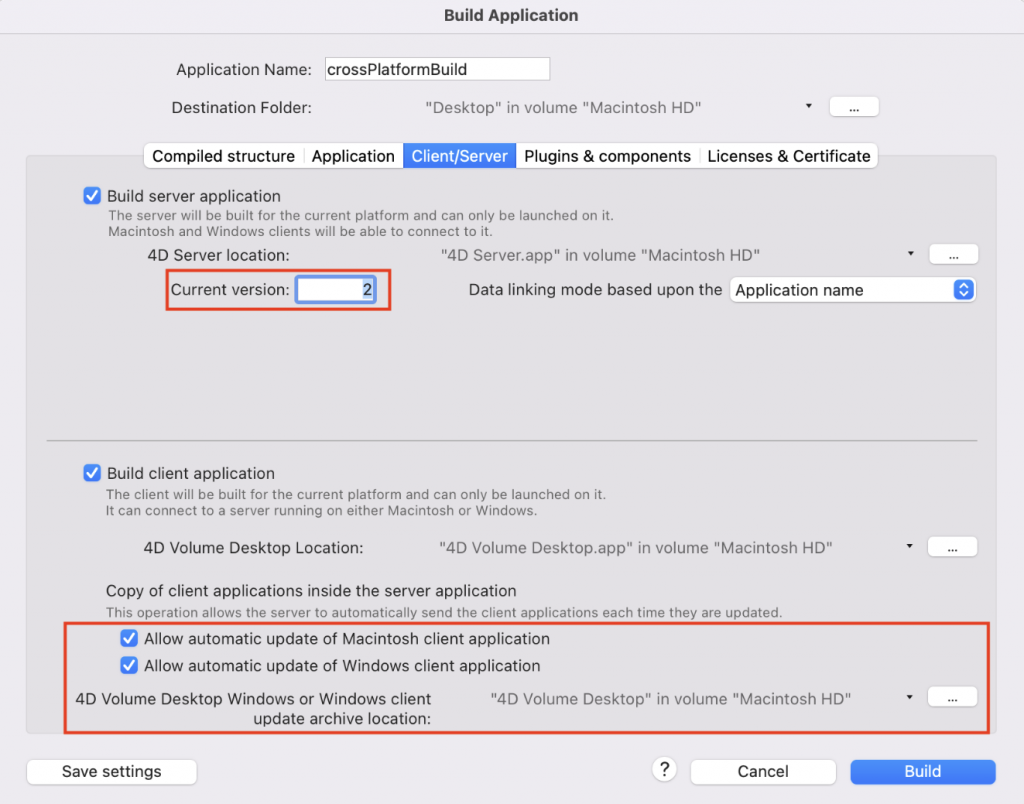
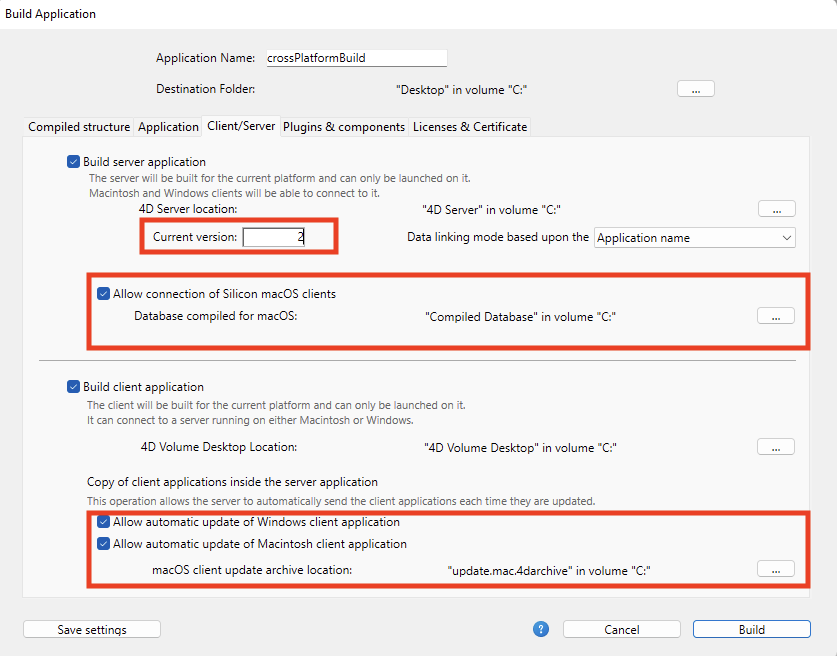
- In the Build Application > Client/Server screen, enable both checkboxes for Build server application and Build client application and link the 19.5 4D Server and 4D Volume Desktop folder locations, respectively.
- Increment the Current version value. If using the BUILD APPLICATION command, increment the value under /Preferences4D/BuildApp/CS/CurrentVersion in the buildApp.4DSettings. In this example, the value was incremented from 1 to 2.
- Enable the checkbox for Allow automatic update of Windows client application
- Hit Build
- Launch the server executable (version 2).
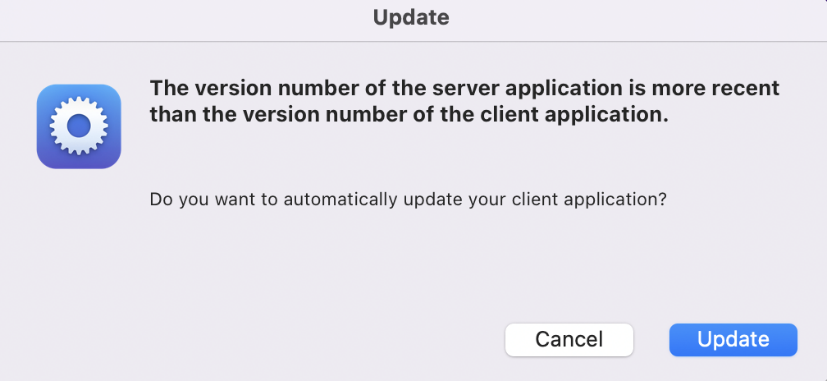
- For the clients, launch the client executable (version 1) and the automatic update should prompt.
- After update finishes, client executables should now be on 19.5.
Scenario 2: Both server and client on MacOS
2a: Apple Silicon based Mac Server deploying to Intel MacOS clients
*Note: If database is binary, the Apple Silicon based Mac will need to be opened in Rosetta to compile for Intel. Otherwise in project mode, it will natively be able to compile for both Intel and Apple Silicon.
Initial Deploying Across Platforms
- On the Apple Silicon based Mac, open binary database in Rosetta mode. If project mode, open it natively with Rosetta
- Build the client-server app.
- Transfer the client app to Mac clients.
- Start the server app on the server machine.
- Start the client app and confirm connection has successfully been made.
Handling Automatic Updates
- On the Mac server machine, open the Build Application dialog.
- Increment Current version value.
- Enable the checkbox for Allow automatic update of Macintosh client application
- Build the 2nd client-server app on server machine.
- Launch the server app (with the incremented version).
- Have the clients run their initial client app and automatic update should initiate.
2b: Intel Mac Server deploying to Apple Silicon clients
Repeats same step 2-5 above in 2a. However, when Apple Silicon based Mac clients try to open a compiled app originating from an Intel chip, app must be opened in Rosetta. Otherwise in project mode, Apple Silicon based clients will be able to open the app natively.
Scenario 3: Server on Mac with Windows clients
Note that the steps below are the same regardless of whether the database type is binary or project as Macs (X86/X64 and Apple Silicon) can compile for Intel.
Initial Deploying Across Platforms
- On the Mac server machine, build a client-server app.
- On the Windows machine, using the same database, build just the client application.
- Distribute the built Windows client executable to other Windows clients if necessary
- On Mac, launch the built server app.
- On Windows, launch built client app and confirm that connection was successfully made.
Handling Automatic Updates
Take the example where 4D Server on Mac is on 19.5 and Windows clients are on 19.4 where the goal is to have all 19.4 clients upgrade to 19.5.
- Using the Mac machine on 19.5, in the Build Application dialog, select both Build server application and Build client application and link them to their 19.5 Server.app and Volume Desktop.app respectively.
- Enable both Allow automatic update of Mac client application and Allow automatic update of Windows client application.
- Link the Windows version of 19.5 4D Volume Desktop in the 4D Volume Desktop Windows or Windows client update archive location field. Since the Windows version of 19.5 Volume Desktop isn’t natively stored on Mac, the Windows 19.5 Volume Desktop folder may need to be transferred from the Windows machine to the Mac machine to link the directory.
- Increment the Current version. In this example, the Current version was incremented from 1 to 2.
- Hit Build to build the client-server app.
- On the Windows built clients running on 19.5, launch the 19.5 built client executables.
- Upon launch, an update prompt should appear. Hit Update.
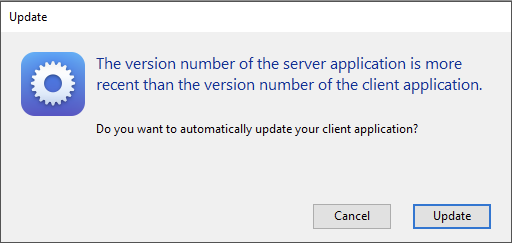
- When the update finishes, the Windows built client executable is now upgraded to 19.5.
Scenario 4: Server on Windows with Mac clients
Since Windows cannot natively build Apple Silicon code, there are two ways to handle this situation. The first solution is for the Apple Silicon based Mac to run the built client app in Rosetta mode which will allow the built client app to connect to the Windows built server. The other alternative is to use 19.5 or newer that allows a new option to include the Compiled Database from the Apple Silicon based Mac’s.
Scenario 5: Server on Windows or Mac Server with mixed clients
While uncommon, this scenario may occur, such as when you have a Mac server with Mac clients but no available additional Mac workstation. In such cases, a Windows-based workstation can be utilised without any issues. To enable this, the Windows SapphireOne Client application needs to be downloaded from the SapphireOne File Station and installed on the Windows workstation. As long as the Windows workstation can access the local network, everything should function smoothly. The only consideration arises when directly exchanging files between the two platforms, where the usual file type rules would apply.
The reverse situation arises when a Windows server is operating with Mac-based client workstations.
Initial Deployment
- On Mac, build the client app.
- For Apple Silicon based Macs:
- If binary database, run 4D in Rosetta and build client app.
- If project database and 4D is 19.5 or newer, the built client app will also include a Compiled Database folder. Copy this folder to the Windows machine. If 4D is 19.x, ignore this step.
- For Intel Macs.
- Build client app as normal.
- For Apple Silicon based Macs:
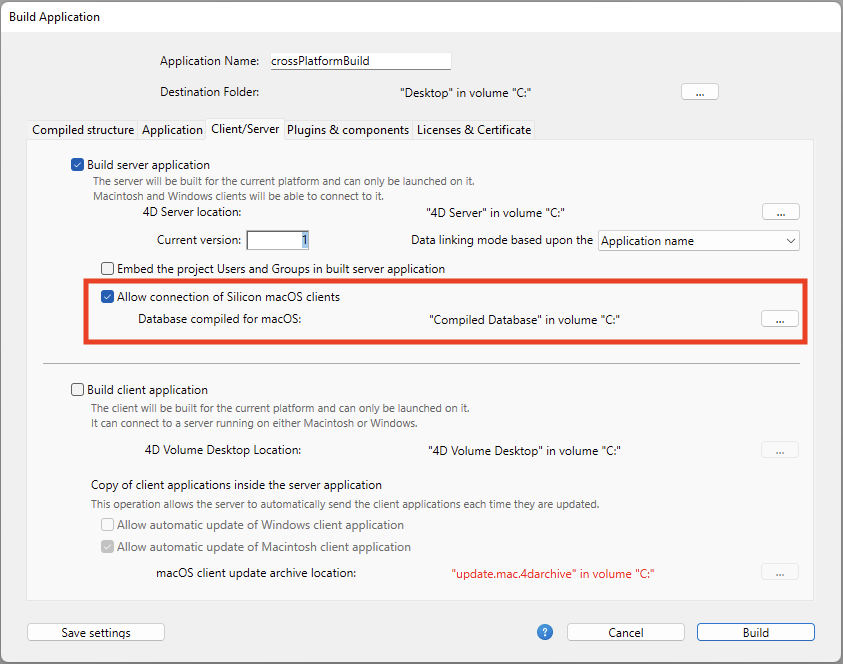
- On Windows, build the server executable.
- For 19.5 or newer versions:
- Enable the Allow connection of Silicon macOS clients
- Link the Compiled Database folder from the Apple Silicon based Mac. This folder will need to be transferred from the Apple Silicon based Mac
- For 19.x
- Build server app as normal
- For 19.5 or newer versions:
- On Windows, launch the server executable.
- On Mac, launch client app.
- If binary database on the Apple Silicon based Mac, run the built client app in Rosetta
- Confirm that connection has successfully been made.
Handling Automatic Updates
Take the same example where 4D Server on Windows is on 19.5 and Mac clients are on 19.4 where the goal is to have all 19.5 clients upgrade to 19.x. To have Windows update Mac clients, the .4darchive must be created from building a client app from the Mac.
- On Mac, build adjust the client app with Allow automatic update of Macintosh client application enabled.
- If binary database, 4D must be opened in Rosetta. Otherwise, build client app as normal.
- Inside the destination folder of the built client app will be the .4darchive file. Transfer this file to the Windows machine.
- If built in 19.5 or newer, also transfer the Compiled Database folder to the Windows machine.
- On Windows, build a client-server executable with automatic updates enabled for both platforms and the .4darchive linked.
- If project database, also enable Allow connection of Silicon macOS clients and link it to the Compiled Database folder from step 3.
- Increment Current version.
- Hit Build to build the client-server app.
- For existing 19.5 Mac clients, launch the built 19.5 client.
- If the Apple Silicon based Mac, built client must be launched in Rosetta.
- Automatic update should prompt here.
- When the update finishes, the 19.5 app should now have been upgraded to 19.x.
Deploying Across Platforms Conclusion
In conclusion, this tech note has covered the variety of scenarios when deploying between same and different platforms and taking advantage of the automatic updates feature. Accordingly, for same platform deployment, the process is mainly the same with the exception of Apple Silicon based Macs needing to open 4D in Rosetta for Intel compiled apps. In addition, for cross platform deployment, the build app process must include the 4D Volume Desktop of the opposite platform to allow automatic updates and a client app must be built on both platforms at least once. Finally, it is our intention that this article has provided a simple guide for those looking to deploy on both Windows and MacOS platforms.
You can review our Blog and YouTube channel for additional information and resources on SapphireOne ERP, CRM and Business Accounting software.