Balances Report Overview
The SapphireOne Balances report offers a prompt and comprehensive overview of a business’s outstanding finances to vendors by generating Credit Information (balances) reports with a high degree of automation. To access the Balances function, users simply need to enter Accounts Mode and open the Payables Menu. SapphireOne automatically updates user data files in real-time, ensuring that Balance reports are based on current data without the need for manual input.
Report Options for Vendor Balances Report
Users have the flexibility to customise their preferred layout for the Balances Report by making selections from the Print Destination, Report Type, and Report Sort Order drop-down menus. The report layout is generated based on the chosen metrics from these options. Additionally, users can opt to create personalised reports using either SapphireOne Quick Reports or Custom Reports, providing them with the freedom to tailor their reporting experience according to their specific needs.
Dictation and Speech to Text Overview
SapphireOne’s implementation of both Dictation (MacOS) and Speech to Text (Windows) is a game changer for data entry. Any data entry field you can type into using a keyboard can use this feature.
You can also use this functionality on all inquiry screens within SapphireOne. For example, the user is in a Contact within a Client. They may have made a phone call to that particular client using the Softphone technology. Consequently, this will automatically date and time stamp both the contact and the phone number you called.
As soon as the call is completed, the user has the ability to use Speech to Text (Windows) or Dictation (MacOS). They can dictate into the memo field of the CRM contact, adding as much description as they require.
Dictation and Speech to Text Procedure
This functionality applies across every single Data Entry screen. For example, the SapphireOne user is entering a Vendor Invoice (VI). Additionally, you may want to add a memo within the Vendor Invoice (VI). The user can utilise the tool and simply dictate the memo.
Another example is if the user wants to add additional lines to the General Ledger account, within each General Ledger account. When the user is completing data entry using a General Ledger, there’s always a unique memo field for each GL account line.
The user can then utilise this feature to quickly add the information they need to add. Alternatively, you may have an interview with an employee. After the interview process is completed, the user can then make notes about the employee.
Speech to Text or Dictation is an extremely powerful tool. It is something that we at SapphireOne, as well as our clients, utilise daily. It is a massive time saver.
Print Destination Menu
The Print Destination Menu allows the user to choose the destination for the Report, and select from the options Printer, Custom Report and Quick Report.
| Printer | Choosing this option instructs SapphireOne to directly send the report to the designated printer for physical printing. |
| Custom Report | This selection empowers users to design and create a customised report layout. Once chosen, SapphireOne will utilise this preference from the Print Destination menu. |
| Quick Report | Opting for this choice will initiate the Sapphire Quick Report function, allowing users to swiftly generate a report tailored to their immediate requirements. |
| CSV | When selecting the CSV option, the report will be presented in a CSV file format. This file format can be opened using spreadsheet programs such as Excel, providing users with the capability to view and manipulate the report data with ease. |
Report Type Menu
The Report Type drop down menu provides users with the flexibility to select from 16 distinct report types, catering to their specific reporting needs. Here is an overview of each report type and its intended use:
| Standard Balances: | This report shows the Standard Aged Balances. |
| Un-posted Values: | Includes un-posted values in the Standard Aged Balances Report. |
| Credit Control: | Enhances with information about the last receipt date and amount, contact details, position, and phone information. |
| Wide – Balances: | Allows printing in a wider format, increasing the displayed Balance Data. |
| Wide – Un-posted: | Enables printing in a wider format, displaying more Balance Data, including un-posted values. |
| Wide – Credit Control: | Facilitates printing in a wider format, increasing the displayed Balance Data, including Last Payment details. |
| As at Period Balance: | Provides Client Balances as of a specific period, aligned with the Balance Sheet Control Account for the same period. |
| As at Date Balance: | This report provides a balance report based on current transactions, considering the date input by the user. |
| As at Detailed: | This report gives a balance report based on 7, 14, 21, 30, 60 and 90 days. This report also provides the Vendors terms. |
| As at Detailed Unallocated: | Prints balances for each Vendor that are overdue and unallocated as of the entered date. |
| Cash Flow: | Allows specifying a date before viewing balances, aiding in cash flow projections. |
| Cash Flow Detailed: | Permits specifying a date before viewing balances and transactions, aiding in detailed cash flow projections. |
| Std. Balances (Landscape): | Similar to the Standard Balances report but in a landscape format with extra room for Company name. |
| Standard Balances in FX Currency: | Prints the Standard balances in both the Local and FX currencies. |
| FX Balances: | This report prints the balances in both the local and FX currencies but in addition also prints the FX rate on the balances. |
Report Sort Order Menu
The Report Sort Order Menu allows the user to select from various sorting methods and criteria to organise data in different sequences while still maintaining the same fundamental report format. The user can sort data by:
| No Sort: | The report is printed as displayed on the screen without any sorting performed. |
| by ID: | Data is sorted and totaled based on each Vendor ID. |
| by UDF 1: | Data is sorted and totaled by User-Defined Field 1. |
| by UDF2 | Data is sorted and totaled by User-Defined Field 2. |
| by Class: | Balances are sorted and either totaled or grouped by VendorClass |
| by Total Owing Ascending: | Balances are sorted and ordered in ascending order of dollar value.. |
| by Total Owing Descending: | Balances are sorted and ordered in descending order of dollar value. |
| by Area: | Balances are sorted and ordered by the area value. |
| by Control Account: | Balances are sorted and ordered by control account. |
| by FX Type: | Balances are sorted and ordered by FX type. |
| by Rep: | Balances are sorted and ordered by representative. |
| by Company: | Balances are sorted and ordered by company. |
| by Parent: | Balances are sorted and ordered by Vendor parents |
| by Department: | Balances are sorted and ordered by department |
Report Selection Menu
The Report Selection Popup Menu also allows you to select which Vendors balance data you would like to report on, allowing you to get more granular and specific with your reporting capabilities.
| Balances Only: | This will print out all of the Vendors balances |
| Unposted Balances Included: | Will print out a report which includes all active Vendors balances including any un-posted transactions and those Vendors who do not have a zero balance. |
| All Records: | This option will tell SapphireOne to print balances for all active Vendors currently in SapphireOne including those with a zero balance. |
| All Records Include Inactive: | This will display all records, including inactive items. |
Data Range Selection Area
Following the initial selection as listed above, the user has the choice of utilising the remaining two menus, which function in tandem to facilitate a more precise selection of items for inclusion in the report. Each of these menus also has a secondary drop-down menu.
The first menu, known as the Data Selection menu, empowers users to precisely determine the Vendor data to be incorporated or excluded within the report. The second menu, the Data Metric menu, allows users to input the specific metrics needed for the data in the report. These menus work in conjunction to provide users with detailed control over the data they wish to include in their reports.
| Data Selection | This dropdown menu offers an extensive selection of over 20 options, spanning from the Vendor ID through to the mobile number, enabling users to specify the precise Vendor data to be included or excluded in the report. |
| Data Metric | In the Data Metric dropdown menu, users can choose from seven different options. These options range from Equals through to Does not contain, providing users with a range of filtering options in their reports, enhancing data selection precision. |
Report Buttons
| Background Button | Selecting this button allows the user to run the report in the background of the SapphireOne server, allowing the user to continue with other tasks while the report is generating. |
| Print Button | Select this to Print the Report. |
| Cancel Button | Select this to Cancel the Report. |
| Record List Button | This button, when selected, prompts SapphireOne to present a Vendor One Line Report in a list format on the screen. Further information about this functionality can be found in the section below. |
| Options Button | The Options Button allows for even further customisation of the Report. |
| Queue Button | Selecting this button will put the report in a Queue, allowing the user to select the time and day for the report to run and print. |
Record List
In the Balances report of Payables, users now have the option to select the Record List button. This selection will display an Aged Balances one line report for all Vendors, including Vendors with a zero balance.
Within this report, users have the capability to double-click on a Vendor’s Master record, which will then redirect them to the Credit Control page within that Vendor’s Master file. For instance, by double-clicking on the first record in the list, which is above A.J. White, the user is promptly directed to the credit control page for that specific vendor.
Default Report
The report you are viewing is generated using the Bondi Blue Demo with default settings, specifically a Report Type of Standard Balances and a Report Sort Order of by ID.
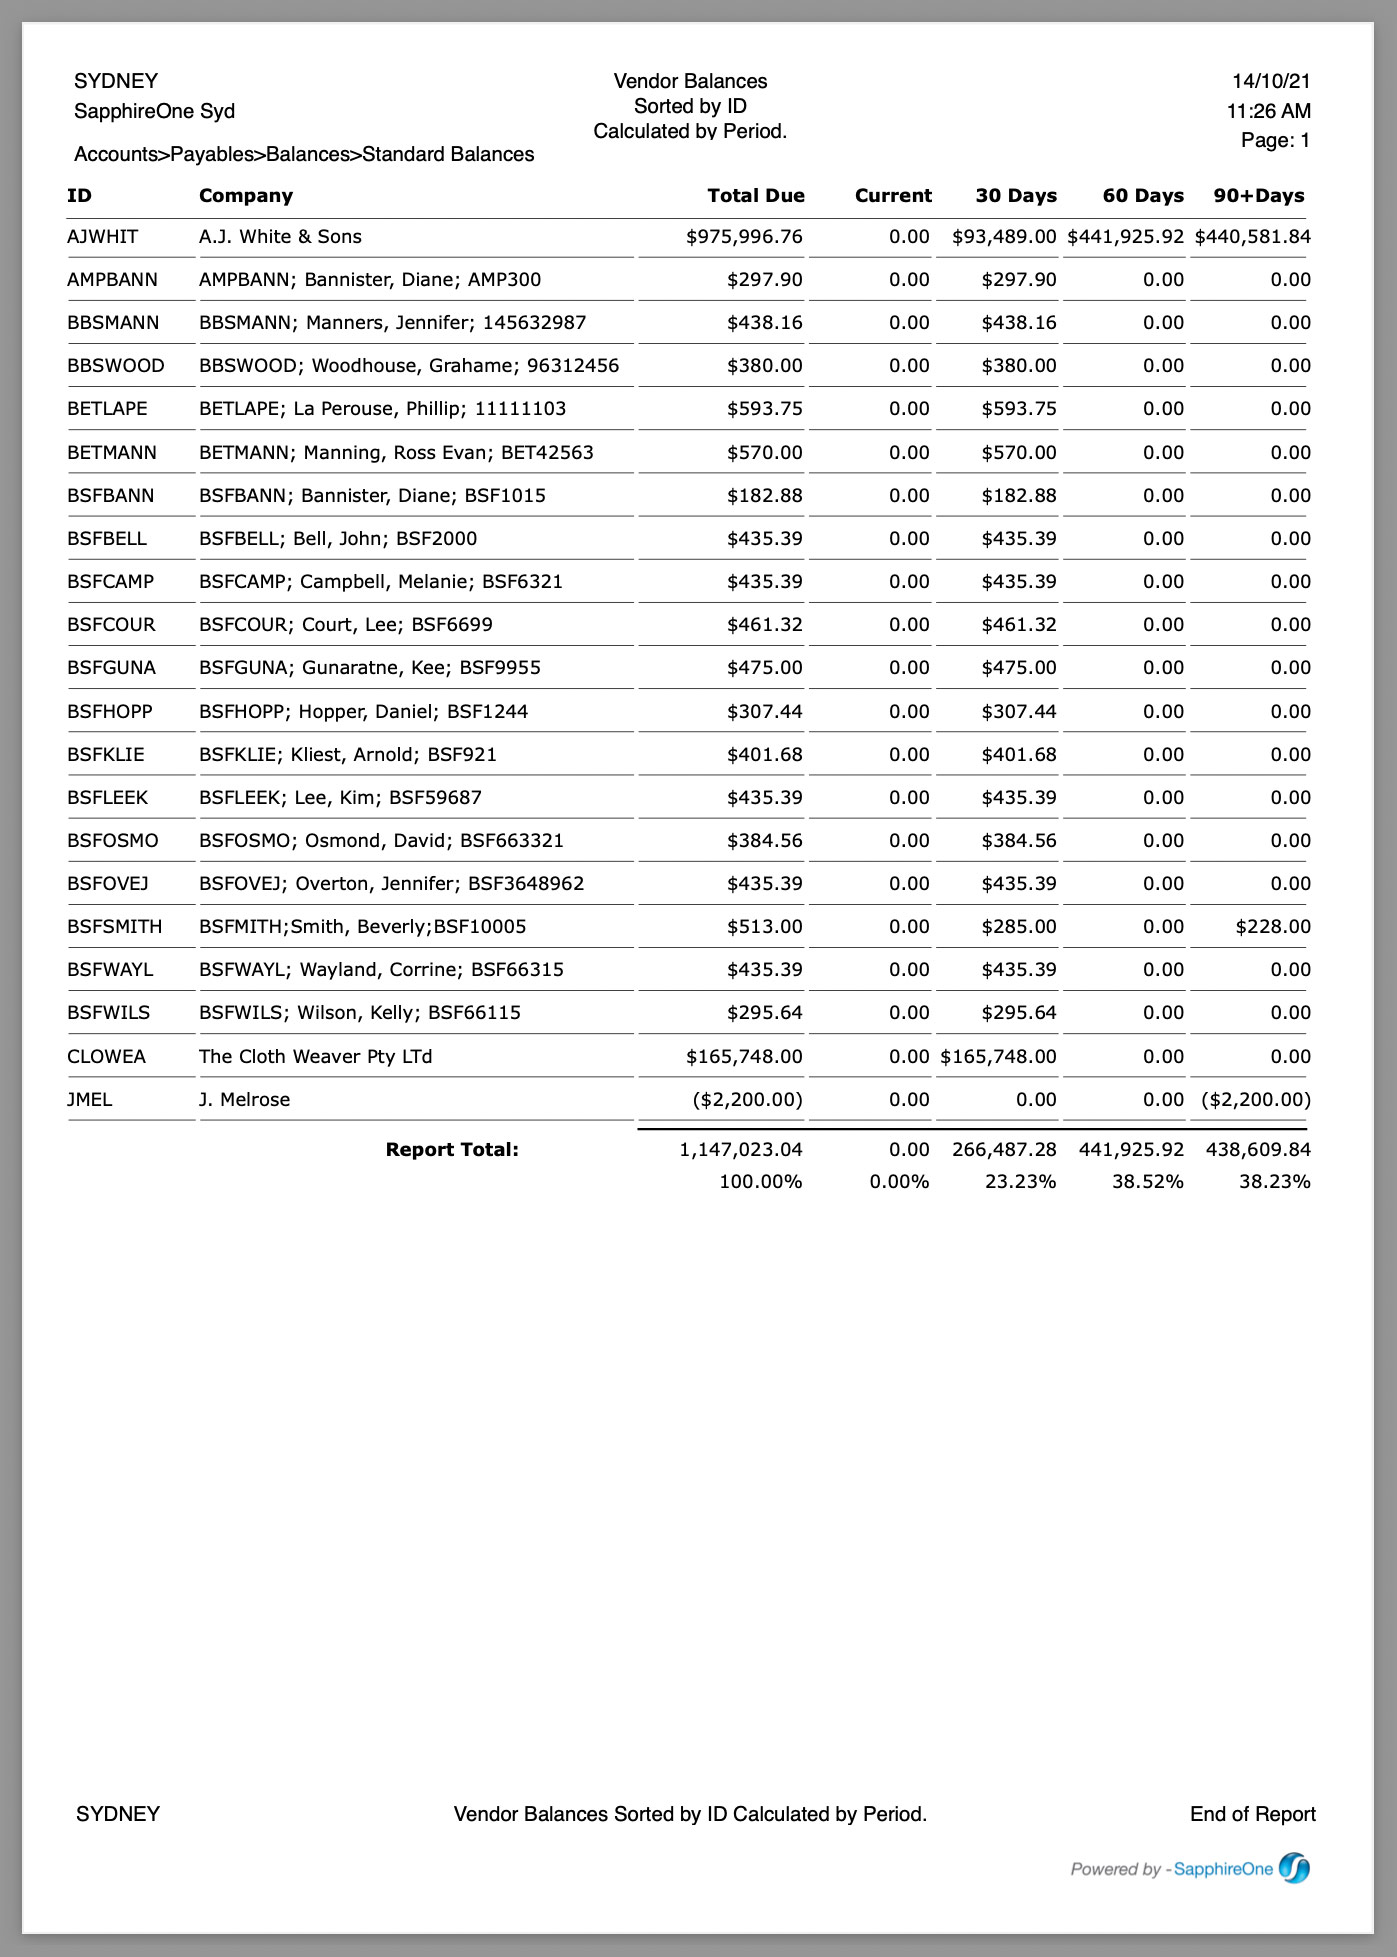
When conducting a balance comparison between this report and your General Ledger, it’s essential to ensure that the Report Selection drop-down menu is set to All Records. This alignment is necessary because the General Ledger Inquiry automatically utilises the All Records setting when executed.
You can review our Blog and YouTube channel for additional information and resources on SapphireOne ERP, CRM and Business Accounting software.