Bank Reconciliation Overview
A bank reconciliation involves aligning the balance of a bank account with the balance presented in the latest statement from a financial institution. This process is crucial for businesses to verify that the two figures match accurately. If any disparities arise, it’s vital to undertake the necessary corrections. A bank reconciliation statement is compiled by the financial institution and it outlines the specific entries that have led to the variance between the two balances.
SapphireOne’s Bank Reconciliation feature empowers users to cross-reference transactions within SapphireOne against their corresponding online banking statements. The advantage of real-time updates to SapphireOne’s databases permits businesses to perform online bank reconciliations seamlessly while working with concurrent data.
There are a number of ways for the user to reconcile bank accounts within SapphireOne, these include:
- Using an OFX file supplied by your bank, outlined below.
- Using SapphireOne’s Bank Sync functionality.
- Using the Bank Reconciliation function. (Manual Reconciliation)
All inquiry screens in SapphireOne offer the option to customise the list of items displayed on the page. This feature, known as Custom Inquiry, allows you to select the data fields to be shown and the order in which the columns of data appear across the screen. Although a client list is used as an example below, any type of inquiry can be customised within SapphireOne.
The list below represents the standard inquiry list, displaying a basic set of data fields for each client record:
Swap to Custom Inquiry
When you select the ‘Swap to Custom Inquiry’ button in the lower left-hand corner of the screen, SapphireOne will display the default Custom Screen, as shown below. This Custom List screen provides the user with two main options for organising the data display:
- To add or remove the data field columns displayed on the screen, click the ‘Setup’ button in the bottom right corner of the screen. Within the Setup screen, you can right-click on the column lines and choose from Delete, Move Left, or Move Right. More information on the Setup screen is provided below.
- To change the order in which the data field columns are displayed, click the ‘Setup’ button in the bottom right corner of the screen. Within the Setup screen, you can right-click on the column lines and choose from Delete, Move Left, or Move Right. More information on the Setup screen is provided below.
Once you have customised the Custom Inquiry screen, the screen view will be unique to you, and each time you log in, you will see the same custom view. You also have the option to select and save an unlimited number of custom views. This can be done in the ‘Setup’ screen, as detailed below.
The Inquiry screen below is the initial Custom Inquiry screen, which can be modified by the user.
Custom Inquiry Screen ‘Setup’ Function
To begin setting up your Customised List screen, click the Setup button, as shown above. The Setup screen will appear, as displayed below.
From this screen, users can add and remove data columns as needed. Almost every field within the SapphireOne data tables can be included in the Custom List screen, provided the user has the necessary authorisation.
The screen features several menu items across the top, which include:
- Reset to Default – Clicking this button resets the display to the default settings determined by SapphireOne. When you add a new data field, SapphireOne will place it on the right-hand side of the data columns. You can then click on the field heading and drag it to your desired location on the screen.
- Show Related Record – This option allows you to add related fields from other tables. By ticking the Show Related checkbox
 at the top of the screen, you can select a related record, and a mini view of that related record for the chosen entry will be displayed for the currently selected record. You will need to select the fields to be displayed.
 - Favourite Set – Located at the top left of the screen, this option enables you to save a custom-created screen for future use. For instance, you can have a simple Inquiry screen for general use and a more complex screen view when auditing specific information.
Bank Reconciliation Data Entry
Upon selecting the Bank Reconciliation function, a pop-up window will emerge, presenting a comprehensive list of the bank accounts currently registered in SapphireOne. This facilitates the user’s choice of the specific bank account they intend to reconcile. In instances where the chosen bank account encompasses multiple accounts, like the scenario of multi-currency Foreign Exchange (FX) accounts, users will be directed to a secondary interface. Within this interface, the user is required to pinpoint the exact bank account that is pertinent to their current reconciliation task.
Transaction Indicators
- Reconcile indicator – When the transaction has been posted without error and reconciliation is selected, here, SapphireOne will display a Mac and a + symbol PC in the last column.
- Un-posted transactions – These will display the letter U in the last column and transactions with an error in them will as normal have err in the Status column.
- Grouped Transactions – Any ID’s that have the Σ symbol in them followed by a number indicate that the transaction is grouped. The number immediately after indicates the number of transactions in the group.
Reconciliation Date Range Area
A crucial initial decision for users is to define the date range for the current display within the bank reconciliation function. This pivotal choice can be made on the Bank Reconciliation screen, where users are presented with a range of options. Notably, there’s an option labeled Date Range, positioned in the lower left-hand corner of the page. This Date Range option encompasses two distinct selections: From and To data entry fields both headings being conveniently underlined. Clicking on either of these Underlined Headings triggers the appearance of a date selection calendar, allowing users to pinpoint specific dates with ease.
The interface affords users the flexibility to specify both a From date and and To date, thereby allowing them to refine the scope of the displayed data. In response, SapphireOne promptly adjusts the presented transactions on the reconciliation page, exclusively showcasing transactions that transpired between the selected From and To dates. For instance, if a user were to opt for December and precisely define the time span as 01/12/2034 to 31/12/2034, SapphireOne would present transactions falling strictly within this designated time frame on the reconciliation screen.
Dictation and Speech to Text Overview
SapphireOne’s implementation of both Dictation (MacOS) and Speech to Text (Windows) is a game changer for data entry. Any data entry field you can type into using a keyboard can use this feature.
You can also use this functionality on all inquiry screens within SapphireOne. For example, the user is in a Contact within a Client. They may have made a phone call to that particular client using the Softphone technology. Consequently, this will automatically date and time stamp both the contact and the phone number you called.
As soon as the call is completed, the user has the ability to use Speech to Text (Windows) or Dictation (MacOS). They can dictate into the memo field of the CRM contact, adding as much description as they require.
Dictation and Speech to Text Procedure
This functionality applies across every single Data Entry screen. For example, the SapphireOne user is entering a Vendor Invoice (VI). Additionally, you may want to add a memo within the Vendor Invoice (VI). The user can utilise the tool and simply dictate the memo.
Another example is if the user wants to add additional lines to the General Ledger account, within each General Ledger account. When the user is completing data entry using a General Ledger, there’s always a unique memo field for each GL account line.
The user can then utilise this feature to quickly add the information they need to add. Alternatively, you may have an interview with an employee. After the interview process is completed, the user can then make notes about the employee.
Speech to Text or Dictation is an extremely powerful tool. It is something that we at SapphireOne, as well as our clients, utilise daily. It is a massive time saver.
Transactions Area
The Opening Bank Balance is displayed in the top right-hand corner of the Bank Reconciliation screen, positioned above the Transactions Area. Within the Transactions Area, a comprehensive listing of all transactions associated with the chosen bank account and falling within the specified date range is presented. The relevant data is organised under specific headings for columns, which include.
- ID – This column reveals the Client or Vendor ID linked to the respective transaction, whenever applicable.
- Group – The Group column showcases the assigned group number for the transaction. Usually, this corresponds to a batch group number that the user is prompted to specify during the initial transaction saving process. If the column displays a 0, zero, it indicates that the transaction is not part of a group.
- Date In – In this column, the date of the transaction occurrence is visibly displayed.
- Type – This column highlights the transaction type, which could be Cash Payment (MP), Cash Receipt (MR), Vendor Payment (VP), or Client Receipt (CR). (note carefulyl MR and CR type transactions)
- Period – This column will display the period when the transaction was created.
- Status – In this column, the status of the transaction is presented. Common statuses include Ent (Entered correctly) Yes (it has been posted) and err (it has an error of some type).
- Internal Ref – If entered this column showcases the external reference linked to the transaction.
- External Ref – If entered this column showcases the external reference linked to the transaction..
- Sequence – SapphireOne always generates a Sequence number so this column displays the sequence number associated with the transaction.
- Withdrawal – This column displays the amount withdrawn from the selected bank account for the specific transaction is displayed.
- Deposit – This column will display how much was deposited into the selected bank for this transaction.
- Unnamed – In this column when a transaction is marked, it will bear a ✓ symbol on Apple devices or a + symbol on Windows devices. This symbol signifies the inclusion of the transaction in the current ongoing reconciliation process.
- U in the column – Conversely, if a U is visible, the transaction is marked as un-reconcilable. To rectify this, users must deselect the transaction, removing the U marking. This action effectively eliminates the transaction from the current reconciliation procedure.
- Reason – The reason for this distinction is that transactions marked with U are un-posted, necessitating posting prior to them being processed in any bank reconciliation procedure.
Transaction Details Area
The Transactions Details area displays the following additional details for the currently selected or highlighted transaction.
- Due – This field will display the date the transaction is due for the selected transaction.
- Un-named Field – This field presents the current type of selected transaction, which can encompass various designations such as MP, VP, CJ, and more.
- Amount – This will display the dollar value amount of the transaction.
- Tax – This will display the tax applied to the selected transaction.
- Total – The total amount minus tax.
- FX (Foreign Currency) – If the transaction involves a foreign currency, this field indicates the specific currency type.
- Conv – For transactions in foreign currency, the Conv field denotes the conversion rate applied..
- Discount – This field indicates the percentage-based discount applied to the selected transaction.
- Amount – This field displays the overall dollar value of the transaction is visible.
- Tax – This field shows the tax amount linked to the specific transaction.
- Total – This field displays the total dollar value of the transaction, accounting for both the transaction amount and the tax.
- Batch Total – This field represents the cumulative dollar value of the selected transactions. If this value appears in brackets, it indicates that the total dollar value of the selected transactions is a withdrawal or a negative amount.
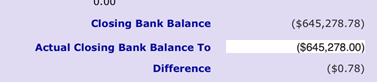
- Closing Bank Balance – The Closing Bank Balance is derived by subtracting the Batch Total from the Opening Bank Balance.
- Actual Closing Bank Balance To – This field displays the difference between the Closing Bank Balance, Batch Total, and tax.
- Difference – This field displays the closing bank balance plus the value entered into the actual closing bank balance into box.
- Available – The Available column shows the balance available in the chosen bank account, incorporating the selected transactions.
- Overdraft – In case an overdraft value has been recorded in SapphireOne General Ledger bank account, this column presents the overdraft facility’s value. This value is then applied to the Closing Bank Total, and the result is exhibited here.
Footer Area Buttons
The footer area of the Bank Reconciliation screen offers users a collection of buttons, furnishing them with various options that contribute to streamlining the bank reconciliation process. These buttons serve to enhance the efficiency of the reconciliation task by providing convenient actions. Moreover, the buttons in this section empower users to either cancel or execute the ongoing online bank reconciliation, offering a comprehensive control over the reconciliation procedure.
- Mark All – By selecting this
 button, all transactions will be marked for processing.
 - Unmark All – This
 button clears markings from all previously marked transactions.
 - List To Date – Once two or more transactions are marked, this
 button allows users to sort marked transactions by specifying date parameters through a pop-up window.
 - Look – This
 button opens a pop-up displaying comprehensive details about a selected transaction, including client or vendor information and related data.
 - Save – This
 button serves the purpose of recording all marked transactions. This functionality proves particularly useful when the user’s reconciliation process is interrupted. By saving the progress, users can easily resume from where they left off.
- Load – Subsequently, the
 button can be employed to restore the screen to the exact point where the user’s progress was saved.
- Load – Subsequently, the
- Collapse – This
 button condenses collapsible transactions into a single transaction. (Default is collapsed)
- Expand – When a transaction involves deposits with receivables from multiple Clients, it is marked by the Σ symbol and a number, selecting or highlighting a transaction and then selecting this
 button enables individual selection of these deposits for reconciliation.
- Expand – When a transaction involves deposits with receivables from multiple Clients, it is marked by the Σ symbol and a number, selecting or highlighting a transaction and then selecting this
- Expand All – Selecting this
 button triggers the expansion of all lines that begin with the Σ symbol. However, it’s important to note that in cases where a substantial number of deposits are encompassed within a single transaction, the on-screen list of extracted transactions could rapidly become quite extensive.
 - Load File – This button opens a pop-up allowing users to select a CSV file from their computer, containing transactions.
- Find – Clicking the
 button opens a pop-up where users can search transactions based on date in, internal reference, or amount.
 - Reload – Clicking the
 button removes any applied expansions or markings and reloads the original transactions list.
 - Open – The
 button will open an interface where the user can see the transactions and apply different metrics to sort transactions by using the Custom Inquiry function. This will open an interface where the user can see the selected transactions and apply different metrics to sort transactions by using the Custom Inquiry function.
 - Export – Clicking the
 function tells SapphireOne to generate a CSV file presenting data from the marked transactions.
 - Cancel – The
 l button reverses any alterations made to the Bank Reconciliation page and closes the interface.
 - Process – Upon clicking the
 button, the Posting pop-up appears, initiating the posting procedure. Following this, the selected transactions cannot be further modified. Options include Print Reconciliation, Print Reconciliation + Outstanding Reports, Process Later, and Process in Background. An attachment option is also available to store a PDF copy of the online reconciliation in the Historical Bank Reconciliation list.
OFX Bank Reconciliation Options
An alternate method for performing the Bank Reconciliation function is by utilizing a bank-provided OFX file. To proceed with this method, once the Bank Reconciliation function interface is open, the user needs to click on the “Load File” button situated at the page’s bottom. Following this action, SapphireOne will present a standard search pop-up, enabling the user to pinpoint and select the pertinent OFX file for processing.
Please refrain from altering these OFX files by opening and saving them using editing software. Although certain software programs might allow you to view the information contained within them, these files are encrypted and should not be re-saved. Doing so could result in the file being modified, rendering it unusable for importing into SapphireOne.
Currently, all banks offer customers a standard OFX file when they have electronic banking set up. It’s important to recognize that slight variations exist from bank to bank when requesting the OFX file. Here are two examples:
- For ANZ bank, users will encounter a list of options and should choose the MYOB(OFX) option.
- In the case of Westpac, users will be prompted to input a date in the format CC, YY, MM, DD, Century, Year, Month, and Day.
Since different banks might have distinct procedures, users must inquire with their specific bank or seek assistance from SapphireOne support to obtain additional details tailored to their situation.
.
When SapphireOne processes the OFX file, the criteria for establishing a successful link between the OFX file and your bank account transactions in SapphireOne is as follows:
- A straightforward verification of the dollar amount in each transaction takes place. SapphireOne distinguishes deposits and withdrawals as distinct amounts, even if they share the same monetary value (e.g., $200.00 or $-200.00)
- In cases where multiple transactions possess identical dollar amounts, SapphireOne proceeds to examine the transaction dates for differentiation.
When SapphireOne detects a match, it will populate the Auto Bank Reconciliation screen accordingly. Once accuracy is attained with the Actual Closing Bank Balance To, SapphireOne will display a value of zero in the Difference field.
However, if a match cannot be established, you have the flexibility to handle the situation. You can manually match the transactions with un-cleared transactions in the Bank Reconciliation, adding them as needed or choosing to skip them entirely.
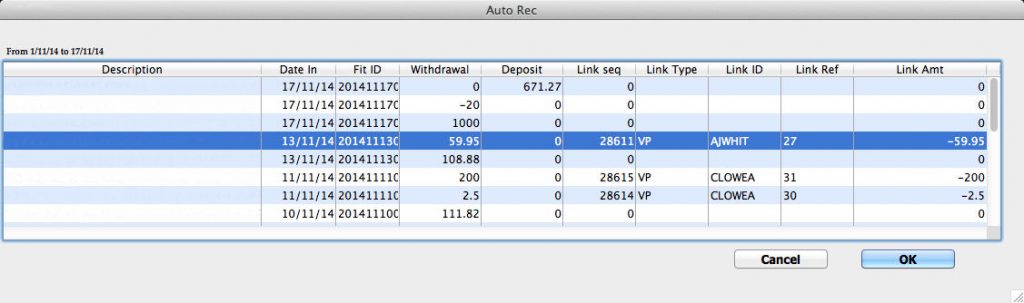
The columns shown in the screenshot provided, starting from Description and extending to Deposit, are sourced directly from the Bank’s OFX file. On the other hand, the columns spanning from Link Seq to Link Amt represent the transactions within SapphireOne that are currently undergoing reconciliation.
This list includes either all transactions or those specifically falling within the chosen date range. If any errors happen to occur, please make reference to the Bank Reconciliation Errors section located at the lower part of this page.
In the event that you come across any errors, I suggest proceeding to the subsequent section of this article. Here, you will find a detailed outline of the procedure for a Manual Bank Reconciliation. This resource can be particularly valuable when troubleshooting becomes necessary.
Manual Reconciliation
The provided screenshot above depicts the local currency account and encompasses all posted and un-posted activities, awaiting reconciliation for the selected bank account. It is advisable to cross-reference the Bank Reconciliation Page with your online bank account. Employ your mouse to mark the necessary items. SapphireOne utilises a ✓ symbol for Apple devices and a + symbol for Windows devices, maintaining these symbols until the closing balances are synchronized.
To ensure accuracy, it is crucial to input all bank charges, interest, and similar transactions through the Transaction Entry Page. This practice guarantees that the Closing Bank Balance aligns faithfully with your bank statements.
Keep in mind that when printing an Audit Trail from this page, it solely prints the marked items (✓ for Mac or + for PC). The entire list of items to be posted is not included in the printout.
After choosing the ![]() button in the provided screenshot above, please take note of the un-posted transaction situated at the bottom of the list. You can identify this transaction by the presence of the character U, which is displayed.
button in the provided screenshot above, please take note of the un-posted transaction situated at the bottom of the list. You can identify this transaction by the presence of the character U, which is displayed.
In order to proceed with the processing of marked transactions, it is imperative to re-select this specific transaction. By doing so, it becomes de-selected and the U character is removed. This action is necessary to enable the continuation of marked transactions
Transaction Indicators
- Reconcile indicator – When the transaction has been posted without error and reconciliation is selected, here, SapphireOne will display a Mac and a + symbol PC in the last column.
- Un-posted transactions – These will display the letter U in the last column and transactions with an error in them will as normal have err in the Status column.
- Grouped Transactions – Any ID’s that have the Σ symbol in them followed by a number indicate that the transaction is grouped. The number immediately after indicates the number of transactions in the group.
Footer area Buttons
The footer area of the Bank Reconciliation screen offers users a collection of buttons, furnishing them with various options that contribute to streamlining the bank reconciliation process. These buttons serve to enhance the efficiency of the reconciliation task by providing convenient actions. Moreover, the buttons in this section empower users to either cancel or execute the ongoing online bank reconciliation, offering a comprehensive control over the reconciliation procedure.
- Mark All – By selecting this button, all transactions will be marked for processing.
- Unmark All – This button clears markings from all previously marked transactions.
- List To Date – Once two or more transactions are marked, this button allows users to sort marked transactions by specifying date parameters through a pop-up window.
- Look – This button opens a pop-up displaying comprehensive details about a selected transaction, including client or vendor information and related data.
- Save – This button serves the purpose of recording all marked transactions. This functionality proves particularly useful when the user’s reconciliation process is interrupted. By saving the progress, users can easily resume from where they left off.
- Load – Subsequently, the button can be employed to restore the screen to the exact point where the user’s progress was saved.
- Load – Subsequently, the
- Collapse – This button condenses collapsible transactions into a single transaction. (Default is collapsed)
- Expand – When a transaction involves deposits with receivables from multiple Clients, it is marked by the Σ symbol and a number, selecting or highlighting a transaction and then selecting this button enables individual selection of these deposits for reconciliation.
- Expand – When a transaction involves deposits with receivables from multiple Clients, it is marked by the Σ symbol and a number, selecting or highlighting a transaction and then selecting this
- Expand All – Selecting this button triggers the expansion of all lines that begin with the Σ symbol. However, it’s important to note that in cases where a substantial number of deposits are encompassed within a single transaction, the on-screen list of extracted transactions could rapidly become quite extensive.
- Load File – This button opens a pop-up allowing users to select a CSV file from their computer, containing transactions.
- Find – Clicking the button opens a pop-up where users can search transactions based on date in, internal reference, or amount.
- Reload – Clicking the button removes any applied expansions or markings and reloads the original transactions list.
- Open – The button will open an interface where the user can see the transactions and apply different metrics to sort transactions by using the Custom Inquiry function.
- Export – Clicking the function tells SapphireOne to generate a CSV file presenting data from the marked transactions.
- Cancel – The l button reverses any alterations made to the Bank Reconciliation page and closes the interface.
- Process – Upon clicking the button, the Posting pop-up appears, initiating the posting procedure. Following this, the selected transactions cannot be further modified. Options include Print Reconciliation, Print Reconciliation + Outstanding Reports, Process Later, and Process in Background. An attachment option is also available to store a PDF copy of the online reconciliation in the Historical Bank Reconciliation list.
Common Errors
Here are some possible reasons as to why your SapphireOne Bank Reconciliation Opening Balance could be different from your Online Bank Opening Balance:
- A General Ledger Journal has been incorrectly processed between two bank accounts.
- To prevent this occurring, use a Cash Receipt (MR) or Cash Payment (MP) to transfer money through a Clearing Account.
- A Non-Bank type transaction has been entered into SapphireOne and posted to the Bank Account.
- To locate the transaction(s), navigate to Utilities Mode > History > Audit Lines and perform a Query on the General Ledger Bank Account code for transaction types equaling VI, VC, CI or CC.
- A Bank Reconciliation has been completed between your last known reconciliation and the current one.
- Search for the date greater than or equal to your last Bank Reconciliation.
How to Post a Bank Reconciliation
1) Post the Opening GJ
In order for the bank accounts to show an opening balance, you need to first post the opening GJ that was created to bring in your opening balances.

The easiest way to find this is by going to: Accounts > General Ledger > Transactions
Then search for an external reference of Opening Transaction Balances.
Then Right click > Post OR Go to Tools > Process > Post
2) Reconcile the Opening GJ
Find the GJ you just posted in your Bank Reconciliation screen and then click on it. This will create a tick on the end of the line.

Then select Process. Now when you go back into the Bank Reconciliation for that bank account, there will be an opening balance.
3) Bank Reconciliation of the Individual Transactions
Click on the column of Date In to sort by date of the transaction:
Then go through all transactions methodically by comparing your bank statements to the value showing on your Bank Reconciliation screen and if they match, click on the line. This will create a tick in the last column.

If instead of a tick, you get a U that means the transaction is unposted. Here you have two choices leave the reconciliation screen and post the transaction, or stay here re-select the transaction which will unmark it so that the reconciliation procedure may be executed.
It can make sense to reconcile the bank with all unposted transactions first, as this will allow you to amend any incorrect ones. Either by going through your normal transactions inquiry, or click Open on the bottom of the screen, which takes you to the highlighted transaction.
Once you have made all necessary amendments, don’t forget to post all transactions, otherwise you won’t be able to process the Bank Reconciliation. Go back into the banking screen and select the ![]() button to save you the time of selecting each line.
button to save you the time of selecting each line.
Hint: If you mark all unposted transactions, it will show you the closing bank balance up to date.
If this matches your closing balance on your bank statement, you can be 99.9% sure that all transactions were entered correctly. If so, you simply can batch-post all of them and then go back to your Bank Reconciliation screen to process them all in one go. If it does not match, you will need to go through the transactions one-by-one as described above.
4) Compare Opening and Closing Bank Balance
Once you have ticked all transactions, the closing bank balance on the bottom of the screen should match your actual closing for that hour, day, week, month, etc. that you’re reconciling (or up to date if you are doing them all in one go). It’s recommended to perform a Bank Reconciliation on a daily basis.
If it does not, enter the closing balance on your bank statement into the white field. This will show you the difference that you are out by to assist you in finding the incorrect transaction.
You can review our Blog and YouTube channel for additional information and resources on SapphireOne ERP, CRM and Business Accounting software.